Number Masking Using Ruby
Overview
Phone number masking hides the phone numbers of parties in a call from each other. Many businesses find it advantageous to anonymize communication between two parties — for example, between a customer and a delivery agent on a food delivery service platform or a driver and a rider using a ride-hailing application. Businesses can implement phone number masking by sending calls through an intermediate phone number that acts as a proxy between the two parties. A Plivo number can serve as the intermediate number to connect the two parties while keeping their contact information private.
Outline
As an example, we’ll build a number-masking application for a food delivery service that lets the company connect customers with delivery agents and vice versa without revealing any actual phone numbers. To do this, you
- Create a customer-to-agent phone number mapping in your application’s back end.
- Create the number masking application using Plivo.
- Assign the number masking application to a Plivo number.
Prerequisites
To get started, you need a Plivo account — sign up with your work email address if you don’t have one already. You must have a voice-enabled Plivo phone number to receive incoming calls; you can rent numbers from the Numbers page of the Plivo console, or by using the Numbers API. If this is your first time using Plivo APIs, follow our instructions to set up a Ruby development environment and a web server and safely expose that server to the internet.
Create a 1:1 map with actual numbers
Create customer-to-agent phone number mapping for the application. Whenever a customer places an order, their phone number should be stored in a database for your application to access. A delivery agent will be assigned for the order, and the agent’s number will also be stored in your database, and will be mapped to the customer’s number:
Customer’s Number		<->		Agent’s Number
  1-415-666-7777					1-415-666-7778
We created sample mapping data in a config/application.rb file:
# customer <> agent map
config.base_map = {"14156667777" => "14156667778", "14156667779" => "14156667780", "14156667781" => "14156667782"}
Create a Rails controller for number masking
Change to the project directory and run the command rails generate controller Numbermasking to create a Rails controller named numbermasking_controller in the app/controllers/ directory. Edit the app/controllers/numbermasking_controller.rb file and paste into it this code:
1
2
3
4
5
6
7
8
9
10
11
12
13
14
15
16
17
18
19
20
21
22
23
24
25
26
27
28
29
30
31
32
33
34
35
include Plivo

include Plivo::XML
include Plivo::Exceptions

\# Handle incoming calls to a Plivo number, connect agent with customer and vice versa without revealing their actual phone numbers.
class NumbermaskingController < ApplicationController
    def handle_incoming
        customer_agent_map = Rails.application.config.base_map
        agent_customer_map = customer_agent_map.invert
        from_number = params[:From]
        to_number = params[:To]
        response = Response.new()
        customer_to_agent = customer_agent_map.include?(from_number) # Check whether the customer's number is in the customer-agent mapping
        agent_to_customer = agent_customer_map.include?(from_number) # Check whether the agent's number is in the customer-agent mapping
        if(customer_to_agent == true)
            dest_number = customer_agent_map[from_number] # Assign the value from the customer-agent array to dest_number variable
            params = {
            'callerId' => to_number # Plivo number is used as the caller ID for the call toward the agent
            }
            dial = response.addDial(params)
            dial.addNumber(dest_number)
        elsif(agent_to_customer == true)
            dest_number = agent_customer_map[from_number] # Assign the key from the customer-agent array to dest_number variable
            params = {
            'callerId' => to_number # Plivo number is used as the caller ID for the call toward the customer
            }
            dial = response.addDial(params)
            dial.addNumber(dest_number)
        end
        xml = PlivoXML.new(response)
        puts xml.to_xml()
        render xml: xml.to_xml
    end
end
Add a route
Add a route for the handle_incoming function in NumbermaskingController class. Edit the config/routes.rb file and add this line after the outbound route:
get 'numbermasking/handle_incoming'
Start the Rails server to forward incoming calls.
$ rails server
You should see your basic server application in action at http://localhost:3000/numbermasking/handle_incoming/.
Set up ngrok to expose your local server to the internet.
# Whitelist ngrok domain
config.hosts << /[a-z0-9]+\.ngrok\.io/
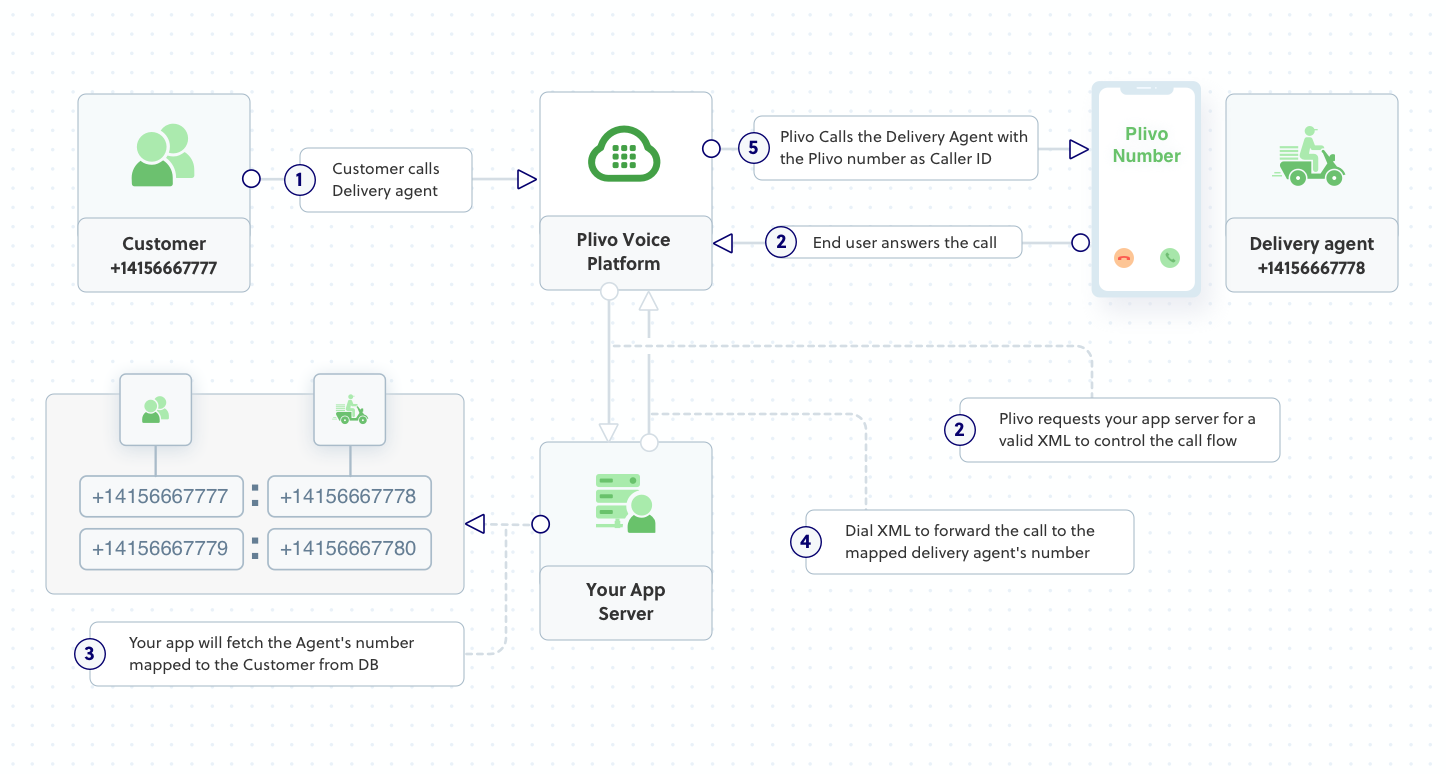
Now people can call your Plivo number. If an incoming call to your Plivo number is from one of the customer phone numbers in the customer-agent map — for example, if the caller number is 14156667777 — then Plivo will send the XML response to process the incoming call as below, and you can check the XML document in your browser.

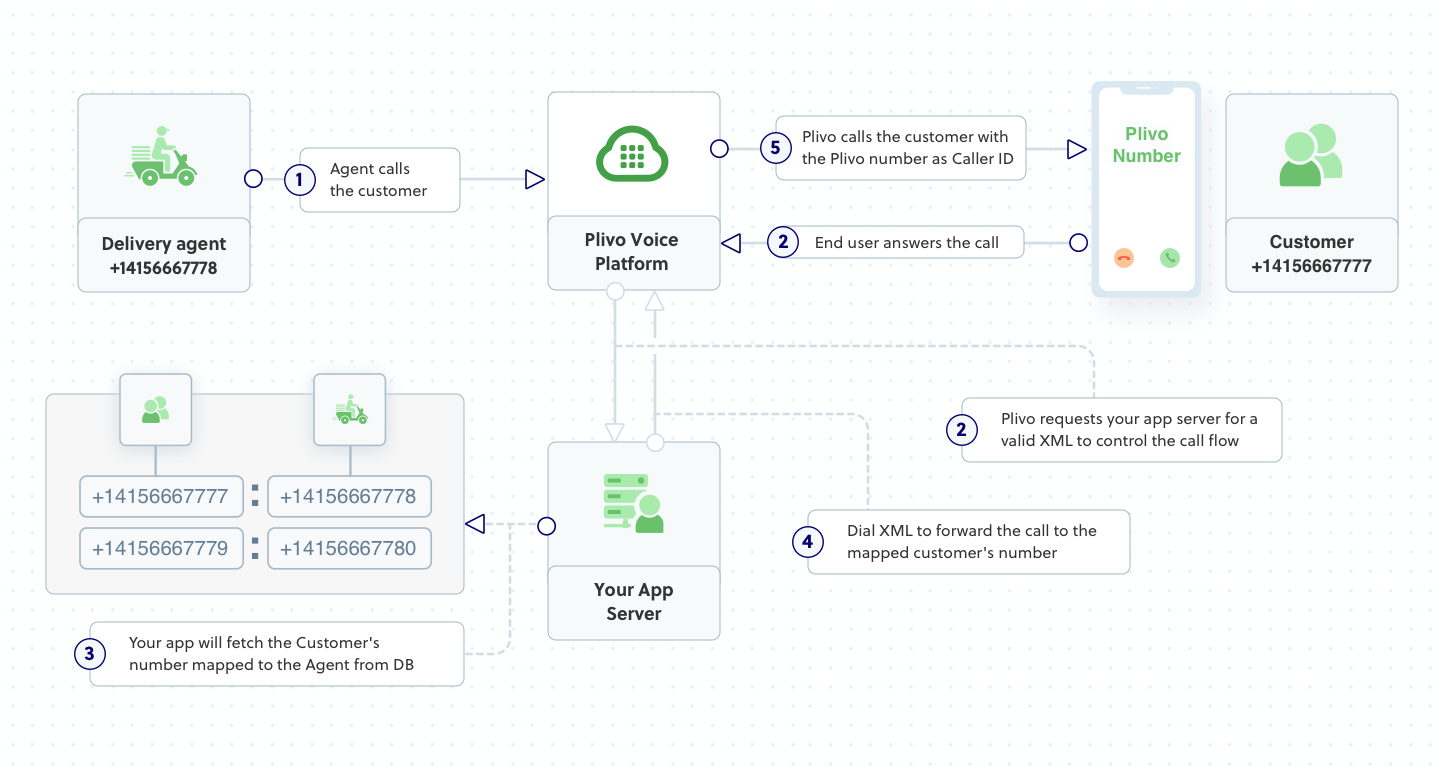
If the incoming call to your Plivo number is from one of the agent phone numbers in the customer-agent map — for example, if the caller number is 14156667778 — then Plivo will send the XML response to process the incoming call as below, and you can check the XML document in your browser.

Create a Plivo application
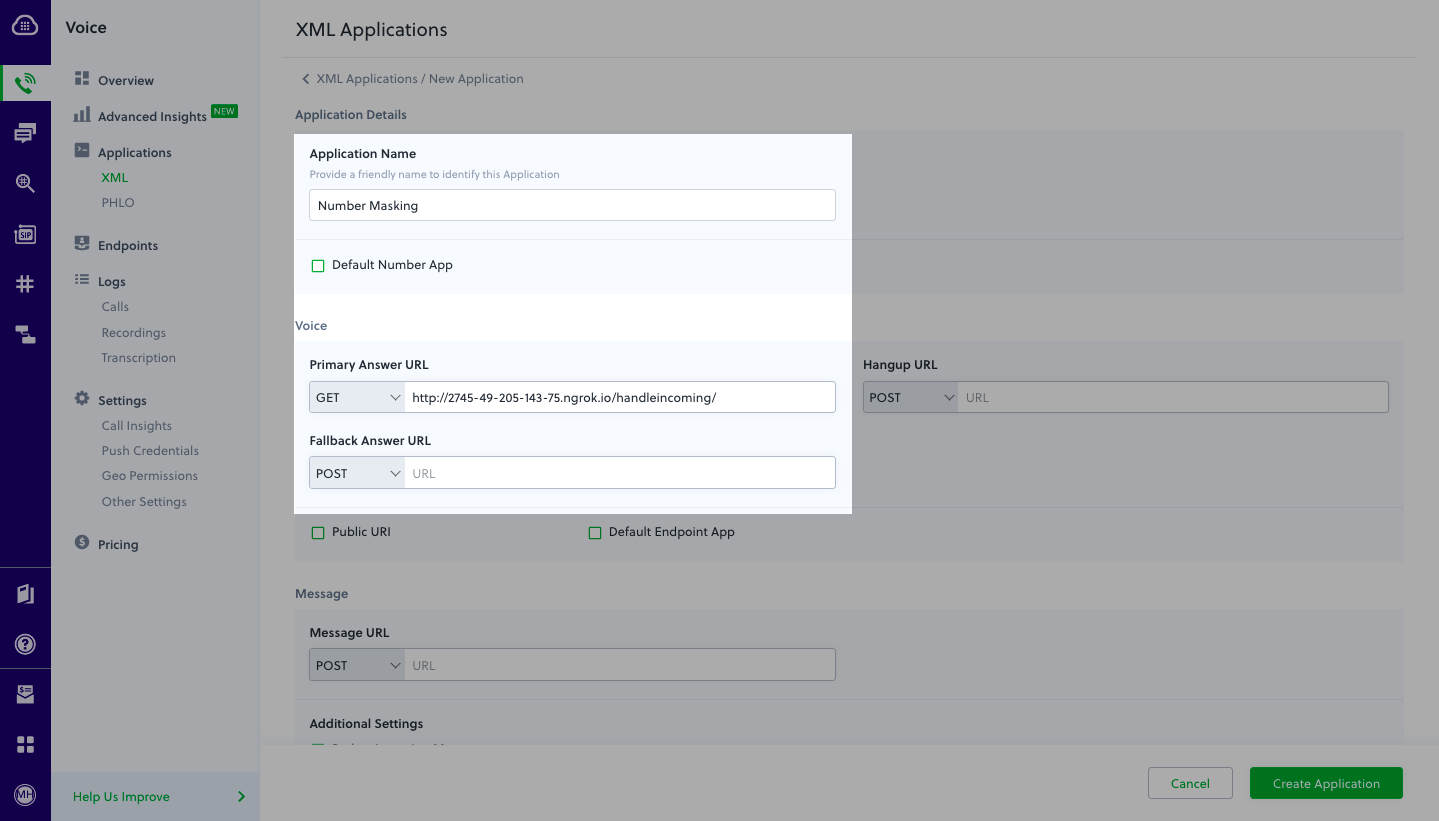
Associate the Rails controller you created with Plivo by creating a Plivo application. Visit Voice > Applications in the Plivo console and click on Add New Application, or use Plivo’s Application API.
Give your application a name — we called ours Number Masking. Enter the server URL you want to use (for example, https://<ngrok_identifier>.ngrok.io/handleincoming/) in the Answer URL field and set the method as GET. Click Create Application to save your application.

Assign a Plivo number to your application
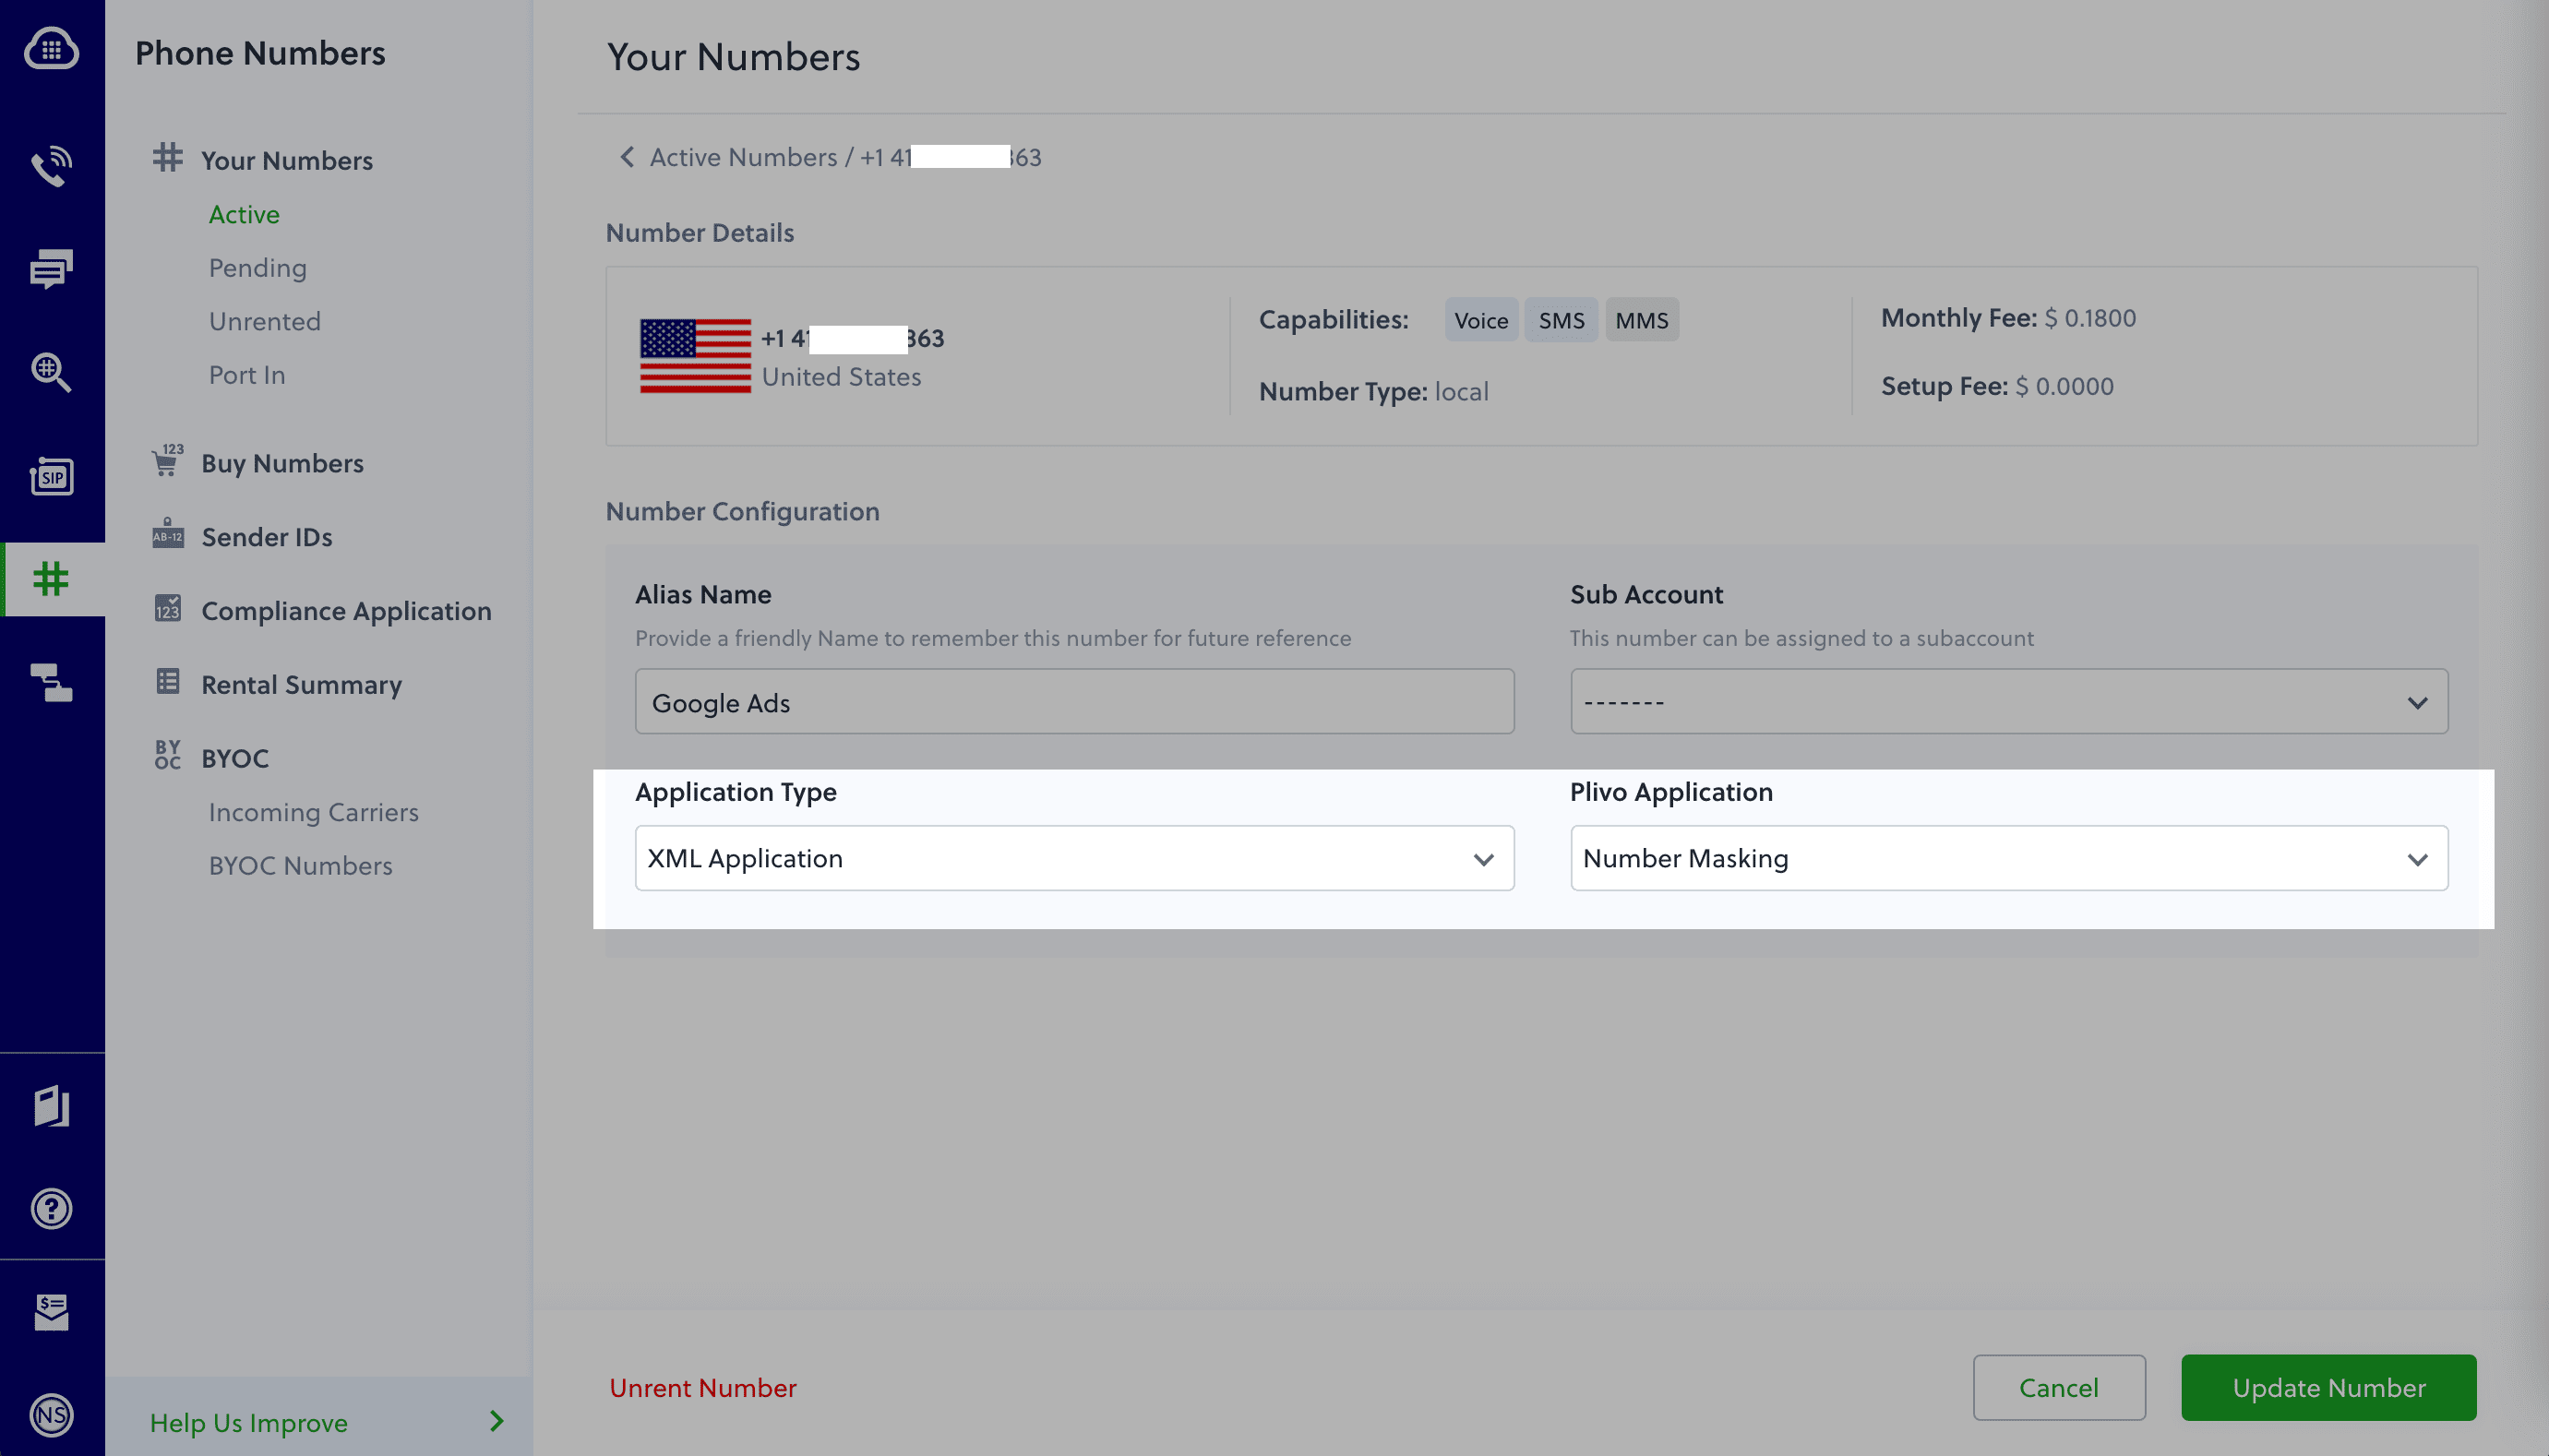
Navigate to the Numbers page and select the phone number you want to use for this application.
From the Application Type drop-down, select XML Application.
From the Plivo Application drop-down, select Number Masking (the name we gave the application).
Click Update Number to save.

Test
To test the application, you need two Plivo numbers. Set up one of your numbers as a customer and another as an agent in the customer-to-agent mapping data in the config file. Make a call from each of your mobile numbers to the Plivo number you mapped to the application. You should see that the call is forwarded to the other number, and that the incoming call has the Plivo number as the caller ID.


