- Node
- Ruby
- Python
- PHP
- .NET
- Java
- Go
Overview
Phone number masking hides the phone numbers of parties in a call from each other. Many businesses find it advantageous to anonymize communication between two parties — for example, between a customer and a delivery agent on a food delivery service platform or a driver and a rider using a ride-hailing application. Businesses can implement phone number masking by sending calls through an intermediate phone number that acts as a proxy between the two parties. A Plivo number can serve as the intermediate number to connect the two parties while keeping their contact information private.How it works
- Customer calls agent
- Agent calls customer
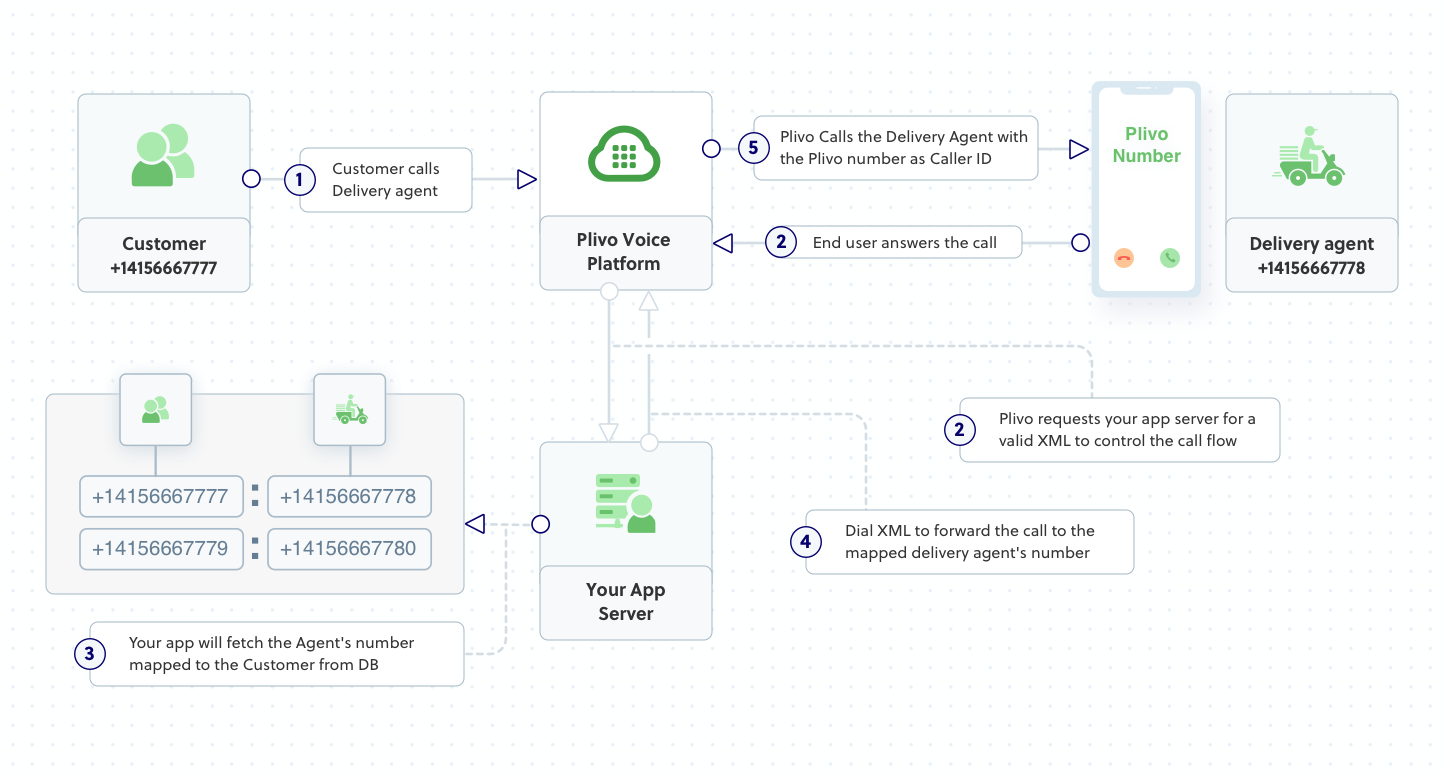
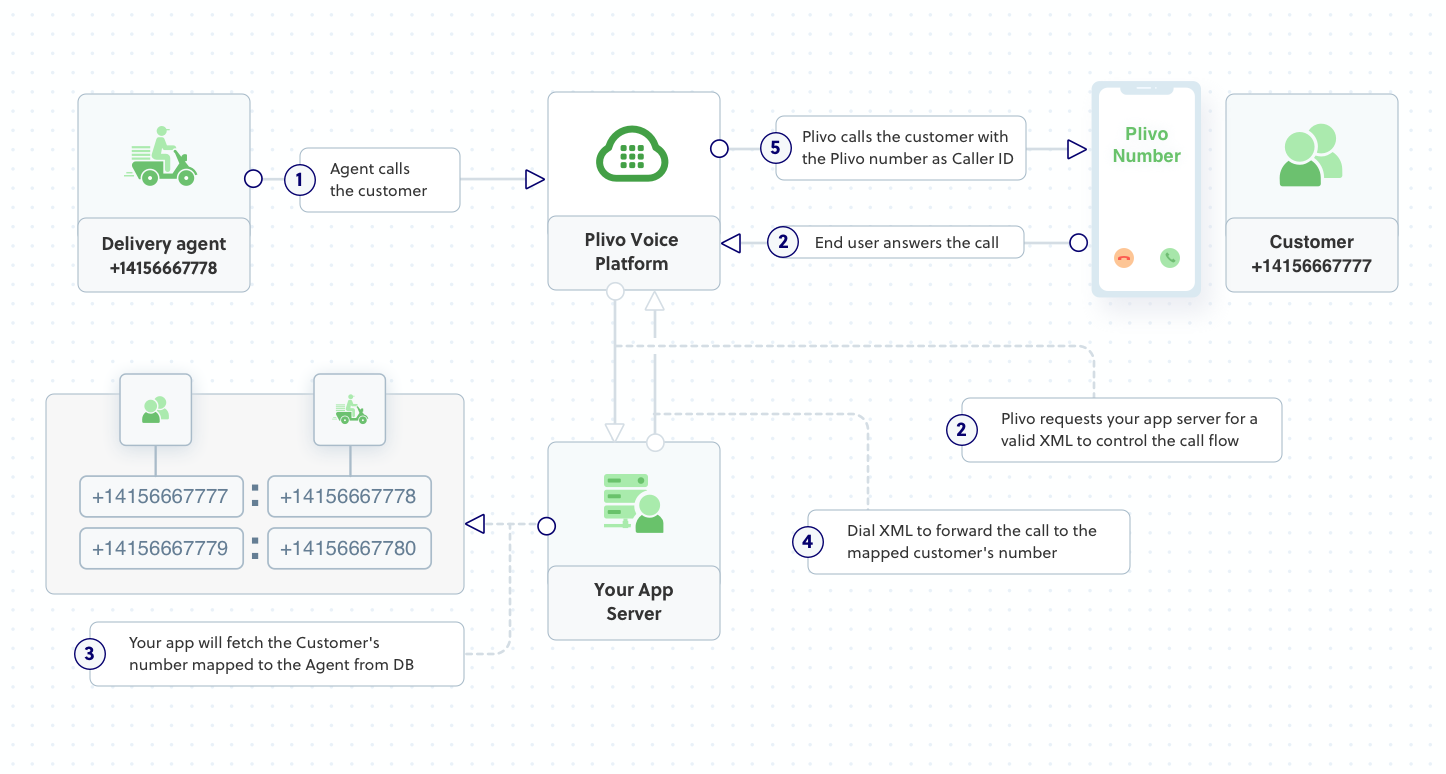
- Create a customer-to-agent phone number mapping in your application’s back end.
- Create the number masking application using Plivo.
- Assign the number masking application to a Plivo number.
Prerequisites
To get started, you need a Plivo account — sign up with your work email address if you don’t have one already. You must have a voice-enabled Plivo phone number to receive incoming calls; you can rent numbers from the Numbers page of the Plivo console, or by using the Numbers API. If this is your first time using Plivo APIs, follow our instructions to set up a Node.js development environment and a web server and safely expose that server to the internet.Create a 1:1 map with actual numbers
Create customer-to-agent phone number mapping for the application. Whenever a customer places an order, their phone number should be stored in a database for your application to access. A delivery agent will be assigned for the order, and the agent’s number will also be stored in your database, and will be mapped to the customer’s number:- Customer’s Number1-415-666-7777
- Agent’s Number1-415-666-7778
    const config = {app: {port: 5000}}
	config.customerAgentMap = {
		'14156667777':'14156667778',
		'14156667779':'14156667780',
		'14156667781':'14156667782'
	};
	module.exports = config;
Create an Express application for number masking
Create a file callednumber_masking.js and paste into it this code.const config = require('./config');
const plivo = require('plivo');
const express = require('express');
const app = express();
app.set('port', (process.env.PORT || 5000));
// Handle incoming calls to a Plivo number, connect agent with customer and vice versa without revealing their actual phone numbers.
app.all('/handleincoming/', function(req, res) {
const fromNumber = (req.query.From);
const toNumber = (req.query.To);
const response = plivo.Response();
const customerPhoneMapping = config.customerAgentMap;
const agentCustomerMapping = Object.fromEntries(Object.entries(customerPhoneMapping).map(v => v.reverse()));
if(fromNumber in customerPhoneMapping){ // Check whether the customer's number is in the customer-agent mapping
const number = customerPhoneMapping[fromNumber]; // Assign the value from the customer-agent array to number variable
const params = {
'callerId': toNumber, // Plivo number is used as the caller ID for the call toward the agent
};
const dial = response.addDial(params);
const destNumber = number;
dial.addNumber(destNumber);
res.send(response.toXML());
}
else if(fromNumber in agentCustomerMapping){ // Check whether the agent's number is in the customer-agent mapping
const number = agentCustomerMapping[fromNumber]; // Assign the key from the customer-agent array to number variable
const params = {
'callerId': toNumber, // Plivo number is used as the caller ID for the call toward the customer
};
const dial = response.addDial(params);
const destNumber = number;
dial.addNumber(destNumber);
res.send(response.toXML());
}
});
app.listen(app.get('port'), function () {
console.log('Node app is running on port', app.get('port'));
});
$ node number_masking.js
14156667777 — then Plivo will send the XML response to process the incoming call as below, and you can check the XML document in your browser.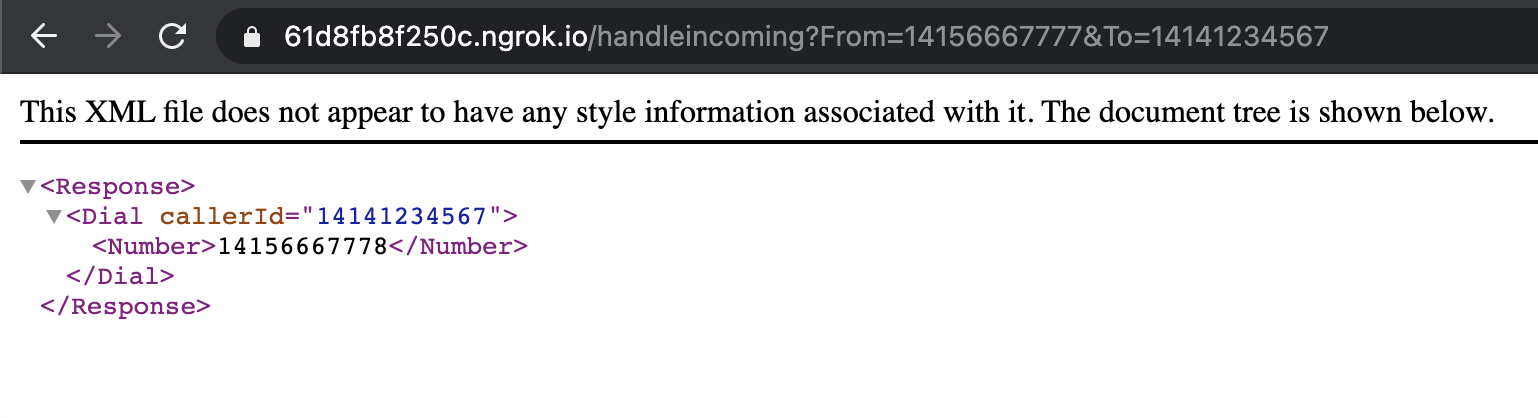
14156667778 — then Plivo will send the XML response to process the incoming call as below, and you can check the XML document in your browser.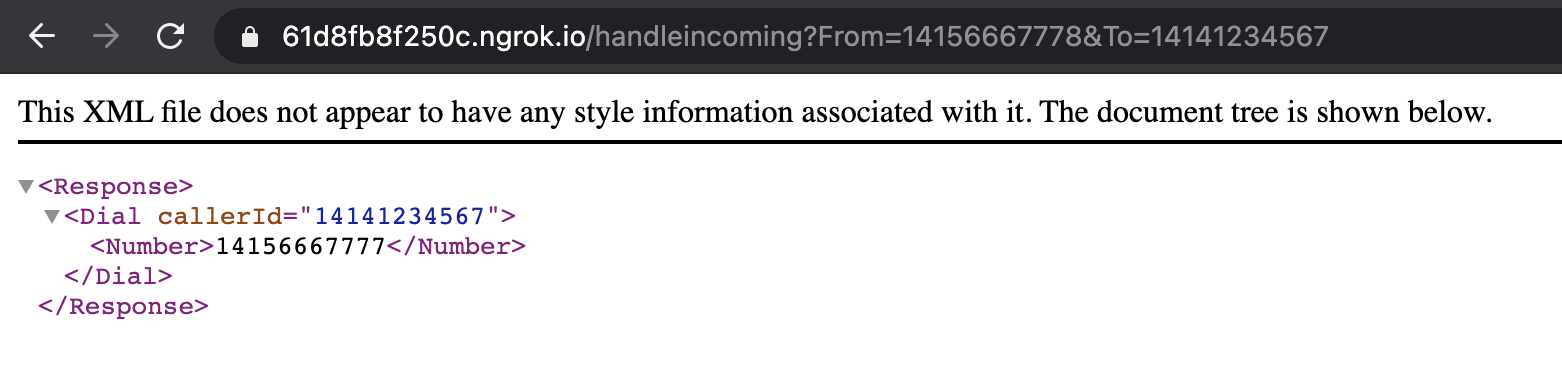
Create a Plivo application
Associate the Express application you created with Plivo by creating a Plivo application. Visit Voice > Applications in the Plivo console and click on Add New Application, or use Plivo’s Application API.Give your application a name — we called oursNumber Masking. Enter the server URL you want to use (for example, https://<ngrok_identifier>.ngrok.io/handleincoming/) in the Answer URL field and set the method as GET. Click Create Application to save your application.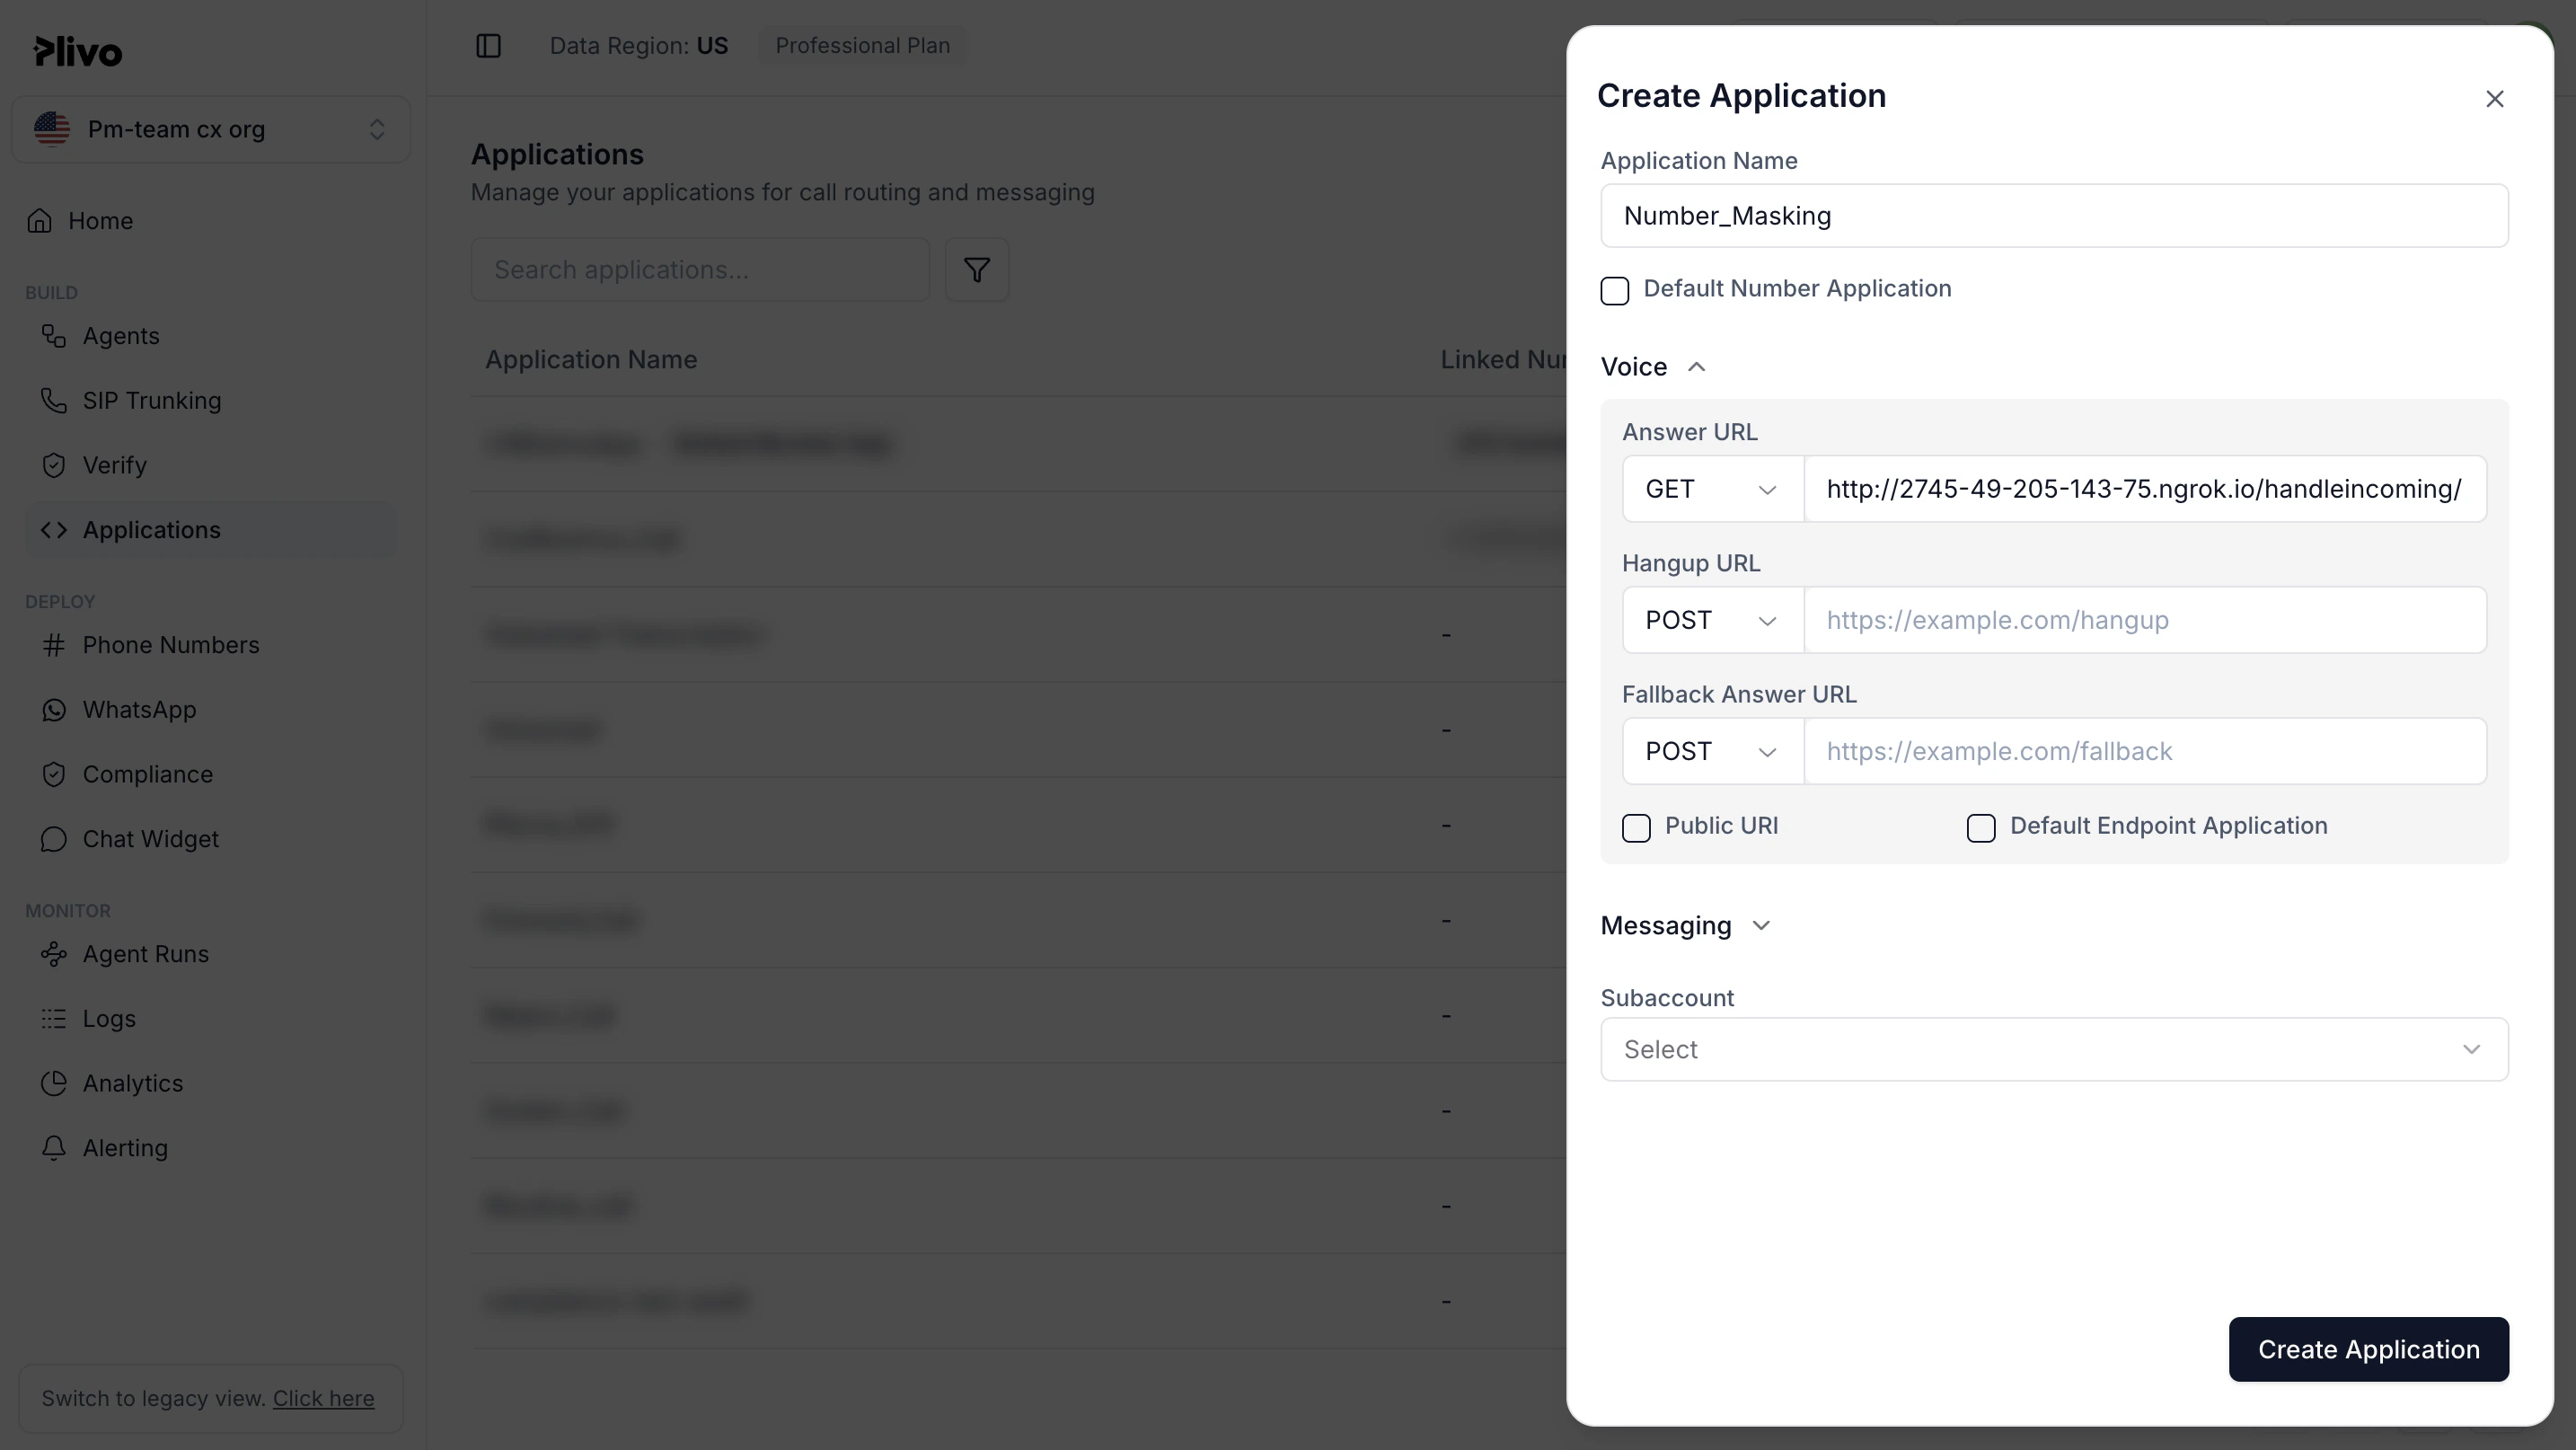
Assign a Plivo number to your application
Navigate to the Numbers page and select the phone number you want to use for this application.From the Application Type drop-down, selectXML Application.From the Plivo Application drop-down, select Number Masking (the name we gave the application).Click Update Number to save.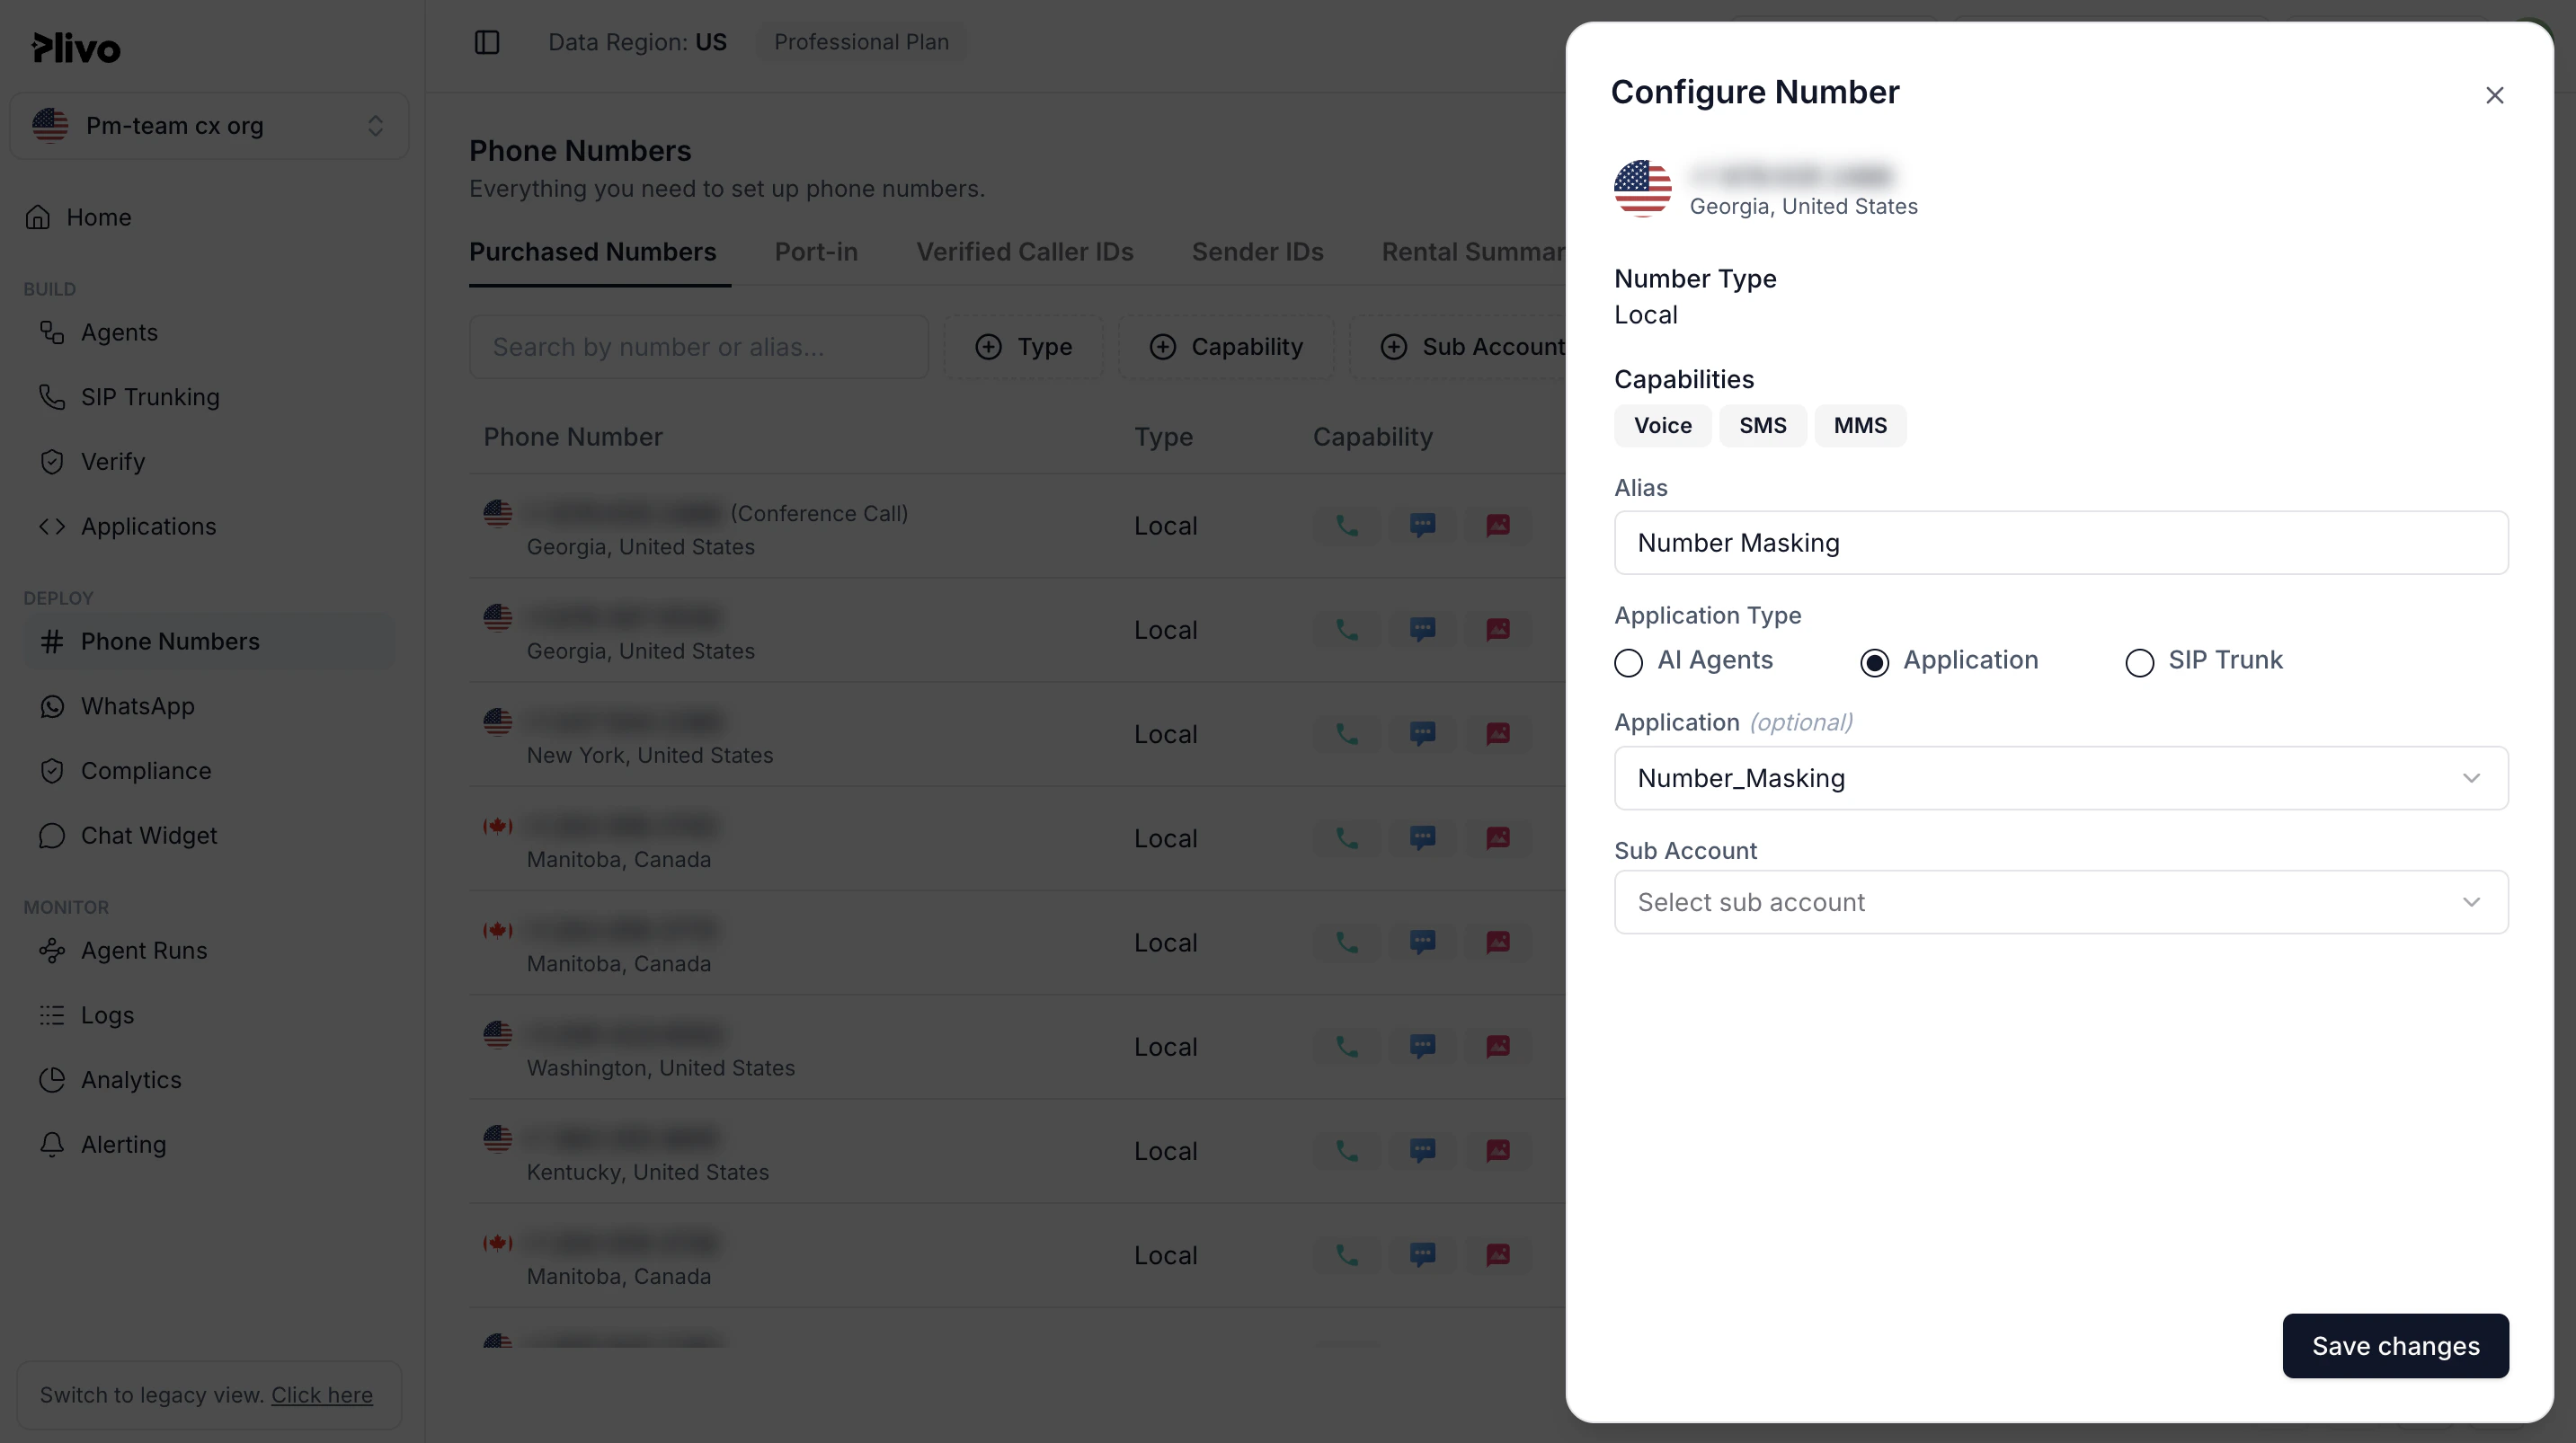
Test
To test the application, you need two Plivo numbers. Set up one of your numbers as a customer and another as an agent in the customer-to-agent mapping data in the config file. Make a call from each of your mobile numbers to the Plivo number you mapped to the application. You should see that the call is forwarded to the other number, and that the incoming call has the Plivo number as the caller ID.Overview
Phone number masking hides the phone numbers of parties in a call from each other. Many businesses find it advantageous to anonymize communication between two parties — for example, between a customer and a delivery agent on a food delivery service platform or a driver and a rider using a ride-hailing application. Businesses can implement phone number masking by sending calls through an intermediate phone number that acts as a proxy between the two parties. A Plivo number can serve as the intermediate number to connect the two parties while keeping their contact information private.Outline
- Customer calls agent
- Agent calls customer
- Create a customer-to-agent phone number mapping in your application’s back end.
- Create the number masking application using Plivo.
- Assign the number masking application to a Plivo number.
Prerequisites
To get started, you need a Plivo account — sign up with your work email address if you don’t have one already. You must have a voice-enabled Plivo phone number to receive incoming calls; you can rent numbers from the Numbers page of the Plivo console, or by using the Numbers API. If this is your first time using Plivo APIs, follow our instructions to set up a Ruby development environment and a web server and safely expose that server to the internet.Create a 1:1 map with actual numbers
Create customer-to-agent phone number mapping for the application. Whenever a customer places an order, their phone number should be stored in a database for your application to access. A delivery agent will be assigned for the order, and the agent’s number will also be stored in your database, and will be mapped to the customer’s number:- Customer’s Number1-415-666-7777
- Agent’s Number1-415-666-7778
# customer <> agent map
config.base_map = {"14156667777" => "14156667778", "14156667779" => "14156667780", "14156667781" => "14156667782"}
Create a Rails controller for number masking
Change to the project directory and run the commandrails generate controller Numbermasking to create a Rails controller named numbermasking_controller in the app/controllers/ directory. Edit the app/controllers/numbermasking_controller.rb file and paste into it this code:include Plivo
include Plivo::XML
include Plivo::Exceptions
\# Handle incoming calls to a Plivo number, connect agent with customer and vice versa without revealing their actual phone numbers.
class NumbermaskingController < ApplicationController
def handle_incoming
customer_agent_map = Rails.application.config.base_map
agent_customer_map = customer_agent_map.invert
from_number = params[:From]
to_number = params[:To]
response = Response.new()
customer_to_agent = customer_agent_map.include?(from_number) # Check whether the customer's number is in the customer-agent mapping
agent_to_customer = agent_customer_map.include?(from_number) # Check whether the agent's number is in the customer-agent mapping
if(customer_to_agent == true)
dest_number = customer_agent_map[from_number] # Assign the value from the customer-agent array to dest_number variable
params = {
'callerId' => to_number # Plivo number is used as the caller ID for the call toward the agent
}
dial = response.addDial(params)
dial.addNumber(dest_number)
elsif(agent_to_customer == true)
dest_number = agent_customer_map[from_number] # Assign the key from the customer-agent array to dest_number variable
params = {
'callerId' => to_number # Plivo number is used as the caller ID for the call toward the customer
}
dial = response.addDial(params)
dial.addNumber(dest_number)
end
xml = PlivoXML.new(response)
puts xml.to_xml()
render xml: xml.to_xml
end
end
Add a route
Add a route for the handle_incoming function in NumbermaskingController class. Edit the config/routes.rb file and add this line after the outbound route:get 'numbermasking/handle_incoming'
$ rails server
Note: Before you start the ngrok service, add ngrok in the config.hosts list in the config/environments/development.rb file and include the line below. You’ll start to see Blocked host errors if you fail to add this.
# Whitelist ngrok domain
config.hosts << /[a-z0-9]+\.ngrok\.io/
14156667777 — then Plivo will send the XML response to process the incoming call as below, and you can check the XML document in your browser.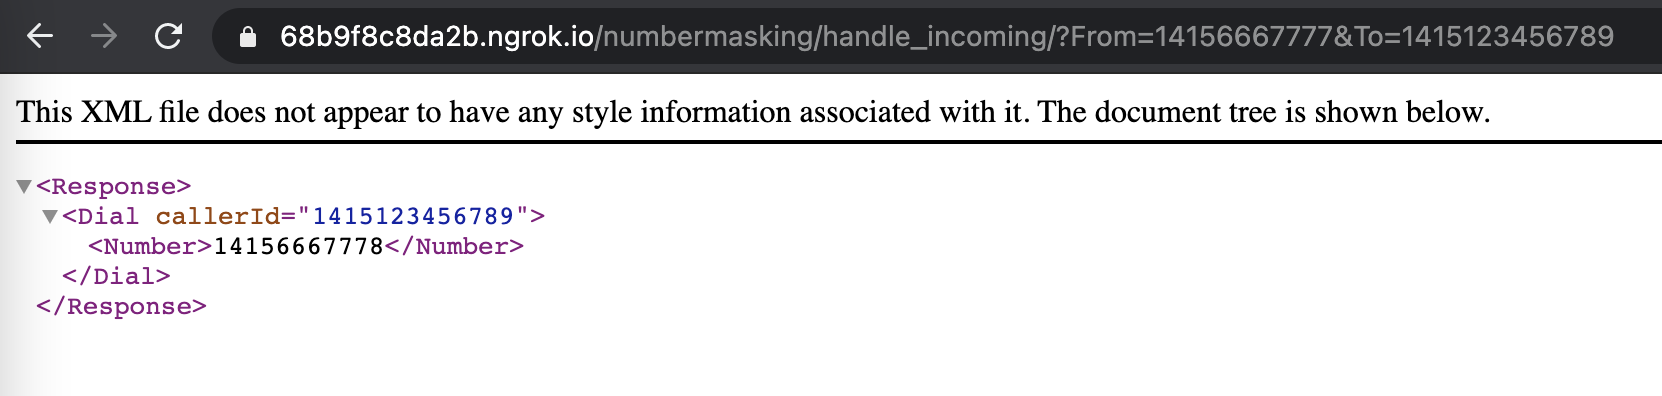
14156667778 — then Plivo will send the XML response to process the incoming call as below, and you can check the XML document in your browser.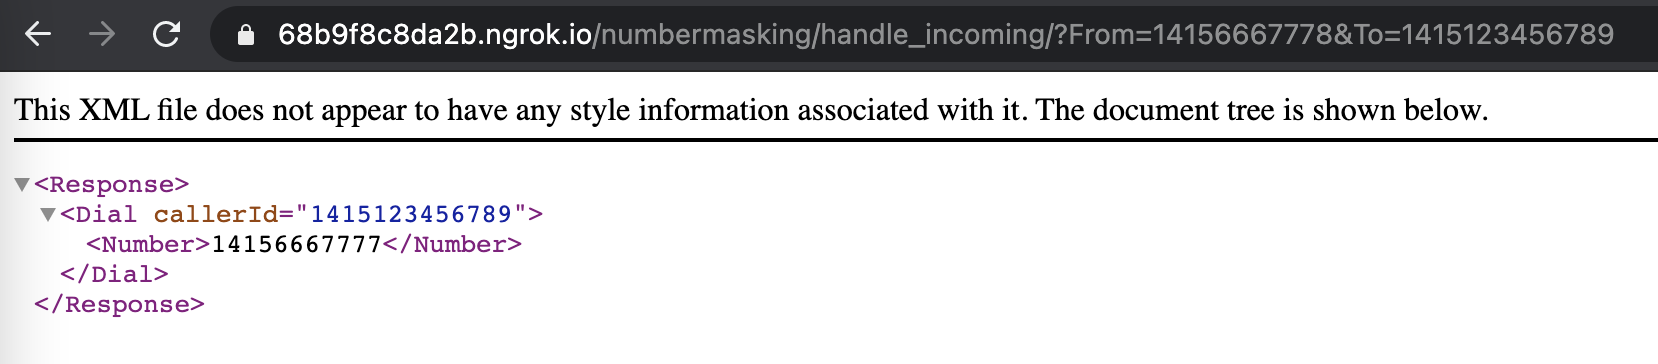
Create a Plivo application
Associate the Rails controller you created with Plivo by creating a Plivo application. Visit Voice > Applications in the Plivo console and click on Add New Application, or use Plivo’s Application API.Give your application a name — we called oursNumber Masking. Enter the server URL you want to use (for example, https://<ngrok_identifier>.ngrok.io/handleincoming/) in the Answer URL field and set the method as GET. Click Create Application to save your application.Assign a Plivo number to your application
Navigate to the Numbers page and select the phone number you want to use for this application.From the Application Type drop-down, selectXML Application.From the Plivo Application drop-down, select Number Masking (the name we gave the application).Click Update Number to save.Test
To test the application, you need two Plivo numbers. Set up one of your numbers as a customer and another as an agent in the customer-to-agent mapping data in the config file. Make a call from each of your mobile numbers to the Plivo number you mapped to the application. You should see that the call is forwarded to the other number, and that the incoming call has the Plivo number as the caller ID.Overview
Phone number masking hides the phone numbers of parties in a call from each other. Many businesses find it advantageous to anonymize communication between two parties — for example, between a customer and a delivery agent on a food delivery service platform or a driver and a rider using a ride-hailing application. Businesses can implement phone number masking by sending calls through an intermediate phone number that acts as a proxy between the two parties. A Plivo number can serve as the intermediate number to connect the two parties while keeping their contact information private.How it works
- Customer calls agent
- Agent calls customer
- Create a customer-to-agent phone number mapping in your application’s back end.
- Create the number masking application using Plivo.
- Assign the number masking application to a Plivo number.
Prerequisites
To get started, you need a Plivo account — sign up with your work email address if you don’t have one already. You must have a voice-enabled Plivo phone number to receive incoming calls; you can rent numbers from the Numbers page of the Plivo console, or by using the Numbers API. If this is your first time using Plivo APIs, follow our instructions to set up a Python development environment and a web server and safely expose that server to the internet.Create a 1:1 map with actual numbers
Create customer-to-agent phone number mapping for the application. Whenever a customer places an order, their phone number should be stored in a database for your application to access. A delivery agent will be assigned for the order, and the agent’s number will also be stored in your database, and will be mapped to the customer’s number:- Customer’s Number1-415-666-7777
- Agent’s Number1-415-666-7778
[c2amap]
customer_agent = {"14156667777":"14156667778", "14156667779":"14156667780", "14156667781":"14156667782"}
Create a Flask application for number masking
Create a file callednumber_masking.py and paste into it this code.import json
from flask import Flask, Response, request
from configparser import ConfigParser
from plivo import plivoxml
config = ConfigParser()
config.read('config.ini')
app = Flask(__name__)
\# Handle incoming calls to a Plivo number, connect agent with customer and vice versa without revealing their actual phone numbers.
@app.route("/handleincoming/", methods=["GET", "POST"])
def number_masking():
base_map = config.get("c2amap","customer_agent")
customer_agent_map = json.loads(base_map) # Customer-agent mapping data
agent_customer_map = {v: k for k, v in customer_agent_map.items()} # Agent-customer mapping data
from_number = request.form.get("From") or request.args.get("From")
to_number = request.form.get("To") or request.args.get("To")
response = plivoxml.ResponseElement()
if from_number in customer_agent_map: # Check whether the customer's number is in the customer-agent mapping
number = customer_agent_map[from_number] # Assign the value from the customer-agent array to number variable
response.add(
plivoxml.DialElement(
caller_id=to_number, # Plivo number is used as the caller ID for the call toward the agent
).add(plivoxml.NumberElement(number))
)
elif from_number in agent_customer_map: # Check whether the agent's number is in the customer-agent mapping
number = agent_customer_map[from_number] # Assign the key from the customer-agent array to number variable
response.add(
plivoxml.DialElement(
caller_id=to_number, # Plivo number is used as the caller ID for the call toward the customer
).add(plivoxml.NumberElement(number))
)
print(response)
return Response(response.to_string(), mimetype='application/xml')
if __name__ == "__main__":
app.run(host="0.0.0.0", debug=True)
$ python number_masking.py
14156667777 — then Plivo will send the XML response to process the incoming call as below, and you can check the XML document in your browser.14156667778 — then Plivo will send the XML response to process the incoming call as below, and you can check the XML document in your browser.Create a Plivo application
Associate the Flask application you created with Plivo by creating a Plivo application. Visit Voice > Applications in the Plivo console and click on Add New Application, or use Plivo’s Application API.Give your application a name — we called oursNumber Masking. Enter the server URL you want to use (for example, https://<ngrok_identifier>.ngrok.io/handleincoming/) in the Answer URL field and set the method as GET. Click Create Application to save your application.Assign a Plivo number to your application
Navigate to the Numbers page and select the phone number you want to use for this application.From the Application Type drop-down, selectXML Application.From the Plivo Application drop-down, select Number Masking (the name we gave the application).Click Update Number to save.Test
To test the application, you need two Plivo numbers. Set up one of your numbers as a customer and another as an agent in the customer-to-agent mapping data in the config file. Make a call from each of your mobile numbers to the Plivo number you mapped to the application. You should see that the call is forwarded to the other number, and that the incoming call has the Plivo number as the caller ID.Overview
Phone number masking hides the phone numbers of parties in a call from each other. Many businesses find it advantageous to anonymize communication between two parties — for example, between a customer and a delivery agent on a food delivery service platform or a driver and a rider using a ride-hailing application. Businesses can implement phone number masking by sending calls through an intermediate phone number that acts as a proxy between the two parties. A Plivo number can serve as the intermediate number to connect the two parties while keeping their contact information private.How it works
- Customer calls agent
- Agent calls customer
- Create a customer-to-agent phone number mapping in your application’s back end.
- Create the number masking application using Plivo.
- Assign the number masking application to a Plivo number.
Prerequisites
To get started, you need a Plivo account — sign up with your work email address if you don’t have one already. You must have a voice-enabled Plivo phone number to receive incoming calls; you can rent numbers from the Numbers page of the Plivo console, or by using the Numbers API. If this is your first time using Plivo APIs, follow our instructions to set up a PHP development environment and a web server and safely expose that server to the internet.Create a 1:1 map with actual numbers
Create customer-to-agent phone number mapping for the application. Whenever a customer places an order, their phone number should be stored in a database for your application to access. A delivery agent will be assigned for the order, and the agent’s number will also be stored in your database, and will be mapped to the customer’s number:- Customer’s Number1-415-666-7777
- Agent’s Number1-415-666-7778
    'customer_agent_map' => [
        '14156667777' => '14156667778',
        '14156667779' => '14156667780',
        '14156667781' => '14156667782',
    ],
Create a Laravel controller for number masking
Change to the project directory and run this command to create a Laravel controller for inbound calls.$ php artisan make:controller MaskingController
<?php

namespace App\Http\Controllers;
require '../../vendor/autoload.php';
use Plivo\RestClient;
use Plivo\XML\Response;
use Illuminate\Http\Request;
use Illuminate\Support\Facades\Log;
use Config;

class MaskingController extends Controller
{
    // Handle incoming calls to a Plivo number, connect agent with customer and vice versa without revealing their actual phone numbers.
    public function numberMasking(Request $request)
    {
        $from_number = $_REQUEST['From'];
        $to_number = $_REQUEST['To'];
        $response = new Response();
        $customerPhoneMaping = Config::get('app.customer_agent_map');
        $customer_to_agent = array_key_exists($from_number, $customerPhoneMaping); // Check whether the customer's number is in the customer-agent mapping
        $agent_to_customer = array_key_exists($from_number, array_flip($customerPhoneMaping)); // Check whether the agent's number is in the customer-agent mapping
        if ($customer_to_agent == true){
            $number = $customerPhoneMaping[$from_number]; // Assign the value from the customer-agent array to $number variable
            $params = array(
                'callerId' => $to_number, // Plivo number is used as the caller ID for the call toward the agent
            );
            $dial = $response->addDial($params);
            $dial->addNumber($number);
        } elseif ($agent_to_customer == true){
            $number = array_search($from_number, $customerPhoneMaping); // Assign the key from the customer-agent array to $number variable
            $params = array(
                'callerId' => $to_number, // Plivo number is used as the caller ID for the call toward the customer
            );
            $dial = $response->addDial($params);
            $dial->addNumber($number);
        }
        $xml_response = $response->toXML();
        return response($xml_response, 200)->header('Content-Type', 'application/xml');
    }
}
Add a route
To add a route for the functions in the MaskingController class, edit the routes/web.php file and add this line at the end of the file:Route::match(['get', 'post'], '/numbermasking', 'App\Http\Controllers\MaskingController@numberMasking');
Note: You can edit the app/Http/Middleware/VerifyCsrfToken.php file and add the route of the app numbermasking to the “except” array to disable CSRF verification.
$ php artisan serve
14156667777 — then Plivo will send the XML response to process the incoming call as below, and you can check the XML document in your browser.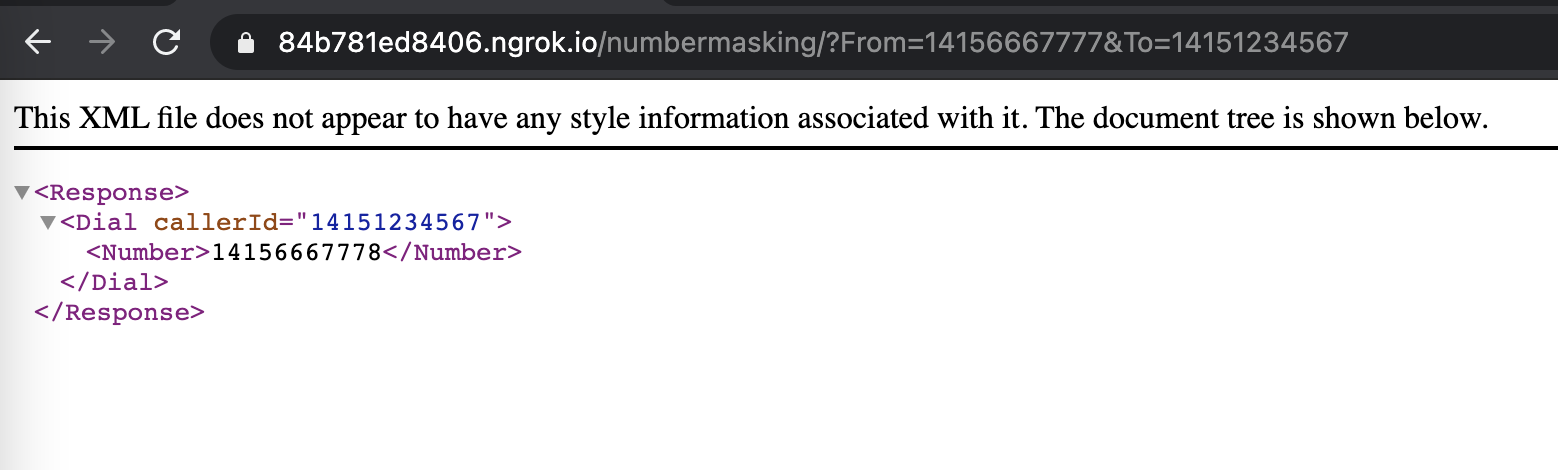
14156667778 — then Plivo will send the XML response to process the incoming call as below, and you can check the XML document in your browser.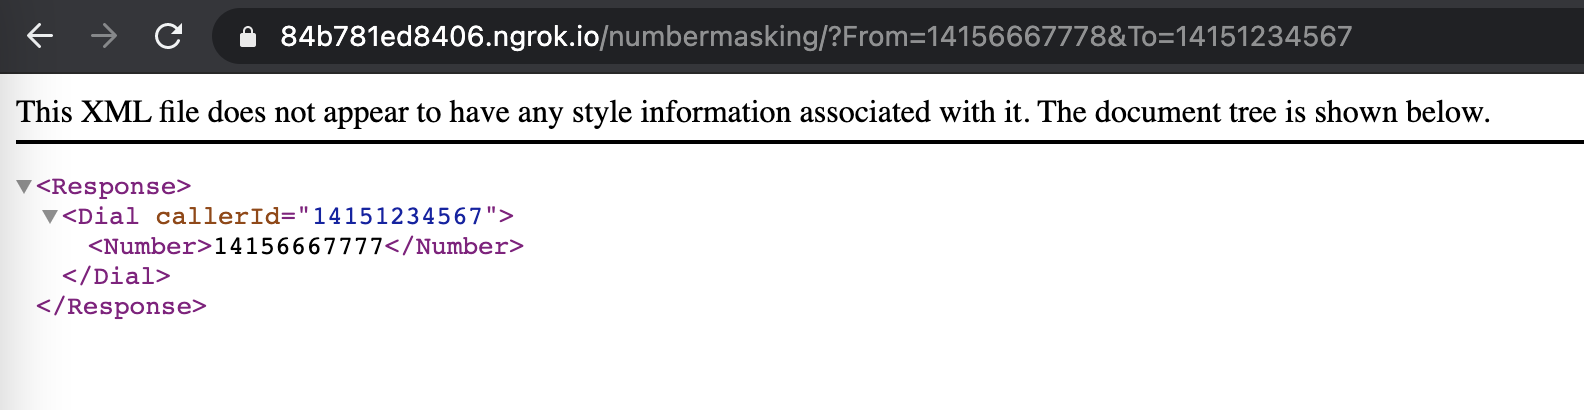
Create a Plivo application
Associate the Laravel controller you created with Plivo by creating a Plivo application. Visit Voice > Applications in the Plivo console and click on Add New Application, or use Plivo’s Application API.Give your application a name — we called oursNumber Masking. Enter the server URL you want to use (for example, https://<ngrok_identifier>.ngrok.io/handleincoming/) in the Answer URL field and set the method as GET. Click Create Application to save your application.Assign a Plivo number to your application
Navigate to the Numbers page and select the phone number you want to use for this application.From the Application Type drop-down, selectXML Application.From the Plivo Application drop-down, select Number Masking (the name we gave the application).Click Update Number to save.Test
To test the application, you need two Plivo numbers. Set up one of your numbers as a customer and another as an agent in the customer-to-agent mapping data in the config file. Make a call from each of your mobile numbers to the Plivo number you mapped to the application. You should see that the call is forwarded to the other number, and that the incoming call has the Plivo number as the caller ID.Overview
Phone number masking hides the phone numbers of parties in a call from each other. Many businesses find it advantageous to anonymize communication between two parties — for example, between a customer and a delivery agent on a food delivery service platform or a driver and a rider using a ride-hailing application. Businesses can implement phone number masking by sending calls through an intermediate phone number that acts as a proxy between the two parties. A Plivo number can serve as the intermediate number to connect the two parties while keeping their contact information private.How it works
- Customer calls agent
- Agent calls customer
- Create a customer-to-agent phone number mapping in your application’s back end.
- Create the number masking application using Plivo.
- Assign the number masking application to a Plivo number.
Prerequisites
To get started, you need a Plivo account — sign up with your work email address if you don’t have one already. You must have a voice-enabled Plivo phone number to receive incoming calls; you can rent numbers from the Numbers page of the Plivo console, or by using the Numbers API. If this is your first time using Plivo APIs, follow our instructions to set up a .NET development environment and a web server and safely expose that server to the internet.Create a 1:1 map with actual numbers
Create customer-to-agent phone number mapping for the application. Whenever a customer places an order, their phone number should be stored in a database for your application to access. A delivery agent will be assigned for the order, and the agent’s number will also be stored in your database, and will be mapped to the customer’s number:- Customer’s Number1-415-666-7777
- Agent’s Number1-415-666-7778
<?xml version="1.0" encoding="UTF-8" ?>
<configuration>
    <configSections>
        <section
                name="CustomerAgent"
                type="System.Configuration.DictionarySectionHandler" />
    </configSections>
    <CustomerAgent>
        <add key="14156667777" value="14156667778" />
        <add key="14156667779" value="14156667780" />
        <add key="14156667781" value="14156667782" />
    </CustomerAgent>
</configuration>
Create an MVC controller for number masking
In Visual Studio, navigate to the Controllers directory in the NumberMasking application. Create a controller namedHandleIncomingController.cs and paste into it this code: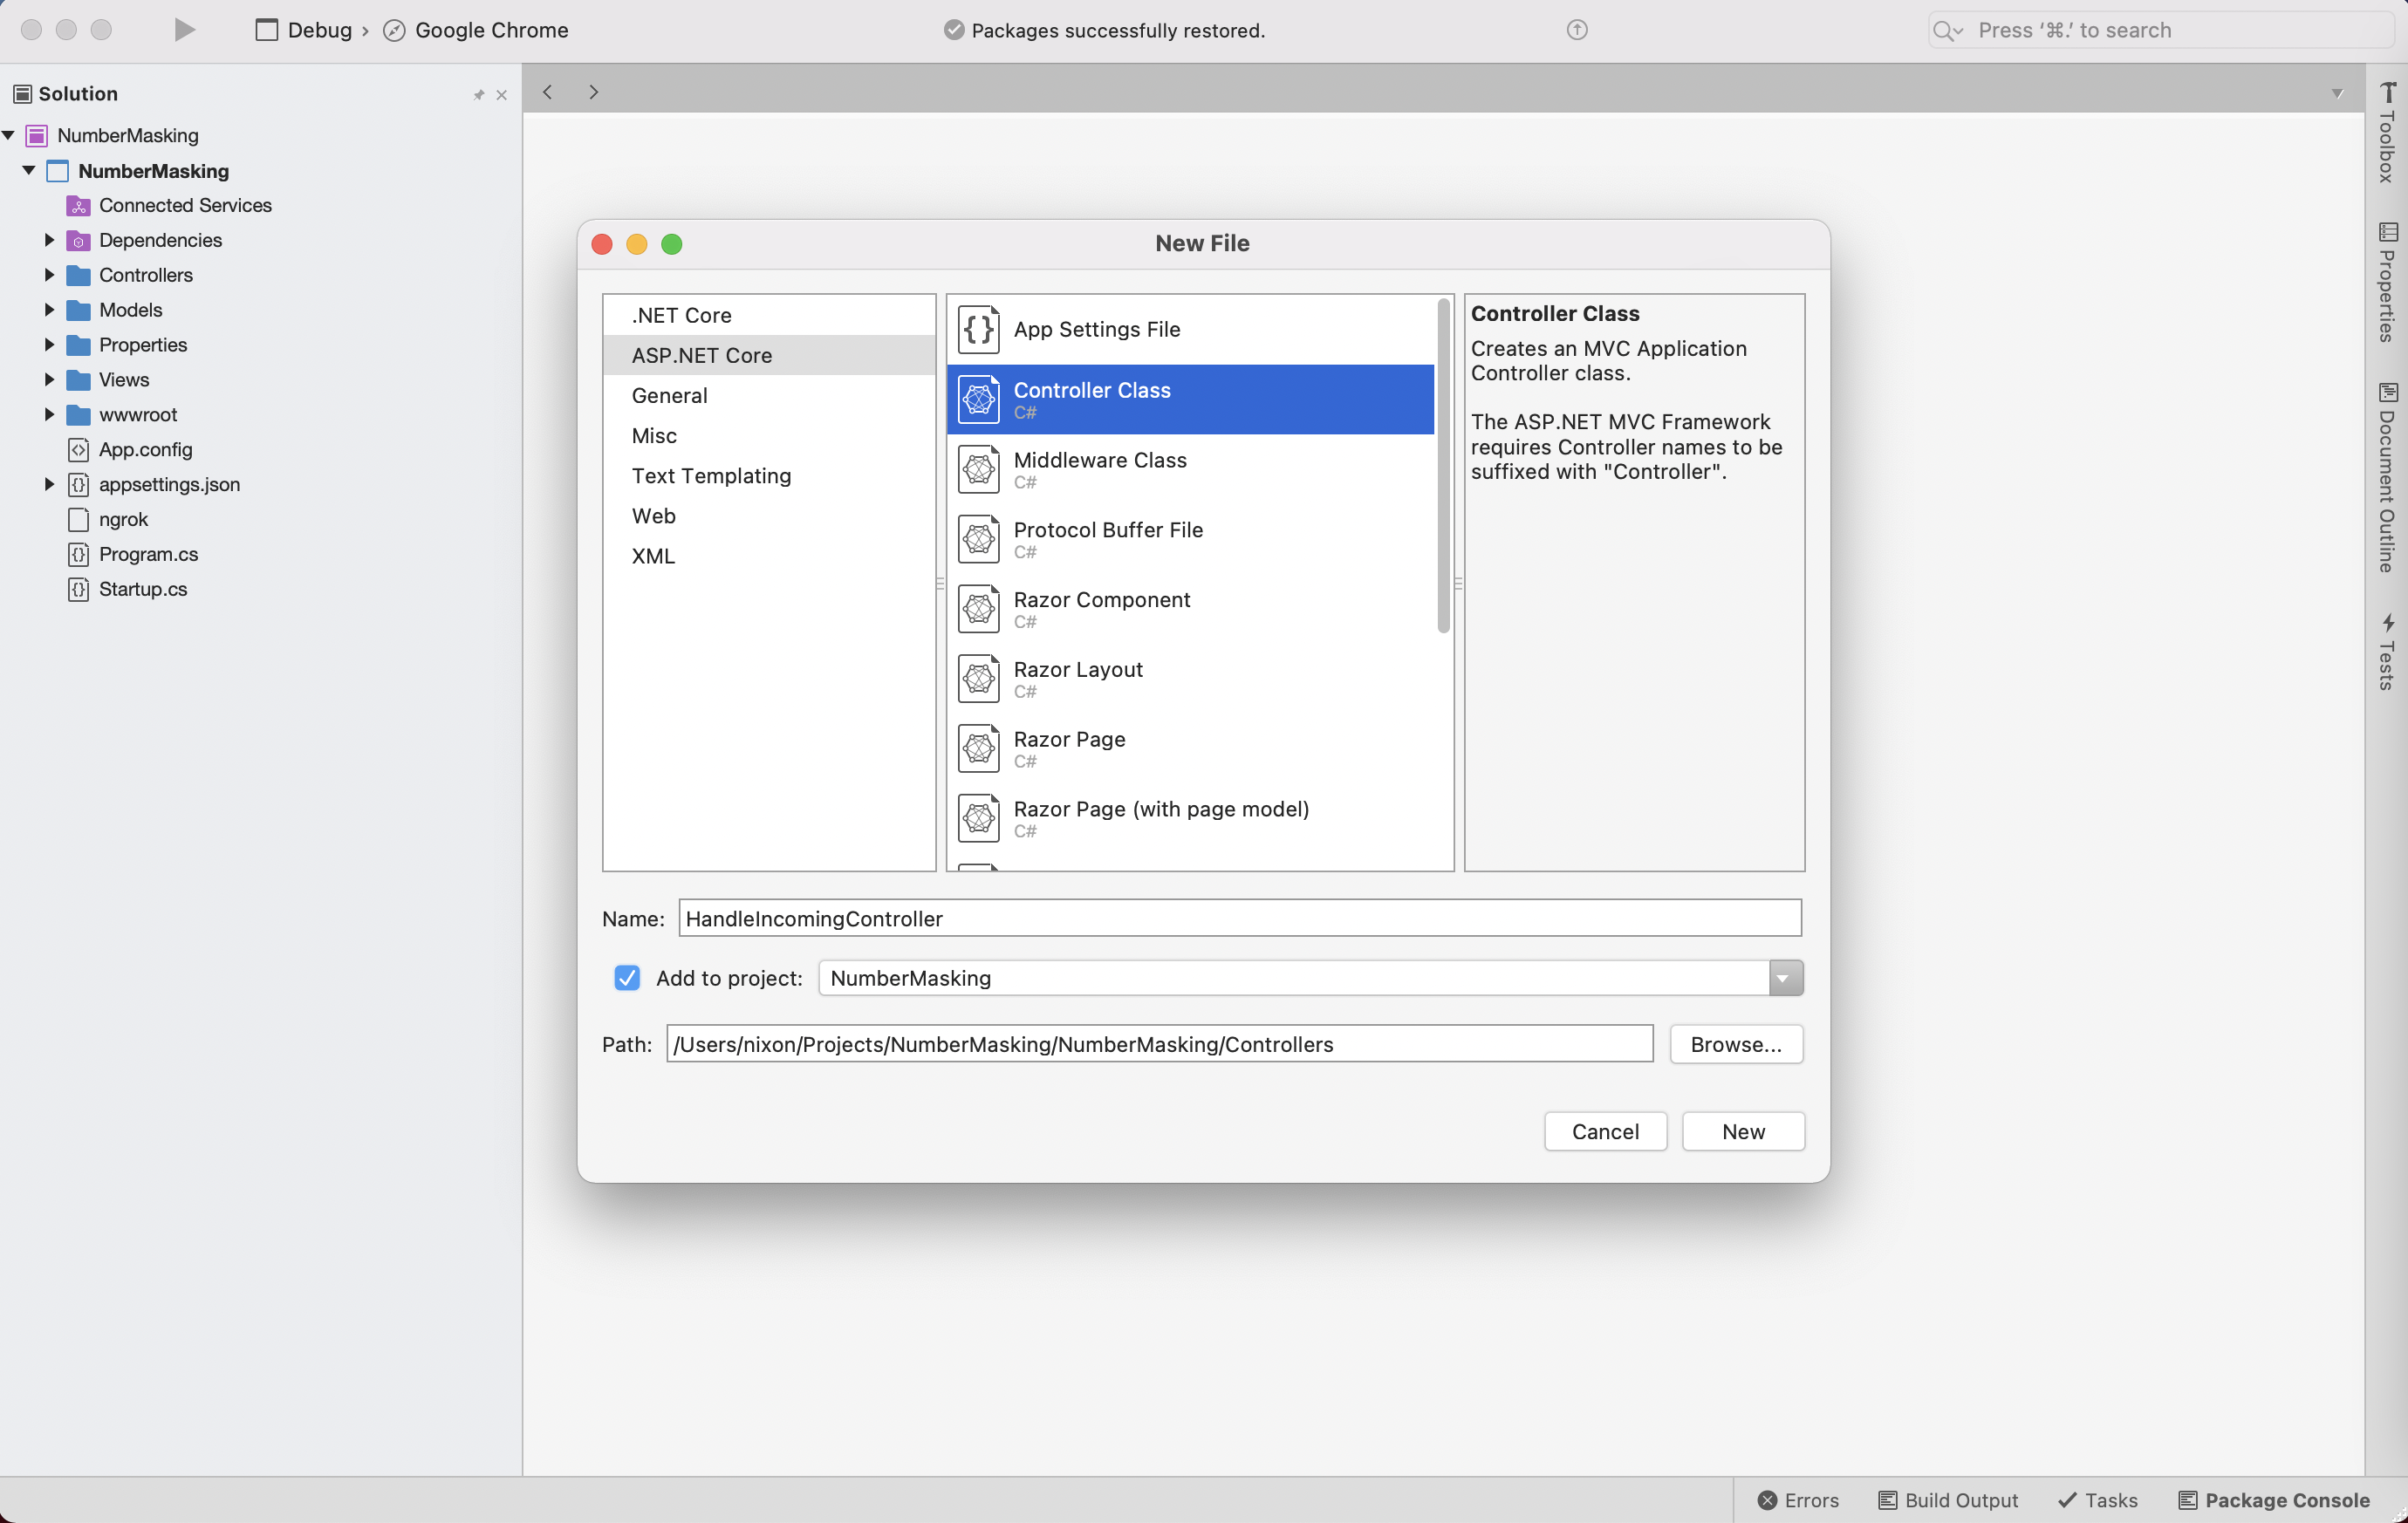
using System.Configuration;
using Plivo.XML;
using System.Collections.Generic;
using System.Linq;
using Microsoft.AspNetCore.Mvc;
using System.Diagnostics;
using System.Collections;

// Handle incoming calls to a Plivo number, connect agent with customer and vice versa without revealing their actual phone numbers.

namespace NumberMasking.Controllers
{
    public class HandleIncomingController : Controller
    {

        // GET: /<controller>/
        public IActionResult Index()
        {
            string FromNumber = Request.Query["From"];
            string ToNumber = Request.Query["To"];
            var resp = new Response();

            // Customer-agent mapping
            var CustomerAgentMap = (ConfigurationManager.GetSection("CustomerAgent") as Hashtable)
                 .Cast<DictionaryEntry>()
                 .ToDictionary(n => n.Key.ToString(), n => n.Value.ToString());

            // Agent-customer mapping
            var AgentCustomerMap = CustomerAgentMap.ToDictionary(kp => kp.Value, kp => kp.Key);

            if (CustomerAgentMap.ContainsKey(FromNumber)) // Check whether the customer's number is in the customer-agent mapping
            {
                var DestNumber = CustomerAgentMap[FromNumber]; // Assign the value from the customer-agent array to number variable

                Dial dial = new Dial(new
                    Dictionary<string, string>() {
                    {"callerId", ToNumber} // Plivo number is used as the caller ID for the call toward the agent
                });
                dial.AddNumber(DestNumber,
                    new Dictionary<string, string>() { });
                resp.Add(dial);
            }
            else if (AgentCustomerMap.ContainsKey(FromNumber)) // Check whether the agent's number is in the customer-agent mapping
            {
                var DestNumber = AgentCustomerMap[FromNumber]; // Assign the key from the customer-agent array to number variable
                Dial dial = new Dial(new
                    Dictionary<string, string>() {
                    {"callerId", ToNumber} // Plivo number is used as the caller ID for the call toward the customer
                });
                dial.AddNumber(DestNumber,
                    new Dictionary<string, string>() { });
                resp.Add(dial);
            }
            Debug.WriteLine(resp.ToString());
            var output = resp.ToString();
            return this.Content(output, "text/xml");
        }

    }
}
applicationUrl:"applicationUrl": "http://localhost:5000/"
14156667777 — then Plivo will send the XML response to process the incoming call as below, and you can check the XML document in your browser.14156667778 — then Plivo will send the XML response to process the incoming call as below, and you can check the XML document in your browser.Create a Plivo application
Associate the MVC controller you created with Plivo by creating a Plivo application. Visit Voice > Applications in the Plivo console and click on Add New Application, or use Plivo’s Application API.Give your application a name — we called oursNumber Masking. Enter the server URL you want to use (for example, https://<ngrok_identifier>.ngrok.io/handleincoming/) in the Answer URL field and set the method as GET. Click Create Application to save your application.Assign a Plivo number to your application
Navigate to the Numbers page and select the phone number you want to use for this application.From the Application Type drop-down, selectXML Application.From the Plivo Application drop-down, select Number Masking (the name we gave the application).Click Update Number to save.Test
To test the application, you need two Plivo numbers. Set up one of your numbers as a customer and another as an agent in the customer-to-agent mapping data in the config file. Make a call from each of your mobile numbers to the Plivo number you mapped to the application. You should see that the call is forwarded to the other number, and that the incoming call has the Plivo number as the caller ID.Overview
Phone number masking hides the phone numbers of parties in a call from each other. Many businesses find it advantageous to anonymize communication between two parties — for example, between a customer and a delivery agent on a food delivery service platform or a driver and a rider using a ride-hailing application. Businesses can implement phone number masking by sending calls through an intermediate phone number that acts as a proxy between the two parties. A Plivo number can serve as the intermediate number to connect the two parties while keeping their contact information private.How it works
- Customer calls agent
- Agent calls customer
- Create a customer-to-agent phone number mapping in your application’s back end.
- Create the number masking application using Plivo.
- Assign the number masking application to a Plivo number.
Prerequisites
To get started, you need a Plivo account — sign up with your work email address if you don’t have one already. You must have a voice-enabled Plivo phone number to receive incoming calls; you can rent numbers from the Numbers page of the Plivo console, or by using the Numbers API. If this is your first time using Plivo APIs, follow our instructions to set up a Java development environment and a web server and safely expose that server to the internet.Create a 1:1 map with actual numbers
Create customer-to-agent phone number mapping for the application. Whenever a customer places an order, their phone number should be stored in a database for your application to access. A delivery agent will be assigned for the order, and the agent’s number will also be stored in your database, and will be mapped to the customer’s number:- Customer’s Number1-415-666-7777
- Agent’s Number1-415-666-7778
spring.main.banner-mode=off
spring.output.ansi.enabled=ALWAYS
logging.pattern.console=%clr(%d{yy-MM-dd E HH:mm:ss.SSS}){blue} %clr(%-5p) %clr(%logger{0}){blue} %clr(%m){faint}%n

number.map={"14156667777":"14156667778", "14156667779":"14156667780", "14156667781":"14156667782"}
Create a Spring application for number masking
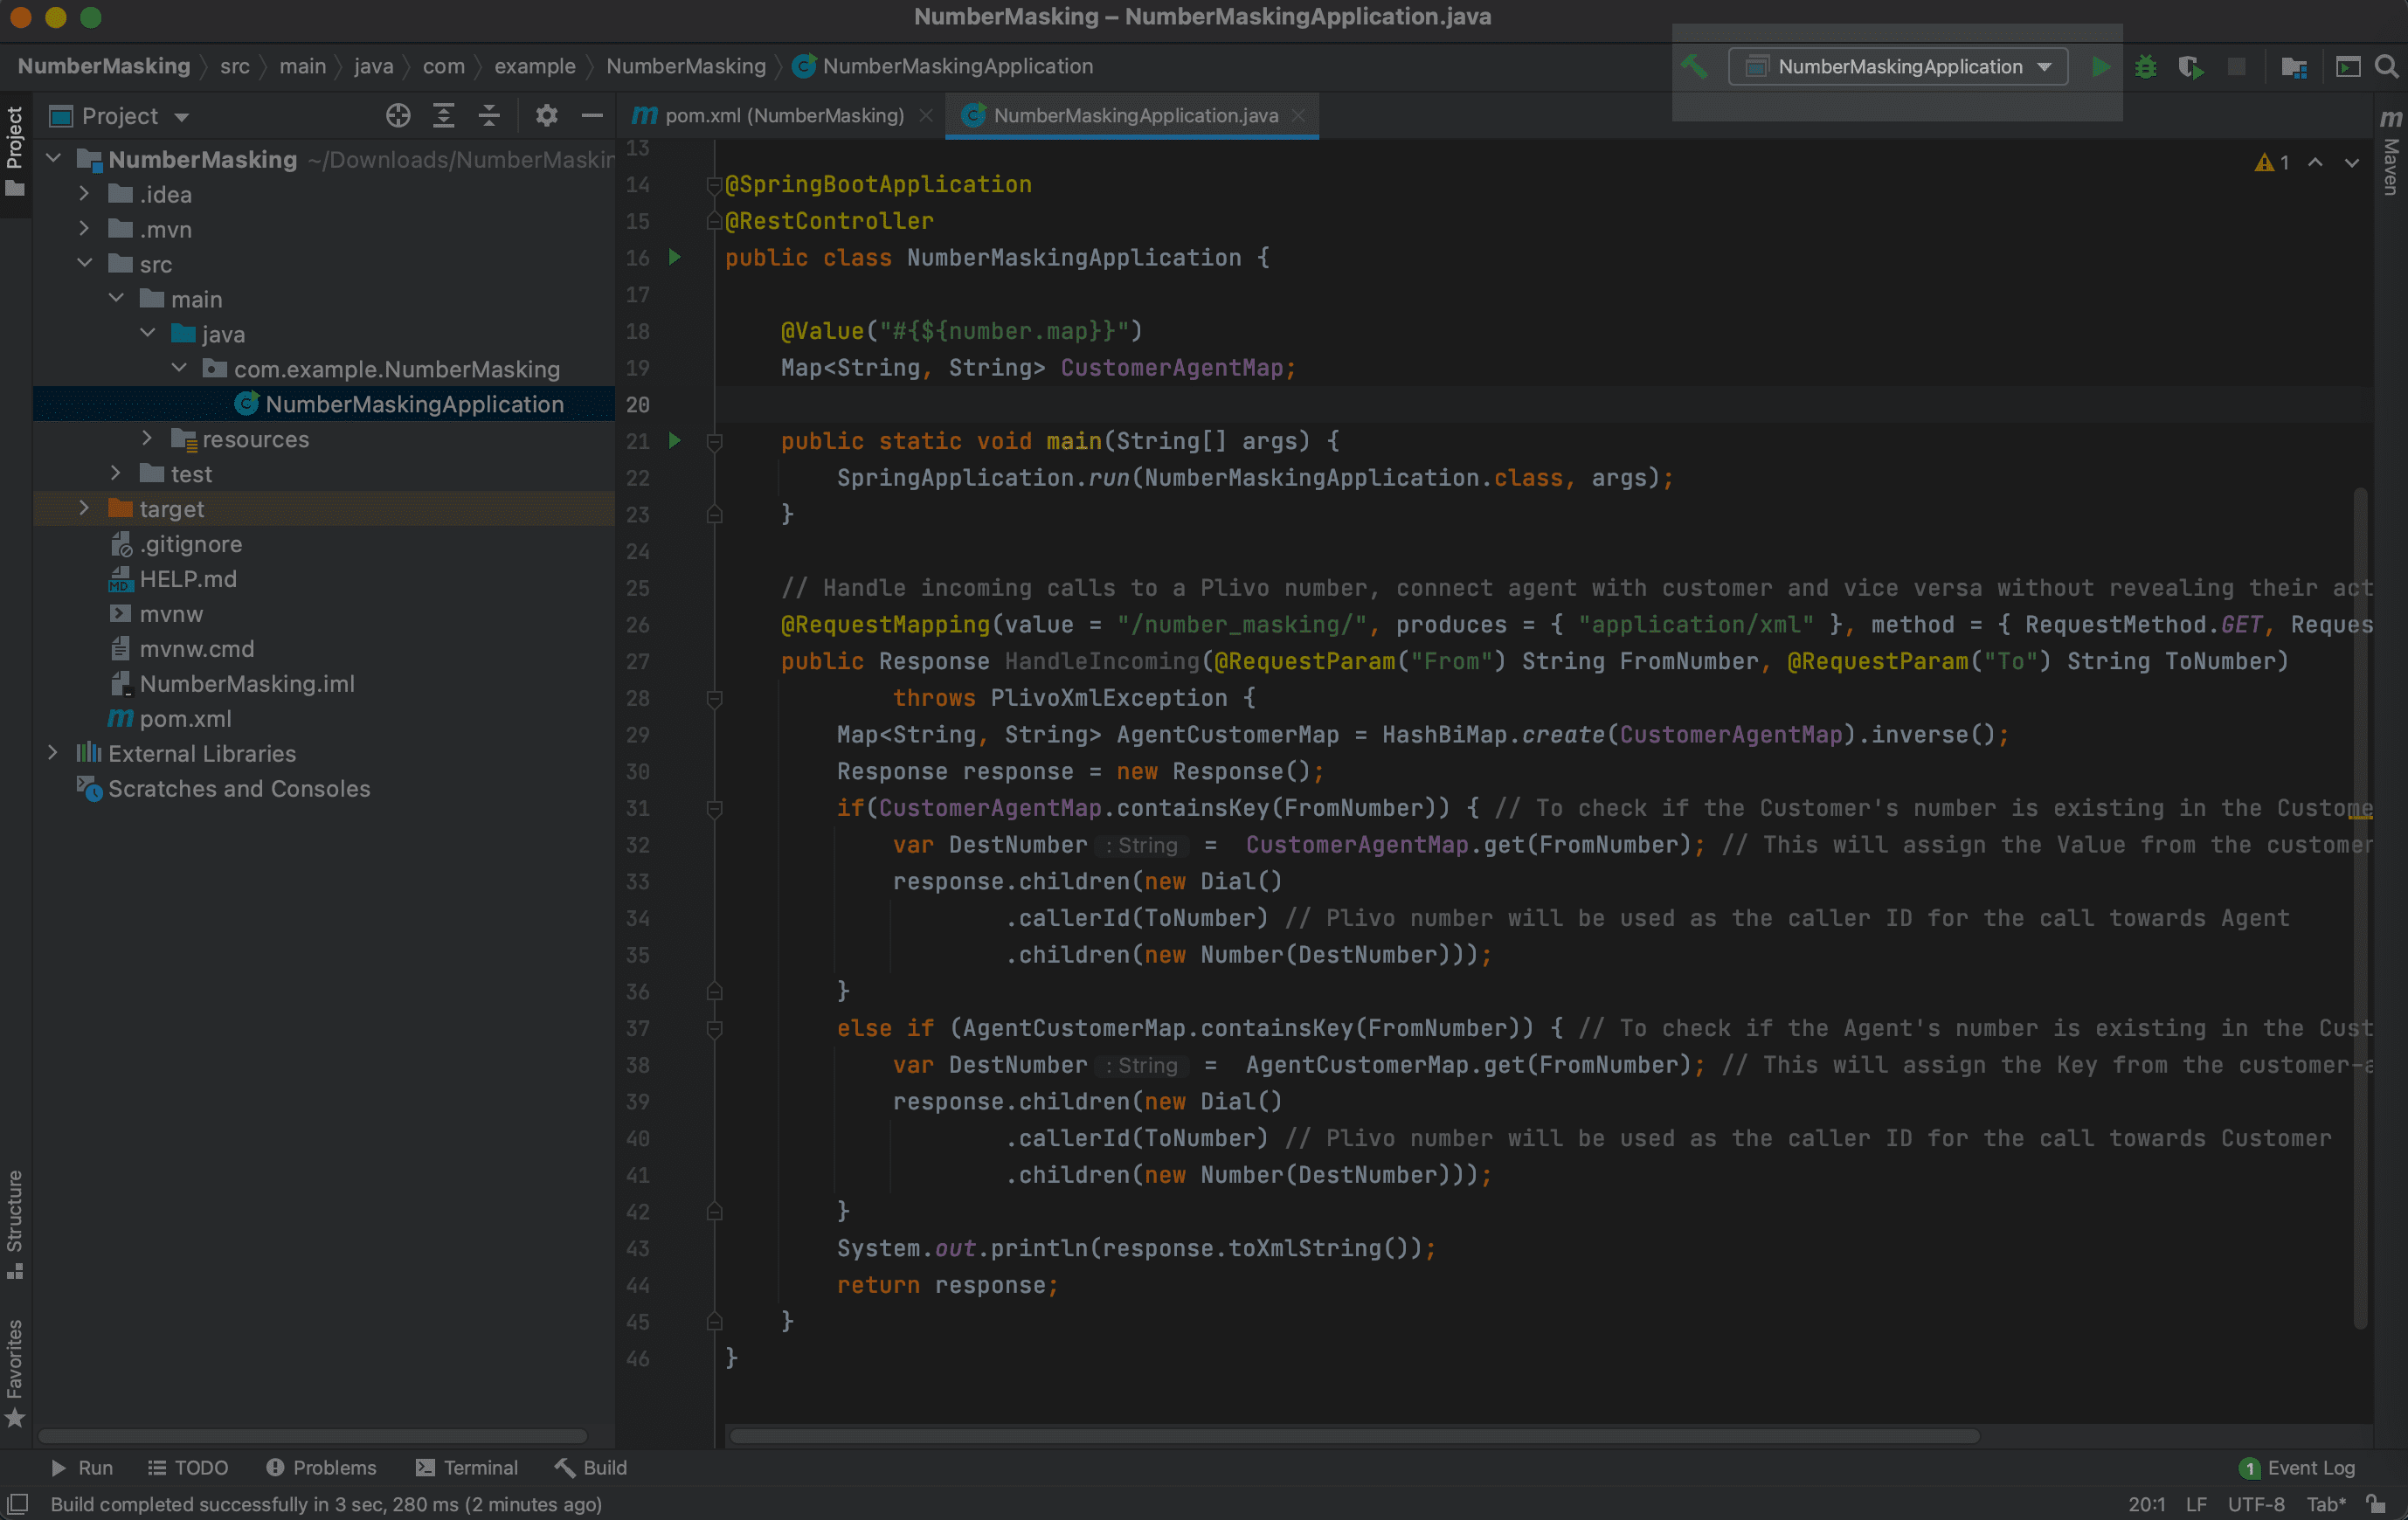
Open the NumberMaskingApplication.java file in the src/main/java/com.example.NumberMasking/ folder and paste into it this code.Note: Here, the demo application name is NumberMaskingApplication.java because the friendly name we provided in Spring Initializr was
NumberMasking.package com.example.NumberMasking;
import com.plivo.api.exceptions.PlivoXmlException;
import com.plivo.api.xml.Dial;
import com.plivo.api.xml.Response;
import com.plivo.api.xml.Number;
import org.springframework.beans.factory.annotation.Value;
import org.springframework.boot.SpringApplication;
import org.springframework.boot.autoconfigure.SpringBootApplication;
import org.springframework.web.bind.annotation.*;
import com.google.common.collect.HashBiMap;
import java.util.Map;
@SpringBootApplication
@RestController
public class NumberMaskingApplication {
@Value("#{${number.map}}")
Map<String, String> CustomerAgentMap;
public static void main(String[] args) {
SpringApplication.run(NumberMaskingApplication.class, args);
}
// Handle incoming calls to a Plivo number, connect agent with customer and vice versa without revealing their actual phone numbers.
@RequestMapping(value = "/number_masking/", produces = { "application/xml" }, method = { RequestMethod.GET, RequestMethod.POST })
public Response HandleIncoming(@RequestParam("From") String FromNumber, @RequestParam("To") String ToNumber)
throws PlivoXmlException {
Map<String, String> AgentCustomerMap = HashBiMap.create(CustomerAgentMap).inverse();
Response response = new Response();
if(CustomerAgentMap.containsKey(FromNumber)) { // Check whether the customer's number is in the customer-agent mapping
var DestNumber = CustomerAgentMap.get(FromNumber); // Assign the value from the customer-agent map to DestNumber variable
response.children(new Dial()
.callerId(ToNumber) // Plivo number is used as the caller ID for the call toward the agent
.children(new Number(DestNumber)));
}
else if (AgentCustomerMap.containsKey(FromNumber)) { // Check whether the agent's number is in the customer-agent mapping
var DestNumber = AgentCustomerMap.get(FromNumber); // Assign the Kky from the customer-agent map to DestNumber variable
response.children(new Dial()
.callerId(ToNumber) // Plivo number is used as the caller ID for the call toward the customer
.children(new Number(DestNumber)));
}
System.out.println(response.toXmlString());
return response;
}
}
14156667777 — then Plivo will send the XML response to process the incoming call as below, and you can check the XML document in your browser.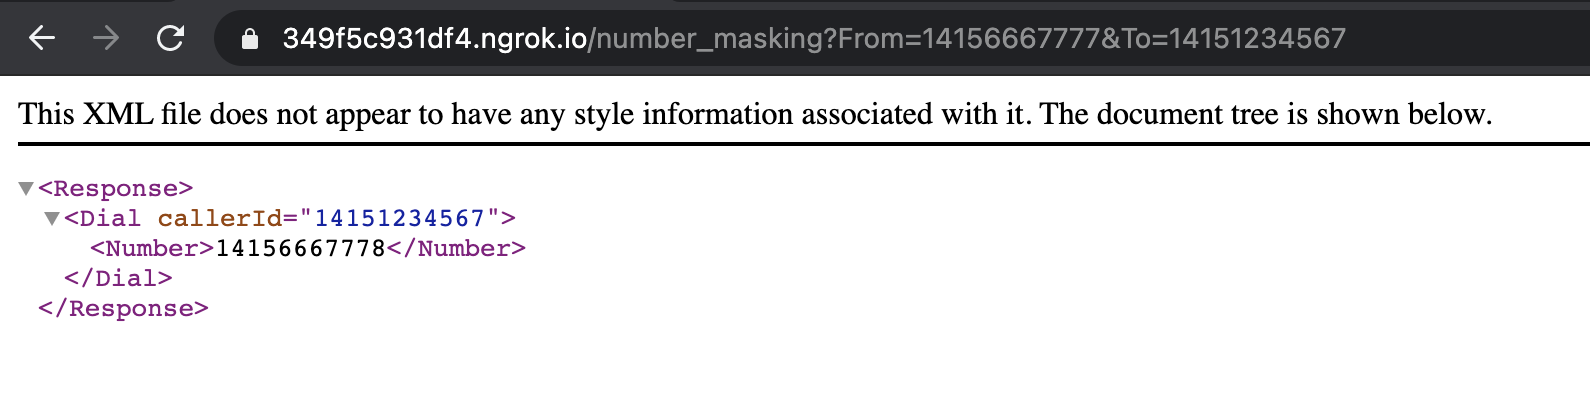
14156667778 — then Plivo will send the XML response to process the incoming call as below, and you can check the XML document in your browser.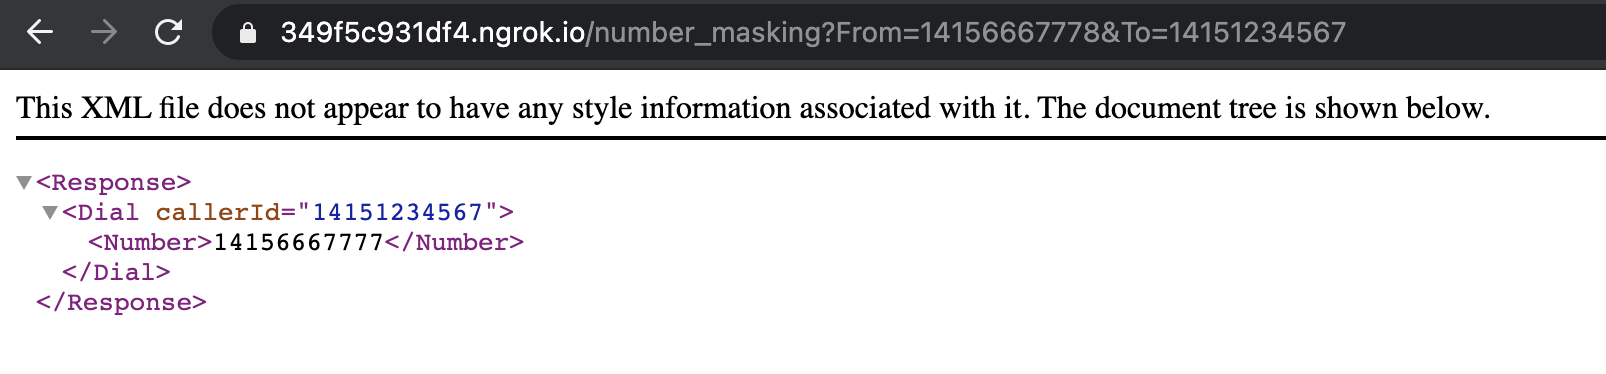
Create a Plivo application
Associate the Spring application you created with Plivo by creating a Plivo application. Visit Voice > Applications in the Plivo console and click on Add New Application, or use Plivo’s Application API.Give your application a name — we called oursNumber Masking. Enter the server URL you want to use (for example, https://<ngrok_identifier>.ngrok.io/handleincoming/) in the Answer URL field and set the method as GET. Click Create Application to save your application.Assign a Plivo number to your application
Navigate to the Numbers page and select the phone number you want to use for this application.From the Application Type drop-down, selectXML Application.From the Plivo Application drop-down, select Number Masking (the name we gave the application).Click Update Number to save.Test
To test the application, you need two Plivo numbers. Set up one of your numbers as a customer and another as an agent in the customer-to-agent mapping data in the config file. Make a call from each of your mobile numbers to the Plivo number you mapped to the application. You should see that the call is forwarded to the other number, and that the incoming call has the Plivo number as the caller ID.Overview
Phone number masking hides the phone numbers of parties in a call from each other. Many businesses find it advantageous to anonymize communication between two parties — for example, between a customer and a delivery agent on a food delivery service platform or a driver and a rider using a ride-hailing application. Businesses can implement phone number masking by sending calls through an intermediate phone number that acts as a proxy between the two parties. A Plivo number can serve as the intermediate number to connect the two parties while keeping their contact information private.How it works
- Customer calls agent
- Agent calls customer
- Create a customer-to-agent phone number mapping in your application’s back end.
- Create the number masking application using Plivo.
- Assign the number masking application to a Plivo number.
Prerequisites
To get started, you need a Plivo account — sign up with your work email address if you don’t have one already. You must have a voice-enabled Plivo phone number to receive incoming calls; you can rent numbers from the Numbers page of the Plivo console, or by using the Numbers API. If this is your first time using Plivo APIs, follow our instructions to set up a Go development environment and a web server and safely expose that server to the internet.Create a 1:1 map with actual numbers
Create customer-to-agent phone number mapping for the application. Whenever a customer places an order, their phone number should be stored in a database for your application to access. A delivery agent will be assigned for the order, and the agent’s number will also be stored in your database, and will be mapped to the customer’s number:- Customer’s Number1-415-666-7777
- Agent’s Number1-415-666-7778
json
BASEMAP = {"14156667777":"14156667778","14156667779":"14156667780","14156667781":"14156667782"}
Create a Go server for number masking
Create a file calledmasking.go and paste into it this code.package main
import (
"encoding/json"
"log"
"os"
"github.com/gin-gonic/gin"
"github.com/joho/godotenv"
"github.com/plivo/plivo-go/v7/xml"
)
// init gets called before the main function
func init() {
// Log error if .env file does not exist
err := godotenv.Load(".env")
if err != nil {
log.Fatal("Error loading .env file")
}
}
// Handle incoming calls to a Plivo number, connect agent with customer and vice versa without revealing their actual phone numbers.
func main() {
r := gin.Default()
r.GET("/number_masking", func(c *gin.Context) {
customerAgentmap := os.Getenv("BASEMAP")
// Declares an empty map interface
var result map[string]string
fromNumber := c.Query("From")
toNumber := c.Query("To")
// Unmarshal or Decode the JSON to the interface.
json.Unmarshal([]byte(customerAgentmap), &result)
agentCustomermap := reverseMap(result)
_, custToagent := result[fromNumber]
_, agenTocust := agentCustomermap[fromNumber]
if custToagent { // Check whether the customer's number is in the customer-agent mapping
destNumber := result[fromNumber] // Assign the value from the customer-agent array to number variable
c.XML(200, xml.ResponseElement{
Contents: []interface{}{
new(xml.DialElement).
SetCallerID(toNumber). // Plivo number is used as the caller ID for the call toward the agent
SetContents([]interface{}{
new(xml.NumberElement).
SetContents(destNumber),
}),
},
})
} else if agenTocust { // Check whether the agent's number is in the customer-agent mapping
destNumber := agentCustomermap[fromNumber] // Assign the key from the customer-agent array to number variable
c.XML(200, xml.ResponseElement{
Contents: []interface{}{
new(xml.DialElement).
SetCallerID(toNumber). // Plivo number is used as the caller ID for the call toward the customer
SetContents([]interface{}{
new(xml.NumberElement).
SetContents(destNumber),
}),
},
})
}
c.Header("Content-Type", "application/xml")
})
r.Run() // listen and serve on 0.0.0.0:8080 (for Windows "localhost:8080")
}
// Reverse the Basemap from env file to get customer-agent mapping data
func reverseMap(m map[string]string) map[string]string {
n := make(map[string]string)
for k, v := range m {
n[v] = k
}
return n
}
$ go run masking.go
14156667777 — then Plivo will send the XML response to process the incoming call as below, and you can check the XML document in your browser.14156667778 — then Plivo will send the XML response to process the incoming call as below, and you can check the XML document in your browser.Create a Plivo application
Associate the Go application you created with Plivo by creating a Plivo application. Visit Voice > Applications in the Plivo console and click on Add New Application, or use Plivo’s Application API.Give your application a name — we called oursNumber Masking. Enter the server URL you want to use (for example, https://<ngrok_identifier>.ngrok.io/handleincoming/) in the Answer URL field and set the method as GET. Click Create Application to save your application.Assign a Plivo number to your application
Navigate to the Numbers page and select the phone number you want to use for this application.From the Application Type drop-down, selectXML Application.From the Plivo Application drop-down, select Number Masking (the name we gave the application).Click Update Number to save.