Voice Alerts Using Java

Overview

This guide shows how to make voice calls to alert customers to critical issues that require immediate attention. You can play recorded audio when the call recipient answers or use text-to-speech. You can then take action based on a dialpad key they press in response. You can set different actions if the call is not answered, if the line is busy, or if you reach voicemail.

You can send voice alerts either by using our PHLO visual workflow builder or our APIs and XML documents. Follow the instructions in one of the tabs below.

Prerequisites

To get started, you need a Plivo account — sign up with your work email address if you don’t have one already. If this is your first time triggering a PHLO with Java, follow our instructions to set up a Java development environment.

Create the PHLO

To create a PHLO, visit the PHLO page of the Plivo console. If this is your first PHLO, the PHLO page will be empty.

  • Click Create New PHLO.

  • In the Choose your use case pop-up, click Build my own. The PHLO canvas will appear with the Start node.

    Note: The Start node is the starting point of any PHLO. It lets you trigger a PHLO to start upon one of three actions: incoming SMS message, incoming call, or API request.
  • Click the Start node to open the Configuration tab to the right of the canvas, then enter the information to retrieve from the HTTP Request payload — in this case, from and to numbers and a database server name.

  • From the list of components on the left side, drag and drop the Initiate Call component onto the canvas. This adds an Initiate Call node onto the canvas. When a component is placed on the canvas it becomes a node.

  • Draw a line to connect the Start node’s API Request trigger state to the Initiate Call node.

  • In the Configuration tab of the Initiate Call node, give the node a meaningful name. To enter values for the From and To fields, start typing two curly brackets. PHLO will display a list of all available variables; choose the appropriate ones. When you use variables in a PHLO, the values are retrieved from the HTTP Request payload you defined in the Start node.

  • Validate the configuration by clicking Validate. Every time you finish configuring a node, click Validate to check the syntax and save your changes.

  • Next, drag and drop the IVR Menu component onto the canvas. Draw a line to connect the Answered trigger state of the Initiate Call node to the IVR Menu node.

  • Click the IVR Menu node to open its Configuration tab. Rename the node to Gather_Input. You can rename nodes as you like to improve your PHLO’s readability.

    For this example, select 1 and 2 as the allowed choices, and enter a message to play to the user in the Speak Text field. If you like, you can also configure the Language and Voice fields for the message.

  • Because we specified two allowed choices in the IVR menu, we need to drag and drop three Play Audio nodes onto the canvas — one for each option, plus one for invalid input. Rename the nodes Invalid_Input_Prompt, Resolved_Prompt, and Escalation_Prompt in their Configuration tabs, and enter appropriate messages in their Prompt fields.

  • From the Gather_Input node, connect the Wrong Input trigger state to the Invalid_Input_Prompt node.
  • From the Invalid_Input_Prompt node, connect the Prompt Completed trigger state back to the Gather_Input node. This sends the user back to the IVR menu if they press an incorrect option, or if they don‘t press any key.

  • From the Gather_Input node, connect the 1 and 2 trigger states to the Resolved_Prompt and Escalation_Prompt nodes.

  • Configure all three Play Audio nodes to each play a relevant message to the user. Audio playback can either be static or dynamic or a combination of the two; for example, you could specify in the Speak Text field “Your status is,” followed by a variable to include the dynamic text. You can bring up a list of available variables by typing two curly brackets in the Speak Text field.

  • Drag and drop the Initiate Call component onto the canvas and rename the node to Escalation_Call.

  • Draw a line to connect the Prompt Completed trigger state of the Escalation_Prompt node to the Escalation_Call node. This triggers a call to another phone number and announces the alert. You can set up any number of escalation numbers by creating similar nodes for each phone number.

  • Draw a line to connect the Answered trigger state of the Escalation_Call node back to the Gather Input node. This will play the same prompt to the user after the original escalation call is answered and completed and give the user another chance to either resolve the call or escalate it.
  • After you complete and validate all the node configurations, give the PHLO a name by clicking in the upper left, then click Save.

Your completed PHLO should look like this:

Voice Alert

Your PHLO is now ready to test.

Trigger the PHLO

You integrate a PHLO into your application workflow by making an API request to trigger the PHLO with the required payload — the set of parameters you pass to the PHLO. You can define a static payload by specifying values when you create the PHLO, or define a dynamic payload by passing values through parameters when you trigger the PHLO from your application.

With a static payload

When you configure values when creating the PHLO, they act as a static payload.

With Static Payload

Code

Create a Java class in the project called TriggerPhlo and paste into it this code.

1
2
3
4
5
6
7
8
9
10
11
12
13
14
15
16
17
18
19
import com.plivo.api.Plivo;
import com.plivo.api.PlivoClient;
import com.plivo.api.exceptions.PlivoRestException;
import com.plivo.api.models.phlo.Phlo;
import java.io.IOException;

public class Example
{
    private static final String authId = "<auth_id>";
    private static final String authToken = "<auth_token>";
    private static PlivoClient client = new PlivoClient(authId, authToken);
    public static void main(String[] args) throws IOException, PlivoRestException
    {
        String phloId = "<phlo_id>";
        Plivo.init(authId, authToken);
        Phlo phlo = Phlo.getter(phloId).client(client).get();
        PhloUpdateResponse response = Phlo.updater(phloId).payload().run();
    }
}

Replace the auth placeholders with your authentication credentials from the Plivo console. Replace the phlo_id placeholder with your PHLO ID from the Plivo console.

With a dynamic payload

To use dynamic values for the parameters, use Liquid templating parameters when you create the PHLO and pass the values from your code to the PHLO when you trigger it.

With Dynamic Payload

Code

Create a Java class in the project called TriggerPhlo and paste into it this code.

1
2
3
4
5
6
7
8
9
10
11
12
13
14
15
16
17
18
19
20
21
22
import com.plivo.api.Plivo;
import com.plivo.api.PlivoClient;
import com.plivo.api.exceptions.PlivoRestException;
import com.plivo.api.models.phlo.Phlo;
import java.io.IOException;

public class Example
{
    private static final String authId = "<auth_id>";
    private static final String authToken = "<auth_token>";
    private static PlivoClient client = new PlivoClient(authId, authToken);
    public static void main(String[] args) throws IOException, PlivoRestException
    {
        String phloId = "<phlo_id>";
        Plivo.init(authId, authToken);
        Phlo phlo = Phlo.getter(phloId).client(client).get();
        Map<String, Object> payload = new HashMap<>();
        payload.put("from", "<caller_id>");
        payload.put("to", "<destination_number>");
        PhloUpdateResponse response = Phlo.updater(phloId).payload(payload).run();
    }
}

Replace the auth placeholders with your authentication credentials from the Plivo console. Replace the phlo_id placeholder with your PHLO ID from the Plivo console. Replace the phone number placeholders with actual phone numbers in E.164 format (for example, +12025551234).

Test

Save the file and run it.

Note: If you’re using a Plivo Trial account, you can make calls only to phone numbers that have been verified with Plivo. You can verify (sandbox) a number by going to the console’s Phone Numbers > Sandbox Numbers page.

Here’s how to use Plivo APIs and XML to implement voice notifications.
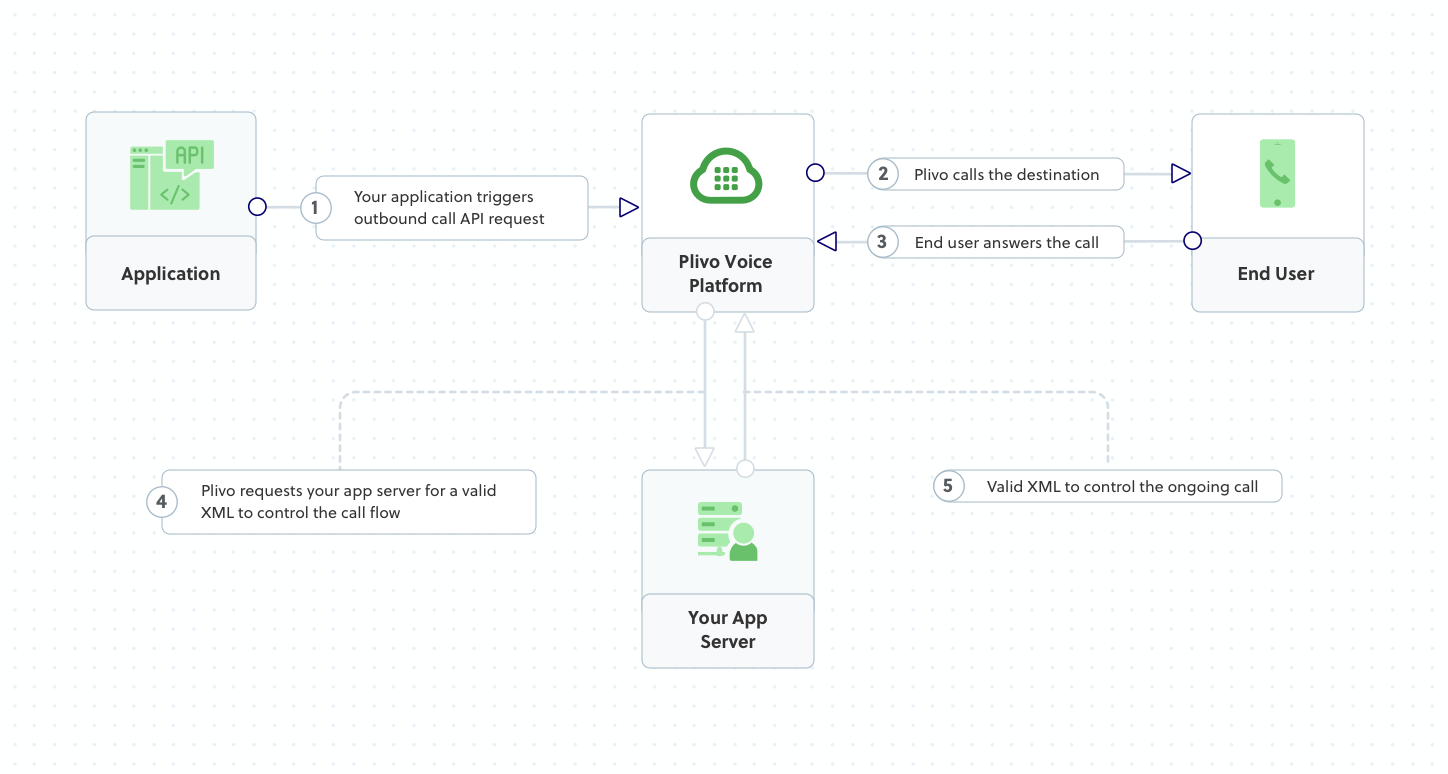
How it works

Outbound Call Flow

Plivo requests an answer URL when the call is answered (step 4) and expects the file at that address to hold a valid XML response from the application with instructions on how to handle the call. To see how this works, you can use https://s3.amazonaws.com/static.plivo.com/alert.xml as an answer URL to test your first outgoing call. The file contains this XML code:

<Response> 
<Speak>Your database is out of memory. Press 1 to resolve or 2 to escalate.</Speak> 
</Response>

This code instructs Plivo to say, “Your database is out of memory. Press 1 to resolve or 2 to escalate” to the call recipient. You can find the entire list of valid Plivo XML verbs in our XML Reference documentation.

Prerequisites

To get started, you need a Plivo account — sign up with your work email address if you don’t have one already. If this is your first time using Plivo APIs, follow our instructions to set up a Java development environment.

Create a voice alerts application in Java

Create a Java class in the project called MakeCall and paste into it this code.

1
2
3
4
5
6
7
8
9
10
11
12
13
14
15
16
17
18
import java.io.IOException;
import java.util.Collections;
import com.plivo.api.Plivo;
import com.plivo.api.exceptions.PlivoRestException;
import com.plivo.api.models.call.Call;
import com.plivo.api.models.call.CallCreateResponse;

class MakeCall {
    public static void main(String [] args) throws IOException, PlivoRestException {
        Plivo.init("<auth_id>","<auth_token>");
        CallCreateResponse response = Call.creator("<caller_id>",
                Collections.singletonList("<destination_number>"),
                "https://s3.amazonaws.com/static.plivo.com/alert.xml")
                .answerMethod("GET")
                .create();
        System.out.println(response);
    }
}

Replace the auth placeholders with your authentication credentials from the Plivo console. Replace the phone number placeholders with actual phone numbers in E.164 format (for example, +12025551234).

Note: We recommend that you store your credentials in the auth_id and auth_token environment variables, to avoid the possibility of accidentally committing them to source control. If you do this, you can initialize the client with no arguments and Plivo will automatically fetch the values from the environment variables. You can use System.getenv() to store environment variables and retrieve them when initializing the client.

Test

Save the file and run it.

Make Call

Note: If you’re using a Plivo Trial account, you can make calls only to phone numbers that have been verified with Plivo. You can verify (sandbox) a number by going to the console’s Phone Numbers > Sandbox Numbers page.