Toll-free Verification
Overview
Before you can use a toll-free number to send application-to-person (A2P) messages in the US and Canada, you must complete the toll-free number verification process. This process is meant to identify the sender, ensure compliance with the A2P messaging best practices, and help eliminate bad actors from gaining access to the A2P channel.
During verification, you will be asked to provide details about your company and the content you intend to send. If you’re a reseller, please provide information about the customers on whose behalf you will be sending text messages.
Note: The status of a SMS-enabled toll-free number that you rent from Plivo is set to ‘Unverified’ by default. The status will change to ‘Pending Verification’ when you submit the details required for verification. If your verification is successful, the toll-free number will be ‘Verified’ and you can send A2P messages. If the carrier rejects the verification request, the number will be marked “Unverified” and you cannot send A2P messages using this number. You can review the rejection reason, consult with our support team, and make changes before re-submitting your request.
Submitting a toll-free verification request via Plivo Console
Follow these steps to request verification of your existing SMS-enabled toll-free numbers on the Plivo console.
Prerequisites
To get started, you need a Plivo account — sign up with your work email address if you don’t have one already.
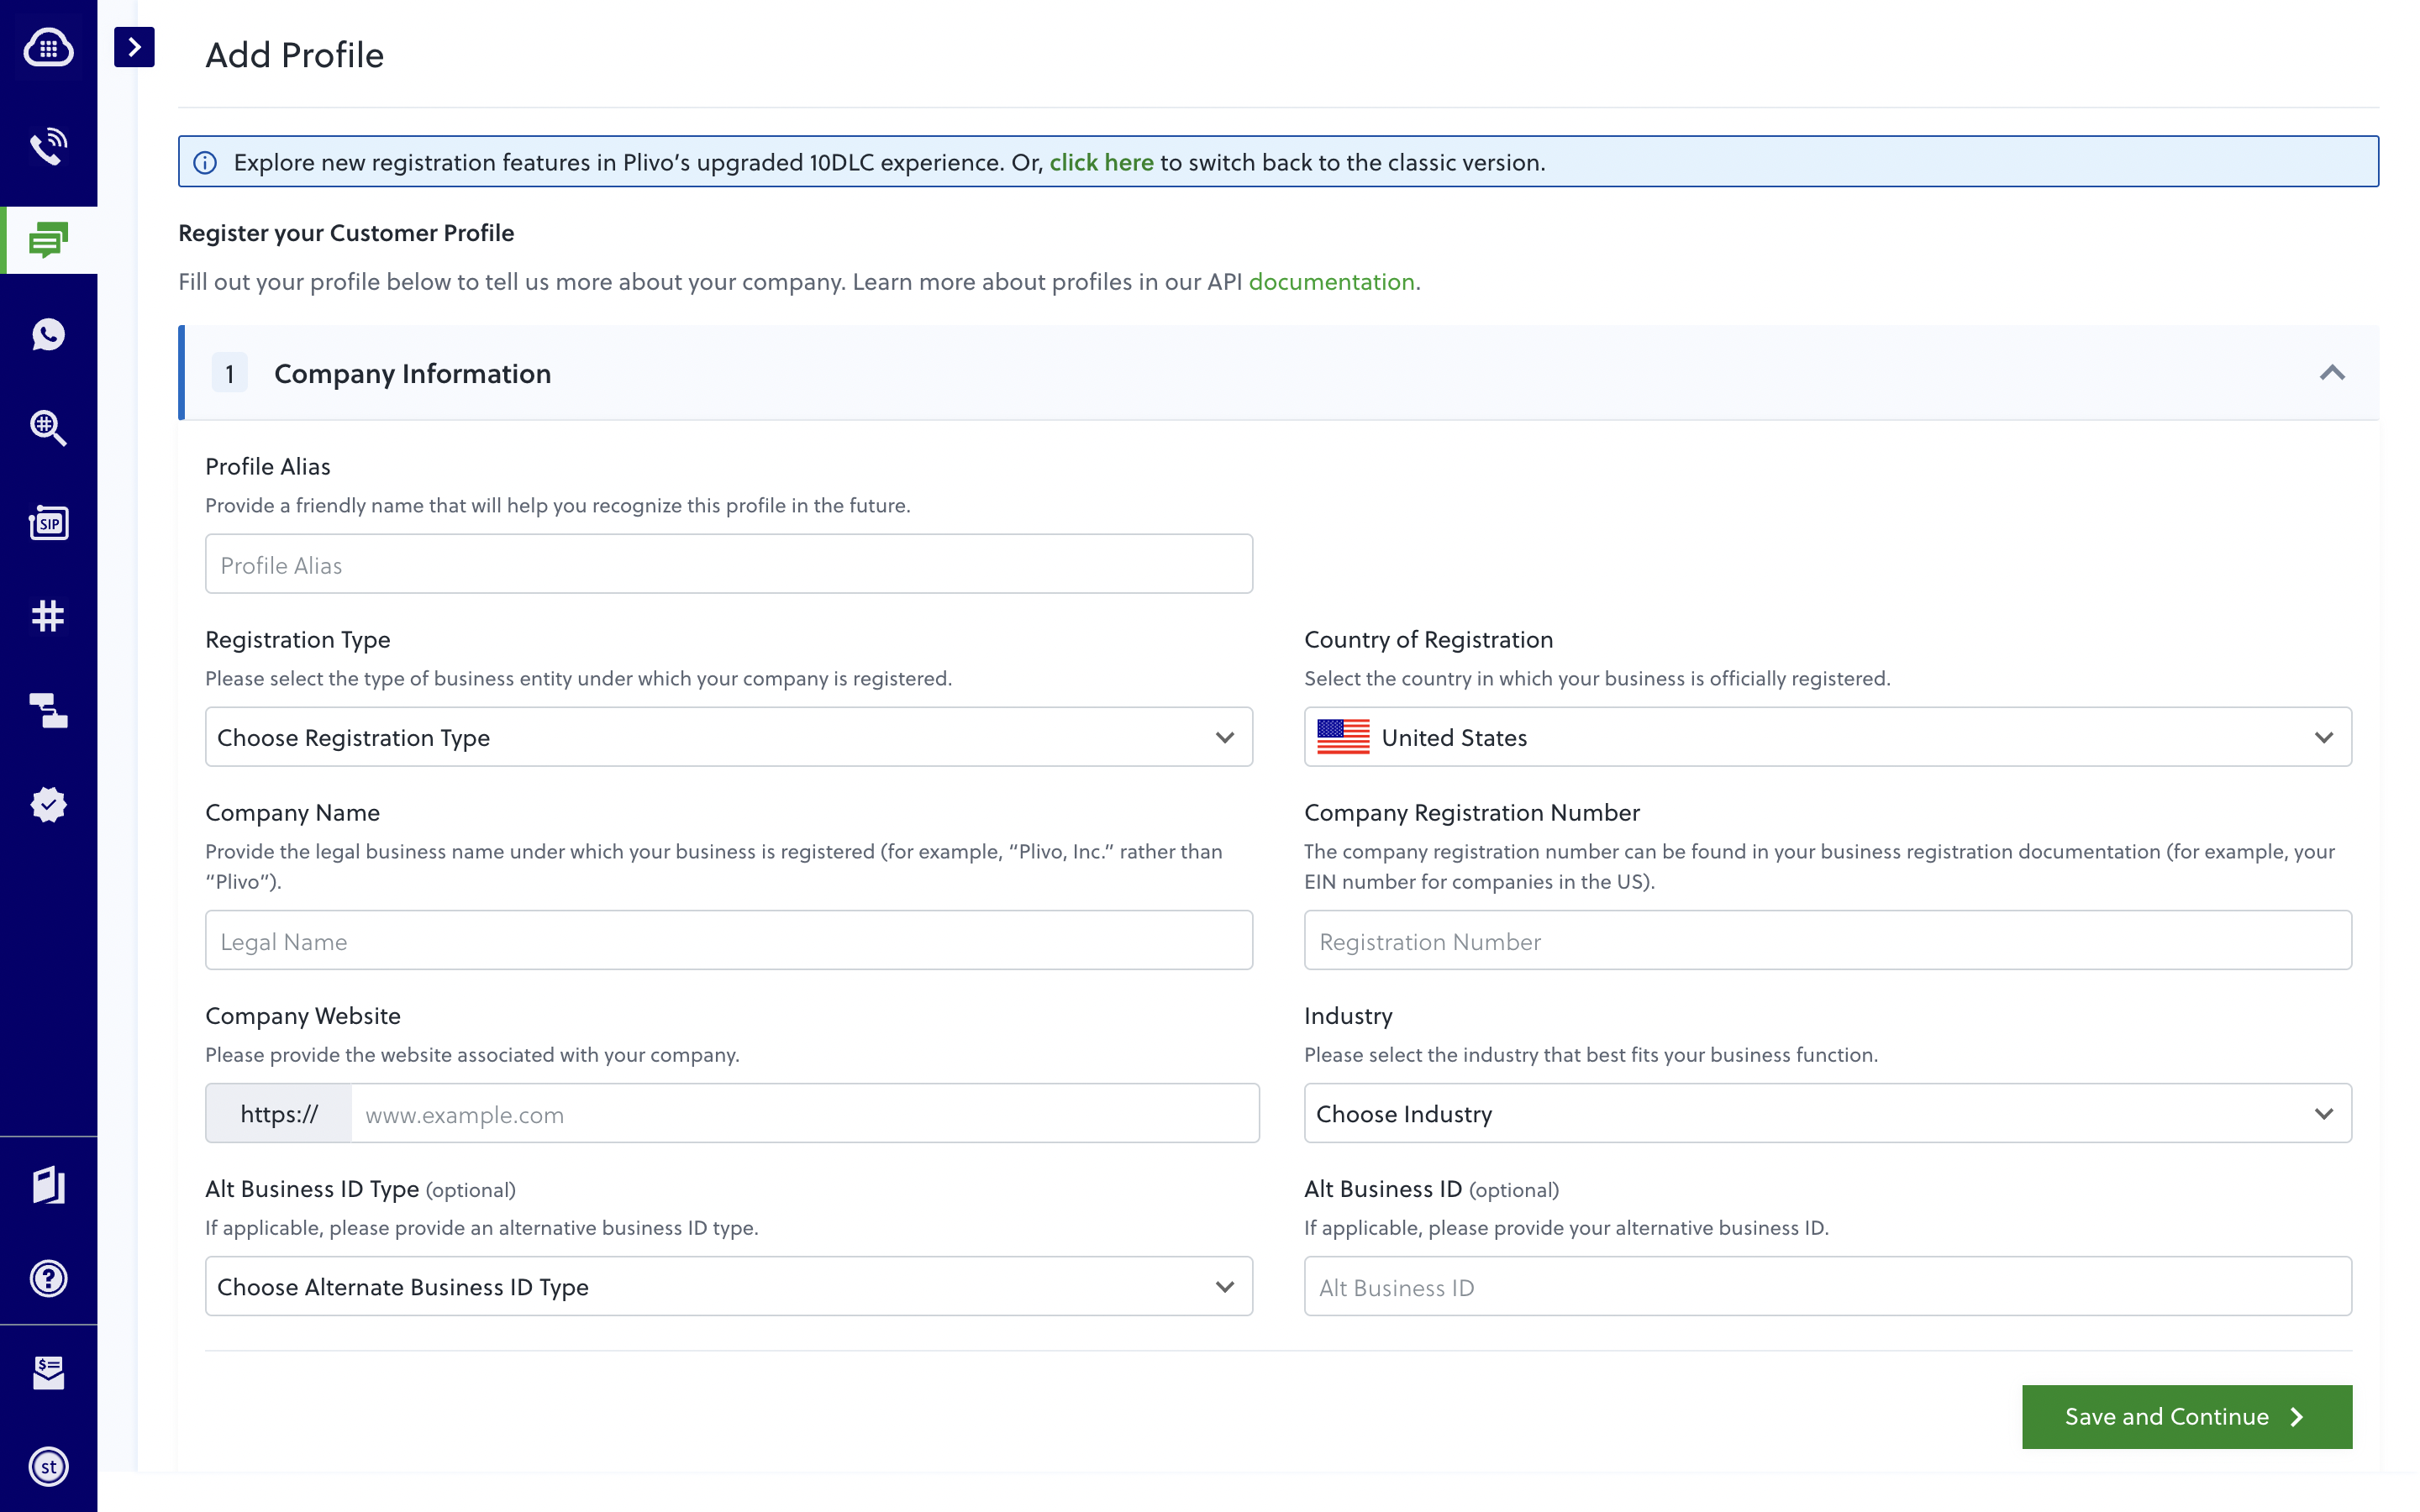
Step 1: Submit your business details using profiles
Create a profile in the Plivo console. Your profile should contain accurate, up-to-date business details (refer the image below for reference). Failing to provide accurate details will result in your request being rejected.
Profiles for reseller submissions
If you are a reseller, you must create a profile for your business first. This will be your primary profile. You should also create a secondary profile for each customer on whose behalf you intend to send messages. Both can be created using the ‘Create Profile’ option on the Profile page in the Plivo console.
A relevant secondary profile with the end customer details should be selected for toll-free verification along with the toll-free number you intend to use. This process is similar to the 10DLC registration process for resellers.
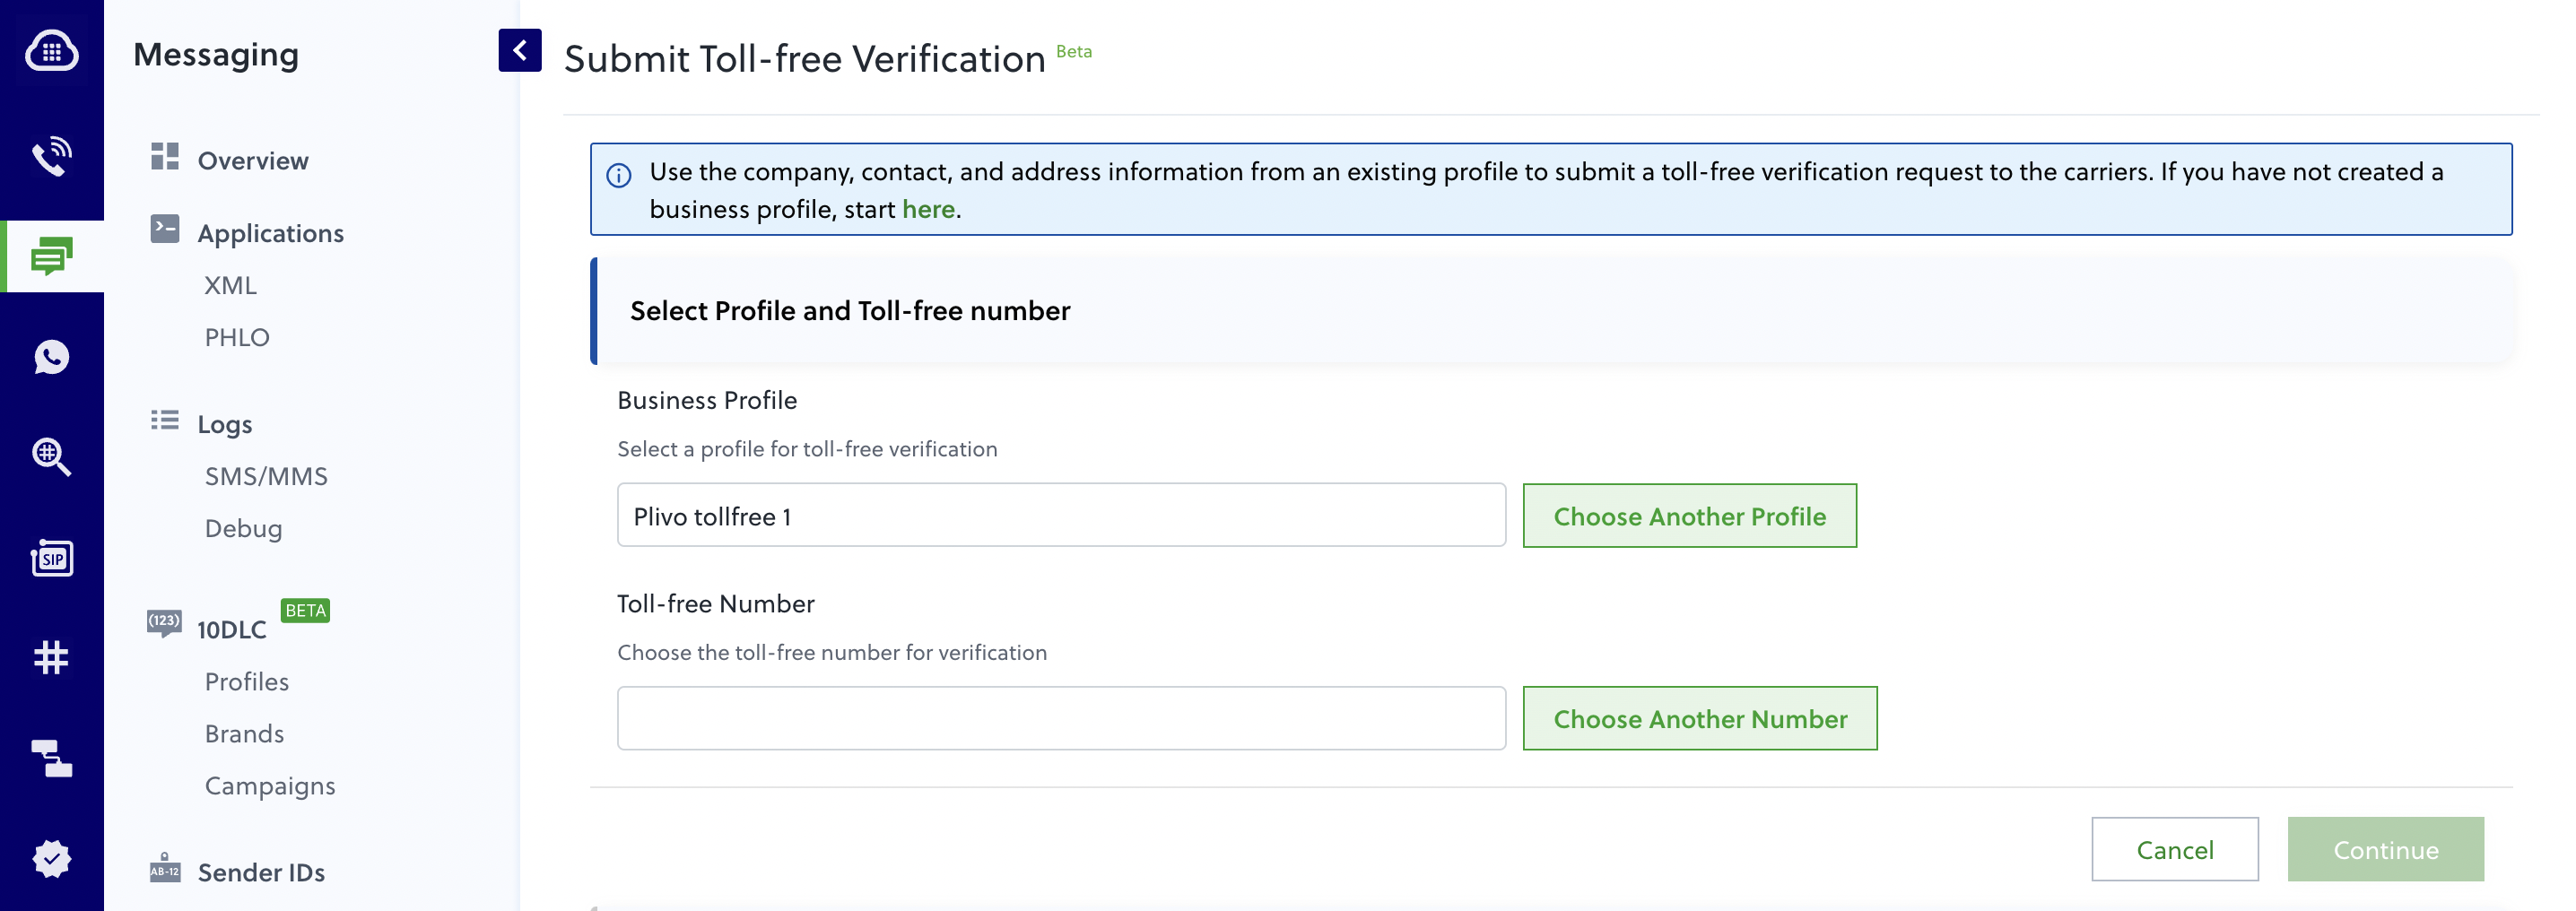
Step 2: Initiate a toll-free verification request
Once you have created a profile, start the toll-free verification process by following the prompts in the console. You can only choose a toll-free number that you’ve already rented.
Step 3: Submit message details
Verification requires submitting information about the messages you intend to send using your toll-free number. The image below shows the details you need to provide about your business use case before your request is approved.
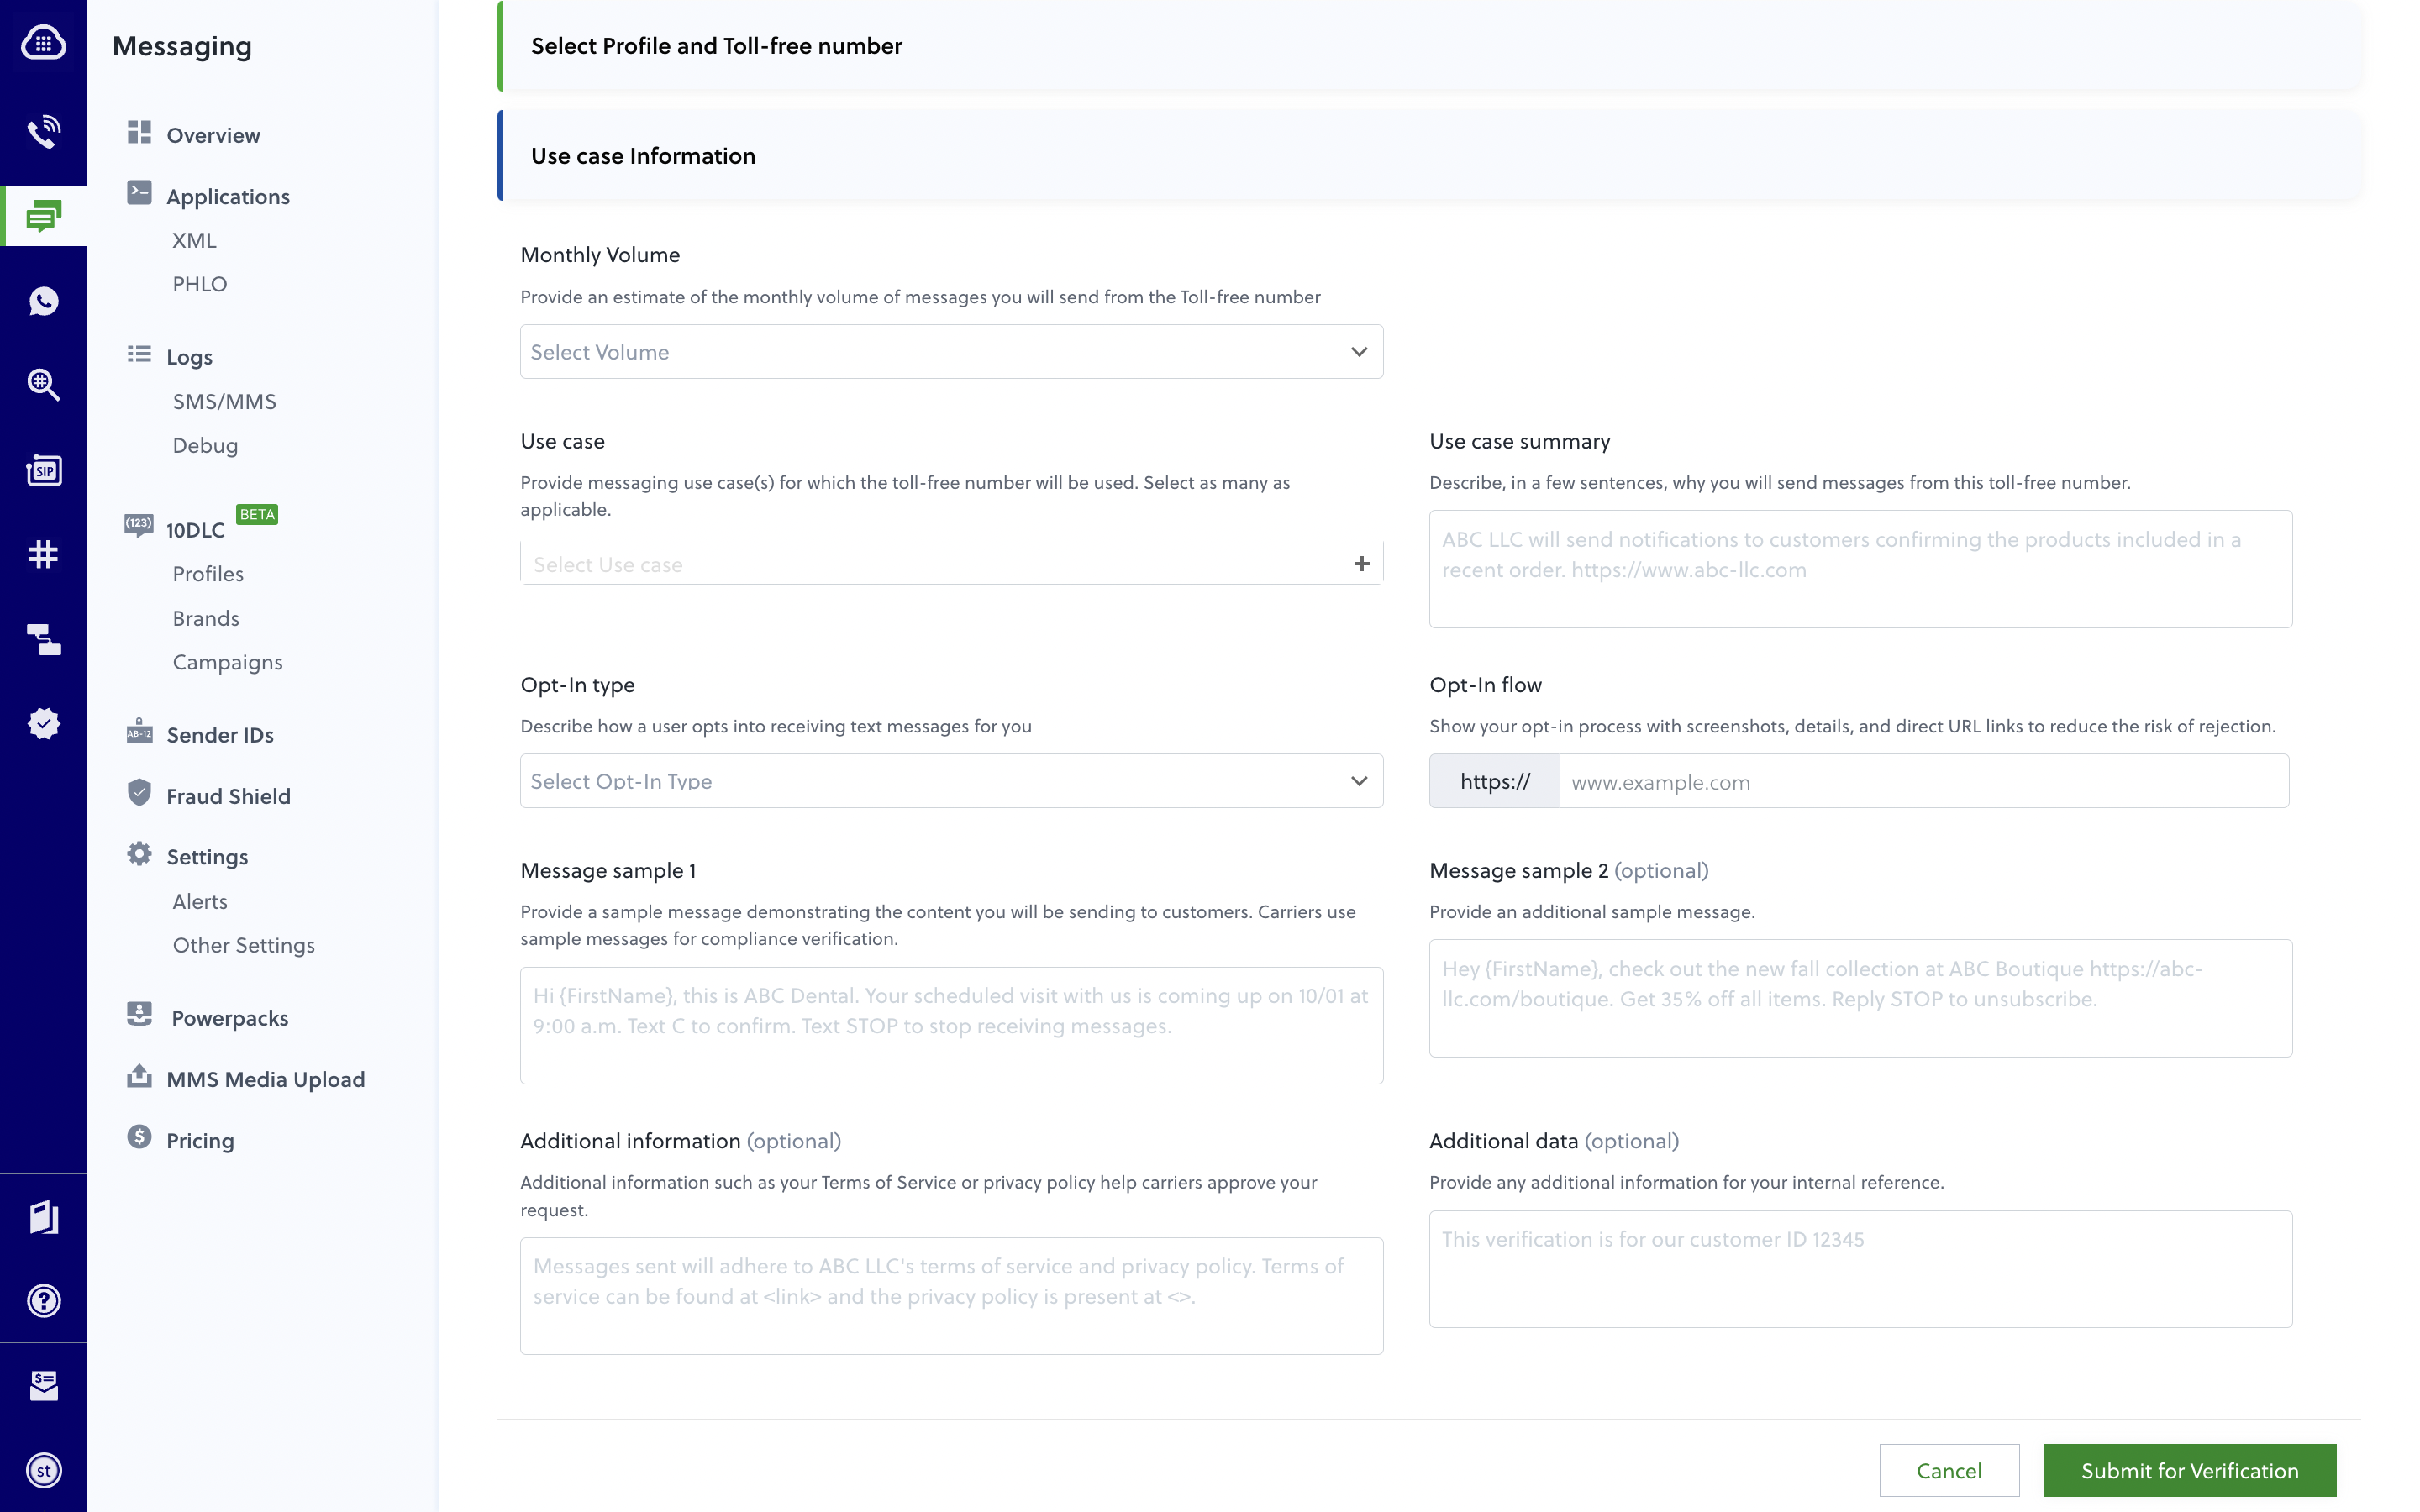
Here are more details about the information you need to provide during verification.
- Monthly volume: an estimate of the monthly volume of messages you will send from the toll-free number
- Use-case: The list of allowed use cases is outlined below.
| Type | Details |
| 2FA | Any two-factor authentication with passcodes used to unlock accounts. |
| ACCOUNT_NOTIFICATION | A notification sent to account holders about changes in accounts. |
| CUSTOMER_CARE | Customer care interactions by the support and other customer-facing teams. |
| DELIVERY_NOTIFICATION | Updates about the delivery of products and services. |
| FRAUD_ALERT | Notifications of suspicious behavior identified by the business. |
| HIGHER_EDUCATION | Messages sent by colleges, universities, and other educational institutions. |
| MARKETING | Communications related to time-bound events and sales. |
| POLLING_VOTING | Surveys, polling, and voting campaigns used for non-political purposes. |
| PUBLIC_SERVICE_ANNOUNCEMENT | Messages aimed at creating awareness about important topics. |
| SECURITY_ALERT | Notifications that alert users about a potential security breach. |
- Use case summary: Describe why you will send messages from this toll-free number.
- Message sample(s): The content of the sample message(s) should align with the use case and the business details provided in the form. You may provide up to two sample messages. Please refer to our US messaging best practices to ensure your SMS content adheres to the standards for effective messaging and to avoid rejection.
- Opt-in type: Describe how a user opts into receiving text messages for you. Opt-in can be collected in one of the following ways:
- Verbal
- Web Form
- Paper Form
- Via Text
- Mobile QR Code
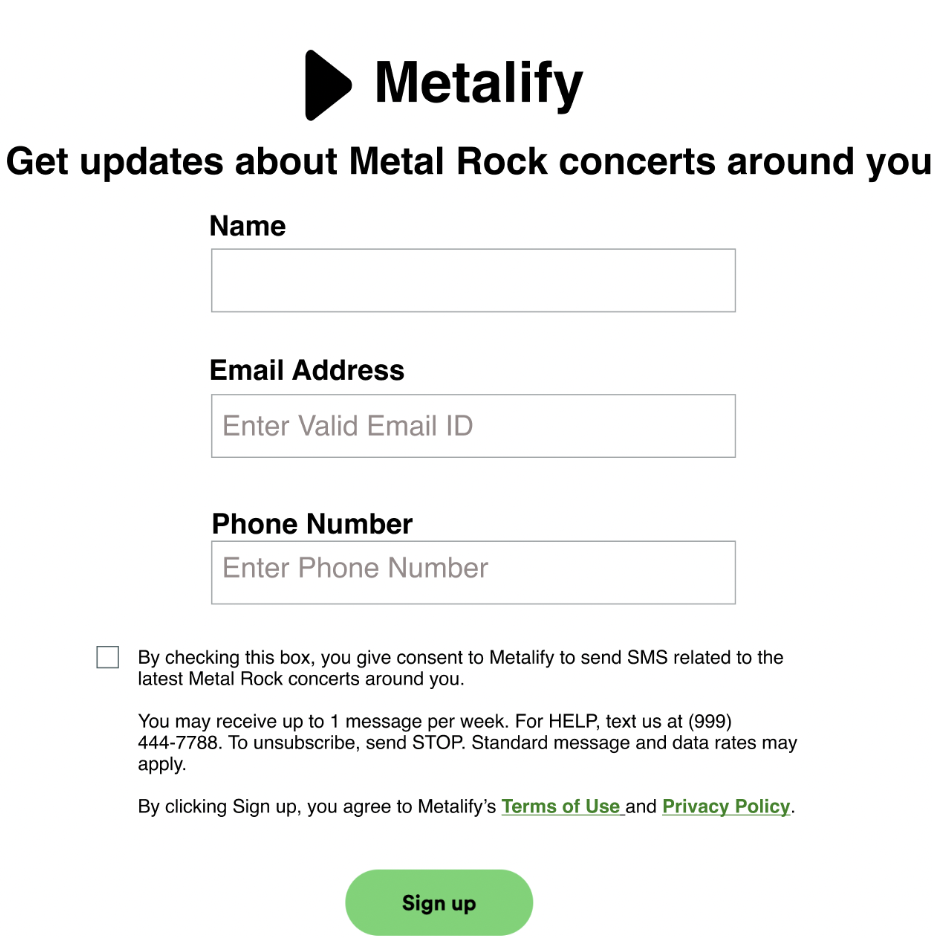
- Opt-in flow: The opt-in flow field should contain image(s), which are screenshot(s) of the opt-in displayed on your website; an image of where opt-in is collected; or an image of the relevant opt-in practice. The opt-in should clearly state that it is for receiving messages.
- Here is a sample opt-in collected on a website. Detailed guidelines about consent collection are mentioned in the ‘Customer consent’ section on our US Messaging Best Practices page.
- Additional information (optional): It is highly recommended that you share additional information to help the carrier approve your request, such as:
- Your Terms of Service, and
- Privacy Policy
You can submit your Toll-Free verification request after providing the above information.
Submitting Toll-Free Verification Requests as a Reseller
Consider a hypothetical reseller, Ovilp Corp., that provides a toll-free messaging platform for organizations that send messages in the US and Canada. Ovilp’s customers are hospitals and medical practitioners that might send messages such as:
- Appointment alerts for patients;
- Marketing announcements to customers who have opted in;
- and Two-factor authentication (2FA) codes for individuals to use to log in to patient portals.
Ovilp also has a console for their customers’ tech teams that requires 2FA to log in.
This diagram shows this flow in action.
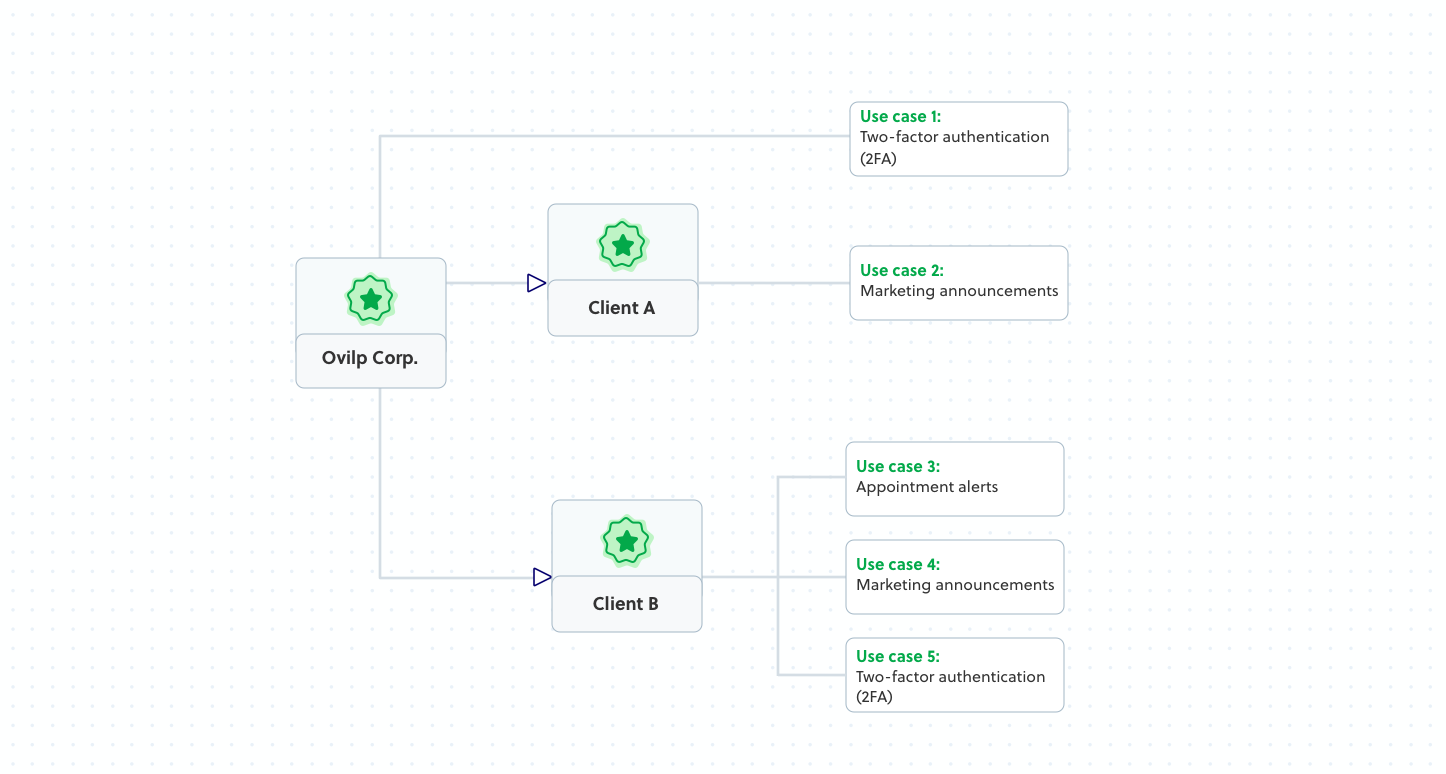
Ovilp must submit verification requests for its business and each of its clients’ businesses separately and specify their respective use cases.
Resellers who do not have toll-free messaging requirements for their own business still need to create a primary Plivo profile. They can forgo submitting verification for their own business and proceed directly to verify their customers if they do not serve a use case that requires verification.
To ensure its own toll-free messages are verified, Ovilp must:
- Create a primary profile with Plivo.
- Select the primary profile while initiating the toll-free verification request and submit its 2FA use case for verification.
Then, per the diagram above, for Client A, Ovilp must:
- Create a secondary profile with Plivo for Client A.
- Use the secondary profile while initiating the toll-free verification request and submit it for A’s marketing use case.
For Client B, Ovilp must:
- Create a secondary profile with Plivo for Client B.
- Use the secondary profile to initiate the toll-free verification request and submit a verification request for B’s use cases.
- Toll-free verification for B’s use cases can be submitted through a single verification request as the verification process supports submitting up to two use cases through a single verification request.
Step 4: After submission
Track submitted requests in your Plivo console under Messaging > Toll-Free Verification. Your request could be in one of the following statuses:
| TF verification status | Description |
| SUBMITTED | The carrier has accepted the submission and is reviewing the request. |
| APPROVED | The carrier has verified the request. |
| REJECTED | The carrier has rejected the toll-free verification request. The use case cannot be submitted for verification anymore. |
| UPDATE_REQUIRED | Verification submission has been put on hold and the carrier has requested additional data to validate the request. You need to provide this additional information by updating the verification request from the Plivo console. If you do not provide details within six days from when the status is posted, the open request will be closed and the toll-free verification status will change to REJECTED. |
Immediately after submission, your request will be listed as ‘Submitted’. Plivo will send you an email whenever the status of your request changes. Once a request is ‘Approved’, the corresponding toll-free number is listed as “Verified” and can be used for A2P Messaging.