- Node
- Ruby
- Python
- PHP
- .NET
- Java
- Go
Overview
Interactive voice response (IVR) systems let incoming callers access information and find contacts via a menu of prerecorded messages, without having to speak to an agent, and let you automate polling via outgoing calls. Callers and call recipients can respond to prompts via Touch-Tone keypad presses or speech recognition. IVR systems can handle larger call volumes than operators and reduce costs associated with customer service.Common IVR use cases include:- Auto-attendant: You can replace a receptionist with an IVR system that routes calls to agents during business hours and accepts voicemail when no one is available.
- Call center: You can route calls coming in to call centers to the appropriate representatives based on user input.
- Surveys, polling, and voting: You can implement IVR in outbound calls to collect customer satisfaction scores or conduct political polling.
- Appointment reminders: You can send automated reminders to customers before their scheduled visits to help avoid missed appointments and facilitate rescheduling.
- Lead assignment and lead routing: For inbound sales calls, you can set up an IVR menu with a set of qualifying questions to discover a customer’s interests, then redirect their call to a representative based on their responses.
- Using XML
Here‘s how to implement an IVR system using XML.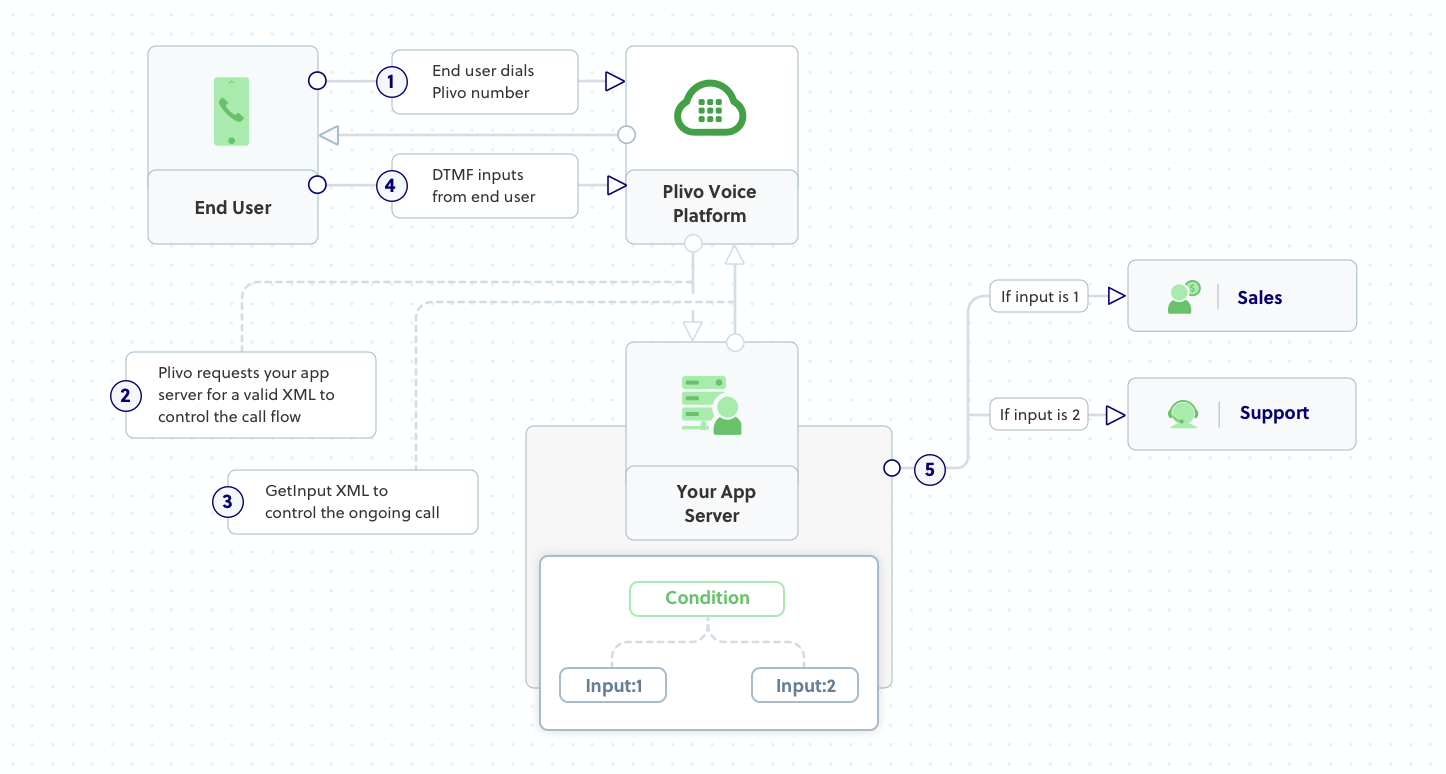


How it works
Prerequisites
To get started, you need a Plivo account — sign up with your work email address if you don’t have one already. You must have a voice-enabled Plivo phone number to receive incoming calls; you can rent numbers from the Numbers page of the Plivo console, or by using the Numbers API. If this is your first time using Plivo APIs, follow our instructions to set up a Node.js development environment and a web server and safely expose that server to the internet.Create an Express server to implement IVR
Create a file calledivr.js and paste into it this code.var plivo = require('plivo');
var express = require('express');
var bodyParser = require('body-parser');
var app = express();
app.use(bodyParser.urlencoded({extended: true}));
app.set('port', (process.env.PORT || 5000));
// Message that Plivo reads when the caller dials in
var IvrMessage1 = "Welcome to the demo. Press 1 to contact sales. Press 2 to contact support";
// Message that Plivo reads when the caller does nothing
var NoinputMessage = "Sorry, I didn't catch that. Please hang up and try again";
// Message that Plivo reads when the caller enters an invalid number
var WronginputMessage = "Sorry, that's not a valid entry";
// Sales Phone number
var salesPhoneNumber = "+15671234567"
// Support Phone number
var supportPhoneNumber = "+15671234578"
app.post('/ivr/', function(request, response) {
var r = plivo.Response();
var getinput_action_url, params, get_input;
getinput_action_url = request.protocol + '://' + request.headers.host + '/ivr/firstbranch/';
params = {
'action': getinput_action_url,
'method': 'POST',
'inputType': 'dtmf',
'digitEndTimeout': '5',
'redirect': 'true',
};
get_input = r.addGetInput(params);
get_input.addSpeak(IvrMessage1);
r.addSpeak(NoinputMessage);
console.log(r.toXML());
response.set({'Content-Type': 'text/xml'});
response.send(r.toXML());
});
app.post('/ivr/firstbranch/', function(request, response) {
var r = plivo.Response();
var digit = request.body.Digits;
console.log(digit);
if (digit === '1') {
var dial = r.addDial();
dial.addNumber(salesPhoneNumber);
} else if (digit === '2') {
var dial = r.addDial();
dial.addNumber(supportPhoneNumber);
} else {
r.addSpeak(WronginputMessage);
}
console.log(r.toXML());
response.set({'Content-Type': 'text/xml'});
response.send(r.toXML());
});
app.listen(app.get('port'), function() {
console.log('Node app is running on port', app.get('port'));
});
node ivr.js
Create a Plivo application
Associate the Express server you created with Plivo by creating a Plivo application. Visit Voice > Applications in the Plivo console and click on Add New Application, or use Plivo’s Application API.Give your application a name — we called oursPhone IVR. Enter the server URL you want to use (for example https://<yourdomain>.com/ivr/) in the Answer URL field and set the method to POST. Click Create Application to save your application.Assign a Plivo number to your application
Navigate to the Numbers page and select the phone number you want to use for this application.From the Application Type drop-down, selectXML Application.From the Plivo Application drop-down, select Phone IVR (the name we gave the application).Click Update Number to save.Test
Make a call to your Plivo phone number and see how the IVR application works.Overview
Interactive voice response (IVR) systems let incoming callers access information and find contacts via a menu of prerecorded messages, without having to speak to an agent, and let you automate polling via outgoing calls. Callers and call recipients can respond to prompts via Touch-Tone keypad presses or speech recognition. IVR systems can handle larger call volumes than operators and reduce costs associated with customer service.Common IVR use cases include:- Auto-attendant: You can replace a receptionist with an IVR system that routes calls to agents during business hours and accepts voicemail when no one is available.
- Call center: You can route calls coming in to call centers to the appropriate representatives based on user input.
- Surveys, polling, and voting: You can implement IVR in outbound calls to collect customer satisfaction scores or conduct political polling.
- Appointment reminders: You can send automated reminders to customers before their scheduled visits to help avoid missed appointments and facilitate rescheduling.
- Lead assignment and lead routing: For inbound sales calls, you can set up an IVR menu with a set of qualifying questions to discover a customer’s interests, then redirect their call to a representative based on their responses.
- Using XML
Here‘s how to implement an IVR system using XML.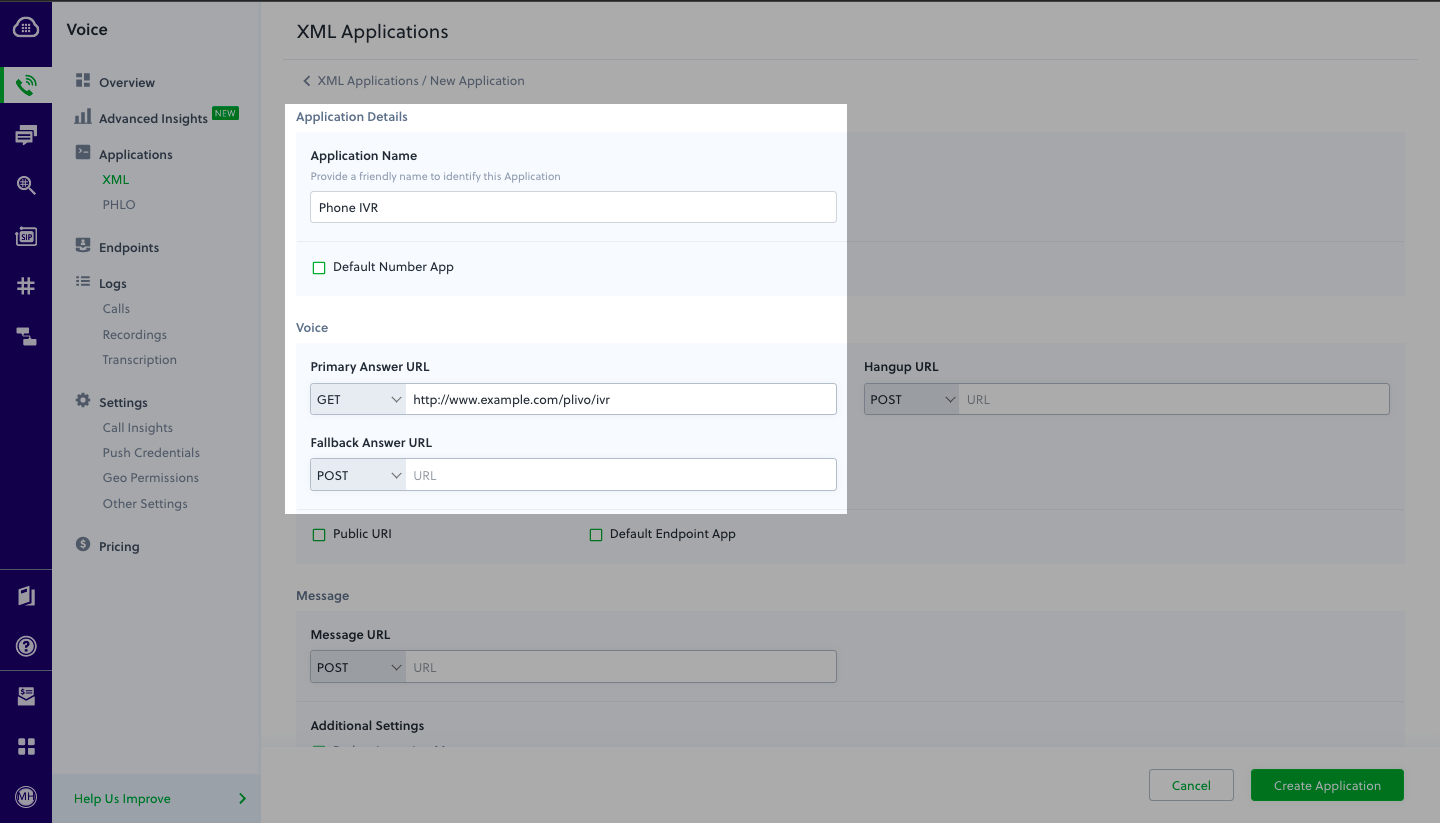
How it works
Prerequisites
To get started, you need a Plivo account — sign up with your work email address if you don’t have one already. You must have a voice-enabled Plivo phone number to receive incoming calls; you can rent numbers from the Numbers page of the Plivo console, or by using the Numbers API. If this is your first time using Plivo APIs, follow our instructions to set up a Ruby development environment and a web server and safely expose that server to the internet.Create a Rails controller to implement IVR
Change to the project directory and run this command to create a Rails controller for inbound calls.rails generate controller Plivo voice
rm app/views/plivo/voice.html.erb
include Plivo
include Plivo::XML
include Plivo::Exceptions

class PlivoController < ApplicationController
  $ivr_message1 = "Welcome to the demo. Press 1 to contact sales. Press 2 to contact support"
  # Message that Plivo reads when the caller does nothing
  $noinput_message = "Sorry, I did not catch that. Please hang up and try again"
  # Message that Plivo reads when the caller enters an invalid number
  $wronginput_message = "Sorry, that's not a valid entry"
  # Sales Phone number
  $salesphone_number = "+15671234567"
  # Support Phone number
  $supportphone_number = "+15671234578"

  def ivr
    r = Response.new()

    getinput_action_url = "https://<yourdomain>.com/ivr/firstbranch/"
    params = {
        action: getinput_action_url,
        method: 'POST',
        digitEndTimeout: '5',
        inputType:'dtmf',
        redirect:'true'
    }
    getinput = r.addGetInput(params)
    getinput.addSpeak($ivr_message1)
    r.addSpeak($noinput_message)

    xml = PlivoXML.new(r)
    render xml: xml.to_xml
  end

  def firstbranch
    digit = params[:Digits]
    r = Response.new()

    if (digit == "1")
      r = response.addDial()
      r.addNumber(salesphone_number)

    elsif (digit == "2")
      r = response.addDial()
      r.addNumber(supportphone_number)
    else
        r.addSpeak($wronginput_message)
    end

    xml = PlivoXML.new(r)
    render xml: xml.to_xml
  end
end
Add a route
Add a route for the inbound function in PlivoController class. Edit config/routes.rb and add these lines after the inbound route:get 'plivo/ivr'
get 'plivo/firstbranch'
rails server
Create a Plivo application
Associate the Rails controller you created with Plivo by creating a Plivo application. Visit Voice > Applications in the Plivo console and click on Add New Application, or use Plivo’s Application API.Give your application a name — we called oursPhone IVR. Enter the server URL you want to use (for example https://<yourdomain>.com/ivr/) in the Answer URL field and set the method to GET. Click Create Application to save your application.Assign a Plivo number to your application
Navigate to the Numbers page and select the phone number you want to use for this application.From the Application Type drop-down, selectXML Application.From the Plivo Application drop-down, select Phone IVR (the name we gave the application).Click Update Number to save.Test
Make a call to your Plivo phone number and see how the IVR application works.Overview
Interactive voice response (IVR) systems let incoming callers access information and find contacts via a menu of prerecorded messages, without having to speak to an agent, and let you automate polling via outgoing calls. Callers and call recipients can respond to prompts via Touch-Tone keypad presses or speech recognition. IVR systems can handle larger call volumes than operators and reduce costs associated with customer service.Common IVR use cases include:- Auto-attendant: You can replace a receptionist with an IVR system that routes calls to agents during business hours and accepts voicemail when no one is available.
- Call center: You can route calls coming in to call centers to the appropriate representatives based on user input.
- Surveys, polling, and voting: You can implement IVR in outbound calls to collect customer satisfaction scores or conduct political polling.
- Appointment reminders: You can send automated reminders to customers before their scheduled visits to help avoid missed appointments and facilitate rescheduling.
- Lead assignment and lead routing: For inbound sales calls, you can set up an IVR menu with a set of qualifying questions to discover a customer’s interests, then redirect their call to a representative based on their responses.
- Using XML
Here‘s how to implement an IVR system using XML.
How it works
Prerequisites
To get started, you need a Plivo account — sign up with your work email address if you don’t have one already. You must have a voice-enabled Plivo phone number to receive incoming calls; you can rent numbers from the Numbers page of the Plivo console, or by using the Numbers API. If this is your first time using Plivo APIs, follow our instructions to set up a Python development environment and a web server and safely expose that server to the internet.Create a Flask server to implement IVR
Create a file calledivr.py and paste into it this code.# -*- coding: utf-8 -*-
from flask import Flask, Response, request, url_for
from plivo import plivoxml
# Message that Plivo reads when the caller dials in
ivr_message1 = "Welcome to the demo. Press 1 to contact sales. Press 2 to contact support"
# Message that Plivo reads when the caller does nothing
noinput_message = "Sorry, I didn't catch that. Please hang up and try again"
# Message that Plivo reads when the caller enters an invalid number
wronginput_message = "Sorry, that's not a valid entry"
# Sales Phone number
salesphone_number = "+15671234567"
# Support Phone number
supportphone_number = "+15671234578"
app = Flask(__name__)
@app.route('/ivr/', methods=['GET','POST'])
def ivr():
response = plivoxml.ResponseElement()
response.add(plivoxml.GetInputElement().
set_action(url_for('firstbranch', _external=True)).
set_method('POST').
set_input_type('dtmf').
set_digit_end_timeout(5).
set_redirect(True).add(
plivoxml.SpeakElement(ivr_message1)))
response.add(plivoxml.SpeakElement(noinput_message))
return Response(response.to_string(), mimetype='application/xml')
@app.route('/ivr/firstbranch/', methods=['GET','POST'])
def firstbranch():
response = plivoxml.ResponseElement()
digit = request.values.get('Digits')
if digit == "1":
response.add(plivoxml.DialElement().add(
plivoxml.NumberElement(salesphone_number)))
elif digit == "2":
response.add(plivoxml.DialElement().add(
plivoxml.NumberElement(supportphone_number)))
else:
response.add_speak(wronginput_message)
return Response(response.to_string(), mimetype='application/xml')
if __name__ == '__main__':
app.run(host='0.0.0.0', debug=True)
python ivr.py
Create a Plivo application
Associate the Flask application you created with Plivo by creating a Plivo application. Visit Voice > Applications in the Plivo console and click on Add New Application, or use Plivo’s Application API.Give your application a name — we called oursPhone IVR. Enter the server URL you want to use (for example https://<yourdomain>.com/ivr/) in the Answer URL field and set the method to POST. Click Create Application to save your application.Assign a Plivo number to your application
Navigate to the Numbers page and select the phone number you want to use for this application.From the Application Type drop-down, selectXML Application.From the Plivo Application drop-down, select Phone IVR (the name we gave the application).Click Update Number to save.Test
Make a call to your Plivo phone number and see how the IVR application works.Overview
Interactive voice response (IVR) systems let incoming callers access information and find contacts via a menu of prerecorded messages, without having to speak to an agent, and let you automate polling via outgoing calls. Callers and call recipients can respond to prompts via Touch-Tone keypad presses or speech recognition. IVR systems can handle larger call volumes than operators and reduce costs associated with customer service.Common IVR use cases include:- Auto-attendant: You can replace a receptionist with an IVR system that routes calls to agents during business hours and accepts voicemail when no one is available.
- Call center: You can route calls coming in to call centers to the appropriate representatives based on user input.
- Surveys, polling, and voting: You can implement IVR in outbound calls to collect customer satisfaction scores or conduct political polling.
- Appointment reminders: You can send automated reminders to customers before their scheduled visits to help avoid missed appointments and facilitate rescheduling.
- Lead assignment and lead routing: For inbound sales calls, you can set up an IVR menu with a set of qualifying questions to discover a customer’s interests, then redirect their call to a representative based on their responses.
- Using XML
Here‘s how to implement an IVR system using XML.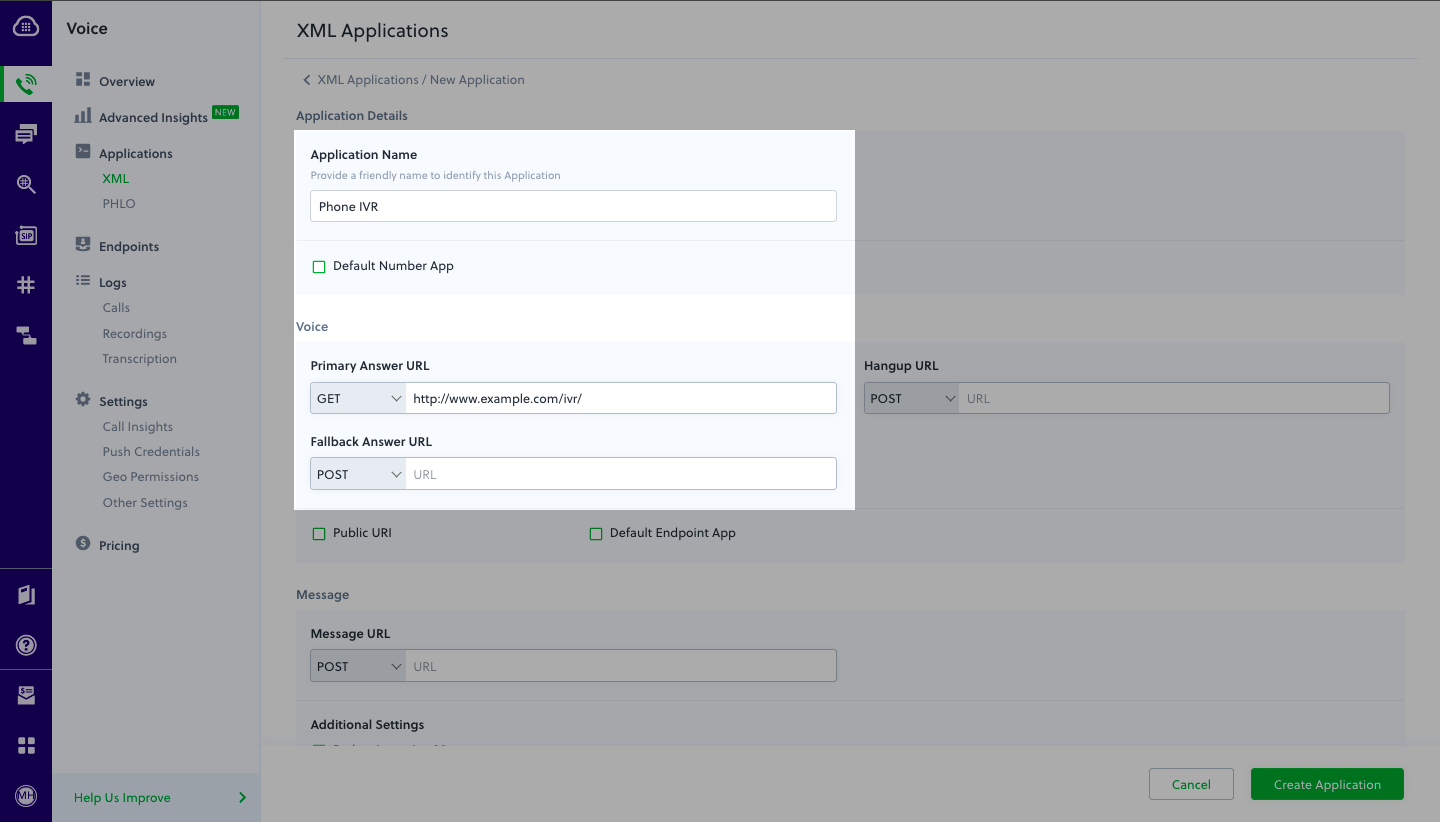
How it works
Prerequisites
To get started, you need a Plivo account — sign up with your work email address if you don’t have one already. You must have a voice-enabled Plivo phone number to receive incoming calls; you can rent numbers from the Numbers page of the Plivo console, or by using the Numbers API. If this is your first time using Plivo APIs, follow our instructions to set up a PHP development environment and a web server and safely expose that server to the internet.Create a Laravel server to implement IVR
Change the project directory and run this command to create a Laravel controller for inbound calls.php artisan make:controller IvrController
<?php

namespace App\Http\Controllers;
require '../../vendor/autoload.php';
use Plivo\RestClient;
use Plivo\XML\Response;
use Illuminate\Http\Request;

class IvrController extends Controller
{
    // GetInput XML to handle the incoming call
    public function ivrMain()
    {
        # Message that Plivo reads when the caller dials in
        $IvrMessage = "Welcome to the demo. Press 1 to contact sales. Press 2 to contact support";
        # Message that Plivo reads when the caller does nothing
        $NoinputMessage = "Sorry, I didn't catch that. Please hang up and try again";
        # Message that Plivo reads when the caller enters an invalid number.
        $WronginputMessage = "Sorry, that's not a valid entry";

        // Sales Phone Number
        $salesPhoneNumber = "+15671234567";

        // support Phone Number
        $supportPhoneNumber = "+15671234578";

        $r = new Response();
        $getinput_action_url = "https://<yourdomain>.com/firstbranch.php";
        $get_input = $r->addGetInput([
                    'action' => $getinput_action_url,
                    'method' => "POST",
                    'digitEndTimeout' => "5",
                    'inputType' => "dtmf",
                    'redirect' => "true",
                ]);
        $get_input->addSpeak($IvrMessage);
        $r->addSpeak($NoinputMessage);
        Header('Content-type: text/xml');
        echo $r->toXML();
    }

    // Action URL block for DTMF
    public function firstBranch(Request $request)
    {
        # File to be played when a caller presses 2
        $PlivoSong = "https://s3.amazonaws.com/plivocloud/music.mp3";
        $IvrMessage = "Press 1 for English. Press 2 for French. Press 3 for Russian";
        # Message that Plivo reads when the caller does nothing
        $NoinputMessage = "Sorry, I didn't catch that. Please hang up and try again";
        # Message that Plivo reads when the caller enters an invalid number
        $WronginputMessage = "Sorry, that's not a valid entry";

        $r = new Response();

        $digit = $_REQUEST['Digits'];
        if ($digit == '1'){
        $dial = $response->addDial();
        $dial->addNumber($salesPhoneNumber);
        }
        else if ($digit == '2'){
            $dial = $response->addDial();
            $dial->addNumber($supportPhoneNumber);
        }
        else {
            $r->addSpeak($WronginputMessage);
        }
        Header('Content-type: text/xml');
        echo $r->toXML();
    }
}
Add a route
Add a route for the forward function in the IvrController class. Edit routes/web.php and add these lines:Route::match(['get', 'post'], '/ivr', 'IvrController@ivrMain');
Route::match(['get', 'post'], '/firstbranch', 'IvrController@firstBranch');
php artisan serve
Create a Plivo application
Associate the Laravel server you created with Plivo by creating a Plivo application. Visit Voice > Applications in the Plivo console and click on Add New Application, or use Plivo’s Application API.Give your application a name — we called oursPhone IVR. Enter the server URL you want to use (for example https://<yourdomain>.com/ivr/) in the Answer URL field and set the method to GET. Click Create Application to save your application.Assign a Plivo number to your application
Navigate to the Numbers page and select the phone number you want to use for this application.From the Application Type drop-down, selectXML Application.From the Plivo Application drop-down, select Phone IVR (the name we gave the application).Click Update Number to save.Test
Make a call to your Plivo phone number and see how the IVR application works.Overview
Interactive voice response (IVR) systems let incoming callers access information and find contacts via a menu of prerecorded messages, without having to speak to an agent, and let you automate polling via outgoing calls. Callers and call recipients can respond to prompts via Touch-Tone keypad presses or speech recognition. IVR systems can handle larger call volumes than operators and reduce costs associated with customer service.Common IVR use cases include:- Auto-attendant: You can replace a receptionist with an IVR system that routes calls to agents during business hours and accepts voicemail when no one is available.
- Call center: You can route calls coming in to call centers to the appropriate representatives based on user input.
- Surveys, polling, and voting: You can implement IVR in outbound calls to collect customer satisfaction scores or conduct political polling.
- Appointment reminders: You can send automated reminders to customers before their scheduled visits to help avoid missed appointments and facilitate rescheduling.
- Lead assignment and lead routing: For inbound sales calls, you can set up an IVR menu with a set of qualifying questions to discover a customer’s interests, then redirect their call to a representative based on their responses.
- Using XML
Here‘s how to implement an IVR system using XML.
How it works
Prerequisites
To get started, you need a Plivo account — sign up with your work email address if you don’t have one already. You must have a voice-enabled Plivo phone number to receive incoming calls; you can rent numbers from the Numbers page of the Plivo console, or by using the Numbers API. If this is your first time using Plivo APIs, follow our instructions to set up a .NET development environment and a web server and safely expose that server to the internet.Create an MVC controller to implement IVR
In Visual Studio, create a controller calledIvrController.cs and paste into it this code.using System;
using Plivo.XML;
using Microsoft.AspNetCore.Mvc;
using System.Collections.Generic;
using System.Diagnostics;
namespace Ivrphonetree.Controllers
{
public class IvrController : Controller
{
// Message that Plivo reads when the caller dials in
String IvrMessage = "Welcome to the demo. Press 1 to contact sales. Press 2 to contact support";
// Message that Plivo reads when the caller does nothing
String NoinputMessage = "Sorry, I didn't catch that. Please hang up and try again";
// Message that Plivo reads when the caller enters an invalid number
String WronginputMessage = "Sorry, that's not a valid entry";
// Sales Phone Number
String salesPhoneNumber = "+15671234567";
// Support Phone number
String supprtPhoneNumber = "+15671234578";
// GET: /<controller>/
public IActionResult Index()
{
var resp = new Response();
Plivo.XML.GetInput get_input = new
Plivo.XML.GetInput("",
new Dictionary<string, string>()
{
{"action", "https://<yourdomain>.com/ivr/firstbranch/"},
{"method", "POST"},
{"digitEndTimeout", "5"},
{"inputType", "dtmf"},
{"redirect", "true"},
});
resp.Add(get_input);
get_input.AddSpeak(IvrMessage,
new Dictionary<string, string>() { });
resp.AddSpeak(NoinputMessage,
new Dictionary<string, string>() { });
var output = resp.ToString();
return this.Content(output, "text/xml");
}
// First branch of IVR phone tree
public IActionResult FirstBranch()
{
String digit = Request.Query["Digits"];
Debug.WriteLine("Digit pressed : {0}", digit);
var resp = new Response();
if (digit == "1")
{
String getinput_action_url = "https://<yourdomain>.com/ivr/secondbranch/";
Plivo.XML.Dial dial = new Plivo.XML.Dial(new
Dictionary<string, string>() {{}});
dial.AddNumber(salesPhoneNumber,
new Dictionary<string, string>() { });
resp.Add(dial);
}
else if (digit == "2")
{
Plivo.XML.Dial dial = new Plivo.XML.Dial(new
Dictionary<string, string>() {{}});
dial.AddNumber(supprtPhoneNumber,
new Dictionary<string, string>() { });
resp.Add(dial);
}
else
{
// Add Speak XML tag
resp.AddSpeak(WronginputMessage,new Dictionary<string, string>() { });
}
Debug.WriteLine(resp.ToString());
var output = resp.ToString();
return this.Content(output, "text/xml");
}
}
}
Create a Plivo application
Associate the MVC controller you created with Plivo by creating a Plivo application. Visit Voice > Applications in the Plivo console and click on Add New Application, or use Plivo’s Application API.Give your application a name — we called oursPhone IVR. Enter the server URL you want to use (for example https://<yourdomain>.com/ivr/) in the Answer URL field and set the method to GET. Click Create Application to save your application.Assign a Plivo number to your application
Navigate to the Numbers page and select the phone number you want to use for this application.From the Application Type drop-down, selectXML Application.From the Plivo Application drop-down, select Phone IVR (the name we gave the application).Click Update Number to save.Test
Make a call to your Plivo phone number and see how the IVR application works.Overview
Interactive voice response (IVR) systems let incoming callers access information and find contacts via a menu of prerecorded messages, without having to speak to an agent, and let you automate polling via outgoing calls. Callers and call recipients can respond to prompts via Touch-Tone keypad presses or speech recognition. IVR systems can handle larger call volumes than operators and reduce costs associated with customer service.Common IVR use cases include:- Auto-attendant: You can replace a receptionist with an IVR system that routes calls to agents during business hours and accepts voicemail when no one is available.
- Call center: You can route calls coming in to call centers to the appropriate representatives based on user input.
- Surveys, polling, and voting: You can implement IVR in outbound calls to collect customer satisfaction scores or conduct political polling.
- Appointment reminders: You can send automated reminders to customers before their scheduled visits to help avoid missed appointments and facilitate rescheduling.
- Lead assignment and lead routing: For inbound sales calls, you can set up an IVR menu with a set of qualifying questions to discover a customer’s interests, then redirect their call to a representative based on their responses.
- Using XML
Here‘s how to implement an IVR system using XML.
How it works
Prerequisites
To get started, you need a Plivo account — sign up with your work email address if you don’t have one already. You must have a voice-enabled Plivo phone number to receive incoming calls; you can rent numbers from the Numbers page of the Plivo console, or by using the Numbers API. If this is your first time using Plivo APIs, follow our instructions to set up a Java development environment and a web server and safely expose that server to the internet.Create a Spark web application to implement IVR
Create a Java class calledIVR and paste into it this code.import com.plivo.api.exceptions.PlivoValidationException;
import com.plivo.api.exceptions.PlivoXmlException;
import com.plivo.api.xml.Dial;
import com.plivo.api.xml.GetInput;
import com.plivo.api.xml.Response;
import com.plivo.api.xml.Speak;
import com.plivo.api.xml.Number;
import static spark.Spark.*;
public class ivr {
public static void main(String[] args) throws PlivoValidationException, PlivoXmlException {
// Message that Plivo reads when the caller dials in
String ivrMessage = "Welcome to the demo. Press 1 to contact sales. Press 2 to contact support";
// Message that Plivo reads when the caller does nothing
String noInputMessage = "Sorry, I didn't catch that. Please hang up and try again";
// Message that Plivo reads when the caller enters an invalid number
String wrongInputMessage = "Sorry, that's not a valid entry";
// Sales Phone number
final String salesPhoneNumber = "+15671234567";
// Support Phone number
final String supportPhoneNumber = "+15671234578";
post("/ivr/", (req, res) -> {
res.type("application/xml");
Response resp = new Response();
resp.children(
new GetInput()
.action("https://<yourdomain>.com/ivr/firstbranch/")
.method("POST")
.inputType("dtmf")
.digitEndTimeout(5)
.redirect(true)
.children(
new Speak(ivrMessage)
)
);
resp.children(new Speak(noInputMessage));
return resp.toXmlString();
});
post("/ivr/firstbranch/", (req, res) -> {
res.type("application/xml");
String digit = req.queryParams("Digits");
Response resp = new Response();
if (digit.equals("1")) {
resp.children(
new Dial()
.children(
new Number(salesPhoneNumber)
)
);
resp.children(new Speak(noInputMessage));
} else if (digit.equals("2")) {
resp.children(
new Dial()
.children(
new Number(supportPhoneNumber)
)
);
} else {
resp.children(
new Speak(wrongInputMessage)
);
}
return resp.toXmlString();
});
}
}
Create a Plivo application
Associate the Spark web application you created with Plivo by creating a Plivo application. Visit Voice > Applications in the Plivo console and click on Add New Application, or use Plivo’s Application API.Give your application a name — we called oursPhone IVR. Enter the server URL you want to use (for example https://<yourdomain>.com/ivr/) in the Answer URL field and set the method to POST. Click Create Application to save your application.Assign a Plivo number to your application
Navigate to the Numbers page and select the phone number you want to use for this application.From the Application Type drop-down, selectXML Application.From the Plivo Application drop-down, select Phone IVR (the name we gave the application).Click Update Number to save.Test
Make a call to your Plivo phone number and see how the IVR application works.Overview
Interactive voice response (IVR) systems let incoming callers access information and find contacts via a menu of prerecorded messages, without having to speak to an agent, and let you automate polling via outgoing calls. Callers and call recipients can respond to prompts via Touch-Tone keypad presses or speech recognition. IVR systems can handle larger call volumes than operators and reduce costs associated with customer service.Common IVR use cases include:- Auto-attendant: You can replace a receptionist with an IVR system that routes calls to agents during business hours and accepts voicemail when no one is available.
- Call center: You can route calls coming in to call centers to the appropriate representatives based on user input.
- Surveys, polling, and voting: You can implement IVR in outbound calls to collect customer satisfaction scores or conduct political polling.
- Appointment reminders: You can send automated reminders to customers before their scheduled visits to help avoid missed appointments and facilitate rescheduling.
- Lead assignment and lead routing: For inbound sales calls, you can set up an IVR menu with a set of qualifying questions to discover a customer’s interests, then redirect their call to a representative based on their responses.
- Using XML
Here‘s how to implement an IVR system using XML.
How it works
Prerequisites
To get started, you need a Plivo account — sign up with your work email address if you don’t have one already. You must have a voice-enabled Plivo phone number to receive incoming calls; you can rent numbers from the Numbers page of the Plivo console, or by using the Numbers API. If this is your first time using Plivo APIs, follow our instructions to set up a Go development environment and a web server and safely expose that server to the internet.Create a Go server to implement IVR
Create a file calledivr.go and paste into it this code.package main
import (
"github.com/go-martini/martini"
"github.com/plivo/plivo-go/v7/xml"
"net/http"
)
func main() {
m := martini.Classic()
const
(
// Message that Plivo reads when the caller dials in
WelcomeMessage = "Welcome to the demo. Press 1 to contact sales. Press 2 to contact support"
// Message that Plivo reads when the caller does nothing
NoInputMessage = "Sorry, I didn't catch that. Please hang up and try again"
// Message that Plivo reads when the caller enters an invalid number
WrongInputMessage = "Sorry, that's not a valid entry"
// Sales phone number
SalesPhoneNumber = "+15671234567"
// Support phone number
SupportPhoneNumber = "+15671234578"
)
m.Post("/ivr/", func(w http.ResponseWriter, r *http.Request) string {
w.Header().Set("Content-Type", "application/xml")
response := xml.ResponseElement{
Contents: []interface{}{
new(xml.GetInputElement).
SetAction("https://<yourdomain>.com/ivr/firstbranch/").
SetMethod("POST").
SetDigitEndTimeout(5).
SetInputType("dtmf").
SetRedirect(true).
SetContents([]interface{}{new(xml.SpeakElement).
AddSpeak(WelcomeMessage),
}),
new(xml.SpeakElement).
AddSpeak(NoInputMessage),
},
}
return response.String()
})
m.Post("/ivr/firstbranch/", func(w http.ResponseWriter, r *http.Request) string {
w.Header().Set("Content-Type", "application/xml")
digit := r.FormValue("Digits")
if digit == "1" {
return xml.ResponseElement{
Contents: []interface{}{
new(xml.DialElement).
SetContents(
[]interface{}{
new(xml.NumberElement).
SetContents(SalesPhoneNumber),
},
),
},
}.String()
} else if digit == "2" {
return xml.ResponseElement{
Contents: []interface{}{
new(xml.DialElement).
SetContents(
[]interface{}{
new(xml.NumberElement).
SetContents(SupportPhoneNumber),
},
),
},
}.String()
} else {
return xml.ResponseElement{
Contents: []interface{}{
new(xml.SpeakElement).
AddSpeak(WrongInputMessage),
},
}.String()
}
})
m.Run()
}
$ go run ivr.go
Create a Plivo application
Associate the Go server you created with Plivo by creating a Plivo application. Visit Voice > Applications in the Plivo console and click on Add New Application, or use Plivo’s Application API.Give your application a name — we called oursPhone IVR. Enter the server URL you want to use (for example https://<yourdomain>.com/ivr/) in the Answer URL field and set the method to POST. Click Create Application to save your application.Assign a Plivo number to your application
Navigate to the Numbers page and select the phone number you want to use for this application.From the Application Type drop-down, selectXML Application.From the Plivo Application drop-down, select Phone IVR (the name we gave the application).Click Update Number to save.