- Node
- Ruby
- Python
- PHP
- .NET
- Java
- Go
Overview
You may want to have an application dial out for someone, so that it calls them on their phone, then connects them to the number they want. This involves three tasks:- Make an outbound call to a caller.
- When the call recipient answers the phone, place a new call to a different number (second user).
- Bridge the calls (first and second user) after the second user answers.
- Using PHLO
- Using XML
You can create and deploy a PHLO to have an application call someone then connect them to a third party, and you can trigger the PHLO with a few lines of code.To create a PHLO, visit the PHLO page of the Plivo console. If this is your first PHLO, the PHLO page will be empty.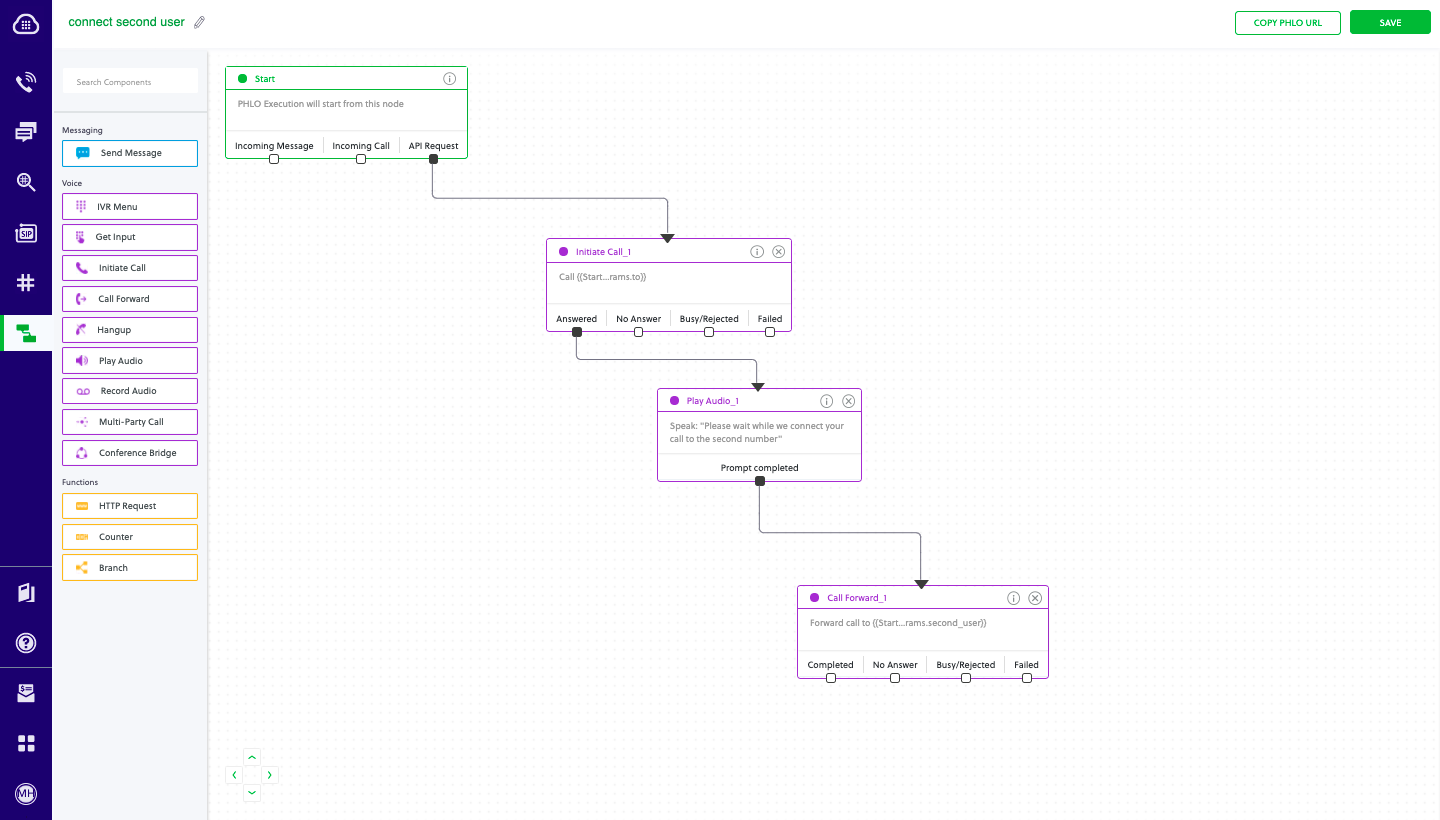
Prerequisites
To get started, you need a Plivo account — sign up with your work email address if you don’t have one already. If this is your first time using Plivo APIs, follow our instructions to set up a Node.js development environment and a web server and safely expose that server to the internet.Create the PHLO
- Click Create New PHLO.
-
In the Choose your use case pop-up, click Build my own. The PHLO canvas will appear with the Start node.
Note: The Start node is the starting point of any PHLO. It lets you trigger a PHLO to start upon one of three actions: incoming SMS message, incoming call, or API request.
- Click the Start node to open the Configuration tab, and then enter the information to retrieve from the HTTP Request payload — in this case key names for the From and To numbers and the second user‘s number.
- Validate the configuration by clicking Validate. Do the same for each node as you go along.
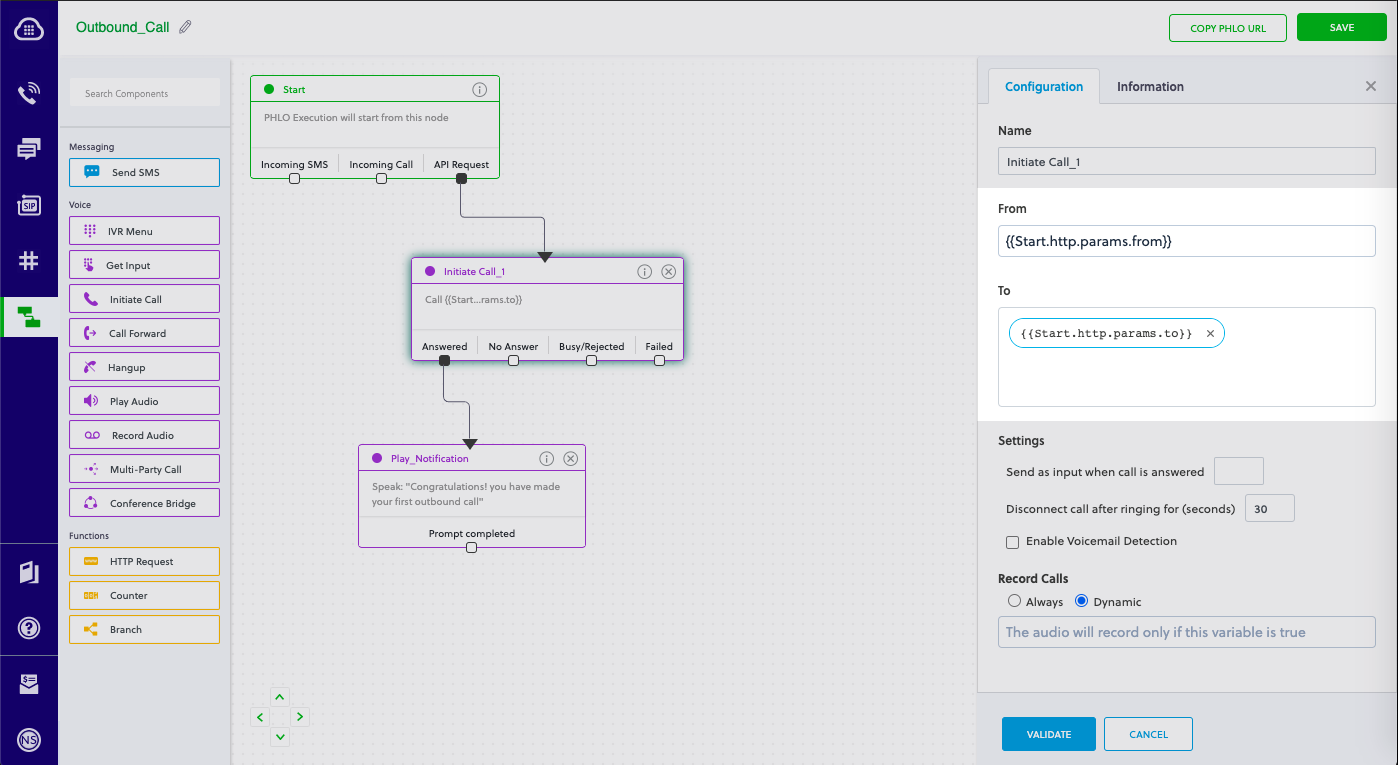
- From the list of components on the left side, drag and drop the Initiate Call component onto the canvas. This adds an Initiate Call node onto the canvas. When a component is placed on the canvas it becomes a node.
- Draw a line to connect the Start node’s API Request trigger state to the Initiate Call node.
- In the Configuration tab of the Initiate Call node, give the node a name. To enter values for the From and To fields, enter two curly brackets to view all available variables, and choose the appropriate ones. The values for the numbers will be retrieved from the HTTP Request payload you defined in the Start node.
- From the list of components on the left side, drag and drop the Play Audio component onto the canvas. Draw a line to connect the Answered trigger state of the Initiate Call node with the Play Audio node.
- Configure the Play Audio node to play a message to the user by entering text in the Speak Text box in the Prompt section of the Configuration pane. Enter a static message — for example, “Please wait while we connect your call to the second number.”
- From the list of components on the left side, drag and drop the Call Forward component onto the canvas.
- Draw a line to connect the Prompt Completed trigger state of the Play Audio with the Call Forward node.
- In the Configuration tab of the Call Forward node, give the node a name. To enter values for the From and To fields, enter two curly brackets to view all available variables, and choose the appropriate ones. The values for the numbers will be retrieved from the HTTP Request payload you defined in the Start node.
- After you complete and validate the node configurations, give the PHLO a name by clicking in the upper left, then click Save.
Trigger the PHLO
You integrate a PHLO into your application workflow by making an API request to trigger the PHLO with the required payload — the set of parameters you pass to the PHLO. You can define a static payload by specifying values when you create the PHLO, or, as we do here, define a dynamic payload by passing values through parameters when you trigger the PHLO from your application.With dynamic payload
To use dynamic values for the parameters, use Liquid templating parameters when you create the PHLO and pass the values from your code to the PHLO when you trigger it.Code
Create a file calledTriggerPhlo.js and paste into it this code.Copy
Ask AI
var plivo = require('plivo');
var PhloClient = plivo.PhloClient;

var authId = '<auth_id>';
var authToken = '<auth_token>';
var phloId = '<phlo_id>';
var phloClient = phlo = null;

var payload = {
    from: '<caller_id>',
    to: '<destination_number>',
    second_user: '<second_number>'
}
phloClient = new PhloClient(authId, authToken);
phloClient.phlo(phloId).run(payload).then(function (result) {
    console.log('Phlo run result', result);
}).catch(function (err) {
    console.error('Phlo run failed', err);
});
Test
Save the file and run it.Copy
Ask AI
node TriggerPhlo.js
Here‘s how to connect a call to a second person using XML.Replace the auth placeholders with your authentication credentials from the Plivo console. Replace the phone number placeholders with actual phone numbers (for example, 12025551234).Save the file and run it.You should see your basic server application in action at http://localhost:3000/outbound_call/.Set up ngrok to expose your local server to the internet.
Prerequisites
To get started, you need a Plivo account — sign up with your work email address if you don’t have one already. You must have a voice-enabled Plivo phone number to receive incoming calls; you can rent numbers from the Numbers page of the Plivo console, or by using the Numbers API. If this is your first time using Plivo APIs, follow our instructions to set up a Node.js development environment and a web server and safely expose that server to the internet.Create an Express server to connect calls to a second person
Create a file calledconnect_call.js and paste into it this code.Copy
Ask AI
var express = require('express');
var plivo = require('plivo');

var app = express();

app.set('port', (process.env.PORT || 5000));
app.use(express.urlencoded({extended: true}));

app.all('/outbound_call/', function(request, response) {
    var client = new plivo.Client("<auth_id>","<auth_token>");
    var resp = client.calls.create(
        "<caller_id>",
        "<destination_number>",
        request.protocol + '://' + request.get('host') + "/connect",
    ).then(function (response) {
        console.log(response);
    },function (err) {
        console.error(err);
    });

});

app.post('/connect/', function(request, response) {
    var res = plivo.Response();

    res.addSpeak("Please wait while we connect the call to second person");
    var dial = res.addDial();
    dial.addNumber("<second_number>"); // Dial to second number

    response.set({'Content-Type': 'text/xml'});
    response.send(res.toXML());
});

app.listen(app.get('port'), function() {
    console.log('Node app is running on port', app.get('port'));
});
Copy
Ask AI
node connect_call.js
Note:
We recommend that you store your credentials in the
auth_id and auth_token environment variables, to avoid the possibility of accidentally committing them to source control. If you do this, you can initialize the client with no arguments and Plivo will automatically fetch them from the environment variables. You can use process.env to store environment variables and fetch them when initializing the client.Test
Have your application make a call to a regular mobile phone. Plivo will send a request to your answer URL requesting a valid XML response and connect the call to a second user.Overview
You may want to have an application dial out for someone, so that it calls them on their phone, then connects them to the number they want. This involves three tasks:- Make an outbound call to a caller.
- When the call recipient answers the phone, place a new call to a different number (second user).
- Bridge the calls (first and second user) after the second user answers.
- Using PHLO
- Using XML
You can create and deploy a PHLO to have an application call someone then connect them to a third party, and you can trigger the PHLO with a few lines of code.To create a PHLO, visit the PHLO page of the Plivo console. If this is your first PHLO, the PHLO page will be empty.
Prerequisites
To get started, you need a Plivo account — sign up with your work email address if you don’t have one already. If this is your first time using Plivo APIs, follow our instructions to set up a Ruby development environment and a web server and safely expose that server to the internet.Create the PHLO
- Click Create New PHLO.
-
In the Choose your use case pop-up, click Build my own. The PHLO canvas will appear with the Start node.
Note: The Start node is the starting point of any PHLO. It lets you trigger a PHLO to start upon one of three actions: incoming SMS message, incoming call, or API request.
- Click the Start node to open the Configuration tab, and then enter the information to retrieve from the HTTP Request payload — in this case key names for the From and To numbers and the second user‘s number.
- Validate the configuration by clicking Validate. Do the same for each node as you go along.
- From the list of components on the left side, drag and drop the Initiate Call component onto the canvas. This adds an Initiate Call node onto the canvas. When a component is placed on the canvas it becomes a node.
- Draw a line to connect the Start node’s API Request trigger state to the Initiate Call node.
- In the Configuration tab of the Initiate Call node, give the node a name. To enter values for the From and To fields, enter two curly brackets to view all available variables, and choose the appropriate ones. The values for the numbers will be retrieved from the HTTP Request payload you defined in the Start node.
- From the list of components on the left side, drag and drop the Play Audio component onto the canvas. Draw a line to connect the Answered trigger state of the Initiate Call node with the Play Audio node.
- Configure the Play Audio node to play a message to the user by entering text in the Speak Text box in the Prompt section of the Configuration pane. Enter a static message — for example, “Please wait while we connect your call to the second number.”
- From the list of components on the left side, drag and drop the Call Forward component onto the canvas.
- Draw a line to connect the Prompt Completed trigger state of the Play Audio with the Call Forward node.
- In the Configuration tab of the Call Forward node, give the node a name. To enter values for the From and To fields, enter two curly brackets to view all available variables, and choose the appropriate ones. The values for the numbers will be retrieved from the HTTP Request payload you defined in the Start node.
- After you complete and validate the node configurations, give the PHLO a name by clicking in the upper left, then click Save.
Trigger the PHLO
You integrate a PHLO into your application workflow by making an API request to trigger the PHLO with the required payload — the set of parameters you pass to the PHLO. You can define a static payload by specifying values when you create the PHLO, or, as we do here, define a dynamic payload by passing values through parameters when you trigger the PHLO from your application.With dynamic payload
To use dynamic values for the parameters, use Liquid templating parameters when you create the PHLO and pass the values from your code to the PHLO when you trigger it.Code
Create a file calledtrigger_phlo.rb and paste into it this code.Copy
Ask AI
require 'rubygems'
require 'plivo'

include Plivo

AUTH_ID = '<auth_id>'
AUTH_TOKEN = '<auth_token>'

client = Phlo.new(AUTH_ID, AUTH_TOKEN)

# if credentials are stored in the PLIVO_AUTH_ID and the PLIVO_AUTH_TOKEN environment variables
# then initialize client as:
# client = Phlo.new

begin
  phlo = client.phlo.get('<phlo_id>')
  #parameters set in PHLO - params
  params = {
     from: '<caller_id>',
     to: '<destination_number>',
     second_user: '<second_number>'
  }
  response = phlo.run(params)
  puts response
rescue PlivoRESTError => e
  puts 'Exception: ' + e.message
end
Test
Save the file and run it.Copy
Ask AI
ruby trigger_phlo.rb
Here‘s how to connect a call to a second person using XML.This command generates a controller named plivo_controller in the app/controllers/ directory and a respective view in the app/views/plivo directory. We can delete the view, as we don’t need it.Edit app/controllers/plivo_controller.rb and add this code in the PlivoController class.Replace the auth placeholders with your authentication credentials from the Plivo console. Replace the phone number placeholders with actual phone numbers (for example, 12025551234).Start the Rails server.You should see your basic server application in action at http://localhost:3000/plivo/outbound_call/.Set up ngrok to expose your local server to the internet.
Prerequisites
To get started, you need a Plivo account — sign up with your work email address if you don’t have one already. You must have a voice-enabled Plivo phone number to receive incoming calls; you can rent numbers from the Numbers page of the Plivo console, or by using the Numbers API. If this is your first time using Plivo APIs, follow our instructions to set up a Ruby development environment and a web server and safely expose that server to the internet.Create a Rails controller to connect calls to a second person
Change to the project directory and run this command to create a Rails controller for inbound calls.Copy
Ask AI
rails generate controller Plivo voice
Copy
Ask AI
rm app/views/plivo/voice.html.erb
Copy
Ask AI
include Plivo
include Plivo::XML
include Plivo::Exceptions

class PlivoController < ApplicationController
	def outbound_call
		api = RestClient.new('<auth_id>','<auth_token>')
		response = api.calls.create(
			'<caller_id>',
			['<destination_number>'],
			'https://'+request.host+'/plivo/connect',
			{answer_method:'GET'}
		)
		render json: response.to_s
	end

	def connect
		response = Response.new
		response.addSpeak('Please wait while we connect your call')
		dial = response.addDial()
		dial.addNumber('<second_number>') # Dial to second number
		xml = PlivoXML.new(response)
		render xml: xml.to_xml
	end
end
Note: We recommend that you store your credentials in the
auth_id and auth_token environment variables, to avoid the possibility of accidentally committing them to source control. If you do this, you can initialize the client with no arguments and Plivo will automatically fetch them from the environment variables. You can use ENV to store environment variables and fetch them when initializing the client.Add a route
Add a route for the inbound function in the PlivoController class. Edit the config/routes.rb file and add these lines.Copy
Ask AI
  get 'plivo/outbound_call'
  get 'plivo/connect'
Copy
Ask AI
rails server
Test
Have your application make a call to a regular mobile phone. Plivo will send a request to your answer URL requesting a valid XML response and connect the call to a second user.Overview
You may want to have an application dial out for someone, so that it calls them on their phone, then connects them to the number they want. This involves three tasks:- Make an outbound call to a caller.
- When the call recipient answers the phone, place a new call to a different number (second user).
- Bridge the calls (first and second user) after the second user answers.
- Using PHLO
- Using XML
You can create and deploy a PHLO to have an application call someone then connect them to a third party, and you can trigger the PHLO with a few lines of code.To create a PHLO, visit the PHLO page of the Plivo console. If this is your first PHLO, the PHLO page will be empty.
Prerequisites
To get started, you need a Plivo account — sign up with your work email address if you don’t have one already. If this is your first time using Plivo APIs, follow our instructions to set up a Python development environment and a web server and safely expose that server to the internet.Create the PHLO
- Click Create New PHLO.
-
In the Choose your use case pop-up, click Build my own. The PHLO canvas will appear with the Start node.
Note: The Start node is the starting point of any PHLO. It lets you trigger a PHLO to start upon one of three actions: incoming SMS message, incoming call, or API request.
- Click the Start node to open the Configuration tab, and then enter the information to retrieve from the HTTP Request payload — in this case key names for the From and To numbers and the second user‘s number.
- Validate the configuration by clicking Validate. Do the same for each node as you go along.
- From the list of components on the left side, drag and drop the Initiate Call component onto the canvas. This adds an Initiate Call node onto the canvas. When a component is placed on the canvas it becomes a node.
- Draw a line to connect the Start node’s API Request trigger state to the Initiate Call node.
- In the Configuration tab of the Initiate Call node, give the node a name. To enter values for the From and To fields, enter two curly brackets to view all available variables, and choose the appropriate ones. The values for the numbers will be retrieved from the HTTP Request payload you defined in the Start node.
- From the list of components on the left side, drag and drop the Play Audio component onto the canvas. Draw a line to connect the Answered trigger state of the Initiate Call node with the Play Audio node.
- Configure the Play Audio node to play a message to the user by entering text in the Speak Text box in the Prompt section of the Configuration pane. Enter a static message — for example, “Please wait while we connect your call to the second number.”
- From the list of components on the left side, drag and drop the Call Forward component onto the canvas.
- Draw a line to connect the Prompt Completed trigger state of the Play Audio with the Call Forward node.
- In the Configuration tab of the Call Forward node, give the node a name. To enter values for the From and To fields, enter two curly brackets to view all available variables, and choose the appropriate ones. The values for the numbers will be retrieved from the HTTP Request payload you defined in the Start node.
- After you complete and validate the node configurations, give the PHLO a name by clicking in the upper left, then click Save.
Trigger the PHLO
You integrate a PHLO into your application workflow by making an API request to trigger the PHLO with the required payload — the set of parameters you pass to the PHLO. You can define a static payload by specifying values when you create the PHLO, or, as we do here, define a dynamic payload by passing values through parameters when you trigger the PHLO from your application.With dynamic payload
To use dynamic values for the parameters, use Liquid templating parameters when you create the PHLO and pass the values from your code to the PHLO when you trigger it.Code
Create a file calledtrigger_phlo.py and paste into it this code.Copy
Ask AI
import plivo

auth_id = '<auth_id>'
auth_token = '<auth_token>'
phlo_id = '<phlo_id>'
payload = {"from" : "<caller_id>","to" : "<destination_number>", "second_user" : "<second_number>"}
phlo_client = plivo.phlo.RestClient(auth_id=auth_id, auth_token=auth_token)
phlo = phlo_client.phlo.get(phlo_id)
response = phlo.run(**payload)
print str(response)
Test
Save the file and run it.Copy
Ask AI
python trigger_phlo.py
Here‘s how to connect a call to a second person using XML.Replace the auth placeholders with your authentication credentials from the Plivo console. Replace the phone number placeholders with actual phone numbers (for example, 12025551234).Save the file and run it.You should see your basic server application in action at http://localhost:5000/outbound_call/.Set up ngrok to expose your local server to the internet.
Prerequisites
To get started, you need a Plivo account — sign up with your work email address if you don’t have one already. You must have a voice-enabled Plivo phone number to receive incoming calls; you can rent numbers from the Numbers page of the Plivo console, or by using the Numbers API. If this is your first time using Plivo APIs, follow our instructions to set up a Python development environment and a web server and safely expose that server to the internet.Create a Flask application to connect calls to a second person
Create a file calledconnect_call.py and paste into it this code.Copy
Ask AI
from flask import Flask, Response, url_for
import plivo
from plivo import plivoxml

app = Flask(__name__)

@app.route('/outbound_call/')
def outbound_call():
    client = plivo.RestClient('<auth_id>','<auth_token>')
    response = client.calls.create(
        from_='<caller_id>',
        to_='<destination_number>',
        answer_url=url_for('connect', _external=True))
    return response

@app.route('/connect', methods = ['POST'])
def connect():
    response = plivoxml.ResponseElement()
    response.add(plivoxml.SpeakElement('Please wait while we connect your call to the second number'))
    response.add(plivoxml.DialElement().add(
        plivoxml.NumberElement('<second_number>'))) # Dial to second number
    return Response(response.to_string(), mimetype='text/xml')

if __name__ == '__main__':
    app.run(host='0.0.0.0', debug=True)
Copy
Ask AI
python connect_call.py
Note: We recommend that you store your credentials in the
auth_id and auth_token environment variables, to avoid the possibility of accidentally committing them to source control. If you do this, you can initialize the client with no arguments and Plivo will automatically fetch them from the environment variables. You can use the os module (os.environ) to store environment variables and fetch them when initializing the client.Test
Have your application make a call to a regular mobile phone. Plivo will send a request to your answer URL requesting a valid XML response and connect the call to a second user.Overview
You may want to have an application dial out for someone, so that it calls them on their phone, then connects them to the number they want. This involves three tasks:- Make an outbound call to a caller.
- When the call recipient answers the phone, place a new call to a different number (second user).
- Bridge the calls (first and second user) after the second user answers.
- Using PHLO
- Using XML
You can create and deploy a PHLO to have an application call someone then connect them to a third party, and you can trigger the PHLO with a few lines of code.To create a PHLO, visit the PHLO page of the Plivo console. If this is your first PHLO, the PHLO page will be empty.
Prerequisites
To get started, you need a Plivo account — sign up with your work email address if you don’t have one already. If this is your first time using Plivo APIs, follow our instructions to set up a PHP development environment and a web server and safely expose that server to the internet.Create the PHLO
- Click Create New PHLO.
-
In the Choose your use case pop-up, click Build my own. The PHLO canvas will appear with the Start node.
Note: The Start node is the starting point of any PHLO. It lets you trigger a PHLO to start upon one of three actions: incoming SMS message, incoming call, or API request.
- Click the Start node to open the Configuration tab, and then enter the information to retrieve from the HTTP Request payload — in this case key names for the From and To numbers and the second user‘s number.
- Validate the configuration by clicking Validate. Do the same for each node as you go along.
- From the list of components on the left side, drag and drop the Initiate Call component onto the canvas. This adds an Initiate Call node onto the canvas. When a component is placed on the canvas it becomes a node.
- Draw a line to connect the Start node’s API Request trigger state to the Initiate Call node.
- In the Configuration tab of the Initiate Call node, give the node a name. To enter values for the From and To fields, enter two curly brackets to view all available variables, and choose the appropriate ones. The values for the numbers will be retrieved from the HTTP Request payload you defined in the Start node.
- From the list of components on the left side, drag and drop the Play Audio component onto the canvas. Draw a line to connect the Answered trigger state of the Initiate Call node with the Play Audio node.
- Configure the Play Audio node to play a message to the user by entering text in the Speak Text box in the Prompt section of the Configuration pane. Enter a static message — for example, “Please wait while we connect your call to the second number.”
- From the list of components on the left side, drag and drop the Call Forward component onto the canvas.
- Draw a line to connect the Prompt Completed trigger state of the Play Audio with the Call Forward node.
- In the Configuration tab of the Call Forward node, give the node a name. To enter values for the From and To fields, enter two curly brackets to view all available variables, and choose the appropriate ones. The values for the numbers will be retrieved from the HTTP Request payload you defined in the Start node.
- After you complete and validate the node configurations, give the PHLO a name by clicking in the upper left, then click Save.
Trigger the PHLO
You integrate a PHLO into your application workflow by making an API request to trigger the PHLO with the required payload — the set of parameters you pass to the PHLO. You can define a static payload by specifying values when you create the PHLO, or, as we do here, define a dynamic payload by passing values through parameters when you trigger the PHLO from your application.With dynamic payload
To use dynamic values for the parameters, use Liquid templating parameters when you create the PHLO and pass the values from your code to the PHLO when you trigger it.Code
Create a file calledTriggerPhlo.php and paste into it this code.Copy
Ask AI
<?php
require 'vendor/autoload.php';
use Plivo\Resources\PHLO\PhloRestClient;
use Plivo\Exceptions\PlivoRestException;
$client = new PhloRestClient("<auth_id>", "<auth_token>");

$phlo = $client->phlo->get("<phlo_id>");
try {
    $response = $phlo->run(["from" => "<caller_id>", "to" => "<destination_number>", "second_user" => "<second_number>"]);
    print_r($response);
} catch (PlivoRestException $ex) {
    print_r($ex);
}
Test
Save the file and run it.Copy
Ask AI
php TriggerPhlo.php
Here‘s how to connect a call to a second person using XML.This generates a controller named VoiceController in the app/http/controllers/ directory. Now, Edit app/http/controllers/voiceController.php and paste into it this code.Replace the auth placeholders with your authentication credentials from the Plivo console. Replace the phone number placeholders with actual phone numbers (for example, 12025551234).Start the Laravel server.You should see your basic server application in action at http://localhost:8000/outboundCall/.Set up ngrok to expose your local server to the internet.
Prerequisites
To get started, you need a Plivo account — sign up with your work email address if you don’t have one already. You must have a voice-enabled Plivo phone number to receive incoming calls; you can rent numbers from the Numbers page of the Plivo console, or by using the Numbers API. If this is your first time using Plivo APIs, follow our instructions to set up a PHP development environment and a web server and safely expose that server to the internet.Create a Laravel controller to connect calls to a second person
Change to the project directory and run this command to create a Laravel controller for inbound calls.Copy
Ask AI
$ php artisan make:controller VoiceController
Copy
Ask AI
<?php
namespace App\Http\Controllers;
require '../../vendor/autoload.php';
use Plivo\XML\Response;
use Plivo\RestClient;

class VoiceController extends Controller
{
    public function outboundCall()
    {
        $host = request()->getHttpHost();
        $client = new RestClient('<auth_id>','<auth_token>');
        $response = $client->calls->create(
            '<caller_id>',
            ['<destination_number>'],
            'https://'.$host.'/connect',);
        echo json_encode($response);
    }

    public function connect()
    {
            $response = new Response();
            $response->addSpeak('Please wait while we connect your call');
            $dial = $response->addDial();
            $dial->addNumber('<second_number>');
            Header('Content-type: text/xml');
            echo ($response->toXML());
    }
}
Note: We recommend that you store your credentials in the
auth_id and auth_token environment variables, to avoid the possibility of accidentally committing them to source control. If you do this, you can initialize the client with no arguments and Plivo will automatically fetch them from the environment variables. You can use $_ENV or putenv/getenv functions to store environment variables and fetch them when initializing the client.Add a route
Add a route for the forward function in VoiceController. Edit the routes/web.php file and add these lines.Copy
Ask AI
Route::match(['get','post'], '/outboundCall', 'App\Http\Controllers\VoiceController@outboundCall');
Route::match(['get','post'], '/connect', 'App\Http\Controllers\VoiceController@connect');
Copy
Ask AI
php artisan serve
Test
Have your application make a call to a regular mobile phone. Plivo will send a request to your answer URL requesting a valid XML response and connect the call to a second user.Overview
You may want to have an application dial out for someone, so that it calls them on their phone, then connects them to the number they want. This involves three tasks:- Make an outbound call to a caller.
- When the call recipient answers the phone, place a new call to a different number (second user).
- Bridge the calls (first and second user) after the second user answers.
- Using PHLO
- Using XML
You can create and deploy a PHLO to have an application call someone then connect them to a third party, and you can trigger the PHLO with a few lines of code.To create a PHLO, visit the PHLO page of the Plivo console. If this is your first PHLO, the PHLO page will be empty.
Prerequisites
To get started, you need a Plivo account — sign up with your work email address if you don’t have one already. If this is your first time using Plivo APIs, follow our instructions to set up a PHP development environment and a web server and safely expose that server to the internet.Create the PHLO
- Click Create New PHLO.
-
In the Choose your use case pop-up, click Build my own. The PHLO canvas will appear with the Start node.
Note: The Start node is the starting point of any PHLO. It lets you trigger a PHLO to start upon one of three actions: incoming SMS message, incoming call, or API request.
- Click the Start node to open the Configuration tab, and then enter the information to retrieve from the HTTP Request payload — in this case key names for the From and To numbers and the second user‘s number.
- Validate the configuration by clicking Validate. Do the same for each node as you go along.
- From the list of components on the left side, drag and drop the Initiate Call component onto the canvas. This adds an Initiate Call node onto the canvas. When a component is placed on the canvas it becomes a node.
- Draw a line to connect the Start node’s API Request trigger state to the Initiate Call node.
- In the Configuration tab of the Initiate Call node, give the node a name. To enter values for the From and To fields, enter two curly brackets to view all available variables, and choose the appropriate ones. The values for the numbers will be retrieved from the HTTP Request payload you defined in the Start node.
- From the list of components on the left side, drag and drop the Play Audio component onto the canvas. Draw a line to connect the Answered trigger state of the Initiate Call node with the Play Audio node.
- Configure the Play Audio node to play a message to the user by entering text in the Speak Text box in the Prompt section of the Configuration pane. Enter a static message — for example, “Please wait while we connect your call to the second number.”
- From the list of components on the left side, drag and drop the Call Forward component onto the canvas.
- Draw a line to connect the Prompt Completed trigger state of the Play Audio with the Call Forward node.
- In the Configuration tab of the Call Forward node, give the node a name. To enter values for the From and To fields, enter two curly brackets to view all available variables, and choose the appropriate ones. The values for the numbers will be retrieved from the HTTP Request payload you defined in the Start node.
- After you complete and validate the node configurations, give the PHLO a name by clicking in the upper left, then click Save.
Trigger the PHLO
You integrate a PHLO into your application workflow by making an API request to trigger the PHLO with the required payload — the set of parameters you pass to the PHLO. You can define a static payload by specifying values when you create the PHLO, or, as we do here, define a dynamic payload by passing values through parameters when you trigger the PHLO from your application.With dynamic payload
To use dynamic values for the parameters, use Liquid templating parameters when you create the PHLO and pass the values from your code to the PHLO when you trigger it.Code
Open the file in the CS project called Program.cs and paste into it this code.Copy
Ask AI
using System;
using System.Collections.Generic;
using Plivo;

namespace test_PHLO
{
    class Program
    {
        public static void Main(string[] args)
        {
            var phloClient = new PhloApi("<auth_id>", "<auth_token>");
            var phloID = "<phlo_id>";
            var phlo = phloClient.Phlo.Get(phloID);
            var data = new Dictionary<string, object>
            {
                { "from", "<caller_id>" },
                { "to", "<destination_number>" }
                { "second_user", "<second_number>" }

            };
            Console.WriteLine(phlo.Run(data));
        }
    }
}
Test
Save the file and run it.Here‘s how to connect a call to a second person using XML.Replace the auth placeholders with your authentication credentials from the Plivo console. Replace the phone number placeholders with actual phone numbers (for example, 12025551234).Before starting the application, edit Properties/launchSettings.json and set the applicationUrl asRun the project and you should see your basic server application in action at http://localhost:5000/Connect/.Set up ngrok to expose your local server to the internet.
Prerequisites
To get started, you need a Plivo account — sign up with your work email address if you don’t have one already. You must have a voice-enabled Plivo phone number to receive incoming calls; you can rent numbers from the Numbers page of the Plivo console, or by using the Numbers API. If this is your first time using Plivo APIs, follow our instructions to set up a .NET development environment and a web server and safely expose that server to the internet.Create an MVC controller to connect calls to a second person
In Visual Studio, create a controller calledConnect.cs and paste into it this code.Copy
Ask AI
using System;
using Plivo;
using System.Collections.Generic;
using Microsoft.AspNetCore.Mvc;

namespace VoiceApp.Controllers
{
    public class Connect : Controller
    {
        public IActionResult Index()
        {
            var hostName = Request.HttpContext.Request.Host.Value;
            Console.WriteLine(hostName);
            var api = new PlivoApi("<auth_id>", "<auth_token>");
                var response = api.Call.Create(
                    to: new List<String> { "<destination_number>" },
                    from: "<caller_id>",
                    answerUrl: "https://" + hostName + "/Connect/Dial/"
                );

                return this.Content(response.ToString());
        }

        public IActionResult Dial()
        {
            Plivo.XML.Response resp = new Plivo.XML.Response();
            resp.AddSpeak("Please wait while we connect your call to the second number",
            new Dictionary<string, string>() { });
            Plivo.XML.Dial dial = new Plivo.XML.Dial(new Dictionary<string, string>(){});
            dial.AddNumber("<second_number>",
                new Dictionary<string, string>() { }); // Dial to second number
            resp.Add(dial);

            var output = resp.ToString();
            Console.WriteLine(output);

            return this.Content(output, "text/xml");
        }
    }
}
Copy
Ask AI
"applicationUrl": "http://localhost:5000/"
Note: We recommend that you store your credentials in the
auth_id and auth_token environment variables, to avoid the possibility of accidentally committing them to source control. If you do this, you can initialize the client with no arguments and Plivo will automatically fetch them from the environment variables. You can use the Environment.SetEnvironmentVariable method to store environment variables and Environment.GetEnvironmentVariable to fetch them when when initializing the client.Test
Have your application make a call to a regular mobile phone. Plivo will send a request to your answer URL requesting a valid XML response and connect the call to a second user.Overview
You may want to have an application dial out for someone, so that it calls them on their phone, then connects them to the number they want. This involves three tasks:- Make an outbound call to a caller.
- When the call recipient answers the phone, place a new call to a different number (second user).
- Bridge the calls (first and second user) after the second user answers.
- Using PHLO
- Using XML
You can create and deploy a PHLO to have an application call someone then connect them to a third party, and you can trigger the PHLO with a few lines of code.To create a PHLO, visit the PHLO page of the Plivo console. If this is your first PHLO, the PHLO page will be empty.
Prerequisites
To get started, you need a Plivo account — sign up with your work email address if you don’t have one already. If this is your first time using Plivo APIs, follow our instructions to set up a PHP development environment and a web server and safely expose that server to the internet.Create the PHLO
- Click Create New PHLO.
-
In the Choose your use case pop-up, click Build my own. The PHLO canvas will appear with the Start node.
Note: The Start node is the starting point of any PHLO. It lets you trigger a PHLO to start upon one of three actions: incoming SMS message, incoming call, or API request.
- Click the Start node to open the Configuration tab, and then enter the information to retrieve from the HTTP Request payload — in this case key names for the From and To numbers and the second user‘s number.
- Validate the configuration by clicking Validate. Do the same for each node as you go along.
- From the list of components on the left side, drag and drop the Initiate Call component onto the canvas. This adds an Initiate Call node onto the canvas. When a component is placed on the canvas it becomes a node.
- Draw a line to connect the Start node’s API Request trigger state to the Initiate Call node.
- In the Configuration tab of the Initiate Call node, give the node a name. To enter values for the From and To fields, enter two curly brackets to view all available variables, and choose the appropriate ones. The values for the numbers will be retrieved from the HTTP Request payload you defined in the Start node.
- From the list of components on the left side, drag and drop the Play Audio component onto the canvas. Draw a line to connect the Answered trigger state of the Initiate Call node with the Play Audio node.
- Configure the Play Audio node to play a message to the user by entering text in the Speak Text box in the Prompt section of the Configuration pane. Enter a static message — for example, “Please wait while we connect your call to the second number.”
- From the list of components on the left side, drag and drop the Call Forward component onto the canvas.
- Draw a line to connect the Prompt Completed trigger state of the Play Audio with the Call Forward node.
- In the Configuration tab of the Call Forward node, give the node a name. To enter values for the From and To fields, enter two curly brackets to view all available variables, and choose the appropriate ones. The values for the numbers will be retrieved from the HTTP Request payload you defined in the Start node.
- After you complete and validate the node configurations, give the PHLO a name by clicking in the upper left, then click Save.
Trigger the PHLO
You integrate a PHLO into your application workflow by making an API request to trigger the PHLO with the required payload — the set of parameters you pass to the PHLO. You can define a static payload by specifying values when you create the PHLO, or, as we do here, define a dynamic payload by passing values through parameters when you trigger the PHLO from your application.With dynamic payload
To use dynamic values for the parameters, use Liquid templating parameters when you create the PHLO and pass the values from your code to the PHLO when you trigger it.Code
Create a Java class calledTriggerPhlo and paste into it this code.Copy
Ask AI
import com.plivo.api.Plivo;
import com.plivo.api.PlivoClient;
import com.plivo.api.exceptions.PlivoRestException;
import com.plivo.api.models.phlo.Phlo;
import java.io.IOException;

public class Example
{
    private static final String authId = "<auth_id>";
    private static final String authToken = "<auth_token>";
    private static PlivoClient client = new PlivoClient(authId, authToken);
    public static void main(String[] args) throws IOException, PlivoRestException
    {
        String phloId = "<phlo_id>";
        Plivo.init(authId, authToken);
        Phlo phlo = Phlo.getter(phloId).client(client).get();
        Map<String, Object> payload = new HashMap<>();
        payload.put("from", "<caller_id>");
        payload.put("to", "<destination_number>");
        payload.put("second_user", "<second_number>");
        PhloUpdateResponse response = Phlo.updater(phloId).payload(payload).run();
    }
}
Test
Save the file and run it.Here‘s how to connect a call to a second person using XML.Replace the auth placeholders with your authentication credentials from the Plivo console. Replace the phone number placeholders with actual phone numbers (for example, 12025551234).Save the file and run it.
Prerequisites
To get started, you need a Plivo account — sign up with your work email address if you don’t have one already. You must have a voice-enabled Plivo phone number to receive incoming calls; you can rent numbers from the Numbers page of the Plivo console, or by using the Numbers API. If this is your first time using Plivo APIs, follow our instructions to set up a Java development environment and a web server and safely expose that server to the internet.Create a Spring server to connect calls to a second person
Edit the PlivoVoiceApplication.java file in the src/main/java/com.example.demo/ folder and paste into it this code.Note: Here, the demo application name is PlivoVoiceApplication.java because we provided the friendly name
Plivo Voice in the Spring Initializr.Copy
Ask AI
package com.example.connect;

import com.plivo.api.Plivo;
import com.plivo.api.exceptions.PlivoRestException;
import com.plivo.api.exceptions.PlivoValidationException;
import com.plivo.api.exceptions.PlivoXmlException;
import com.plivo.api.models.call.Call;
import com.plivo.api.models.call.CallCreateResponse;
import com.plivo.api.xml.Dial;
import javax.servlet.http.HttpServletRequest;
import com.plivo.api.xml.Number;
import com.plivo.api.xml.Response;
import com.plivo.api.xml.Speak;
import org.springframework.boot.SpringApplication;
import org.springframework.boot.autoconfigure.SpringBootApplication;
import org.springframework.web.bind.annotation.RequestMapping;
import org.springframework.web.bind.annotation.RequestMethod;
import org.springframework.web.bind.annotation.RestController;

import java.io.IOException;
import java.util.Collections;

@RestController
@SpringBootApplication
public class ConnectApplication {

	public static void main(String[] args) {
		SpringApplication.run(ConnectApplication.class, args);
	}

	@RequestMapping(value = "/outbound_call", produces = {"application/json"}, method = {RequestMethod.GET})
	public String call(HttpServletRequest request) throws PlivoXmlException, PlivoValidationException, IOException, PlivoRestException {
		String hostName = request.getRequestURL().toString();
		Plivo.init("<auth_id>","<auth_token>");
		System.out.println(hostName + "/connect");
		CallCreateResponse response = Call.creator("<caller_id>", Collections.singletonList("<destination_number>"), hostName + "connect")
				.create();
		return response.toString();
	}

	@RequestMapping(value = "outbound_call/connect", produces = {"text/xml"})
	public String connect() throws PlivoXmlException, PlivoValidationException {
		Response response = new Response()
				.children(
						new Speak("Please wait while we connect your call to the second number"),
						new Dial()
								.children(
										new Number("<second_number>") // Dial to second number
								));
		return response.toXmlString();
	}
}
Note: We recommend that you store your credentials in the
auth_id and auth_token environment variables, to avoid the possibility of accidentally committing them to source control. If you do this, you can initialize the client with no arguments and Plivo will automatically fetch the values from the environment variables. You can use <a rel="nofollow" href="https://docs.oracle.com/javase/tutorial/essential/environment/env.html">System.getenv()</a> to store environment variables and retrieve them when initializing the client.Test
Have your application make a call to a regular mobile phone. Plivo will send a request to your answer URL requesting a valid XML response and connect the call to a second user.Overview
You may want to have an application dial out for someone, so that it calls them on their phone, then connects them to the number they want. This involves three tasks:- Make an outbound call to a caller.
- When the call recipient answers the phone, place a new call to a different number (second user).
- Bridge the calls (first and second user) after the second user answers.
- Using PHLO
- Using XML
You can create and deploy a PHLO to have an application call someone then connect them to a third party, and you can trigger the PHLO with a few lines of code.To create a PHLO, visit the PHLO page of the Plivo console. If this is your first PHLO, the PHLO page will be empty.
Prerequisites
To get started, you need a Plivo account — sign up with your work email address if you don’t have one already. If this is your first time using Plivo APIs, follow our instructions to set up a PHP development environment and a web server and safely expose that server to the internet.Create the PHLO
- Click Create New PHLO.
-
In the Choose your use case pop-up, click Build my own. The PHLO canvas will appear with the Start node.
Note: The Start node is the starting point of any PHLO. It lets you trigger a PHLO to start upon one of three actions: incoming SMS message, incoming call, or API request.
- Click the Start node to open the Configuration tab, and then enter the information to retrieve from the HTTP Request payload — in this case key names for the From and To numbers and the second user‘s number.
- Validate the configuration by clicking Validate. Do the same for each node as you go along.
- From the list of components on the left side, drag and drop the Initiate Call component onto the canvas. This adds an Initiate Call node onto the canvas. When a component is placed on the canvas it becomes a node.
- Draw a line to connect the Start node’s API Request trigger state to the Initiate Call node.
- In the Configuration tab of the Initiate Call node, give the node a name. To enter values for the From and To fields, enter two curly brackets to view all available variables, and choose the appropriate ones. The values for the numbers will be retrieved from the HTTP Request payload you defined in the Start node.
- From the list of components on the left side, drag and drop the Play Audio component onto the canvas. Draw a line to connect the Answered trigger state of the Initiate Call node with the Play Audio node.
- Configure the Play Audio node to play a message to the user by entering text in the Speak Text box in the Prompt section of the Configuration pane. Enter a static message — for example, “Please wait while we connect your call to the second number.”
- From the list of components on the left side, drag and drop the Call Forward component onto the canvas.
- Draw a line to connect the Prompt Completed trigger state of the Play Audio with the Call Forward node.
- In the Configuration tab of the Call Forward node, give the node a name. To enter values for the From and To fields, enter two curly brackets to view all available variables, and choose the appropriate ones. The values for the numbers will be retrieved from the HTTP Request payload you defined in the Start node.
- After you complete and validate the node configurations, give the PHLO a name by clicking in the upper left, then click Save.
Trigger the PHLO
You integrate a PHLO into your application workflow by making an API request to trigger the PHLO with the required payload — the set of parameters you pass to the PHLO. You can define a static payload by specifying values when you create the PHLO, or, as we do here, define a dynamic payload by passing values through parameters when you trigger the PHLO from your application.With dynamic payload
To use dynamic values for the parameters, use Liquid templating parameters when you create the PHLO and pass the values from your code to the PHLO when you trigger it.Code
Copy
Ask AI
package main

import (
	"fmt"
	"plivo-go"
)
// Initialize the following params with corresponding values to trigger resources
const authId = "<auth_id>"
const authToken = "<auth_token>"
const phloId = "<phlo_id>"

func main() {
	testPhloRunWithParams()
}

func testPhloRunWithParams() {
	phloClient, err := plivo.NewPhloClient(authId, authToken, &plivo.ClientOptions{})
	if err != nil {
			fmt.Print("Error", err.Error())
			return
		}
	phloGet, err := phloClient.Phlos.Get(phloId)
	if err != nil {
			fmt.Print("Error", err.Error())
			return
		}
	//pass corresponding from and to values
	type params map[string]interface{}
	response, err := phloGet.Run(params{
		"from": "<caller_id>",
		"to":   "<destination_number>",
		"second_user":   "<second_number>",
	})

	if err != nil {
		println(err)
	}
	fmt.Printf("Response: %#v\n", response)
}
Test
Save the file and run it.Copy
Ask AI
go run TriggerPhlo.go
Here‘s how to connect a call to a second person using XML.Replace the auth placeholders with your authentication credentials from the Plivo console. Replace the phone number placeholders with actual phone numbers (for example, 12025551234).Save the file and run it.You should see your basic server application in action at http://localhost:8080/outbound-call/.Set up ngrok to expose your local server to the internet.
Prerequisites
To get started, you need a Plivo account — sign up with your work email address if you don’t have one already. You must have a voice-enabled Plivo phone number to receive incoming calls; you can rent numbers from the Numbers page of the Plivo console, or by using the Numbers API. If this is your first time using Plivo APIs, follow our instructions to set up a Go development environment and a web server and safely expose that server to the internet.Create a Go server to connect calls to a second person
Create a file calledconnect_call.go and paste into it this code.Copy
Ask AI
package main

import (
    "fmt"

    "github.com/gin-gonic/gin"
    "github.com/plivo/plivo-go/v7"
    "github.com/plivo/plivo-go/v7/xml"
)

func main() {
    r: = gin.Default()
    r.GET("/outbound-call", func(c * gin.Context) {
        c.Header("Content-Type", "application/JSON")
        fmt.Println("https://" + c.Request.Host + "/connect")
        client, err: = plivo.NewClient("<auth_id>", "<auth_token>", & plivo.ClientOptions {})
        if err != nil {
            panic(err)
        }
        response, err: = client.Calls.Create(
            plivo.CallCreateParams {
                From: "<caller_id>",
                To: "<destination_number>",
                AnswerURL: "https://" + c.Request.Host + "/connect",
            },
        )
        if err != nil {
            panic(err)
        }
        fmt.Printf("Response: %#v\n", response)
        c.JSON(200, response)
    })

    r.POST("/connect", func(c * gin.Context) {
        c.Header("Content-Type", "text/xml")
        response: = xml.ResponseElement {
            Contents: [] interface {} {
                new(xml.SpeakElement).
                AddSpeak("Please wait while we connect your call to the second number", "WOMAN", "en-US", 1),
                    new(xml.DialElement).
                SetContents(
                    [] interface {} {
                        new(xml.NumberElement).
                        SetContents("<second_number>"),
                    },
                ),
            },
        }
        c.String(200, response.String())
    })
    r.Run()
}
Copy
Ask AI
go run connect_call.go
Note: We recommend that you store your credentials in the
auth_id and auth_token environment variables, to avoid the possibility of accidentally committing them to source control. If you do this, you can initialize the client with no arguments and Plivo will automatically fetch them from the environment variables. You can use the os.Setenv and os.Getenv functions to store environment variables and fetch them when initializing the client.