- Node
- Ruby
- Python
- PHP
- .NET
- Java
- Go
Overview
This guide shows how to send audio notifications using voice calls. You can play recorded audio when the call recipient answers or use text-to-speech, as we show here, combining static text with dynamic information that Plivo gets from a variable.You can use voice notification for use cases such as:- Order notification
- Booking status
- Delivery status
- Flight cancellation/rescheduling
- Two-factor authentication/one-time password
- New offer notification
- Account balance notification
- Using PHLO
- Using XML
You can create and deploy a PHLO to send voice notifications with a few clicks on the PHLO canvas.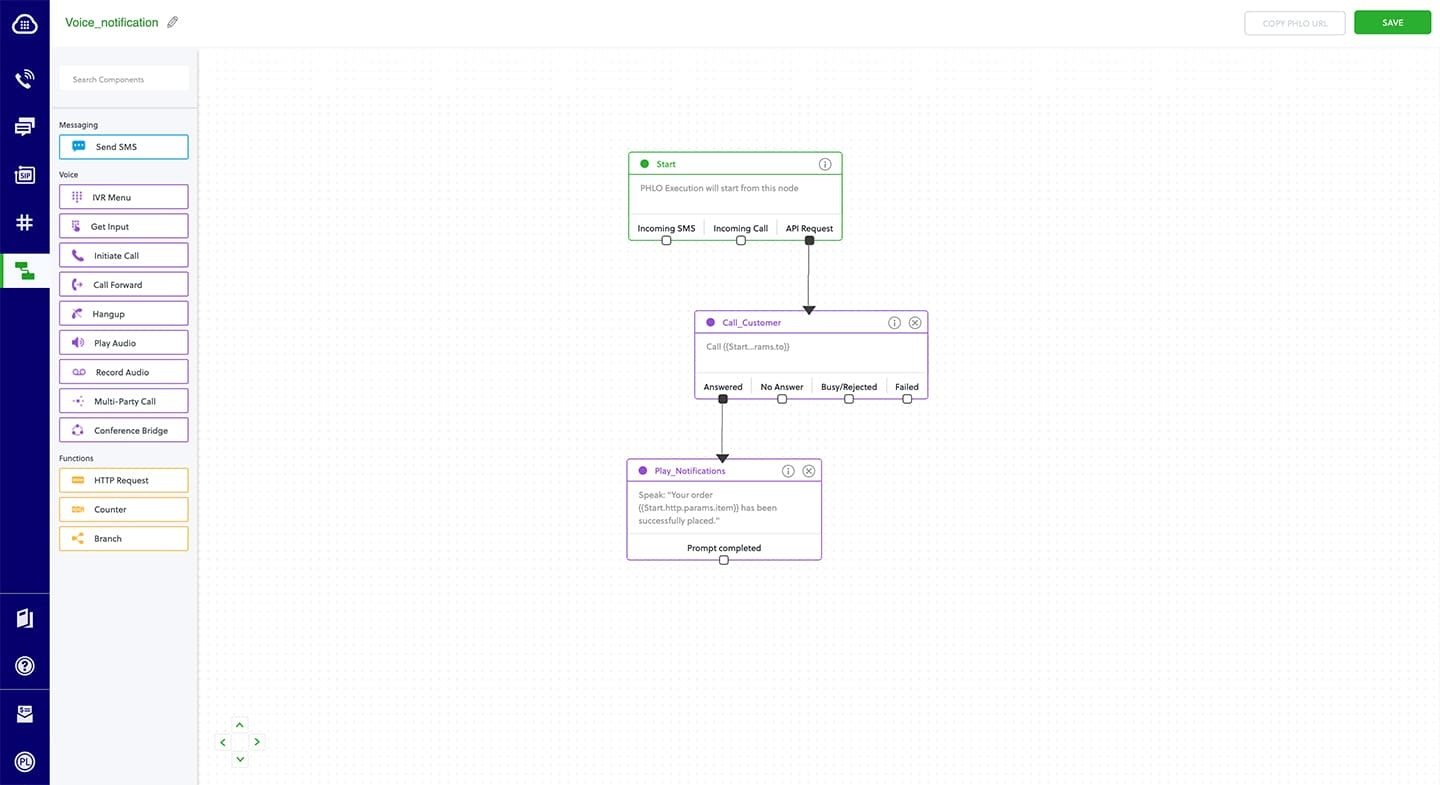
How it works
Prerequisites
To get started, you need a Plivo account — sign up with your work email address if you don’t have one already. If this is your first time triggering a PHLO with Node.js, follow our instructions to set up a Node.js development environment.Create the PHLO
To create a PHLO, visit the PHLO page of the Plivo console. If this is your first PHLO, the PHLO page will be empty.- Click Create New PHLO.
-
In the Choose your use case pop-up, click Build my own. The PHLO canvas will appear with the Start node.
Note: The Start node is the starting point of any PHLO. It lets you trigger a PHLO to start upon one of three actions: incoming SMS message, incoming call, or API request.
-
Click the Start node to open the Configurations tab, then enter the information to retrieve from the HTTP Request payload — in this case, the From and To numbers for the call, and an item number.
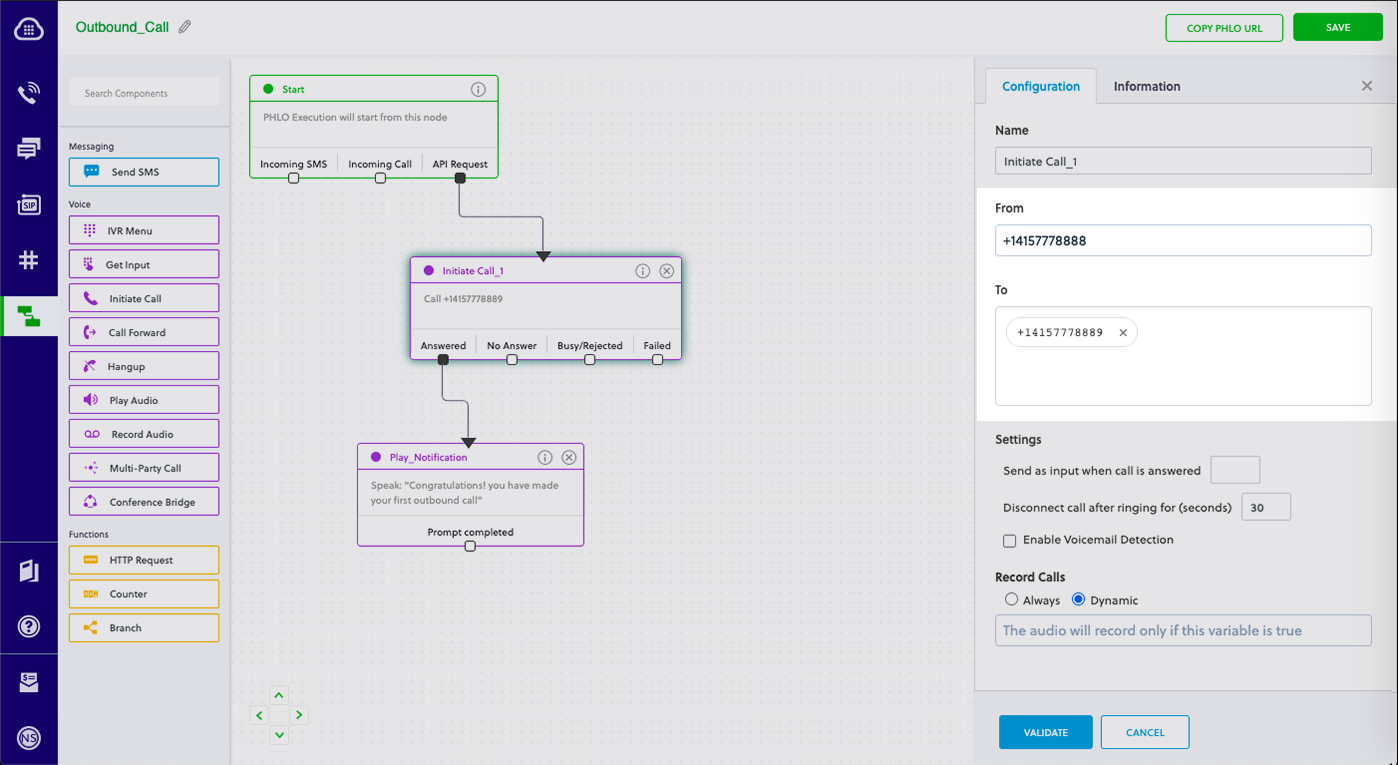
- From the list of components on the left side, drag and drop the Initiate Call component onto the canvas. This adds an Initiate Call node onto the canvas. When a component is placed on the canvas it becomes a node.
-
Draw a line to connect the Start node’s API Request trigger state to the Initiate Call node.
-
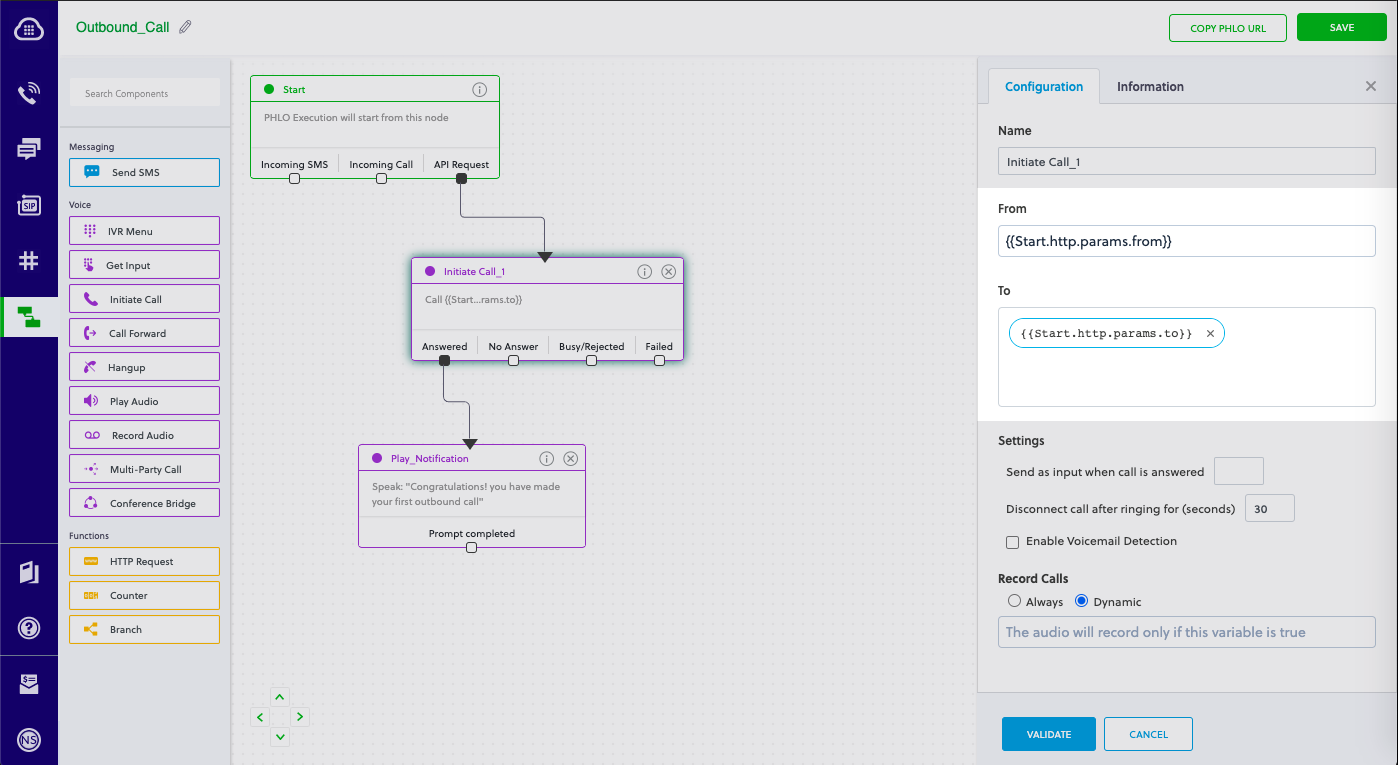
In the Configuration tab of the Initiate Call node, give the node a name. To enter values for the From and To fields, enter two curly brackets to view all available variables, and choose the appropriate ones. The values for the numbers will be retrieved from the HTTP Request payload you defined in the Start node.
- Validate the configuration by clicking Validate. Do the same for each node as you go along.
-
Next, create a node from the Play Audio component. Connect the Initiate Call node to the Play Audio node using the Answered trigger state.
-
Configure the Play Audio node to play a message to the user by entering text in the Speak Text box in the Prompt section of the Configuration pane.
- Audio playback can either be static or dynamic. You define a static payload by specifying values when you create the PHLO, and a dynamic payload by passing values through Liquid templating parameters when you trigger the PHLO from your application.
- On the Play Audio Configuration tab, enter a static message (for example, “Your order has been successfully placed”) in the Speak Text field, with a variable to include the dynamic text. Enter two curly brackets to view all available variables. Choose the item number you defined in the Start node configuration tab.
- After you complete and validate the node configurations, give the PHLO a name by clicking in the upper left, then click Save.
Trigger the PHLO
You integrate a PHLO into your application workflow by making an API request to trigger the PHLO with the required payload — the set of parameters you pass to the PHLO. You can define a static payload by specifying values when you create the PHLO, or define a dynamic payload by passing values through parameters when you trigger the PHLO from your application.With a static payload
When you configure values when creating the PHLO, they act as a static payload.Code
Create a file calledTriggerPhlo.js and paste into it this code.Copy
Ask AI
var plivo = require('plivo');
var PhloClient = plivo.PhloClient;

var authId = '<auth_id>';
var authToken = '<auth_token>';
var phloId = '<phlo_id>';
var phloClient = phlo = null;

phloClient = new PhloClient(authId, authToken);
phloClient.phlo(phloId).run().then(function (result) {
    console.log('Phlo run result', result);
}).catch(function (err) {
    console.error('Phlo run failed', err);
});
With a dynamic payload
To use dynamic values for the parameters, use Liquid templating parameters when you create the PHLO and pass the values from your code to the PHLO when you trigger it.Code
Create a file calledTriggerPhlo.js and paste into it this code.Copy
Ask AI
var plivo = require('plivo');
var PhloClient = plivo.PhloClient;

var authId = '<auth_id>';
var authToken = '<auth_token>';
var phloId = '<phlo_id>';
var phloClient = phlo = null;

var payload = {
    from: '<caller_id>',
    to: '<destination_number>'
}
phloClient = new PhloClient(authId, authToken);
phloClient.phlo(phloId).run(payload).then(function (result) {
    console.log('Phlo run result', result);
}).catch(function (err) {
    console.error('Phlo run failed', err);
});
Test
Save the file and run it.Copy
Ask AI
node TriggerPhlo.js
Here’s how to use Plivo APIs and XML to implement voice notifications.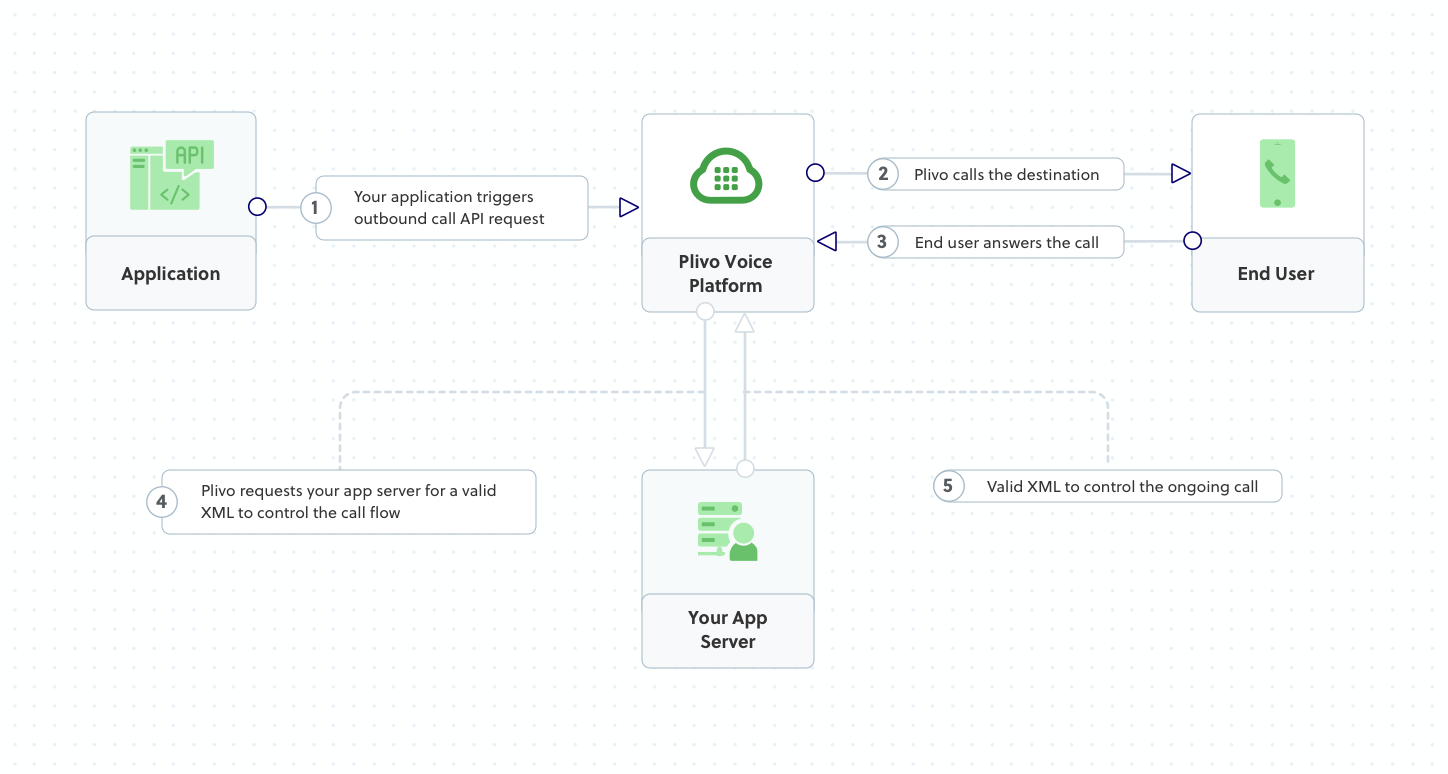
How it works
Copy
Ask AI
<Response>
<Speak>Congratulations, your order was successfully placed</Speak>
</Response>
Prerequisites
To get started, you need a Plivo account — sign up with your work email address if you don’t have one already. If this is your first time using Plivo APIs, follow our instructions to set up a Node.js development environment.Create a voice notification application in Node.js
Create a file calledMakecall.js and paste into it this code.Copy
Ask AI
var plivo = require('plivo');

(function main() {
    'use strict';

    var client = new plivo.Client("<auth_id>","<auth_token>");
    client.calls.create(
        "<caller_id>", // from
        "<destination_number>", // to
        "https://s3.amazonaws.com/static.plivo.com/notification.xml", // answer url
        {
            answerMethod: "GET",
        },
    ).then(function (response) {
        console.log(response);
    }, function (err) {
        console.error(err);
    });
})();
Note:
We recommend that you store your credentials in the
auth_id and auth_token environment variables, to avoid the possibility of accidentally committing them to source control. If you do this, you can initialize the client with no arguments and Plivo will automatically fetch the values from the environment variables. You can use process.env to store environment variables and fetch them while initializing the client.Test
Save the file and run it.Copy
Ask AI
$ node Makecall.js
Overview
This guide shows how to send audio notifications using voice calls. You can play recorded audio when the call recipient answers or use text-to-speech, as we show here, combining static text with dynamic information that Plivo gets from a variable.You can use voice notification for use cases such as:- Order notification
- Booking status
- Delivery status
- Flight cancellation/rescheduling
- Two-factor authentication/one-time password
- New offer notification
- Account balance notification
- Using PHLO
- Using XML
You can create and deploy a PHLO to send voice notifications with a few clicks on the PHLO canvas.
How it works
Prerequisites
To get started, you need a Plivo account — sign up with your work email address if you don’t have one already. If this is your first time triggering a PHLO with Ruby, follow our instructions to set up a Ruby development environment.Create the PHLO
To create a PHLO, visit the PHLO page of the Plivo console. If this is your first PHLO, the PHLO page will be empty.- Click Create New PHLO.
-
In the Choose your use case pop-up, click Build my own. The PHLO canvas will appear with the Start node.
Note: The Start node is the starting point of any PHLO. It lets you trigger a PHLO to start upon one of three actions: incoming SMS message, incoming call, or API request.
-
Click the Start node to open the Configurations tab, then enter the information to retrieve from the HTTP Request payload — in this case, the From and To numbers for the call, and an item number.
- From the list of components on the left side, drag and drop the Initiate Call component onto the canvas. This adds an Initiate Call node onto the canvas. When a component is placed on the canvas it becomes a node.
-
Draw a line to connect the Start node’s API Request trigger state to the Initiate Call node.
-
In the Configuration tab of the Initiate Call node, give the node a name. To enter values for the From and To fields, enter two curly brackets to view all available variables, and choose the appropriate ones. The values for the numbers will be retrieved from the HTTP Request payload you defined in the Start node.
- Validate the configuration by clicking Validate. Do the same for each node as you go along.
-
Next, create a node from the Play Audio component. Connect the Initiate Call node to the Play Audio node using the Answered trigger state.
-
Configure the Play Audio node to play a message to the user by entering text in the Speak Text box in the Prompt section of the Configuration pane.
- Audio playback can either be static or dynamic. You define a static payload by specifying values when you create the PHLO, and a dynamic payload by passing values through Liquid templating parameters when you trigger the PHLO from your application.
- On the Play Audio Configuration tab, enter a static message (for example, “Your order has been successfully placed”) in the Speak Text field, with a variable to include the dynamic text. Enter two curly brackets to view all available variables. Choose the item number you defined in the Start node configuration tab.
- After you complete and validate the node configurations, give the PHLO a name by clicking in the upper left, then click Save.
Trigger the PHLO
You integrate a PHLO into your application workflow by making an API request to trigger the PHLO with the required payload — the set of parameters you pass to the PHLO. You can define a static payload by specifying values when you create the PHLO, or define a dynamic payload by passing values through parameters when you trigger the PHLO from your application.With a static payload
When you configure values when creating the PHLO, they act as a static payload.Code
Create a file calledtrigger_phlo.rb and paste into it this code.Copy
Ask AI
require 'rubygems'
require 'plivo'

include Plivo

AUTH_ID = '<auth_id>'
AUTH_TOKEN = '<auth_token>'

client = Phlo.new(AUTH_ID, AUTH_TOKEN)

# if credentials are stored in the PLIVO_AUTH_ID and the PLIVO_AUTH_TOKEN environment variables
# then initialize client as:
# client = Phlo.new

begin
  phlo = client.phlo.get('<phlo_id>')
  response = phlo.run()
  puts response
rescue PlivoRESTError => e
  puts 'Exception: ' + e.message
end
With a dynamic payload
To use dynamic values for the parameters, use Liquid templating parameters when you create the PHLO and pass the values from your code to the PHLO when you trigger it.Code
Create a file calledtrigger_phlo.rb and paste into it this code.Copy
Ask AI
require 'rubygems'
require 'plivo'

include Plivo

AUTH_ID = '<auth_id>'
AUTH_TOKEN = '<auth_token>'

client = Phlo.new(AUTH_ID, AUTH_TOKEN)

# if credentials are stored in the PLIVO_AUTH_ID and the PLIVO_AUTH_TOKEN environment variables
# then initialize client as:
# client = Phlo.new

begin
  phlo = client.phlo.get('<phlo_id>')
  #parameters set in PHLO - params
  params = {
     from: '<caller_id>',
     to: '<destination_number>'
  }
  response = phlo.run(params)
  puts response
rescue PlivoRESTError => e
  puts 'Exception: ' + e.message
end
Test
Save the file and run it.Copy
Ask AI
ruby trigger_phlo.rb
Here’s how to use Plivo APIs and XML to implement voice notifications.
How it works
Copy
Ask AI
<Response>
<Speak>Congratulations, your order was successfully placed</Speak>
</Response>
Prerequisites
To get started, you need a Plivo account — sign up with your work email address if you don’t have one already. If this is your first time using Plivo APIs, follow our instructions to set up a Ruby development environment.Create a voice notification application in Ruby
Create a file calledmake_call.rb and paste into it this code.Copy
Ask AI
require 'rubygems'
require 'plivo'

include Plivo
include Plivo::Exceptions

api = RestClient.new("<auth_id>","<auth_token>")

begin
  response = api.calls.create(
    '<caller_id>',
    ['<destination_number>'],
    'https://s3.amazonaws.com/static.plivo.com/notification.xml'
  )
  puts response
rescue PlivoRESTError => e
  puts 'Exception: ' + e.message
end
Note:
We recommend that you store your credentials in the
auth_id and auth_token environment variables, to avoid the possibility of accidentally committing them to source control. If you do this, you can initialize the client with no arguments and Plivo will automatically fetch the values from the environment variables. You can use ENV to store environment variables and fetch them when initializing the client.Test
Save the file and run it.Copy
Ask AI
$ ruby make_call.rb
Overview
This guide shows how to send audio notifications using voice calls. You can play recorded audio when the call recipient answers or use text-to-speech, as we show here, combining static text with dynamic information that Plivo gets from a variable.You can use voice notification for use cases such as:- Order notification
- Booking status
- Delivery status
- Flight cancellation/rescheduling
- Two-factor authentication/one-time password
- New offer notification
- Account balance notification
- Using PHLO
- Using XML
You can create and deploy a PHLO to send voice notifications with a few clicks on the PHLO canvas.
How it works
Prerequisites
To get started, you need a Plivo account — sign up with your work email address if you don’t have one already. If this is your first time triggering a PHLO with Python, follow our instructions to set up a Python development environment.Create the PHLO
To create a PHLO, visit the PHLO page of the Plivo console. If this is your first PHLO, the PHLO page will be empty.- Click Create New PHLO.
-
In the Choose your use case pop-up, click Build my own. The PHLO canvas will appear with the Start node.
Note: The Start node is the starting point of any PHLO. It lets you trigger a PHLO to start upon one of three actions: incoming SMS message, incoming call, or API request.
-
Click the Start node to open the Configurations tab, then enter the information to retrieve from the HTTP Request payload — in this case, the From and To numbers for the call, and an item number.
- From the list of components on the left side, drag and drop the Initiate Call component onto the canvas. This adds an Initiate Call node onto the canvas. When a component is placed on the canvas it becomes a node.
-
Draw a line to connect the Start node’s API Request trigger state to the Initiate Call node.
-
In the Configuration tab of the Initiate Call node, give the node a name. To enter values for the From and To fields, enter two curly brackets to view all available variables, and choose the appropriate ones. The values for the numbers will be retrieved from the HTTP Request payload you defined in the Start node.
- Validate the configuration by clicking Validate. Do the same for each node as you go along.
-
Next, create a node from the Play Audio component. Connect the Initiate Call node to the Play Audio node using the Answered trigger state.
-
Configure the Play Audio node to play a message to the user by entering text in the Speak Text box in the Prompt section of the Configuration pane.
- Audio playback can either be static or dynamic. You define a static payload by specifying values when you create the PHLO, and a dynamic payload by passing values through Liquid templating parameters when you trigger the PHLO from your application.
- On the Play Audio Configuration tab, enter a static message (for example, “Your order has been successfully placed”) in the Speak Text field, with a variable to include the dynamic text. Enter two curly brackets to view all available variables. Choose the item number you defined in the Start node configuration tab.
- After you complete and validate the node configurations, give the PHLO a name by clicking in the upper left, then click Save.
Trigger the PHLO
You integrate a PHLO into your application workflow by making an API request to trigger the PHLO with the required payload — the set of parameters you pass to the PHLO. You can define a static payload by specifying values when you create the PHLO, or define a dynamic payload by passing values through parameters when you trigger the PHLO from your application.With a static payload
When you configure values when creating the PHLO, they act as a static payload.Code
Create a file calledtrigger_phlo.py and paste into it this code.Copy
Ask AI
import plivo

auth_id = '<auth_id>'
auth_token = '<auth_token>'
phlo_id = '<phlo_id>'
phlo_client = plivo.phlo.RestClient(auth_id=auth_id, auth_token=auth_token)
phlo = phlo_client.phlo.get(phlo_id)
response = phlo.run()
print str(response)
With a dynamic payload
To use dynamic values for the parameters, use Liquid templating parameters when you create the PHLO and pass the values from your code to the PHLO when you trigger it.Code
Create a file calledtrigger_phlo.py and paste into it this code.Copy
Ask AI
import plivo

auth_id = '<auth_id>'
auth_token = '<auth_token>'
phlo_id = '<phlo_id>'
payload = {"from" : "<caller_id>","to" : "<destination_number>"}
phlo_client = plivo.phlo.RestClient(auth_id=auth_id, auth_token=auth_token)
phlo = phlo_client.phlo.get(phlo_id)
response = phlo.run(**payload)
print str(response)
Test
Save the file and run it.Copy
Ask AI
python trigger_phlo.py
Here’s how to use Plivo APIs and XML to implement voice notifications.
How it works
Copy
Ask AI
<Response>
<Speak>Congratulations, your order was successfully placed</Speak>
</Response>
Prerequisites
To get started, you need a Plivo account — sign up with your work email address if you don’t have one already. If this is your first time using Plivo APIs, follow our instructions to set up a Python development environment.Create a voice notification application in Python
Create a file calledmake_call.py and paste into it this code.Copy
Ask AI
import plivo

client = plivo.RestClient('<auth_id>','<auth_token>')
response = client.calls.create(
    from='<caller_id>',
    to='<destination_number>',
    answer_url='https://s3.amazonaws.com/static.plivo.com/notification.xml',
    answer_method='GET', )
print(response)
Note:
We recommend that you store your credentials in the
auth_id and auth_token environment variables, to avoid the possibility of accidentally committing them to source control. If you do this, you can initialize the client with no arguments and Plivo will automatically fetch the values from the environment variables. You can use the os module (os.environ) to store environment variables and fetch them when initializing the client.Test
Save the file and run it.Copy
Ask AI
$ python make_call.py
Overview
This guide shows how to send audio notifications using voice calls. You can play recorded audio when the call recipient answers or use text-to-speech, as we show here, combining static text with dynamic information that Plivo gets from a variable.You can use voice notification for use cases such as:- Order notification
- Booking status
- Delivery status
- Flight cancellation/rescheduling
- Two-factor authentication/one-time password
- New offer notification
- Account balance notification
- Using PHLO
- Using XML
You can create and deploy a PHLO to send voice notifications with a few clicks on the PHLO canvas.
How it works
Prerequisites
To get started, you need a Plivo account — sign up with your work email address if you don’t have one already. If this is your first time triggering a PHLO with PHP, follow our instructions to set up a PHP development environment.Create the PHLO
To create a PHLO, visit the PHLO page of the Plivo console. If this is your first PHLO, the PHLO page will be empty.- Click Create New PHLO.
-
In the Choose your use case pop-up, click Build my own. The PHLO canvas will appear with the Start node.
Note: The Start node is the starting point of any PHLO. It lets you trigger a PHLO to start upon one of three actions: incoming SMS message, incoming call, or API request.
-
Click the Start node to open the Configurations tab, then enter the information to retrieve from the HTTP Request payload — in this case, the From and To numbers for the call, and an item number.
- From the list of components on the left side, drag and drop the Initiate Call component onto the canvas. This adds an Initiate Call node onto the canvas. When a component is placed on the canvas it becomes a node.
-
Draw a line to connect the Start node’s API Request trigger state to the Initiate Call node.
-
In the Configuration tab of the Initiate Call node, give the node a name. To enter values for the From and To fields, enter two curly brackets to view all available variables, and choose the appropriate ones. The values for the numbers will be retrieved from the HTTP Request payload you defined in the Start node.
- Validate the configuration by clicking Validate. Do the same for each node as you go along.
-
Next, create a node from the Play Audio component. Connect the Initiate Call node to the Play Audio node using the Answered trigger state.
-
Configure the Play Audio node to play a message to the user by entering text in the Speak Text box in the Prompt section of the Configuration pane.
- Audio playback can either be static or dynamic. You define a static payload by specifying values when you create the PHLO, and a dynamic payload by passing values through Liquid templating parameters when you trigger the PHLO from your application.
- On the Play Audio Configuration tab, enter a static message (for example, “Your order has been successfully placed”) in the Speak Text field, with a variable to include the dynamic text. Enter two curly brackets to view all available variables. Choose the item number you defined in the Start node configuration tab.
- After you complete and validate the node configurations, give the PHLO a name by clicking in the upper left, then click Save.
Trigger the PHLO
You integrate a PHLO into your application workflow by making an API request to trigger the PHLO with the required payload — the set of parameters you pass to the PHLO. You can define a static payload by specifying values when you create the PHLO, or define a dynamic payload by passing values through parameters when you trigger the PHLO from your application.With a static payload
When you configure values when creating the PHLO, they act as a static payload.Code
Create a file calledTriggerPhlo.php and paste into it this code.Copy
Ask AI
<?php
require 'vendor/autoload.php';
use Plivo\Resources\PHLO\PhloRestClient;
use Plivo\Exceptions\PlivoRestException;
$client = new PhloRestClient("<auth_id>", "<auth_token>");

$phlo = $client->phlo->get("<phlo_id>");
try {
    $response = $phlo->run();
    print_r($response);
} catch (PlivoRestException $ex) {
    print_r($ex);
}
With a dynamic payload
To use dynamic values for the parameters, use Liquid templating parameters when you create the PHLO and pass the values from your code to the PHLO when you trigger it.Code
Create a file calledTriggerPhlo.php and paste into it this code.Copy
Ask AI
<?php
require 'vendor/autoload.php';
use Plivo\Resources\PHLO\PhloRestClient;
use Plivo\Exceptions\PlivoRestException;
$client = new PhloRestClient("<auth_id>", "<auth_token>");

$phlo = $client->phlo->get("<phlo_id>");
try {
    $response = $phlo->run(["from" => "<caller_id>", "to" => "<destination_number>"]);
    print_r($response);
} catch (PlivoRestException $ex) {
    print_r($ex);
}
Test
Save the file and run it.Copy
Ask AI
php TriggerPhlo.php
Here’s how to use Plivo APIs and XML to implement voice notifications.
How it works
Copy
Ask AI
<Response>
<Speak>Congratulations, your order was successfully placed</Speak>
</Response>
Prerequisites
To get started, you need a Plivo account — sign up with your work email address if you don’t have one already. If this is your first time using Plivo APIs, follow our instructions to set up a PHP development environment.Create a voice notification application in PHP
Create a file calledMakeCall.php and paste into it this code:Copy
Ask AI
<?php
require 'vendor/autoload.php';
use Plivo\RestClient;

$auth_id    = "<auth_id>";
$auth_token = "<auth_token>";
$p          = new RestClient($auth_id, $auth_token);

$response = $client->calls->create('<caller_id>',
                                 ['<destination_number>'],
                                 'https://s3.amazonaws.com/static.plivo.com/notification.xml',);
print_r($response);
Note:
We recommend that you store your credentials in the
auth_id and auth_token environment variables, to avoid the possibility of accidentally committing them to source control. If you do this, you can initialize the client with no arguments and Plivo will automatically fetch the values from the environment variables. You can use the $_ENV or putenv/getenv functions to store environment variables and fetch them when initializing the client.Test
Save the file and run it.Copy
Ask AI
$ php MakeCall.php
Overview
This guide shows how to send audio notifications using voice calls. You can play recorded audio when the call recipient answers or use text-to-speech, as we show here, combining static text with dynamic information that Plivo gets from a variable.You can use voice notification for use cases such as:- Order notification
- Booking status
- Delivery status
- Flight cancellation/rescheduling
- Two-factor authentication/one-time password
- New offer notification
- Account balance notification
- Using PHLO
- Using XML
You can create and deploy a PHLO to send voice notifications with a few clicks on the PHLO canvas.
How it works
Prerequisites
To get started, you need a Plivo account — sign up with your work email address if you don’t have one already. If this is your first time triggering a PHLO with .NET, follow our instructions to set up a .NET development environment.Create the PHLO
To create a PHLO, visit the PHLO page of the Plivo console. If this is your first PHLO, the PHLO page will be empty.- Click Create New PHLO.
-
In the Choose your use case pop-up, click Build my own. The PHLO canvas will appear with the Start node.
Note: The Start node is the starting point of any PHLO. It lets you trigger a PHLO to start upon one of three actions: incoming SMS message, incoming call, or API request.
-
Click the Start node to open the Configurations tab, then enter the information to retrieve from the HTTP Request payload — in this case, the From and To numbers for the call, and an item number.
- From the list of components on the left side, drag and drop the Initiate Call component onto the canvas. This adds an Initiate Call node onto the canvas. When a component is placed on the canvas it becomes a node.
-
Draw a line to connect the Start node’s API Request trigger state to the Initiate Call node.
-
In the Configuration tab of the Initiate Call node, give the node a name. To enter values for the From and To fields, enter two curly brackets to view all available variables, and choose the appropriate ones. The values for the numbers will be retrieved from the HTTP Request payload you defined in the Start node.
- Validate the configuration by clicking Validate. Do the same for each node as you go along.
-
Next, create a node from the Play Audio component. Connect the Initiate Call node to the Play Audio node using the Answered trigger state.
-
Configure the Play Audio node to play a message to the user by entering text in the Speak Text box in the Prompt section of the Configuration pane.
- Audio playback can either be static or dynamic. You define a static payload by specifying values when you create the PHLO, and a dynamic payload by passing values through Liquid templating parameters when you trigger the PHLO from your application.
- On the Play Audio Configuration tab, enter a static message (for example, “Your order has been successfully placed”) in the Speak Text field, with a variable to include the dynamic text. Enter two curly brackets to view all available variables. Choose the item number you defined in the Start node configuration tab.
- After you complete and validate the node configurations, give the PHLO a name by clicking in the upper left, then click Save.
Trigger the PHLO
You integrate a PHLO into your application workflow by making an API request to trigger the PHLO with the required payload — the set of parameters you pass to the PHLO. You can define a static payload by specifying values when you create the PHLO, or define a dynamic payload by passing values through parameters when you trigger the PHLO from your application.With a static payload
When you configure values when creating the PHLO, they act as a static payload.Code
Open the file in the CS project calledProgram.cs and paste into it this code.Copy
Ask AI
using System;
using Plivo;

namespace test_PHLO
{
    class Program
    {
        public static void Main(string[] args)
        {
            var phloClient = new PhloApi("<auth_id>", "<auth_token>");
            var phloID = "<phlo_id>";
            var phlo = phloClient.Phlo.Get(phloID);
            Console.WriteLine(phlo.Run());
        }
    }
}
With a dynamic payload
To use dynamic values for the parameters, use Liquid templating parameters when you create the PHLO and pass the values from your code to the PHLO when you trigger it.Code
Open the file in the CS project calledProgram.cs and paste into it this code.Copy
Ask AI
using System;
using System.Collections.Generic;
using Plivo;

namespace test_PHLO
{
    class Program
    {
        public static void Main(string[] args)
        {
            var phloClient = new PhloApi("<auth_id>", "<auth_token>");
            var phloID = "<phlo_id>";
            var phlo = phloClient.Phlo.Get(phloID);
            var data = new Dictionary<string, object>
            {
                { "from", "<caller_id>" },
                { "to", "<destination_number>" }

            };
            Console.WriteLine(phlo.Run(data));
        }
    }
}
Test
Save the file and run it.Here’s how to use Plivo APIs and XML to implement voice notifications.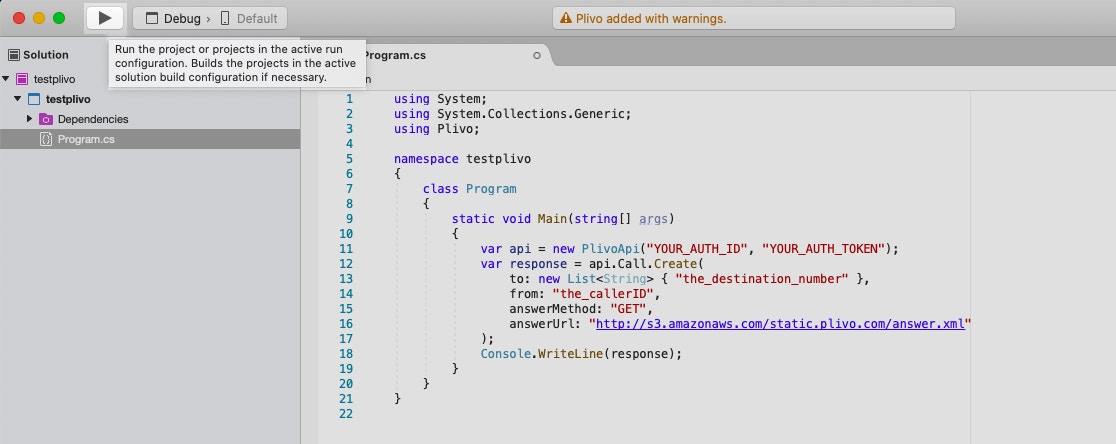
How it works
Copy
Ask AI
<Response>
<Speak>Congratulations, your order was successfully placed</Speak>
</Response>
Prerequisites
To get started, you need a Plivo account — sign up with your work email address if you don’t have one already. If this is your first time using Plivo APIs, follow our instructions to set up a Dotnet development environment.Create a voice notification application in C#
In Visual Studio, open the file in the CS project calledProgram.cs and paste into it this code.Copy
Ask AI
using System;
using System.Collections.Generic;
using Plivo;

namespace testplivo
{
    class Program
    {
        static void Main(string[] args)
        {
            var api = new PlivoApi("<auth_id>","<auth_token>");
            var response = api.Call.Create(
                to: new List<String> { "<destination_number>" },
                from: "<caller_id>",
                answerMethod: "GET",
                answerUrl: "https://s3.amazonaws.com/static.plivo.com/notification.xml"
            );
            Console.WriteLine(response);
        }
    }
}
Note:
We recommend that you store your credentials in the
auth_id and auth_token environment variables, to avoid the possibility of accidentally committing them to source control. If you do this, you can initialize the client with no arguments and Plivo will automatically fetch the values from the environment variables. You can use the <a href="https://docs.microsoft.com/en-us/dotnet/api/system.environment.setenvironmentvariable?view=netcore-3.1" rel="nofollow">Environment.SetEnvironmentVariable</a> method to store environment variables and <a href="https://docs.microsoft.com/en-us/dotnet/api/system.environment.getenvironmentvariable?view=netcore-3.1" rel="nofollow">Environment.GetEnvironmentVariable</a> to fetch them when initializing the client.Test
Save the file and run it.Overview
This guide shows how to send audio notifications using voice calls. You can play recorded audio when the call recipient answers or use text-to-speech, as we show here, combining static text with dynamic information that Plivo gets from a variable.You can use voice notification for use cases such as:- Order notification
- Booking status
- Delivery status
- Flight cancellation/rescheduling
- Two-factor authentication/one-time password
- New offer notification
- Account balance notification
- Using PHLO
- Using XML
You can create and deploy a PHLO to send voice notifications with a few clicks on the PHLO canvas.
How it works
Prerequisites
To get started, you need a Plivo account — sign up with your work email address if you don’t have one already. If this is your first time triggering a PHLO with Java, follow our instructions to set up a Java development environment.Create the PHLO
To create a PHLO, visit the PHLO page of the Plivo console. If this is your first PHLO, the PHLO page will be empty.- Click Create New PHLO.
-
In the Choose your use case pop-up, click Build my own. The PHLO canvas will appear with the Start node.
Note: The Start node is the starting point of any PHLO. It lets you trigger a PHLO to start upon one of three actions: incoming SMS message, incoming call, or API request.
-
Click the Start node to open the Configurations tab, then enter the information to retrieve from the HTTP Request payload — in this case, the From and To numbers for the call, and an item number.
- From the list of components on the left side, drag and drop the Initiate Call component onto the canvas. This adds an Initiate Call node onto the canvas. When a component is placed on the canvas it becomes a node.
-
Draw a line to connect the Start node’s API Request trigger state to the Initiate Call node.
-
In the Configuration tab of the Initiate Call node, give the node a name. To enter values for the From and To fields, enter two curly brackets to view all available variables, and choose the appropriate ones. The values for the numbers will be retrieved from the HTTP Request payload you defined in the Start node.
- Validate the configuration by clicking Validate. Do the same for each node as you go along.
-
Next, create a node from the Play Audio component. Connect the Initiate Call node to the Play Audio node using the Answered trigger state.
-
Configure the Play Audio node to play a message to the user by entering text in the Speak Text box in the Prompt section of the Configuration pane.
- Audio playback can either be static or dynamic. You define a static payload by specifying values when you create the PHLO, and a dynamic payload by passing values through Liquid templating parameters when you trigger the PHLO from your application.
- On the Play Audio Configuration tab, enter a static message (for example, “Your order has been successfully placed”) in the Speak Text field, with a variable to include the dynamic text. Enter two curly brackets to view all available variables. Choose the item number you defined in the Start node configuration tab.
- After you complete and validate the node configurations, give the PHLO a name by clicking in the upper left, then click Save.
Trigger the PHLO
You integrate a PHLO into your application workflow by making an API request to trigger the PHLO with the required payload — the set of parameters you pass to the PHLO. You can define a static payload by specifying values when you create the PHLO, or define a dynamic payload by passing values through parameters when you trigger the PHLO from your application.With a static payload
When you configure values when creating the PHLO, they act as a static payload.Code
Create a Java class in the project calledTriggerPhlo and paste into it this code.Copy
Ask AI
import com.plivo.api.Plivo;
import com.plivo.api.PlivoClient;
import com.plivo.api.exceptions.PlivoRestException;
import com.plivo.api.models.phlo.Phlo;
import java.io.IOException;

public class Example
{
    private static final String authId = "<auth_id>";
    private static final String authToken = "<auth_token>";
    private static PlivoClient client = new PlivoClient(authId, authToken);
    public static void main(String[] args) throws IOException, PlivoRestException
    {
        String phloId = "<phlo_id>";
        Plivo.init(authId, authToken);
        Phlo phlo = Phlo.getter(phloId).client(client).get();
        PhloUpdateResponse response = Phlo.updater(phloId).payload().run();
    }
}
With a dynamic payload
To use dynamic values for the parameters, use Liquid templating parameters when you create the PHLO and pass the values from your code to the PHLO when you trigger it.Code
Create a Java class in the project calledTriggerPhlo and paste into it this code.Copy
Ask AI
import com.plivo.api.Plivo;
import com.plivo.api.PlivoClient;
import com.plivo.api.exceptions.PlivoRestException;
import com.plivo.api.models.phlo.Phlo;
import java.io.IOException;

public class Example
{
    private static final String authId = "<auth_id>";
    private static final String authToken = "<auth_token>";
    private static PlivoClient client = new PlivoClient(authId, authToken);
    public static void main(String[] args) throws IOException, PlivoRestException
    {
        String phloId = "<phlo_id>";
        Plivo.init(authId, authToken);
        Phlo phlo = Phlo.getter(phloId).client(client).get();
        Map<String, Object> payload = new HashMap<>();
        payload.put("from", "<caller_id>");
        payload.put("to", "<destination_number>");
        PhloUpdateResponse response = Phlo.updater(phloId).payload(payload).run();
    }
}
Test
Save the file and run it.Here’s how to use Plivo APIs and XML to implement voice notifications.
How it works
Copy
Ask AI
<Response>
<Speak>Congratulations, your order was successfully placed</Speak>
</Response>
Prerequisites
To get started, you need a Plivo account — sign up with your work email address if you don’t have one already. If this is your first time using Plivo APIs, follow our instructions to set up a Java development environment.Create a voice notification application in Java
Create a Java class in the projectMakeCall and paste into it this code.Copy
Ask AI
import java.io.IOException;
import java.util.Collections;
import com.plivo.api.Plivo;
import com.plivo.api.exceptions.PlivoRestException;
import com.plivo.api.models.call.Call;
import com.plivo.api.models.call.CallCreateResponse;

class MakeCall {
    public static void main(String [] args) throws IOException, PlivoRestException {
        Plivo.init("<auth_id>","<auth_token>");
        CallCreateResponse response = Call.creator("<caller_id>",
                Collections.singletonList("<destination_number>"),
                "https://s3.amazonaws.com/static.plivo.com/notification.xml")
                .answerMethod("GET")
                .create();
        System.out.println(response);
    }
}
Note:
We recommend that you store your credentials in the
auth_id and auth_token environment variables, to avoid the possibility of accidentally committing them to source control. If you do this, you can initialize the client with no arguments and Plivo will automatically fetch the values from the environment variables. You can use <a rel="nofollow" href="https://docs.oracle.com/javase/tutorial/essential/environment/env.html">System.getenv()</a> to store environment variables and retrieve them when initializing the client.Test
Save the file and run it.Overview
This guide shows how to send audio notifications using voice calls. You can play recorded audio when the call recipient answers or use text-to-speech, as we show here, combining static text with dynamic information that Plivo gets from a variable.You can use voice notification for use cases such as:- Order notification
- Booking status
- Delivery status
- Flight cancellation/rescheduling
- Two-factor authentication/one-time password
- New offer notification
- Account balance notification
- Using PHLO
- Using XML
You can create and deploy a PHLO to send voice notifications with a few clicks on the PHLO canvas.
How it works
Prerequisites
To get started, you need a Plivo account — sign up with your work email address if you don’t have one already. If this is your first time triggering a PHLO with Go, follow our instructions to set up a Go development environment.Create the PHLO
To create a PHLO, visit the PHLO page of the Plivo console. If this is your first PHLO, the PHLO page will be empty.- Click Create New PHLO.
-
In the Choose your use case pop-up, click Build my own. The PHLO canvas will appear with the Start node.
Note: The Start node is the starting point of any PHLO. It lets you trigger a PHLO to start upon one of three actions: incoming SMS message, incoming call, or API request.
-
Click the Start node to open the Configurations tab, then enter the information to retrieve from the HTTP Request payload — in this case, the From and To numbers for the call, and an item number.
- From the list of components on the left side, drag and drop the Initiate Call component onto the canvas. This adds an Initiate Call node onto the canvas. When a component is placed on the canvas it becomes a node.
-
Draw a line to connect the Start node’s API Request trigger state to the Initiate Call node.
-
In the Configuration tab of the Initiate Call node, give the node a name. To enter values for the From and To fields, enter two curly brackets to view all available variables, and choose the appropriate ones. The values for the numbers will be retrieved from the HTTP Request payload you defined in the Start node.
- Validate the configuration by clicking Validate. Do the same for each node as you go along.
-
Next, create a node from the Play Audio component. Connect the Initiate Call node to the Play Audio node using the Answered trigger state.
-
Configure the Play Audio node to play a message to the user by entering text in the Speak Text box in the Prompt section of the Configuration pane.
- Audio playback can either be static or dynamic. You define a static payload by specifying values when you create the PHLO, and a dynamic payload by passing values through Liquid templating parameters when you trigger the PHLO from your application.
- On the Play Audio Configuration tab, enter a static message (for example, “Your order has been successfully placed”) in the Speak Text field, with a variable to include the dynamic text. Enter two curly brackets to view all available variables. Choose the item number you defined in the Start node configuration tab.
- After you complete and validate the node configurations, give the PHLO a name by clicking in the upper left, then click Save.
Trigger the PHLO
You integrate a PHLO into your application workflow by making an API request to trigger the PHLO with the required payload — the set of parameters you pass to the PHLO. You can define a static payload by specifying values when you create the PHLO, or define a dynamic payload by passing values through parameters when you trigger the PHLO from your application.With a static payload
When you configure values when creating the PHLO, they act as a static payload.Code
Create a file calledTriggerPhlo.go and paste into it this code.Copy
Ask AI
package main

import (
	"fmt"
	"plivo-go"
)
// Initialize the following params with corresponding values to trigger resources
const authId = "<auth_id>"
const authToken = "<auth_token>"
const phloId = "<phlo_id>"

func main() {
	testPhloRunWithoutParams()
}

func testPhloRunWithoutParams() {
	phloClient, err := plivo.NewPhloClient(authId, authToken, &plivo.ClientOptions{})
	if err != nil {
			fmt.Print("Error", err.Error())
			return
		}
	phloGet, err := phloClient.Phlos.Get(phloId)
	if err != nil {
			fmt.Print("Error", err.Error())
			return
		}
	response, err := phloGet.Run(nil)
	if err != nil {
			fmt.Print("Error", err.Error())
			return
		}
	fmt.Printf("Response: %#v\n", response)
}
With a dynamic payload
To use dynamic values for the parameters, use Liquid templating parameters when you create the PHLO and pass the values from your code to the PHLO when you trigger it.Code
Create a file calledTriggerPhlo.go and paste into it this code.Copy
Ask AI
package main

import (
	"fmt"
	"plivo-go"
)
// Initialize the following params with corresponding values to trigger resources
const authId = "<auth_id>"
const authToken = "<auth_token>"
const phloId = "<phlo_id>"

func main() {
	testPhloRunWithParams()
}

func testPhloRunWithParams() {
	phloClient, err := plivo.NewPhloClient(authId, authToken, &plivo.ClientOptions{})
	if err != nil {
			fmt.Print("Error", err.Error())
			return
		}
	phloGet, err := phloClient.Phlos.Get(phloId)
	if err != nil {
			fmt.Print("Error", err.Error())
			return
		}
	//pass corresponding from and to values
	type params map[string]interface{}
	response, err := phloGet.Run(params{
		"from": "<caller_id>",
		"to":   "<destination_number>",
	})

	if err != nil {
		println(err)
	}
	fmt.Printf("Response: %#v\n", response)
}
Test
Save the file and run it.Copy
Ask AI
go run TriggerPhlo.go
Here’s how to use Plivo APIs and XML to implement voice notifications.
How it works
Copy
Ask AI
<Response>
<Speak>Congratulations, your order was successfully placed</Speak>
</Response>
Prerequisites
To get started, you need a Plivo account — sign up with your work email address if you don’t have one already. If this is your first time using Plivo APIs, follow our instructions to set up a Go development environment.Create a voice notification application in Go
Create a file calledMakeCall.go and paste into it this code.Copy
Ask AI
package main

import "fmt"
import "github.com/plivo/plivo-go/v7"

func main() {
	client, err := plivo.NewClient("<auth_id>","<auth_token>", &plivo.ClientOptions{})
	if err != nil {
			fmt.Print("Error", err.Error())
			return
		}
	response, err := client.Calls.Create(
		plivo.CallCreateParams{
			From: "<caller_id>",
			To: "<destination_number>",
			AnswerURL: "https://s3.amazonaws.com/static.plivo.com/notification.xml",
			AnswerMethod: "GET",
		},
	)
	if err != nil {
			fmt.Print("Error", err.Error())
			return
		}
	fmt.Printf("Response: %#v\n", response)
}
Note:
We recommend that you store your credentials in the
auth_id and auth_token environment variables, to avoid the possibility of accidentally committing them to source control. If you do this, you can initialize the client with no arguments and Plivo will automatically fetch the values from the environment variables. You can use the os.Setenv and os.Getenv functions to store environment variables and fetch them when initializing the client.Test
Save the file and run it.Copy
Ask AI
go run MakeCall.go