- Node
- Ruby
- Python
- PHP
- .NET
- Java
- Go
Overview
When you don’t want to receive calls from a specific phone number or even a whole country, follow the instructions in this guide to create an application to block phone numbers or country codes associated with incoming calls.You can screen incoming calls either by using our PHLO visual workflow builder or our APIs and XML documents. Follow the instructions in one of the tabs below.- Using XML
Here’s how to use a Plivo XML document that screens incoming calls on a Plivo number.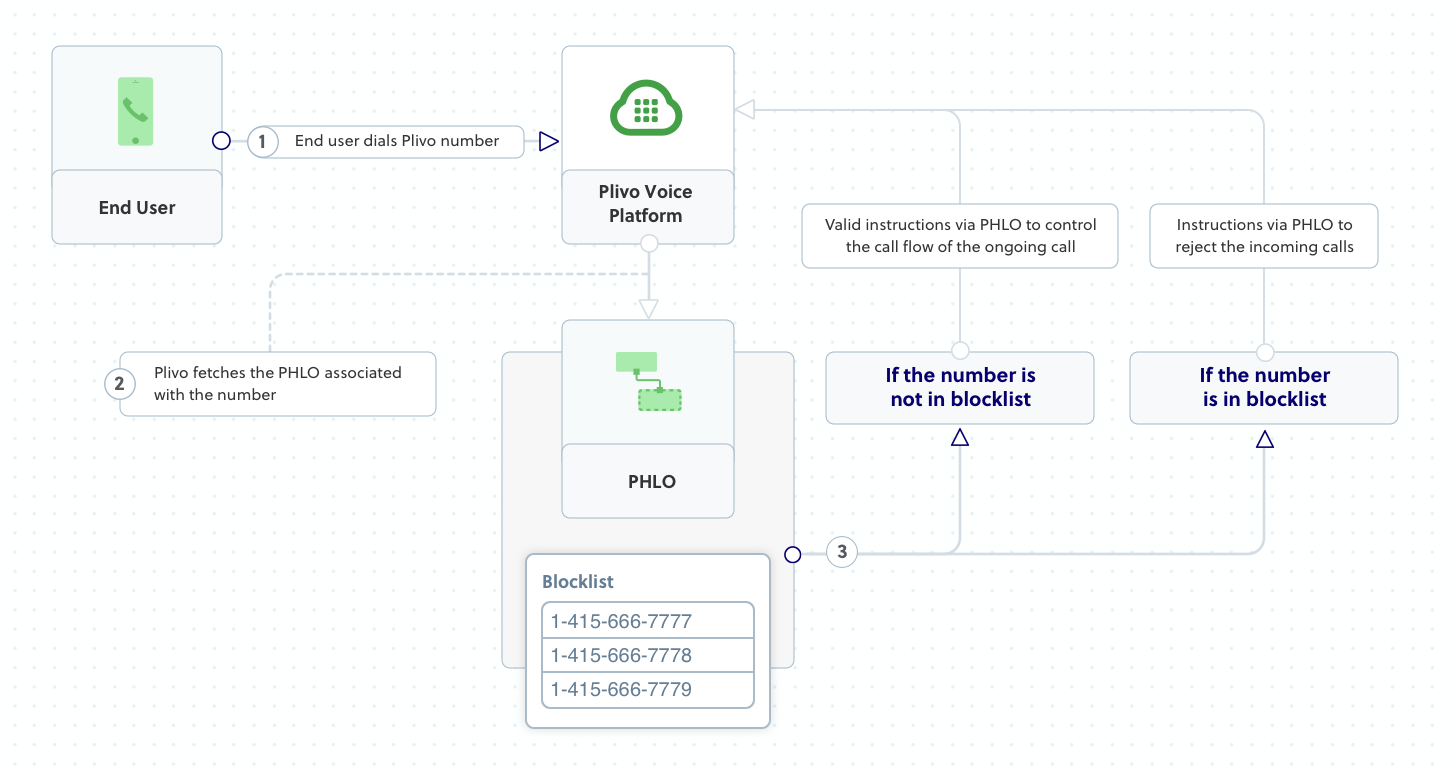
How it works
Prerequisites
To get started, you need a Plivo account — sign up with your work email address if you don’t have one already. You must have a voice-enabled Plivo phone number to receive incoming calls; you can rent numbers from the Numbers page of the Plivo console, or by using the Numbers API. If this is your first time using Plivo APIs, follow our instructions to set up a Node.js development environment and a web server and safely expose that server to the internet.Create an Express server to screen incoming calls
Create a file calledscreen_call.js and paste into it this code.var plivo = require('plivo');
var express = require('express');
var bodyParser = require('body-parser');
var app = express();
app.use(bodyParser.urlencoded({extended: true}));
app.set('port', (process.env.PORT || 5000));
app.all('/screen_call/', function(request, response) {
var blacklist = [ '<phone_number1>', '<phone_number2>', '<phone_number3>'];
// Get the caller's phone number from the 'From' parameter
var from_number = request.query.From || request.body.From;
var r = plivo.Response();
if (blacklist.indexOf(from_number) === -1){
var body = "Hello, how are you today";
r.addSpeak(body);
} else {
//Specify the reason for hangup
var params = {'reason': "rejected"};
r.addHangup(params);
}
console.log (r.toXML());
response.set({'Content-Type': 'text/xml'});
response.send(r.toXML());
});
app.listen(app.get('port'), function() {
console.log('Node app is running on port', app.get('port'));
});
Create a Plivo application to screen calls
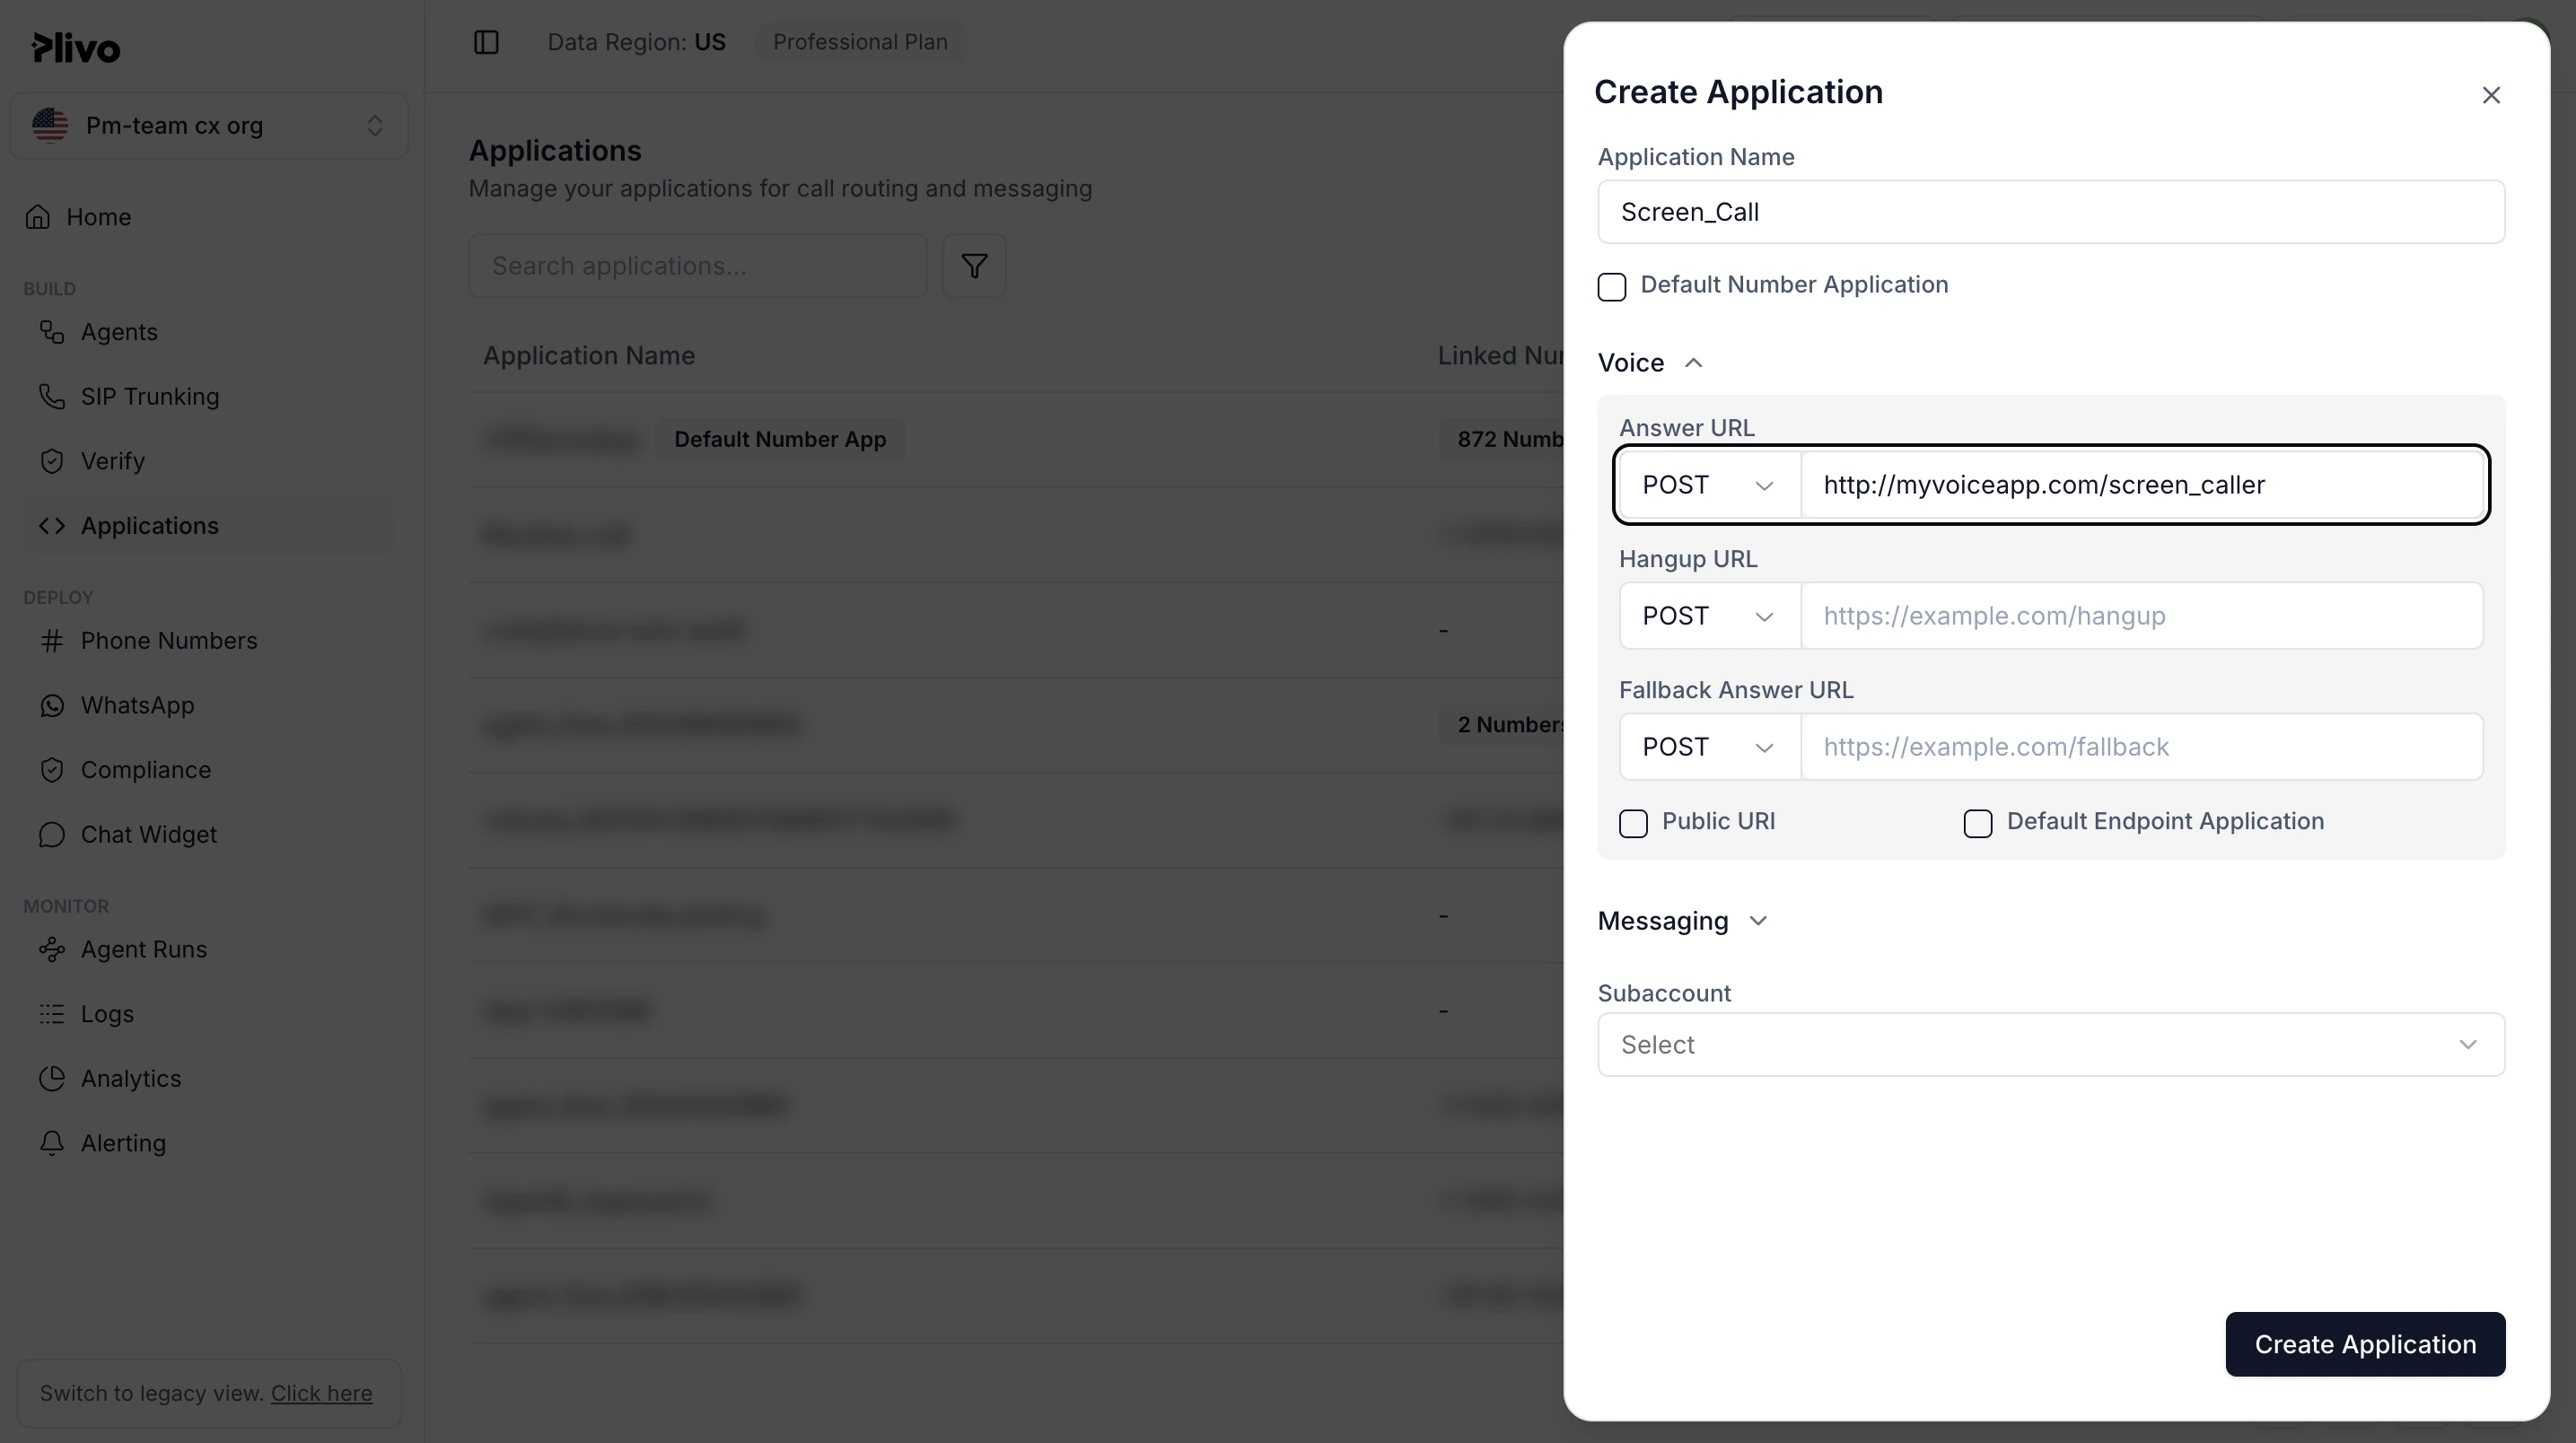
Associate the Express server you created with Plivo by creating a Plivo application. Visit Voice > Applications in the Plivo console and click on Add New Application, or use Plivo’s Application API.Give your application a name — we called oursScreen Call. Enter the server URL you want to use (for example https://<yourdomain>.com/screen_call/) in the Answer URL field and set the method to POST. Click Create Application to save your application.Assign a Plivo number to your application
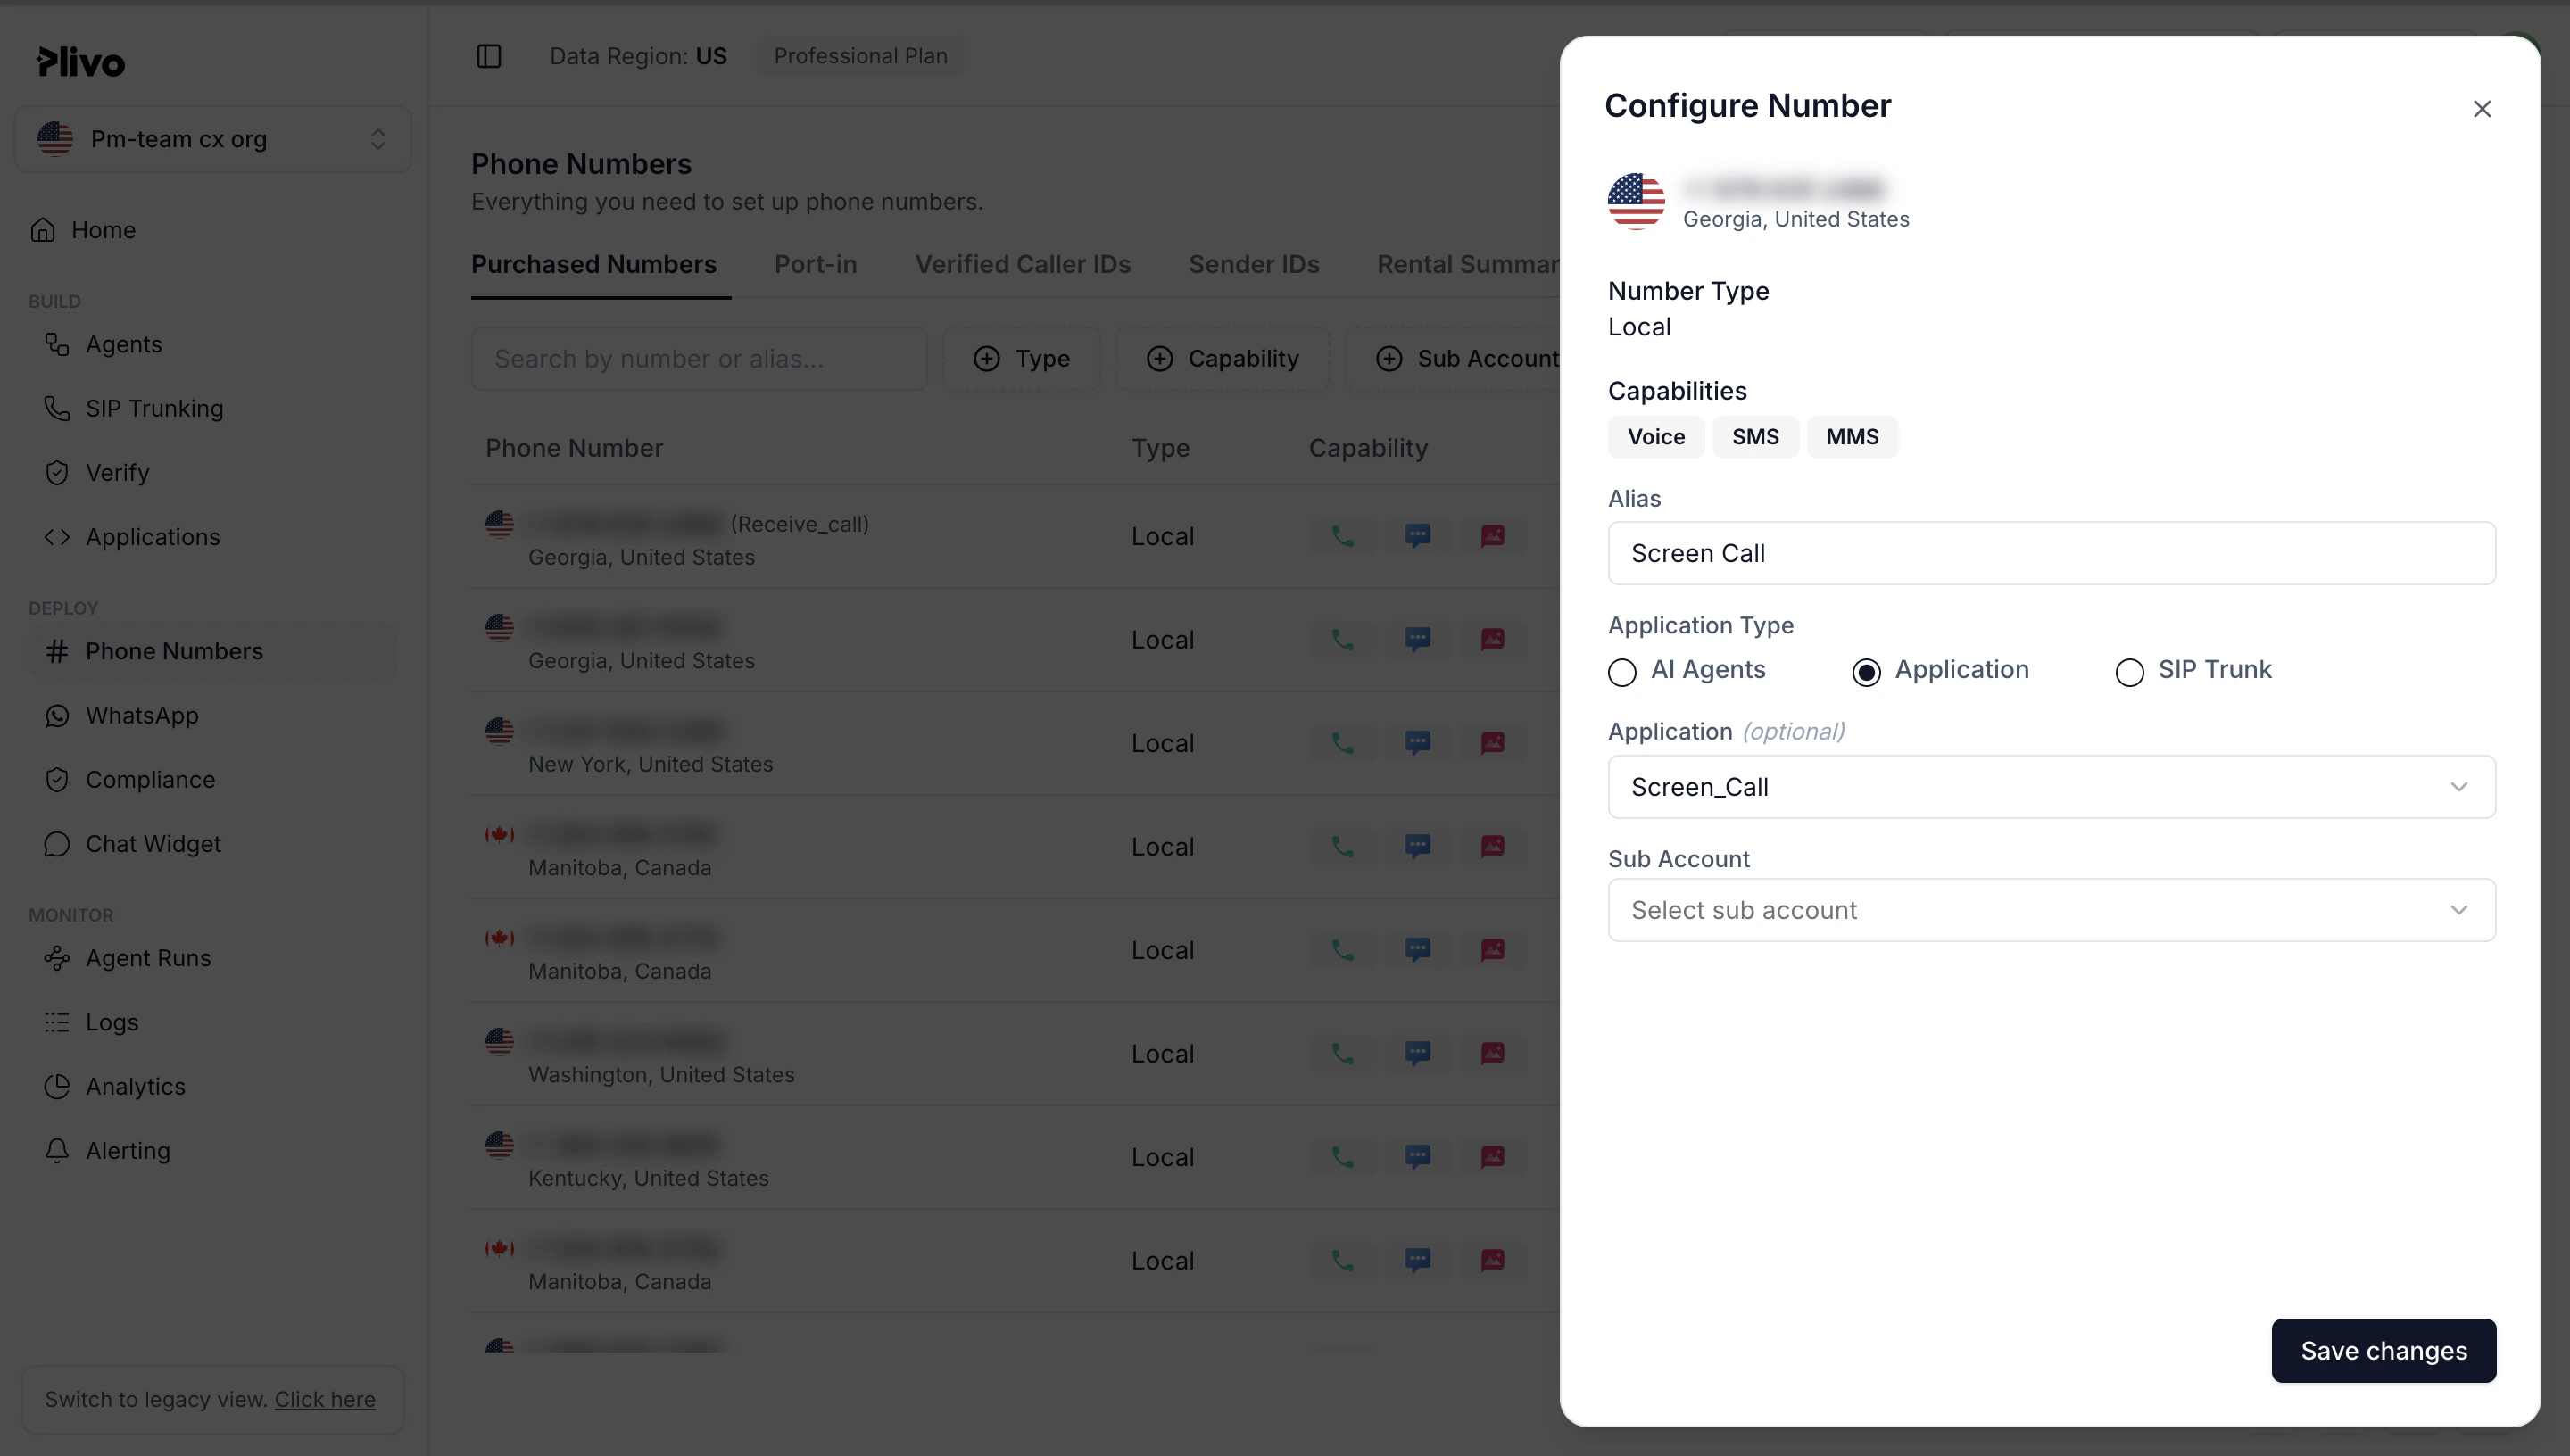
Navigate to the Numbers page and select the phone number you want to use for this application.From the Application Type drop-down, selectXML Application.From the Plivo Application drop-down, select Screen Call (the name we gave the application).Click Update Number to save.Test
Make a call to your Plivo number using any phone. Plivo will send a request to the answer URL you provided requesting an XML response and then process the call according to the instructions in the XML document the server provides. If your phone number is not blacklisted, the call will go through and you should hear, “Hello, how are you today.”Overview
When you don’t want to receive calls from a specific phone number or even a whole country, follow the instructions in this guide to create an application to block phone numbers or country codes associated with incoming calls.You can screen incoming calls either by using our PHLO visual workflow builder or our APIs and XML documents. Follow the instructions in one of the tabs below.- Using XML
Here’s how to use a Plivo XML document that screens incoming calls on a Plivo number.
How it works
Prerequisites
To get started, you need a Plivo account — sign up with your work email address if you don’t have one already. You must have a voice-enabled Plivo phone number to receive incoming calls; you can rent numbers from the Numbers page of the Plivo console, or by using the Numbers API. If this is your first time using Plivo APIs, follow our instructions to set up a Ruby development environment and a web server and safely expose that server to the internet.Create a Rails controller to screen incoming calls
Change to the project directory and run this command to create a Rails controller to screen incoming calls.$ rails generate controller Plivo voice
$ rm app/views/plivo/voice.html.erb
include Plivo
include Plivo::XML
include Plivo::Exceptions

class PlivoController < ApplicationController
 def screen
    blacklist = ['<phone_number1>', '<phone_number2>', '<phone_number3>']

    from_number = params[:From]
    r = Response.new()

    if blacklist.include? from_number
        # Specify the reason for hangup
        params = {
            reason: 'rejected'
        }
        r.addHangup(params)
    else
        r.addSpeak('Hello, how are you today')
    end
    xml = Plivo::PlivoXML.new(r)
    render xml: xml.to_xml
 end
end
Create a Plivo application to screen calls
Associate the Rails server you created with Plivo by creating a Plivo application. Visit Voice > Applications in the Plivo console and click on Add New Application, or use Plivo’s Application API.Give your application a name — we called oursScreen Call. Enter the server URL you want to use (for example https://<yourdomain>.com/screen_call/) in the Answer URL field and set the method to POST. Click Create Application to save your application.Assign a Plivo number to your application
Navigate to the Numbers page and select the phone number you want to use for this application.From the Application Type drop-down, selectXML Application.From the Plivo Application drop-down, select Screen Call (the name we gave the application).Click Update Number to save.Test
Make a call to your Plivo number using any phone. Plivo will send a request to the answer URL you provided requesting an XML response and then process the call according to the instructions in the XML document the server provides. If your phone number is not blacklisted, the call will go through and you should hear, “Hello, how are you today.”Overview
When you don’t want to receive calls from a specific phone number or even a whole country, follow the instructions in this guide to create an application to block phone numbers or country codes associated with incoming calls.You can screen incoming calls either by using our PHLO visual workflow builder or our APIs and XML documents. Follow the instructions in one of the tabs below.- Using XML
Here’s how to use a Plivo XML document that screens incoming calls on a Plivo number.
How it works
Prerequisites
To get started, you need a Plivo account — sign up with your work email address if you don’t have one already. You must have a voice-enabled Plivo phone number to receive incoming calls; you can rent numbers from the Numbers page of the Plivo console, or by using the Numbers API. If this is your first time using Plivo APIs, follow our instructions to set up a Python development environment and a web server and safely expose that server to the internet.Create a Flask application to screen incoming calls
Create a file calledscreen_call.py and paste into it this code.from flask import Flask, Response
from flask import request
from plivo import plivoxml
app = Flask(__name__)
@app.route('/screen_call/', methods=['GET', 'POST'])
def screen_call():
blacklist = ['<phone_number1>','<phone_number2>','<phone_number3>']
from_number = request.values.get('From')
response = plivoxml.ResponseElement()
if from_number in blacklist:
params = {'reason': 'rejected'}
response.add(plivoxml.HangupElement(**params))
else:
response.add(plivoxml.SpeakElement('Hello, how are you today'))
return Response(response.to_string(), mimetype='application/xml')
if __name__ == "__main__":
app.run(host='0.0.0.0', debug=True)
Create a Plivo application to screen calls
Associate the Flask application you created with Plivo by creating a Plivo application. Visit Voice > Applications in the Plivo console and click on Add New Application, or use Plivo’s Application API.Give your application a name — we called oursScreen Call. Enter the server URL you want to use (for example https://<yourdomain>.com/screen_call/) in the Answer URL field and set the method to POST. Click Create Application to save your application.Assign a Plivo number to your application
Navigate to the Numbers page and select the phone number you want to use for this application.From the Application Type drop-down, selectXML Application.From the Plivo Application drop-down, select Screen Call (the name we gave the application).Click Update Number to save.Test
Make a call to your Plivo number using any phone. Plivo will send a request to the answer URL you provided requesting an XML response and then process the call according to the instructions in the XML document the server provides. If your phone number is not blacklisted, the call will go through and you should hear, “Hello, how are you today.”Overview
When you don’t want to receive calls from a specific phone number or even a whole country, follow the instructions in this guide to create an application to block phone numbers or country codes associated with incoming calls.You can screen incoming calls either by using our PHLO visual workflow builder or our APIs and XML documents. Follow the instructions in one of the tabs below.- Using XML
Here’s how to use a Plivo XML document that screens incoming calls on a Plivo number.
How it works
Prerequisites
To get started, you need a Plivo account — sign up with your work email address if you don’t have one already. You must have a voice-enabled Plivo phone number to receive incoming calls; you can rent numbers from the Numbers page of the Plivo console, or by using the Numbers API. If this is your first time using Plivo APIs, follow our instructions to set up a PHP development environment and a web server and safely expose that server to the internet.Create a Laravel controller to screen incoming calls
Change to the project directory and run this command to create a Laravel controller to screen inbound calls.$ php artisan make:controller VoiceController
<?php

namespace App\Http\Controllers;
require '../../vendor/autoload.php';
use Plivo\RestClient;
use Plivo\XML\Response;
use Illuminate\Http\Request;

class VoiceController extends Controller
{
    // Speak XML to handle your first incoming call
    public function screenCall()
    {
      $from_number = $_REQUEST['From'];
      $blacklist = array('<phone_number1>', '<phone_number2>', '<phone_number3>');
      $r = new Response();
      if (in_array($from_number, $blacklist)) {
         $params = array('reason' => 'rejected');
         $r->addHangup($params);
      } else {
         $body = "Hello, how are you today";
         $r->addSpeak($body);
      }
      Header('Content-type: text/xml');
      echo $r->toXML();
    }
}
Create a Plivo application to screen calls
Associate the Laravel controller you created with Plivo by creating a Plivo application. Visit Voice > Applications in the Plivo console and click on Add New Application, or use Plivo’s Application API.Give your application a name — we called oursScreen Call. Enter the server URL you want to use (for example https://<yourdomain>.com/screen_call/) in the Answer URL field and set the method to POST. Click Create Application to save your application.Assign a Plivo number to your application
Navigate to the Numbers page and select the phone number you want to use for this application.From the Application Type drop-down, selectXML Application.From the Plivo Application drop-down, select Screen Call (the name we gave the application).Click Update Number to save.Test
Make a call to your Plivo number using any phone. Plivo will send a request to the answer URL you provided requesting an XML response and then process the call according to the instructions in the XML document the server provides. If your phone number is not blacklisted, the call will go through and you should hear, “Hello, how are you today.”Overview
When you don’t want to receive calls from a specific phone number or even a whole country, follow the instructions in this guide to create an application to block phone numbers or country codes associated with incoming calls.You can screen incoming calls either by using our PHLO visual workflow builder or our APIs and XML documents. Follow the instructions in one of the tabs below.- Using XML
Here’s how to use a Plivo XML document that screens incoming calls on a Plivo number. Give the project a name — we used Replace the phone number placeholders with actual phone numbers (for example, 12025551234).
How it works
Prerequisites
To get started, you need a Plivo account — sign up with your work email address if you don’t have one already. You must have a voice-enabled Plivo phone number to receive incoming calls; you can rent numbers from the Numbers page of the Plivo console, or by using the Numbers API. If this is your first time using Plivo APIs, follow our instructions to set up a .NET development environment and a web server and safely expose that server to the internet.Create an MVC controller to screen incoming calls
In Visual Studio, create a new project. Use the template for Web Application (Model-View-Controller).Screencall.Navigate to Controllers directory in the Screencall project. Create a controller named ScreencallController.cs and paste into it this code.using System;
using System.Collections.Generic;
using Plivo.XML;
using Microsoft.AspNetCore.Mvc;
namespace Screencall.Controllers
{
public class ScreencallController : Controller
{
// GET: /<controller>/
public IActionResult Index()
{
string[] blacklist = { "<phone_number1>", "<phone_number2>", "<phone_number3>" };
string fromNumber = Request.Query["From"];
Plivo.XML.Response resp = new Plivo.XML.Response();
if (blacklist.Equals(fromNumber))
{
resp.AddHangup(new Dictionary<string, string>()
{
{"reason","rejected"}, // Specify the reason for hangup
});
}
else
{
resp.AddSpeak("Hello, how are you today", new Dictionary<string, string>() { });
}
var output = resp.ToString();
return this.Content(output, "text/xml");
}
}
}
Create a Plivo application to screen calls
Associate the controller you created with Plivo by creating a Plivo application. Visit Voice > Applications in the Plivo console and click on Add New Application, or use Plivo’s Application API.Give your application a name — we called oursScreen Call. Enter the server URL you want to use (for example https://<yourdomain>.com/screen_call/) in the Answer URL field and set the method to POST. Click Create Application to save your application.Assign a Plivo number to your application
Navigate to the Numbers page and select the phone number you want to use for this application.From the Application Type drop-down, selectXML Application.From the Plivo Application drop-down, select Screen Call (the name we gave the application).Click Update Number to save.Test
Make a call to your Plivo number using any phone. Plivo will send a request to the answer URL you provided requesting an XML response and then process the call according to the instructions in the XML document the server provides. If your phone number is not blacklisted, the call will go through and you should hear, “Hello, how are you today.”Overview
When you don’t want to receive calls from a specific phone number or even a whole country, follow the instructions in this guide to create an application to block phone numbers or country codes associated with incoming calls.You can screen incoming calls either by using our PHLO visual workflow builder or our APIs and XML documents. Follow the instructions in one of the tabs below.- Using XML
Here’s how to use a Plivo XML document that screens incoming calls on a Plivo number.
How it works
Prerequisites
To get started, you need a Plivo account — sign up with your work email address if you don’t have one already. You must have a voice-enabled Plivo phone number to receive incoming calls; you can rent numbers from the Numbers page of the Plivo console, or by using the Numbers API. If this is your first time using Plivo APIs, follow our instructions to set up a Java development environment and a web server and safely expose that server to the internet.Create a Spark application to screen incoming calls
Create a Java class namedScreenCall and paste into it this code.import java.util.Arrays;
import com.plivo.api.xml.Hangup;
import com.plivo.api.xml.Response;
import com.plivo.api.xml.Speak;
import static spark.Spark.*;
public class screencalls {
public static void main(String[] args) {
post("/screen_call/", (request, response) -> {
response.type("application/xml");
String fromNumber = request.queryParams("From");
String[] blacklist = { "<phone_number1>","<phone_number2>", "<phone_number3>"};
if (Arrays.asList(blacklist).contains(fromNumber)) {
return new Response()
.children(
new Hangup()
.reason("rejected")
).toXmlString();
} else {
return new Response()
.children(
new Speak("Hello, how are you today")
).toXmlString();
}
});
}
}
Create a Plivo application to screen calls
Associate the Spark application you created with Plivo by creating a Plivo application. Visit Voice > Applications in the Plivo console and click on Add New Application, or use Plivo’s Application API.Give your application a name — we called oursScreen Call. Enter the server URL you want to use (for example https://<yourdomain>.com/screen_call/) in the Answer URL field and set the method to POST. Click Create Application to save your application.Assign a Plivo number to your application
Navigate to the Numbers page and select the phone number you want to use for this application.From the Application Type drop-down, selectXML Application.From the Plivo Application drop-down, select Screen Call (the name we gave the application).Click Update Number to save.Test
Make a call to your Plivo number using any phone. Plivo will send a request to the answer URL you provided requesting an XML response and then process the call according to the instructions in the XML document the server provides. If your phone number is not blacklisted, the call will go through and you should hear, “Hello, how are you today.”Overview
When you don’t want to receive calls from a specific phone number or even a whole country, follow the instructions in this guide to create an application to block phone numbers or country codes associated with incoming calls.You can screen incoming calls either by using our PHLO visual workflow builder or our APIs and XML documents. Follow the instructions in one of the tabs below.- Using XML
Here’s how to use a Plivo XML document that screens incoming calls on a Plivo number.
How it works
Prerequisites
To get started, you need a Plivo account — sign up with your work email address if you don’t have one already. You must have a voice-enabled Plivo phone number to receive incoming calls; you can rent numbers from the Numbers page of the Plivo console, or by using the Numbers API. If this is your first time using Plivo APIs, follow our instructions to set up a Go development environment and a web server and safely expose that server to the internet.Create a Go server to screen incoming calls
Create a file calledscreen_call.go and paste into it this code.package main
import (
"github.com/go-martini/martini"
"github.com/plivo/plivo-go/v7/xml"
"net/http"
)
func main() {
m := martini.Classic()
m.Get("/screen_call", func(w http.ResponseWriter, r *http.Request) string {
w.Header().Set("Content-Type", "application/xml")
fromNumber := r.FormValue("From")
blacklist := []string{"<phone_number1>", "<phone_number2>", "<phone_number3>"}
for _, num := range blacklist {
if num == fromNumber {
return xml.ResponseElement{
Contents: []interface{}{
new(xml.HangupElement).
SetReason("rejected"),
},
}.String()
}
}
return xml.ResponseElement{Contents: []interface{}{
new(xml.SpeakElement).
SetLoop(0).
AddSpeak("Hello, how are you today"),
}}.String()
})
m.Run()
}
Create a Plivo application to screen calls
Associate the Go application you created with Plivo by creating a Plivo application. Visit Voice > Applications in the Plivo console and click on Add New Application, or use Plivo’s Application API.Give your application a name — we called oursScreen Call. Enter the server URL you want to use (for example https://<yourdomain>.com/screen_call/) in the Answer URL field and set the method to POST. Click Create Application to save your application.Assign a Plivo number to your application
Navigate to the Numbers page and select the phone number you want to use for this application.From the Application Type drop-down, selectXML Application.From the Plivo Application drop-down, select Screen Call (the name we gave the application).Click Update Number to save.