- Node
- Ruby
- Python
- PHP
- .NET
- Java
- Go
Overview
This guide shows how to write an autoresponder for SMS text messages. Autoresponders can streamline marketing campaigns and subscription signups and reduce the amount of work humans have to do.You can create an autoresponder either by using our PHLO visual workflow builder or our APIs. Follow the instructions in one of the tabs below.- Using PHLO
- Using API
You can create and deploy a PHLO to implement an SMS autoresponder with a few clicks on the PHLO canvas.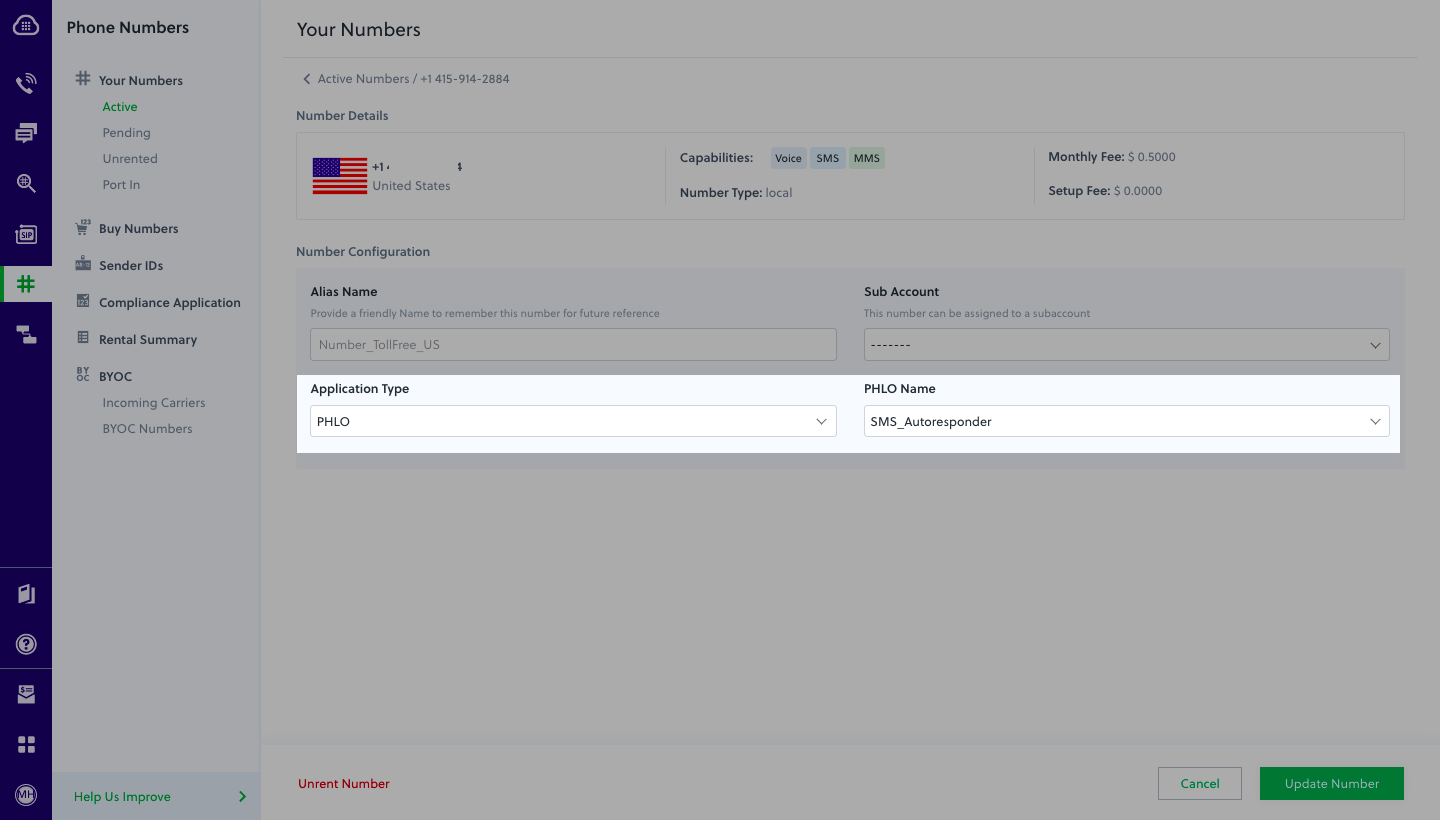
How it works
Prerequisite
To get started, you need a Plivo account — sign up with your work email address if you don’t have one already.Create the PHLO
To create a PHLO, visit the PHLO page of the Plivo console. If this is your first PHLO, the PHLO page will be empty.- Click Create New PHLO.
-
In the Choose your use case pop-up, click Build my own. The PHLO canvas will appear with the Start node.
The Start node is the starting point of any PHLO. It lets you trigger a PHLO to start upon one of three actions: incoming SMS message, incoming call, or API request.
- If you plan to use a dynamic payload — passing values through parameters when you trigger the PHLO from your application — click on the Start node to open the Configuration pane. Under API Request, enter key names for the variables you want to use in your payload — for example, a list of numbers to send an SMS message to.
- Once you’ve configured the node, click Validate to save the configuration.
- From the list of components on the left-hand side, drag and drop the Send Message component onto the canvas. When a component is placed on the canvas it becomes a node.
- Draw a line to connect the Start node’s Incoming Message trigger state to the Send Message node.
-
In the Configuration pane at the right of the canvas, configure the Send Message node with a sender ID in the From field. Enter the destination number you wish to send a message to in the To field. Put your message in the Text field.
You can define a static payload by specifying values when you create the PHLO, or define a dynamic payload by passing values through Liquid templating parameters when you trigger the PHLO from your application.
- Once you’ve configured the node, click Validate to save the configuration.
- After you complete the configuration, give the PHLO a name by clicking in the upper left, then click Save.
Assign the PHLO to a Plivo number
Once you’ve created and configured your PHLO, assign it to a Plivo number.- On the Numbers page of the console, under Your Numbers, click the phone number you want to use for the PHLO.
- In the Number Configuration box, select PHLO from the Application Type drop-down.
- From the PHLO Name drop-down, select the PHLO you want to use with the phone number, then click Update Number.
Test
You can now send a message to your Plivo phone number and see how the autoresponder works.For more information about creating a PHLO application, see the PHLO Getting Started guide. For information on components and their variables, see the PHLO Components Library.Here’s how to use Plivo APIs to set up an SMS autoresponder.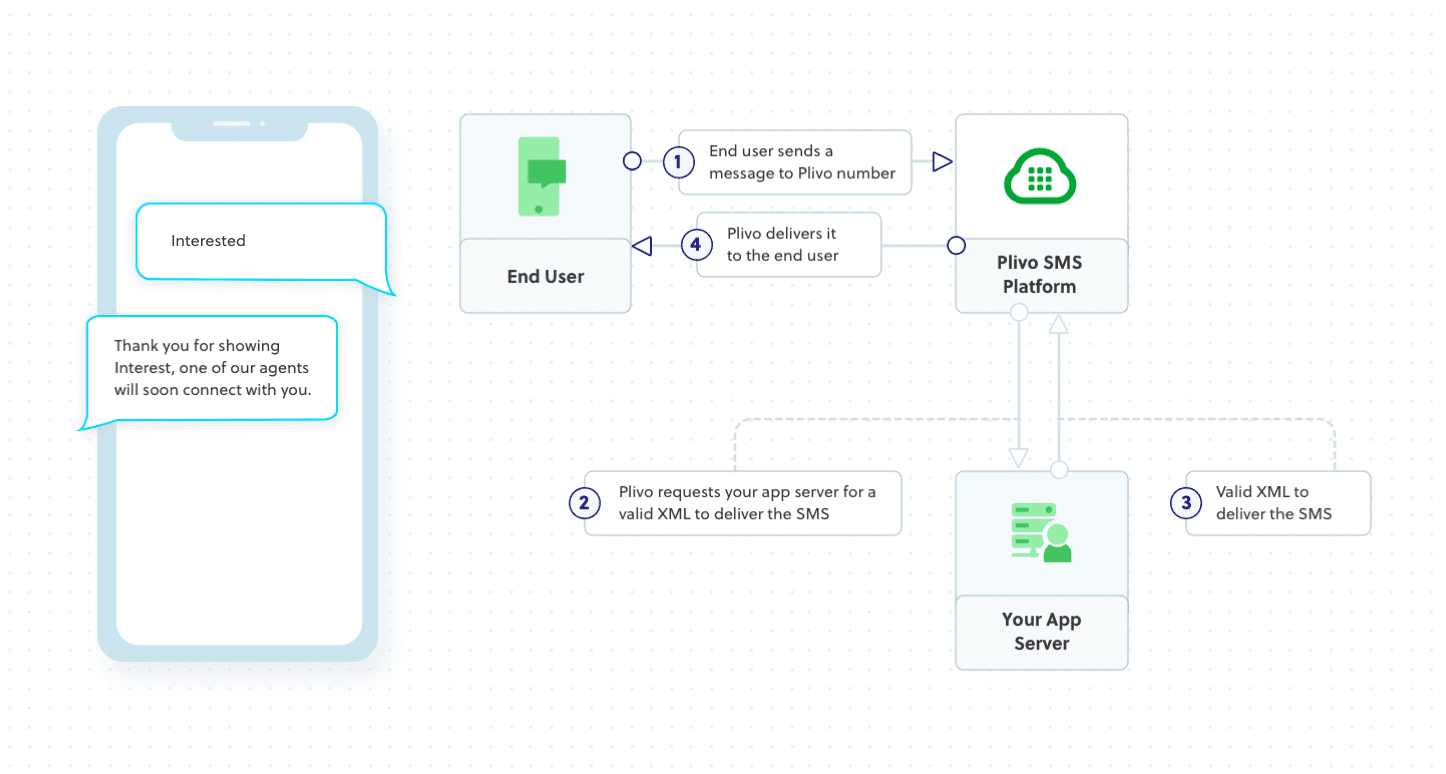
How it works
Prerequisites
To get started, you need a Plivo account — sign up with your work email address if you don’t have one already. To receive incoming messages, you must have a Plivo phone number that supports SMS; you can rent numbers from the Numbers page of the Plivo console or by using the Numbers API. If this is your first time using Plivo APIs, follow our instructions to set up a Node.js development environment.Create the autoresponder application using Express
Create a file calledautoresponder.js and paste into it this code.Copy
Ask AI
const plivo = require('plivo');
const express = require('express');
const bodyParser = require('body-parser');
const app = express();

app.use(bodyParser.urlencoded({
    extended: true
}));
app.use(function(req, response, next) {
    response.contentType('application/xml');
    next();
});
app.set('port', (process.env.PORT || 3000));
app.all('/autoresponder/', function(request, response) {
    let from_number = request.body.From || request.query.From;
    let to_number = request.body.To || request.query.To;
    let text = request.body.Text || request.query.Text;

    if (text.toLowerCase() == 'interested') {
        body = 'Thank you for showing interest. One of our agents will contact you.'
    } else {
        body = 'Reply "Interested" to connect with our agents'
    }
    let r = plivo.Response();
    let params = {
        'src': to_number,
        'dst': from_number,
    };
    r.addMessage(body, params);
    response.end(r.toXML());
});
app.listen(app.get('port'), function() {
    console.log('Node app is running on port', app.get('port'));
});
Copy
Ask AI
$ node autoresponder.js
Create a Plivo application for the autoresponder
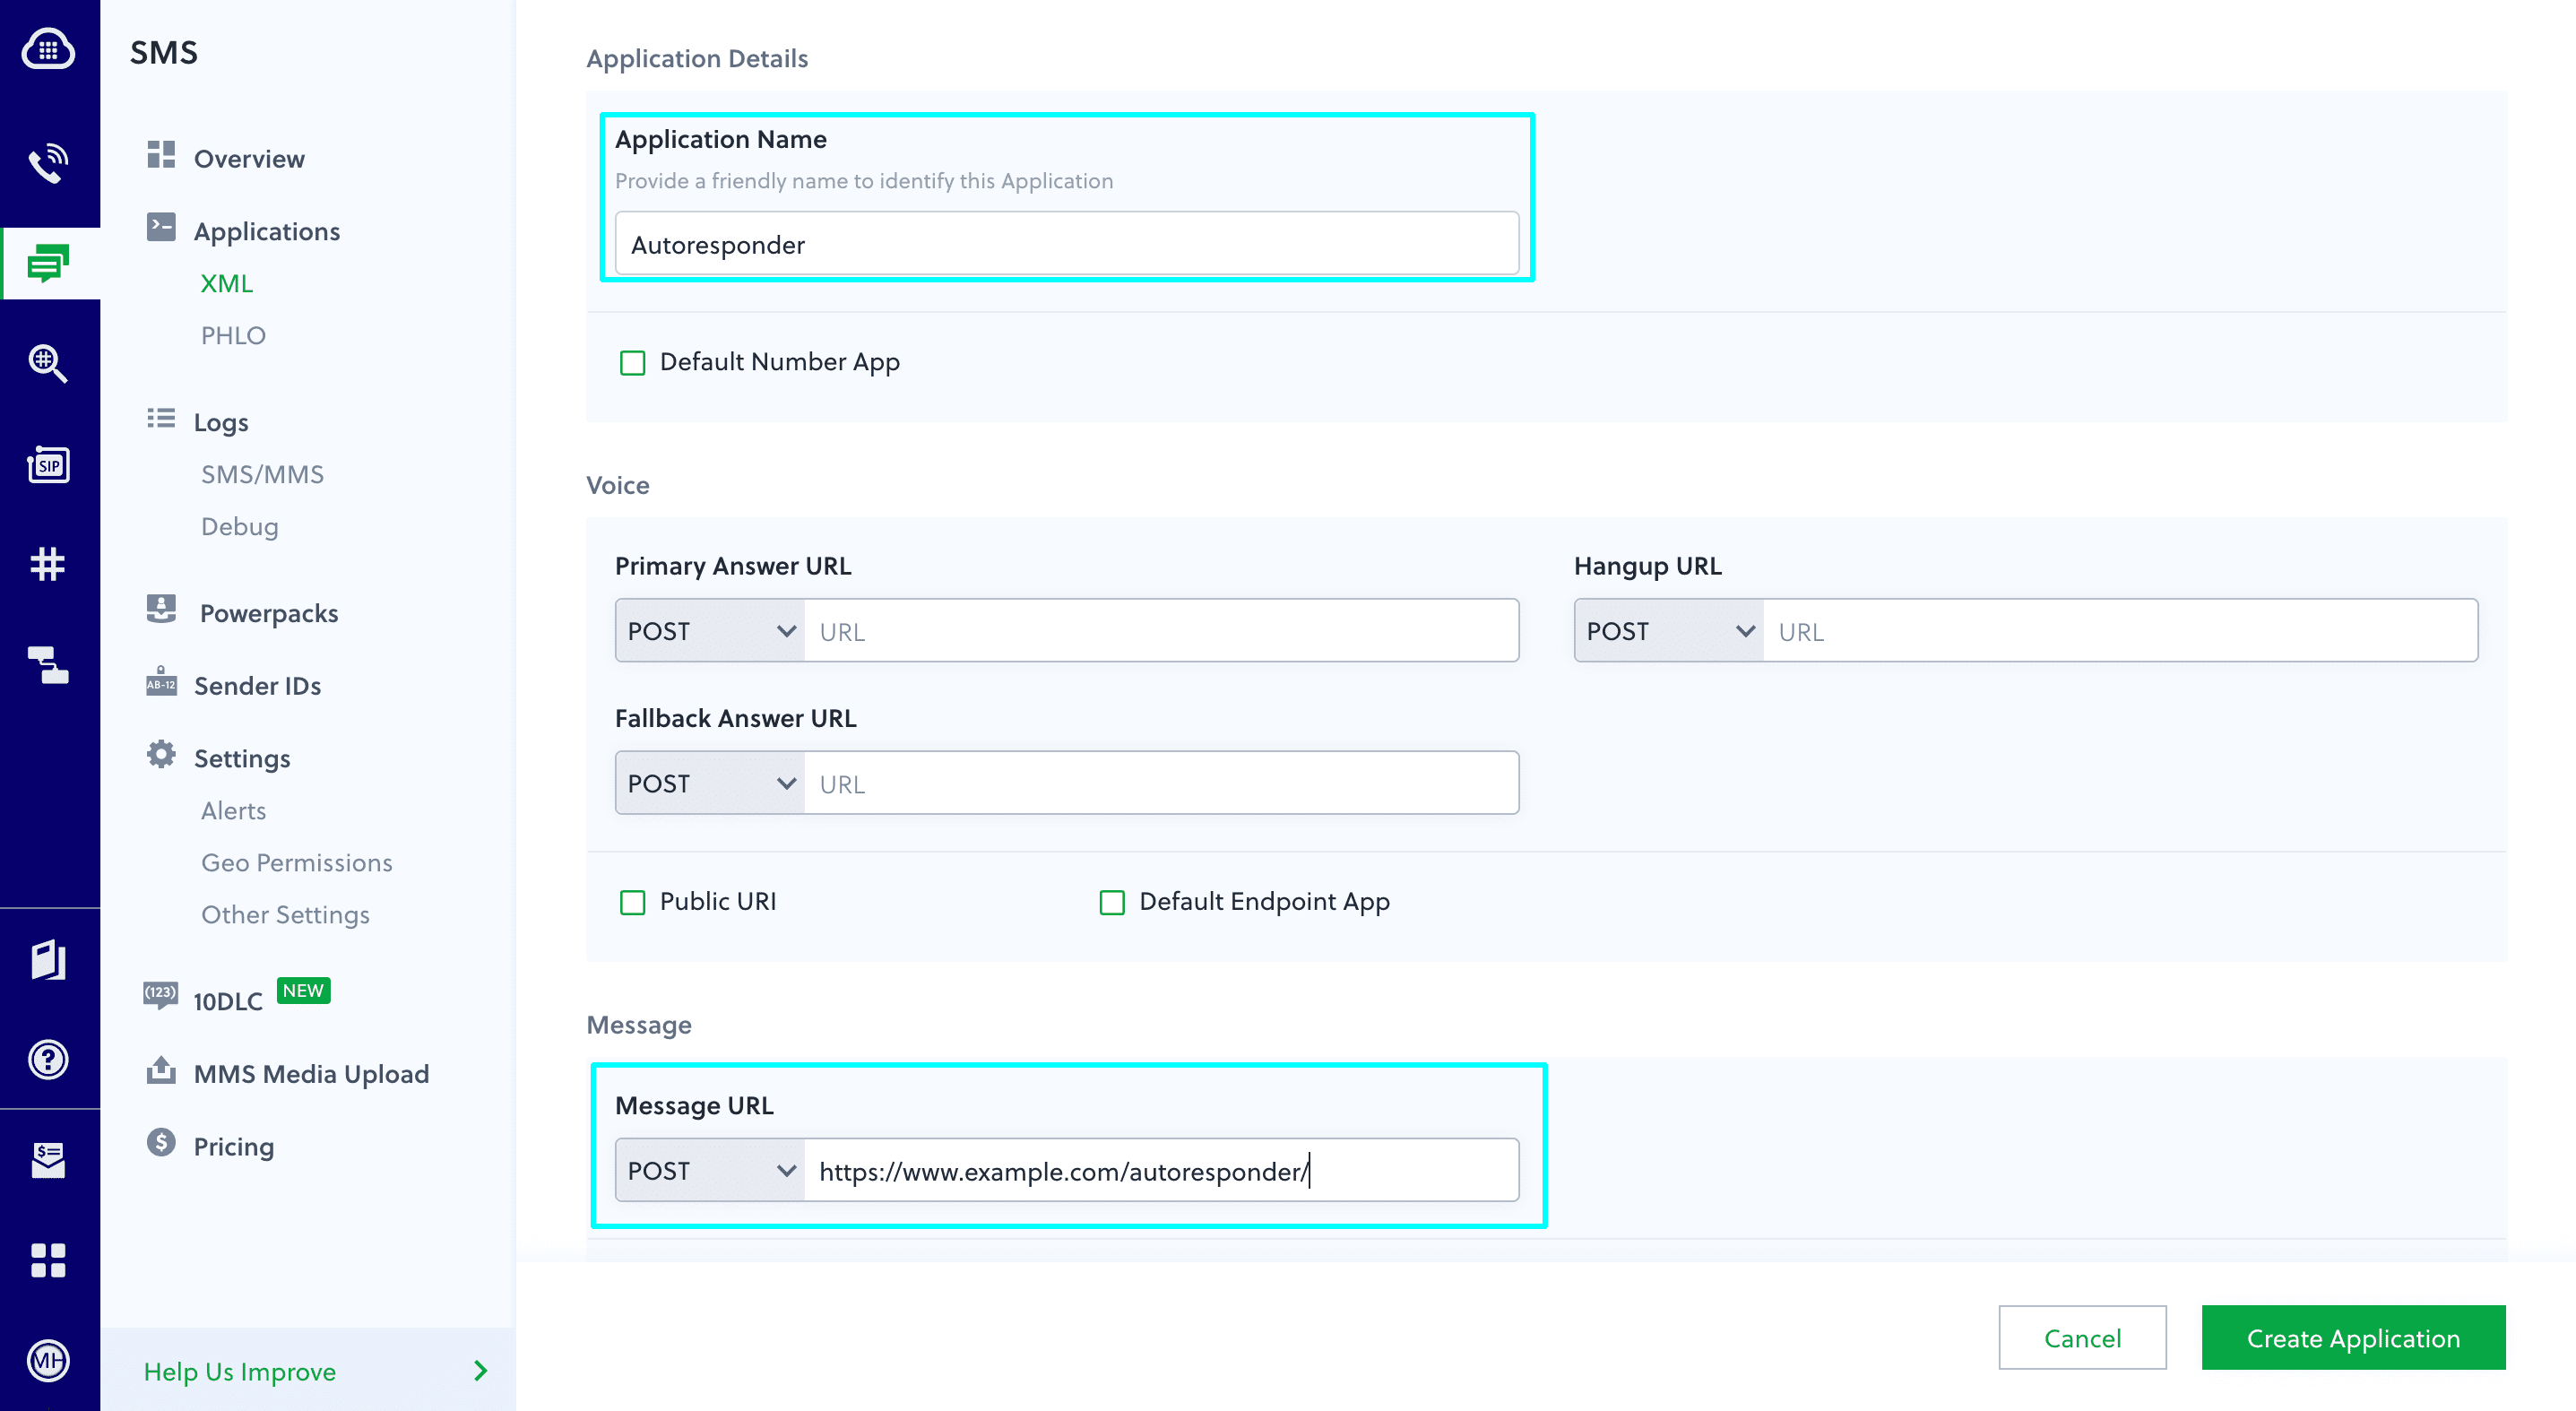
Associate the controller you created with Plivo by creating a Plivo application. Visiting Messaging > Applications and click Add New Application. You can also use Plivo’s Application API.Give your application a name — we called oursAutoresponder. Enter the server URL you want to use (for example https://<yourdomain>.com/autoresponder/) in the Message URL field and set the method to POST. Click Create Application to save your application.Assign a Plivo number to your application
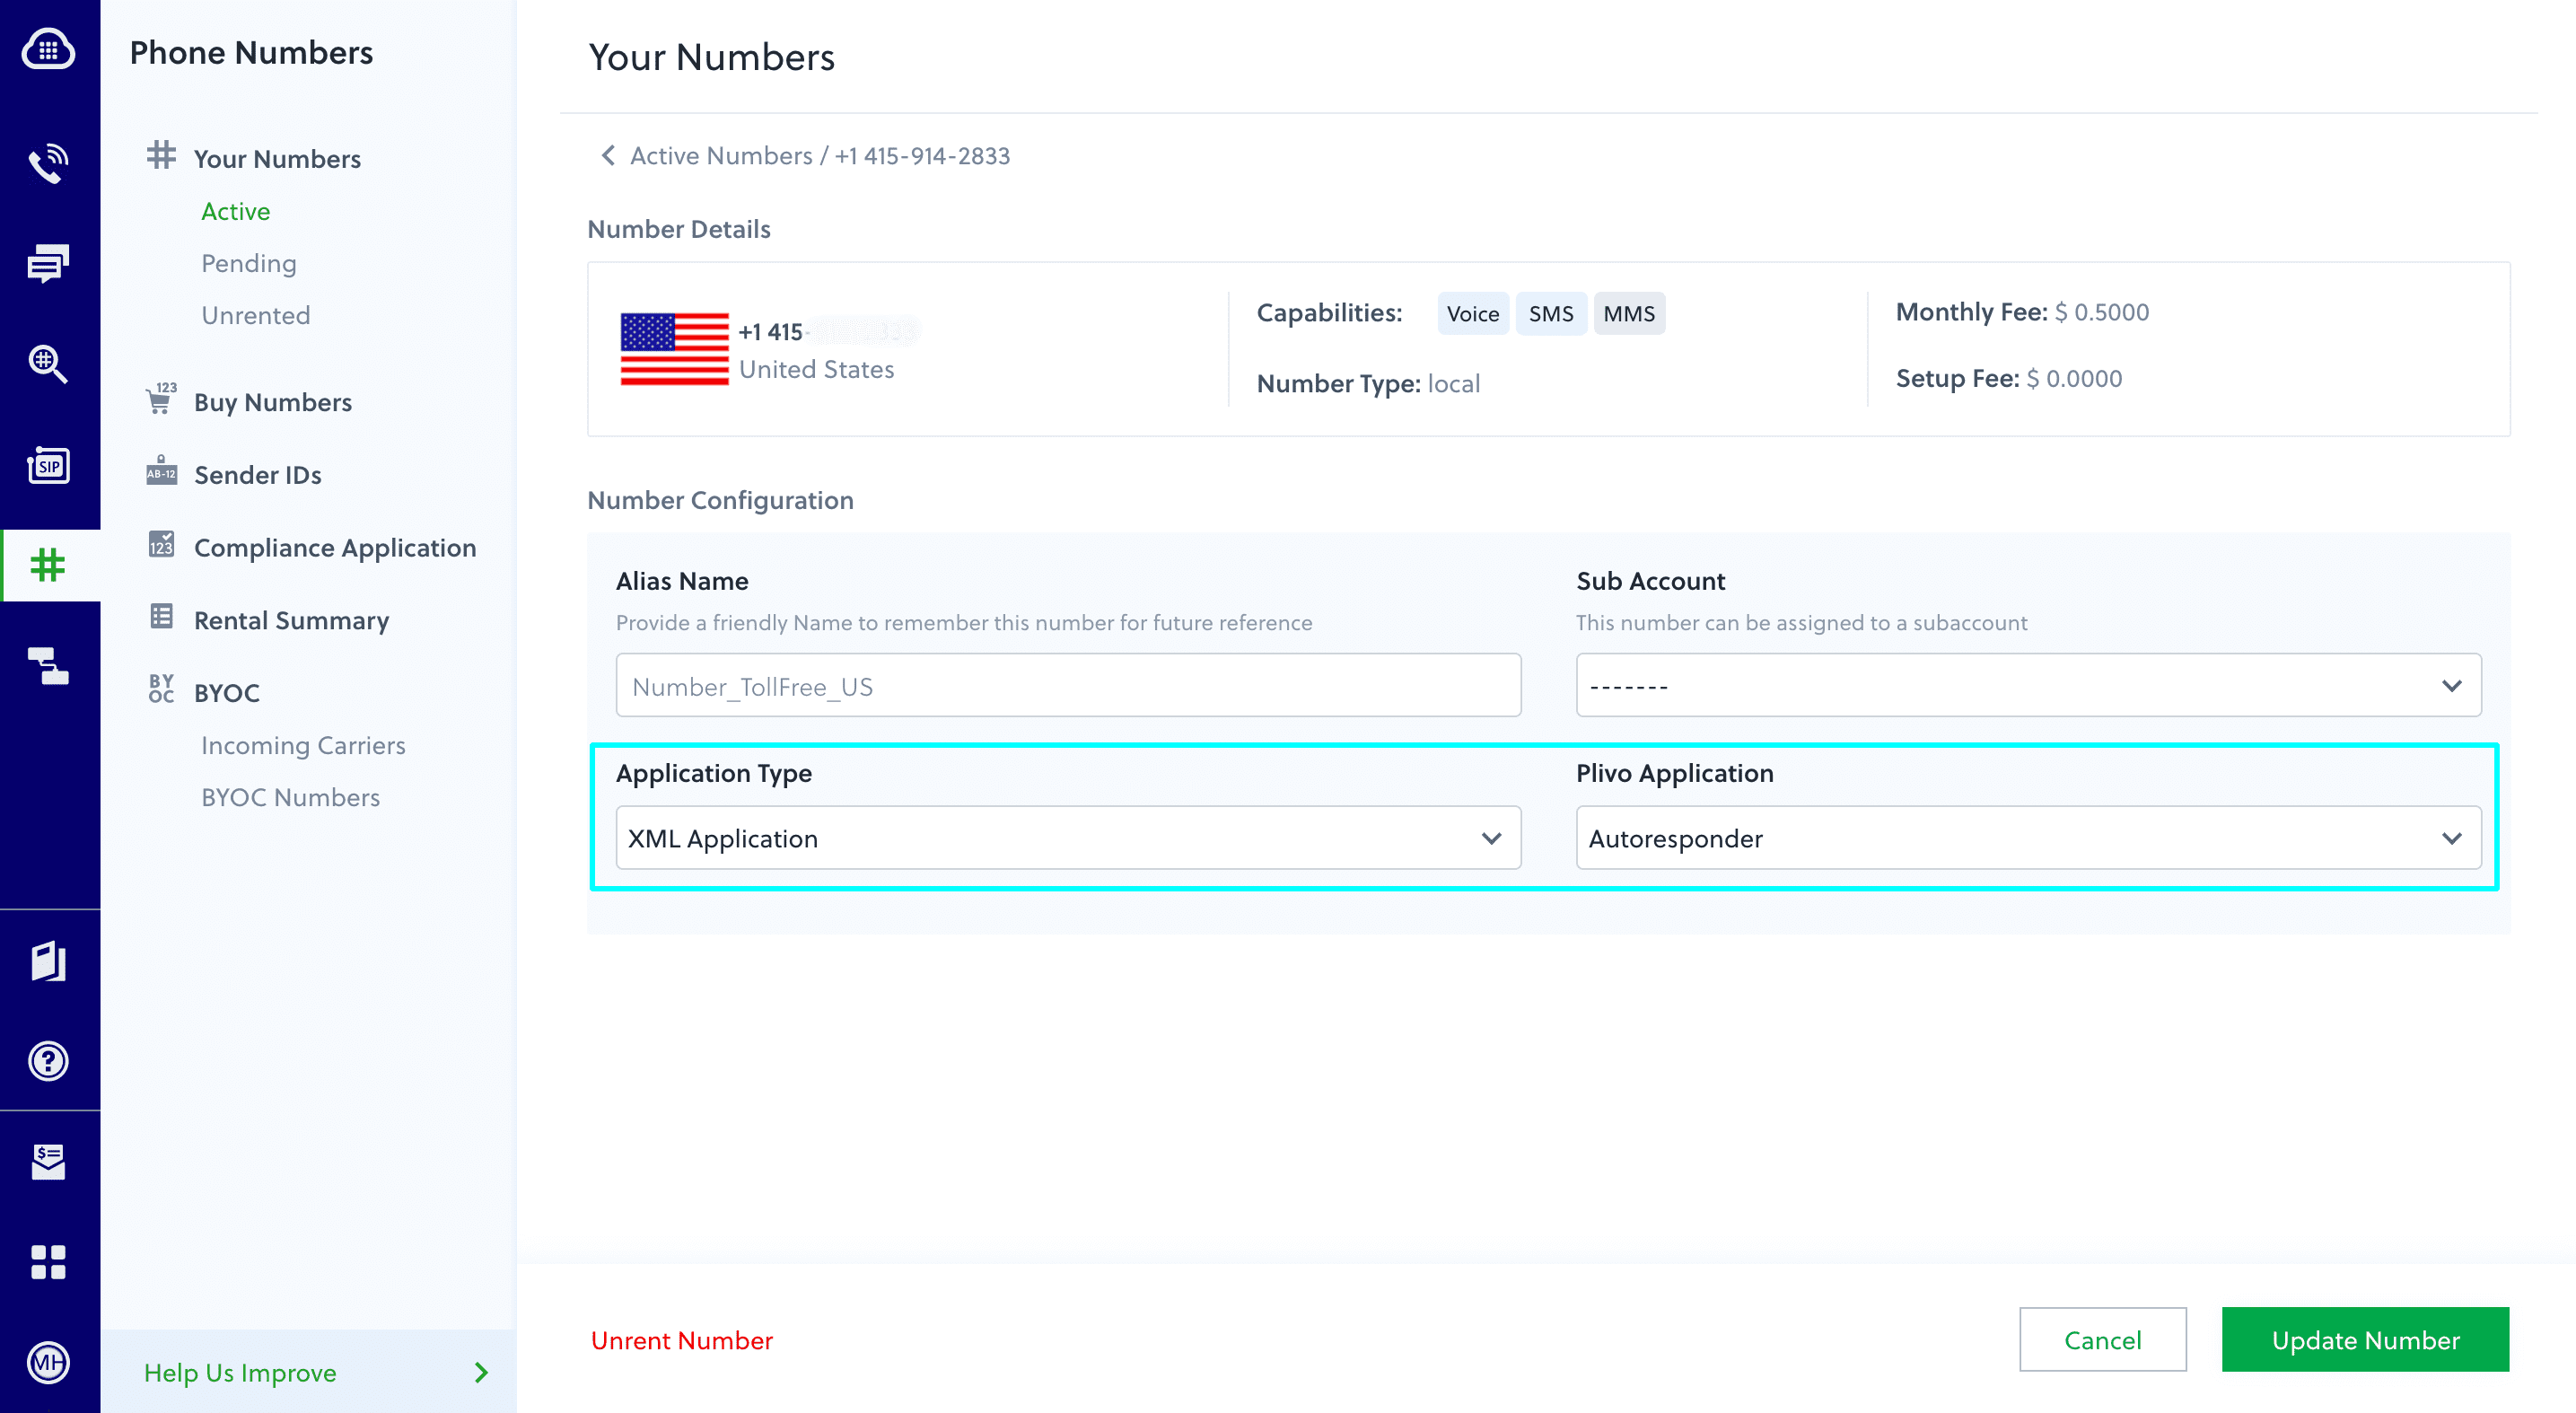
Navigate to the Numbers page and select the phone number you want to use for this application.From the Application Type drop-down, selectXML Application.From the Plivo Application drop-down, select Autoresponder (the name we gave the application).Click Update Number to save.Test
Send a text message to the Plivo number you specified using any phone.Overview
This guide shows how to write an autoresponder for SMS text messages. Autoresponders can streamline marketing campaigns and subscription signups and reduce the amount of work humans have to do.You can create an autoresponder either by using our PHLO visual workflow builder or our APIs. Follow the instructions in one of the tabs below.- Using PHLO
- Using API
You can create and deploy a PHLO to implement an SMS autoresponder with a few clicks on the PHLO canvas.
How it works
Prerequisite
To get started, you need a Plivo account — sign up with your work email address if you don’t have one already.Create the PHLO
To create a PHLO, visit the PHLO page of the Plivo console. If this is your first PHLO, the PHLO page will be empty.- Click Create New PHLO.
-
In the Choose your use case pop-up, click Build my own. The PHLO canvas will appear with the Start node.
The Start node is the starting point of any PHLO. It lets you trigger a PHLO to start upon one of three actions: incoming SMS message, incoming call, or API request.
- If you plan to use a dynamic payload — passing values through parameters when you trigger the PHLO from your application — click on the Start node to open the Configuration pane. Under API Request, enter key names for the variables you want to use in your payload — for example, a list of numbers to send an SMS message to.
- Once you’ve configured the node, click Validate to save the configuration.
- From the list of components on the left-hand side, drag and drop the Send Message component onto the canvas. When a component is placed on the canvas it becomes a node.
- Draw a line to connect the Start node’s Incoming Message trigger state to the Send Message node.
-
In the Configuration pane at the right of the canvas, configure the Send Message node with a sender ID in the From field. Enter the destination number you wish to send a message to in the To field. Put your message in the Text field.
You can define a static payload by specifying values when you create the PHLO, or define a dynamic payload by passing values through Liquid templating parameters when you trigger the PHLO from your application.
- Once you’ve configured the node, click Validate to save the configuration.
- After you complete the configuration, give the PHLO a name by clicking in the upper left, then click Save.
Assign the PHLO to a Plivo number
Once you’ve created and configured your PHLO, assign it to a Plivo number.- On the Numbers page of the console, under Your Numbers, click the phone number you want to use for the PHLO.
- In the Number Configuration box, select PHLO from the Application Type drop-down.
- From the PHLO Name drop-down, select the PHLO you want to use with the phone number, then click Update Number.
Test
You can now send a message to your Plivo phone number and see how the autoresponder works.For more information about creating a PHLO application, see the PHLO Getting Started guide. For information on components and their variables, see the PHLO Components Library.Here’s how to use Plivo APIs to set up an SMS autoresponder.
How it works
Prerequisites
To get started, you need a Plivo account — sign up with your work email address if you don’t have one already. To receive incoming messages, you must have a Plivo phone number that supports SMS; you can rent numbers from the Numbers page of the Plivo console or by using the Numbers API. If this is your first time using Plivo APIs, follow our instructions to set up a Ruby development environment.Create a Rails controller to receive and respond to SMS messages
Change to the project directory and run this command to create a Rails controller for inbound messages.Copy
Ask AI
$ rails generate controller Plivo sms
Copy
Ask AI
$ rm app/views/plivo/sms.html.erb
Create the autoresponder application using Rails server
Edit app/controllers/plivo_controller.rb and paste into it this code.Copy
Ask AI
include Plivo
include Plivo::Exceptions
include Plivo::XML

class PlivoController < ApplicationController
  skip_before_action :verify_authenticity_token
  def autoresponder
		from_number = params[:From]
		to_number = params[:To]
		text = params[:Text]

		if text.downcase == "interested"
			body = "Thank you for showing interest. One of our agents will contact you."
		else
			body = "Reply 'Interested' to connect with our agents"
		end
		response = Response.new
		params = {
			src: to_number,
			dst: from_number,
		}
		response.addMessage(body, params)
		xml = PlivoXML.new(response)
		render xml: xml.to_xml
	end
end
Add a route
Edit config/routes.rb and change the lineCopy
Ask AI
Rails.application.routes.draw do
  get 'plivo/sms'
end
Copy
Ask AI
Rails.application.routes.draw do
  post 'plivo/autoresponder/' => 'plivo#autoresponder'
end
Copy
Ask AI
$ rails server
For ngrok testing, add this line to config/environments/development.rb.
config.hosts << /[a-z0-9-]+\.ngrok\.io/Create a Plivo application for the autoresponder
Associate the Rails controller you created with Plivo by creating a Plivo application. Visit SMS > Applications in the Plivo console and click on Add New Application, or use Plivo’s Application API.Assign a Plivo number to the application
Navigate to the Numbers page and select the phone number you want to use for this application.From the Application Type drop-down, selectXML Application.From the Plivo Application drop-down, select Autoresponder (the name we gave the application).Click Update Number to save.Test
Send a text message to the Plivo number you specified using any phone.Overview
This guide shows how to write an autoresponder for SMS text messages. Autoresponders can streamline marketing campaigns and subscription signups and reduce the amount of work humans have to do.You can create an autoresponder either by using our PHLO visual workflow builder or our APIs. Follow the instructions in one of the tabs below.- Using PHLO
- Using API
You can create and deploy a PHLO to implement an SMS autoresponder with a few clicks on the PHLO canvas.
How it works
Prerequisite
To get started, you need a Plivo account — sign up with your work email address if you don’t have one already.Create the PHLO
To create a PHLO, visit the PHLO page of the Plivo console. If this is your first PHLO, the PHLO page will be empty.- Click Create New PHLO.
-
In the Choose your use case pop-up, click Build my own. The PHLO canvas will appear with the Start node.
The Start node is the starting point of any PHLO. It lets you trigger a PHLO to start upon one of three actions: incoming SMS message, incoming call, or API request.
- If you plan to use a dynamic payload — passing values through parameters when you trigger the PHLO from your application — click on the Start node to open the Configuration pane. Under API Request, enter key names for the variables you want to use in your payload — for example, a list of numbers to send an SMS message to.
- Once you’ve configured the node, click Validate to save the configuration.
- From the list of components on the left-hand side, drag and drop the Send Message component onto the canvas. When a component is placed on the canvas it becomes a node.
- Draw a line to connect the Start node’s Incoming Message trigger state to the Send Message node.
-
In the Configuration pane at the right of the canvas, configure the Send Message node with a sender ID in the From field. Enter the destination number you wish to send a message to in the To field. Put your message in the Text field.
You can define a static payload by specifying values when you create the PHLO, or define a dynamic payload by passing values through Liquid templating parameters when you trigger the PHLO from your application.
- Once you’ve configured the node, click Validate to save the configuration.
- After you complete the configuration, give the PHLO a name by clicking in the upper left, then click Save.
Assign the PHLO to a Plivo number
Once you’ve created and configured your PHLO, assign it to a Plivo number.- On the Numbers page of the console, under Your Numbers, click the phone number you want to use for the PHLO.
- In the Number Configuration box, select PHLO from the Application Type drop-down.
- From the PHLO Name drop-down, select the PHLO you want to use with the phone number, then click Update Number.
Test
You can now send a message to your Plivo phone number and see how the autoresponder works.For more information about creating a PHLO application, see the PHLO Getting Started guide. For information on components and their variables, see the PHLO Components Library.Here’s how to use Plivo APIs to set up an SMS autoresponder.
How it works
Prerequisites
To get started, you need a Plivo account — sign up with your work email address if you don’t have one already. To receive incoming messages, you must have a Plivo phone number that supports SMS; you can rent numbers from the Numbers page of the Plivo console or by using the Numbers API. If this is your first time using Plivo APIs, follow our instructions to set up a Python development environment.Create the autoresponder application
Create a file calledautorepsonder.py and paste into it this code.Copy
Ask AI
from flask import Flask, request, Response
from plivo import plivoxml

app = Flask(__name__)


@app.route('/autoresponder/', methods=['GET', 'POST'])
def autoresponder():
    from_number = request.values.get('From')
    to_number = request.values.get('To')
    text = request.values.get('Text')

    if text.lower() == 'interested':
        body = "Thank you for showing interest. One of our agents will contact you."
    else:
        body = "Reply 'Interested' to connect with our agents"

    response = plivoxml.ResponseElement()
    response.add(plivoxml.MessageElement(body, src=to_number,
                 dst=from_number))
    return Response(response.to_string(), mimetype='application/xml')

if __name__ == '__main__':
    app.run(host='0.0.0.0', debug=True)
Copy
Ask AI
$ python autoresponder.py
Create a Plivo application for the autoresponder
Associate the controller you created with Plivo by creating a Plivo application. Visiting Messaging > Applications and click Add New Application. You can also use Plivo’s Application API.Give your application a name — we called oursAutoresponder. Enter the server URL you want to use (for example https://<yourdomain>.com/autoresponder/) in the Message URL field and set the method to POST. Click Create Application to save your application.Assign a Plivo number to your application
Navigate to the Numbers page and select the phone number you want to use for this application.From the Application Type drop-down, selectXML Application.From the Plivo Application drop-down, select Autoresponder (the name we gave the application).Click Update Number to save.Test
Send a text message to the Plivo number you specified using any phone.Overview
This guide shows how to write an autoresponder for SMS text messages. Autoresponders can streamline marketing campaigns and subscription signups and reduce the amount of work humans have to do.You can create an autoresponder either by using our PHLO visual workflow builder or our APIs. Follow the instructions in one of the tabs below.- Using PHLO
To implement SMS Autoresponder use-case in the traditional API way, you can refer to the instructions in the below section to begin your implementation.
Outline
Implementation
In this section, we will guide you in setting up an app using Plivo’s API to implement SMS Autoresponder use-case. First, let’s make sure you meet these prerequisites before we dive into the code.Prerequisites
To get started, you need a Plivo account — sign up with your work email address if you don’t have one already. To receive incoming messages, you must have a Plivo phone number that supports SMS; you can rent numbers from the Numbers page of the Plivo console or by using the Numbers API. If this is your first time using Plivo APIs, follow our instructions to set up a PHP development environment.Create a Laravel controller to receive and respond to SMS messages
Change to the project directory and run this command.Copy
Ask AI
$ php artisan make:controller SMSController
Copy
Ask AI
<?php

namespace App\Http\Controllers;

use Illuminate\Http\Request;
use Plivo\XML\Response;

class SMSController extends Controller
{
    public function autoresponder()
    {
        $from_number = $_POST["From"];
        $to_number = $_POST["To"];
        $text = $_POST["Text"];

        if (strtolower($text) == "interested")
            $body = "Thank you for showing interest. One of our agents will contact you.";
        else
            $body = "Reply 'Interested' to connect with our agents";

        $response = new Response();
        $params = array(
            'src' => $to_number,
            'dst' => $from_number
        );
        $response->addMessage($body, $params);
        Header('Content-type: text/xml');
        return $response->toXML();
    }
}
Copy
Ask AI
Route::match(['get', 'post'], '/autoresponder', 'SMSController@autoresponder');
If you’re using Laravel 8, use the fully qualified class name for your controllers — for example:For ngrok test, add this line to mylaravelapp/quickstart/app/Http/Middleware/VerifyCsrfToken.php.
Copy
Ask AI
Route::match(['get', 'post'], '/sendSMS', 'App\Http\Controllers\SMSController@sendSMS');
protected $except = ['*'];Copy
Ask AI
$ php artisan serve
Create a Plivo application for the autoresponder
Associate the controller you created with Plivo by creating a Plivo application. Visiting Messaging > Applications and click Add New Application. You can also use Plivo’s Application API.Give your application a name — we called oursAutoresponder. Enter the server URL you want to use (for example https://<yourdomain>.com/autoresponder/) in the Message URL field and set the method to POST. Click Create Application to save your application.Assign a Plivo number to your application
Navigate to the Numbers page and select the phone number you want to use for this application.From the Application Type drop-down, selectXML Application.From the Plivo Application drop-down, select Autoresponder (the name we gave the application).Click Update Number to save.Test
Send a text message to the Plivo number you specified using any phone.Overview
This guide shows how to write an autoresponder for SMS text messages. Autoresponders can streamline marketing campaigns and subscription signups and reduce the amount of work humans have to do.You can create an autoresponder either by using our PHLO visual workflow builder or our APIs. Follow the instructions in one of the tabs below.- Using PHLO
- Using API
You can create and deploy a PHLO to implement an SMS autoresponder with a few clicks on the PHLO canvas.
How it works
Prerequisite
To get started, you need a Plivo account — sign up with your work email address if you don’t have one already.Create the PHLO
To create a PHLO, visit the PHLO page of the Plivo console. If this is your first PHLO, the PHLO page will be empty.- Click Create New PHLO.
-
In the Choose your use case pop-up, click Build my own. The PHLO canvas will appear with the Start node.
The Start node is the starting point of any PHLO. It lets you trigger a PHLO to start upon one of three actions: incoming SMS message, incoming call, or API request.
- If you plan to use a dynamic payload — passing values through parameters when you trigger the PHLO from your application — click on the Start node to open the Configuration pane. Under API Request, enter key names for the variables you want to use in your payload — for example, a list of numbers to send an SMS message to.
- Once you’ve configured the node, click Validate to save the configuration.
- From the list of components on the left-hand side, drag and drop the Send Message component onto the canvas. When a component is placed on the canvas it becomes a node.
- Draw a line to connect the Start node’s Incoming Message trigger state to the Send Message node.
-
In the Configuration pane at the right of the canvas, configure the Send Message node with a sender ID in the From field. Enter the destination number you wish to send a message to in the To field. Put your message in the Text field.
You can define a static payload by specifying values when you create the PHLO, or define a dynamic payload by passing values through Liquid templating parameters when you trigger the PHLO from your application.
- Once you’ve configured the node, click Validate to save the configuration.
- After you complete the configuration, give the PHLO a name by clicking in the upper left, then click Save.
Assign the PHLO to a Plivo number
Once you’ve created and configured your PHLO, assign it to a Plivo number.- On the Numbers page of the console, under Your Numbers, click the phone number you want to use for the PHLO.
- In the Number Configuration box, select PHLO from the Application Type drop-down.
- From the PHLO Name drop-down, select the PHLO you want to use with the phone number, then click Update Number.
Test
You can now send a message to your Plivo phone number and see how the autoresponder works.For more information about creating a PHLO application, see the PHLO Getting Started guide. For information on components and their variables, see the PHLO Components Library.Here’s how to use Plivo APIs to set up an SMS autoresponder.
How it works
Prerequisites
To get started, you need a Plivo account — sign up with your work email address if you don’t have one already. To receive incoming messages, you must have a Plivo phone number that supports SMS; you can rent numbers from the Numbers page of the Plivo console or by using the Numbers API. If this is your first time using Plivo APIs, follow our instructions to set up a .NET development environment.Create a .NET controller
Navigate to the Controllers directory, create a controller calledAutoresponder.cs, and paste into it this code.Copy
Ask AI
using System;
using System.Collections.Generic;
using Microsoft.AspNetCore.Mvc;


namespace demo.Controllers
{
    public class Autoresponder : Controller
    {
        public IActionResult Index()
        {
            String from_number = Request.Form["From"];
            String to_number = Request.Form["To"];
            String text = Request.Form["Text"];
            String body;

            if (text.ToLower() == "interested")
            {
                body = "Thank you for showing interest. One of our agents will contact you.";
            }
            else
            {
                body = "Reply 'Interested' to connect with our agents";
            }

            Plivo.XML.Response resp = new Plivo.XML.Response();
            resp.AddMessage(body, new Dictionary<string, string>()
            {
                {"src", from_number},
                {"dst", to_number},
                {"type", "sms"}
            });
            var output = resp.ToString();
            Console.WriteLine(output);
            return this.Content(output, "text/xml");
        }
    }
}
Copy
Ask AI
$ node autoresponder.js
Create a Plivo application for the autoresponder
Associate the controller you created with Plivo by creating a Plivo application. Visiting Messaging > Applications and click Add New Application. You can also use Plivo’s Application API.Give your application a name — we called oursAutoresponder. Enter the server URL you want to use (for example https://<yourdomain>.com/autoresponder/) in the Message URL field and set the method to POST. Click Create Application to save your application.Assign a Plivo number to your application
Navigate to the Numbers page and select the phone number you want to use for this application.From the Application Type drop-down, selectXML Application.From the Plivo Application drop-down, select Autoresponder (the name we gave the application).Click Update Number to save.Test
Send a text message to the Plivo number you specified using any phone.Overview
This guide shows how to write an autoresponder for SMS text messages. Autoresponders can streamline marketing campaigns and subscription signups and reduce the amount of work humans have to do.You can create an autoresponder either by using our PHLO visual workflow builder or our APIs. Follow the instructions in one of the tabs below.- Using PHLO
- Using API
You can create and deploy a PHLO to implement an SMS autoresponder with a few clicks on the PHLO canvas.
How it works
Prerequisite
To get started, you need a Plivo account — sign up with your work email address if you don’t have one already.Create the PHLO
To create a PHLO, visit the PHLO page of the Plivo console. If this is your first PHLO, the PHLO page will be empty.- Click Create New PHLO.
-
In the Choose your use case pop-up, click Build my own. The PHLO canvas will appear with the Start node.
The Start node is the starting point of any PHLO. It lets you trigger a PHLO to start upon one of three actions: incoming SMS message, incoming call, or API request.
- If you plan to use a dynamic payload — passing values through parameters when you trigger the PHLO from your application — click on the Start node to open the Configuration pane. Under API Request, enter key names for the variables you want to use in your payload — for example, a list of numbers to send an SMS message to.
- Once you’ve configured the node, click Validate to save the configuration.
- From the list of components on the left-hand side, drag and drop the Send Message component onto the canvas. When a component is placed on the canvas it becomes a node.
- Draw a line to connect the Start node’s Incoming Message trigger state to the Send Message node.
-
In the Configuration pane at the right of the canvas, configure the Send Message node with a sender ID in the From field. Enter the destination number you wish to send a message to in the To field. Put your message in the Text field.
You can define a static payload by specifying values when you create the PHLO, or define a dynamic payload by passing values through Liquid templating parameters when you trigger the PHLO from your application.
- Once you’ve configured the node, click Validate to save the configuration.
- After you complete the configuration, give the PHLO a name by clicking in the upper left, then click Save.
Assign the PHLO to a Plivo number
Once you’ve created and configured your PHLO, assign it to a Plivo number.- On the Numbers page of the console, under Your Numbers, click the phone number you want to use for the PHLO.
- In the Number Configuration box, select PHLO from the Application Type drop-down.
- From the PHLO Name drop-down, select the PHLO you want to use with the phone number, then click Update Number.
Test
You can now send a message to your Plivo phone number and see how the autoresponder works.For more information about creating a PHLO application, see the PHLO Getting Started guide. For information on components and their variables, see the PHLO Components Library.Here’s how to use Plivo APIs to set up an SMS autoresponder.
How it works
Prerequisites
To get started, you need a Plivo account — sign up with your work email address if you don’t have one already. To receive incoming messages, you must have a Plivo phone number that supports SMS; you can rent numbers from the Numbers page of the Plivo console or by using the Numbers API. If this is your first time using Plivo APIs, follow our instructions to set up a Java development environment.Create the autoresponder application
Edit the PlivoSmsApplication.java file in the src/main/java/com.example.demo/ folder and paste into it this code.Copy
Ask AI
package com.example.demo;

import com.plivo.api.exceptions.PlivoValidationException;
import com.plivo.api.exceptions.PlivoXmlException;
import com.plivo.api.xml.Message;
import com.plivo.api.xml.Response;
import org.springframework.boot.SpringApplication;
import org.springframework.boot.autoconfigure.SpringBootApplication;
import org.springframework.web.bind.annotation.PostMapping;

@SpringBootApplication
public class PlivoSmsApplication {

	public static void main(String[] args) {
		SpringApplication.run(PlivoSmsApplication.class, args);
	}

	@PostMapping(value = "/autoresponder/", produces = {"text/xml"})
	public String postBody(String From, String To, String Text) throws PlivoXmlException, PlivoValidationException {
		String body;
		if (Text.toLowerCase() == "interested") {
			body = "Thank you for showing interest. One of our agents will contact you.";
		}
		else{
			body = "Reply 'Interested' to connect with our agents";
		}
		Response response = new Response().children(
				new Message(To,From,body));
		return response.toXmlString();
	}

}
Copy
Ask AI
$ node autoresponder.js
Create a Plivo application for the autoresponder
Associate the controller you created with Plivo by creating a Plivo application. Visiting Messaging > Applications and click Add New Application. You can also use Plivo’s Application API.Give your application a name — we called oursAutoresponder. Enter the server URL you want to use (for example https://<yourdomain>.com/autoresponder/) in the Message URL field and set the method to POST. Click Create Application to save your application.Assign a Plivo number to your application
Navigate to the Numbers page and select the phone number you want to use for this application.From the Application Type drop-down, selectXML Application.From the Plivo Application drop-down, select Autoresponder (the name we gave the application).Click Update Number to save.Test
Send a text message to the Plivo number you specified using any phone.Overview
This guide shows how to write an autoresponder for SMS text messages. Autoresponders can streamline marketing campaigns and subscription signups and reduce the amount of work humans have to do.You can create an autoresponder either by using our PHLO visual workflow builder or our APIs. Follow the instructions in one of the tabs below.- Using PHLO
- Using API
You can create and deploy a PHLO to implement an SMS autoresponder with a few clicks on the PHLO canvas.
How it works
Prerequisite
To get started, you need a Plivo account — sign up with your work email address if you don’t have one already.Create the PHLO
To create a PHLO, visit the PHLO page of the Plivo console. If this is your first PHLO, the PHLO page will be empty.- Click Create New PHLO.
-
In the Choose your use case pop-up, click Build my own. The PHLO canvas will appear with the Start node.
The Start node is the starting point of any PHLO. It lets you trigger a PHLO to start upon one of three actions: incoming SMS message, incoming call, or API request.
- If you plan to use a dynamic payload — passing values through parameters when you trigger the PHLO from your application — click on the Start node to open the Configuration pane. Under API Request, enter key names for the variables you want to use in your payload — for example, a list of numbers to send an SMS message to.
- Once you’ve configured the node, click Validate to save the configuration.
- From the list of components on the left-hand side, drag and drop the Send Message component onto the canvas. When a component is placed on the canvas it becomes a node.
- Draw a line to connect the Start node’s Incoming Message trigger state to the Send Message node.
-
In the Configuration pane at the right of the canvas, configure the Send Message node with a sender ID in the From field. Enter the destination number you wish to send a message to in the To field. Put your message in the Text field.
You can define a static payload by specifying values when you create the PHLO, or define a dynamic payload by passing values through Liquid templating parameters when you trigger the PHLO from your application.
- Once you’ve configured the node, click Validate to save the configuration.
- After you complete the configuration, give the PHLO a name by clicking in the upper left, then click Save.
Assign the PHLO to a Plivo number
Once you’ve created and configured your PHLO, assign it to a Plivo number.- On the Numbers page of the console, under Your Numbers, click the phone number you want to use for the PHLO.
- In the Number Configuration box, select PHLO from the Application Type drop-down.
- From the PHLO Name drop-down, select the PHLO you want to use with the phone number, then click Update Number.
Test
You can now send a message to your Plivo phone number and see how the autoresponder works.For more information about creating a PHLO application, see the PHLO Getting Started guide. For information on components and their variables, see the PHLO Components Library.Here’s how to use Plivo APIs to set up an SMS autoresponder.
How it works
Prerequisites
To get started, you need a Plivo account — sign up with your work email address if you don’t have one already. To receive incoming messages, you must have a Plivo phone number that supports SMS; you can rent numbers from the Numbers page of the Plivo console or by using the Numbers API. If this is your first time using Plivo APIs, follow our instructions to set up a Go development environment.Create the autoresponder application
Create a file calledautoresponder.go and paste into it this code.Copy
Ask AI
package main

import (
	"net/http"
	"strings"

	"github.com/go-martini/martini"
	"github.com/plivo/plivo-go/v7/xml"
)

func main() {
	m := martini.Classic()

	m.Post("/autoresponder/", func(w http.ResponseWriter, r *http.Request) string {
		w.Header().Set("Content-Type", "application/xml")
		from_number := r.FormValue("From")
		to_number := r.FormValue("To")
		text := r.FormValue("Text")
		var body string
		if strings.ToLower(text) == "interested" {
			body = "Thank you for showing interest. One of our agents will contact you."
		} else {
			body = "Reply 'Interested' to connect with our agents"
		}
		return xml.ResponseElement{
			Contents: []interface{}{
				new(xml.MessageElement).
					SetDst(to_number).
					SetSrc(from_number).
					SetContents(body),
			},
		}.String()
	})
	m.Run()
}
Copy
Ask AI
go run autoresponder.go
Create a Plivo application for the autoresponder
Associate the controller you created with Plivo by creating a Plivo application. Visiting Messaging > Applications and click Add New Application. You can also use Plivo’s Application API.Give your application a name — we called oursAutoresponder. Enter the server URL you want to use (for example https://<yourdomain>.com/autoresponder/) in the Message URL field and set the method to POST. Click Create Application to save your application.Assign a Plivo number to your application
Navigate to the Numbers page and select the phone number you want to use for this application.From the Application Type drop-down, selectXML Application.From the Plivo Application drop-down, select Autoresponder (the name we gave the application).Click Update Number to save.