- Node
- Ruby
- Python
- PHP
- .NET
- Java
- Go
Overview
This guide shows how to conduct an SMS survey. Surveys can help businesses with market research. Using SMS for surveys lets organizations process input quickly and efficiently.You can conduct SMS surveys either by using our PHLO visual workflow builder or our APIs. Follow the instructions in one of the tabs below.- Using PHLO
- Using API
You can create and deploy a PHLO to conduct an SMS survey with a few clicks on the PHLO canvas and trigger it with a few lines of code.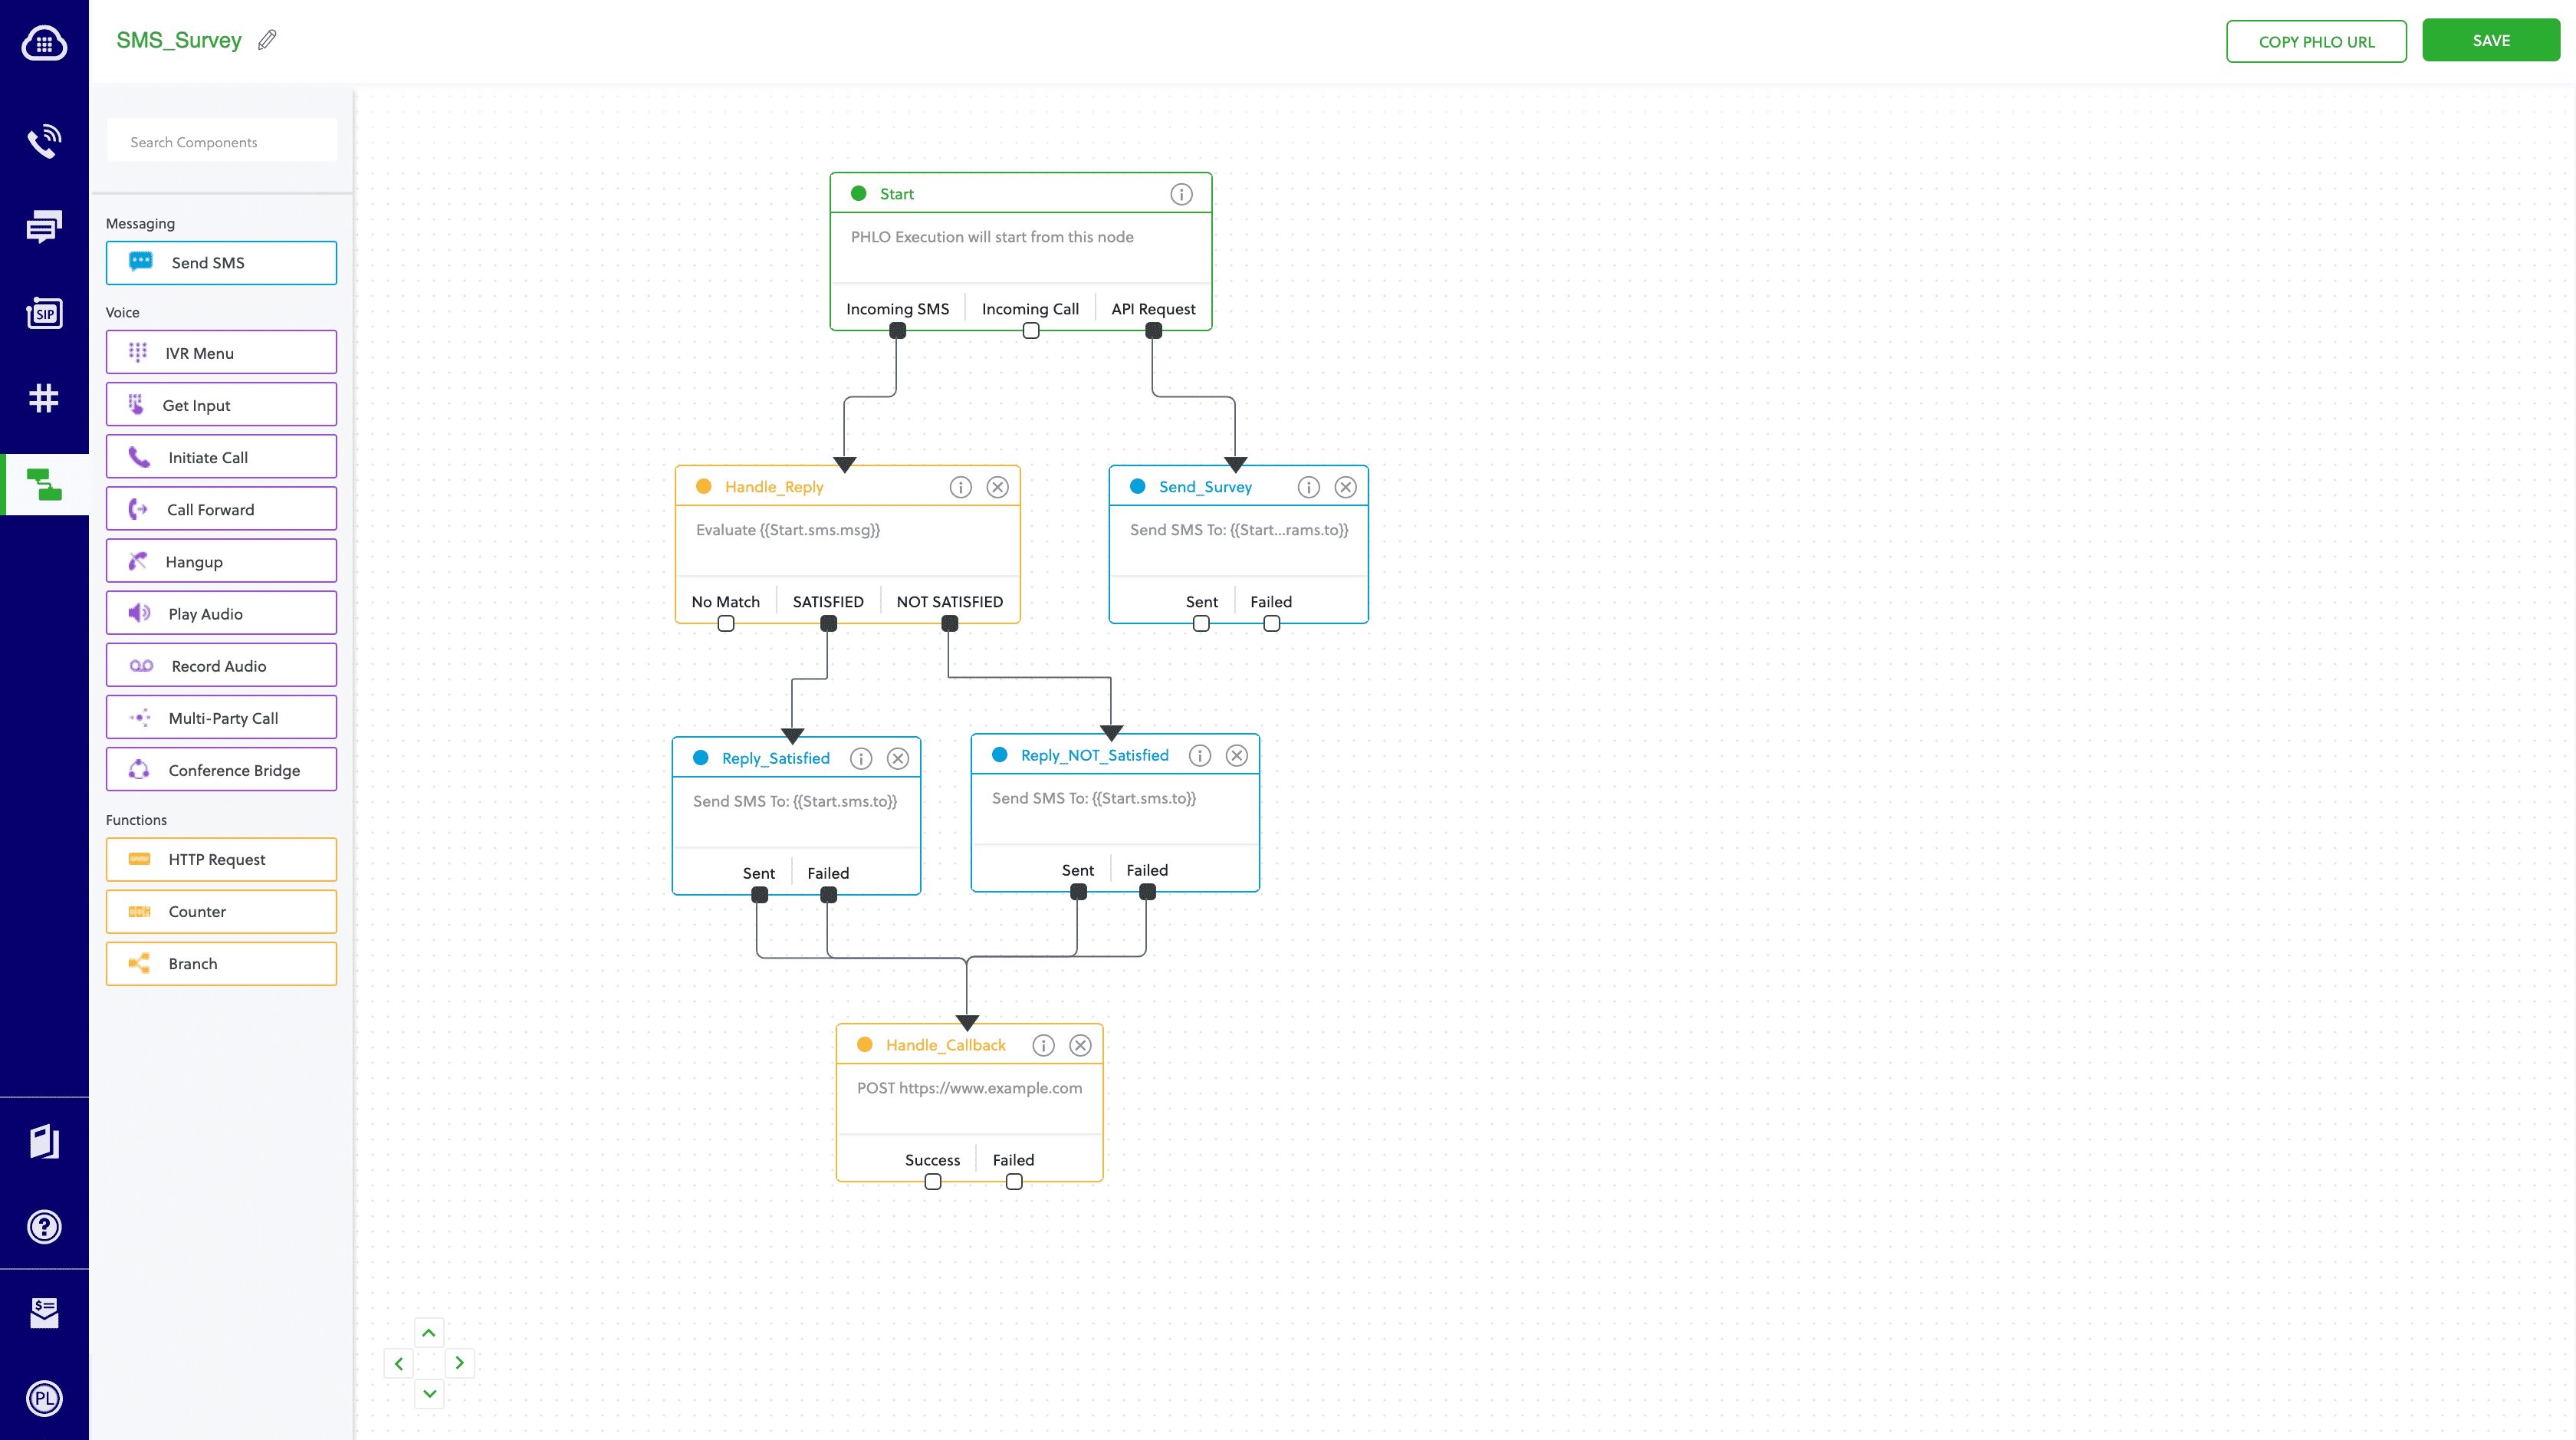

How it works
Prerequisites
To get started, you need a Plivo account — sign up with your work email address if you don’t have one already. If this is your first time triggering a PHLO with Node.js, follow our instructions to set up a Node.js development environment.Create the PHLO
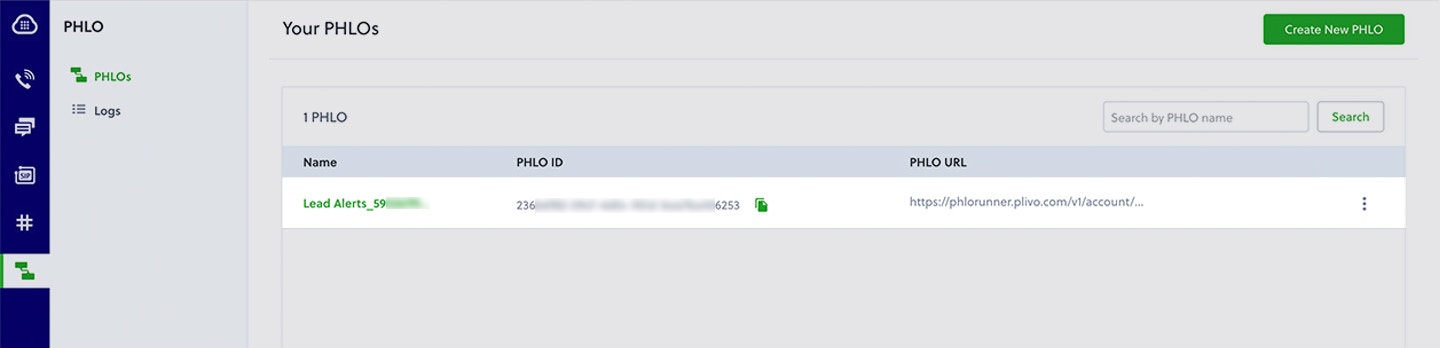
To create a PHLO, visit the PHLO page of the Plivo console. If this is your first PHLO, the PHLO page will be empty.- Click Create New PHLO.
-
In the Choose your use case pop-up, click Build my own. The PHLO canvas will appear with the Start node.
The Start node is the starting point of any PHLO. It lets you trigger a PHLO to start upon one of three actions: incoming SMS message, incoming call, or API request.
-
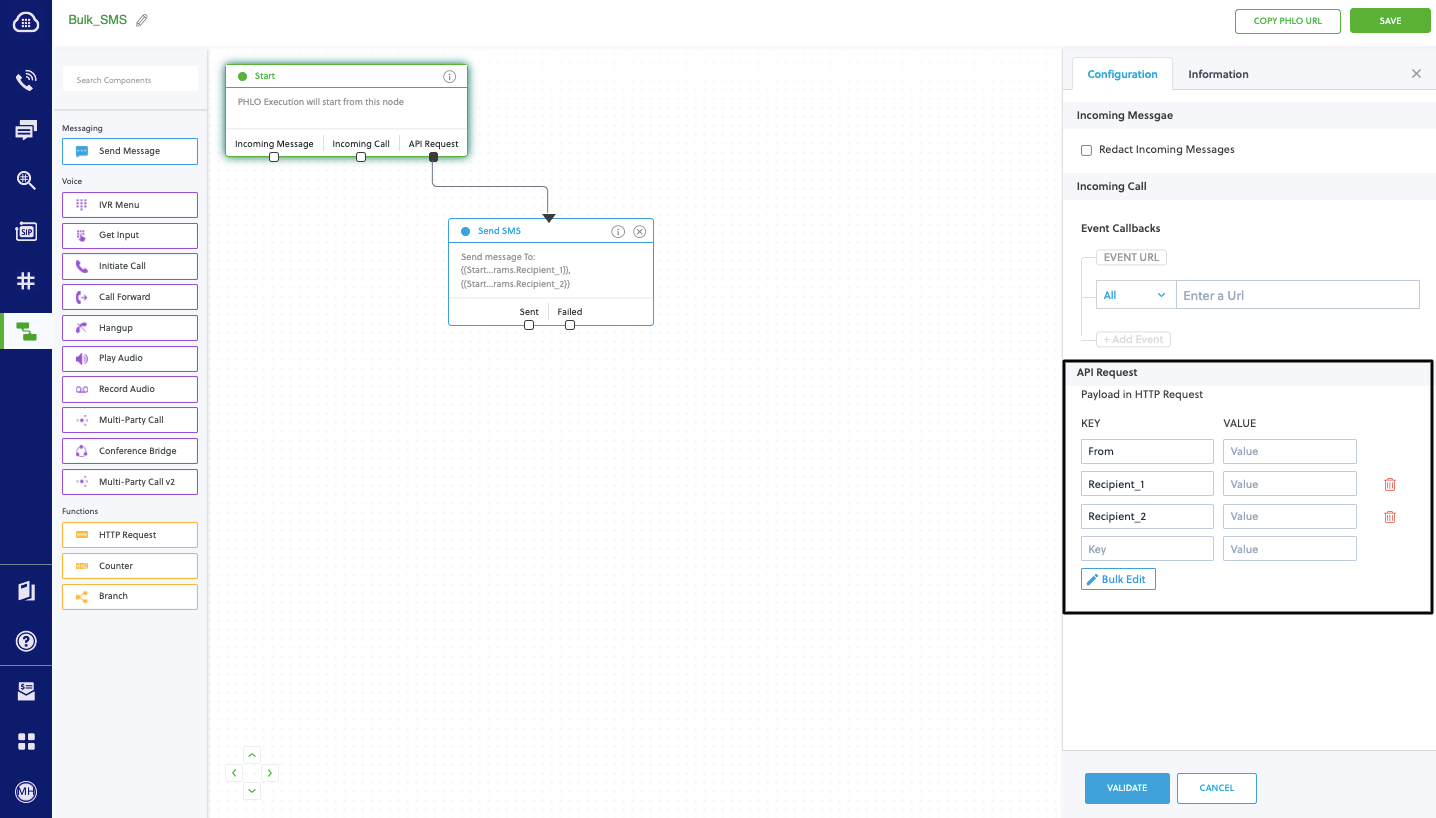
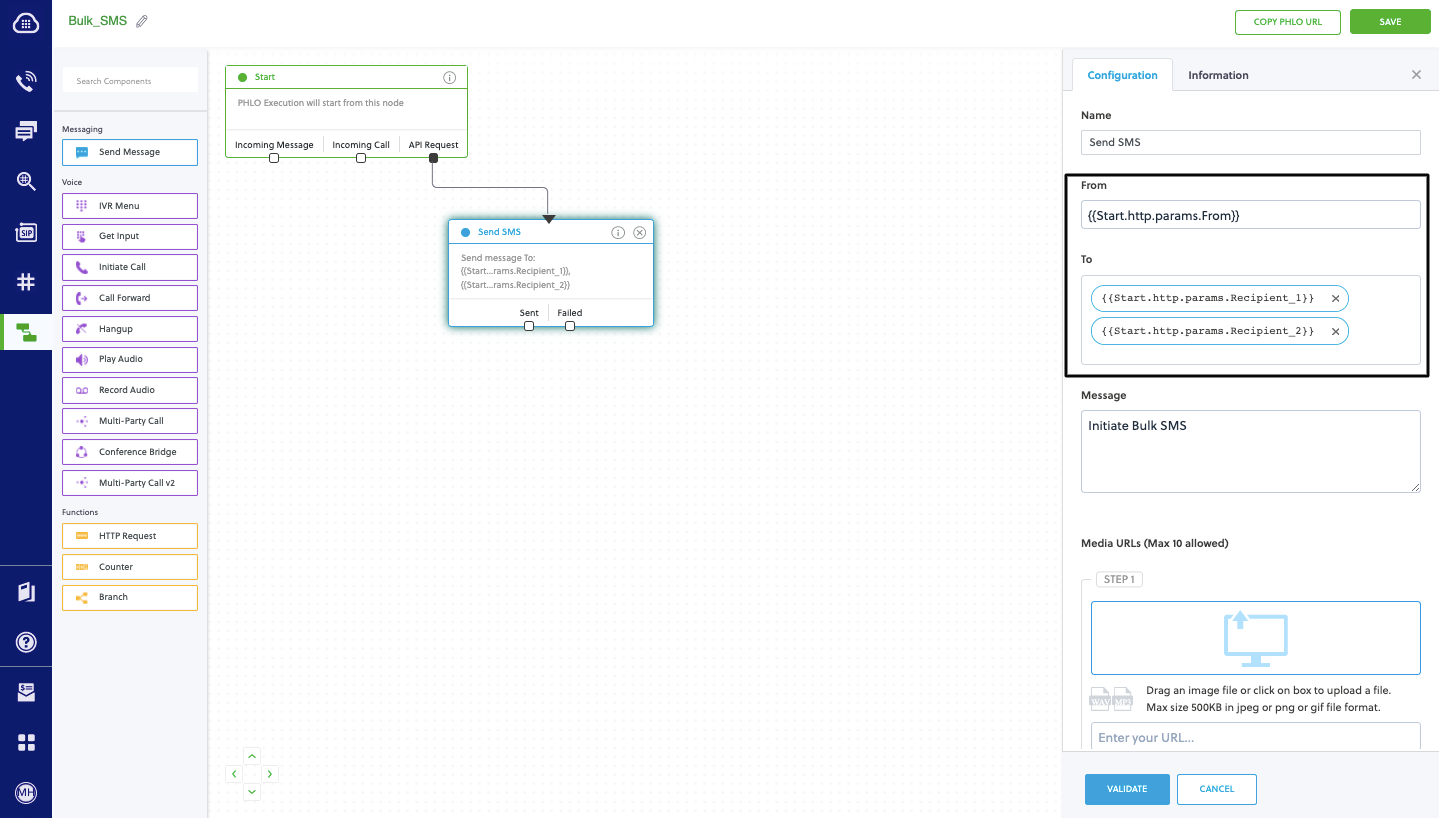
If you plan to use a dynamic payload — passing values through parameters when you trigger the PHLO from your application — click on the Start node to open the Configuration pane. Under API Request, enter key names for the variables you want use in your payload — From, To, and Message fields.
- Once you’ve configured the node, click Validate to save the configuration.
-
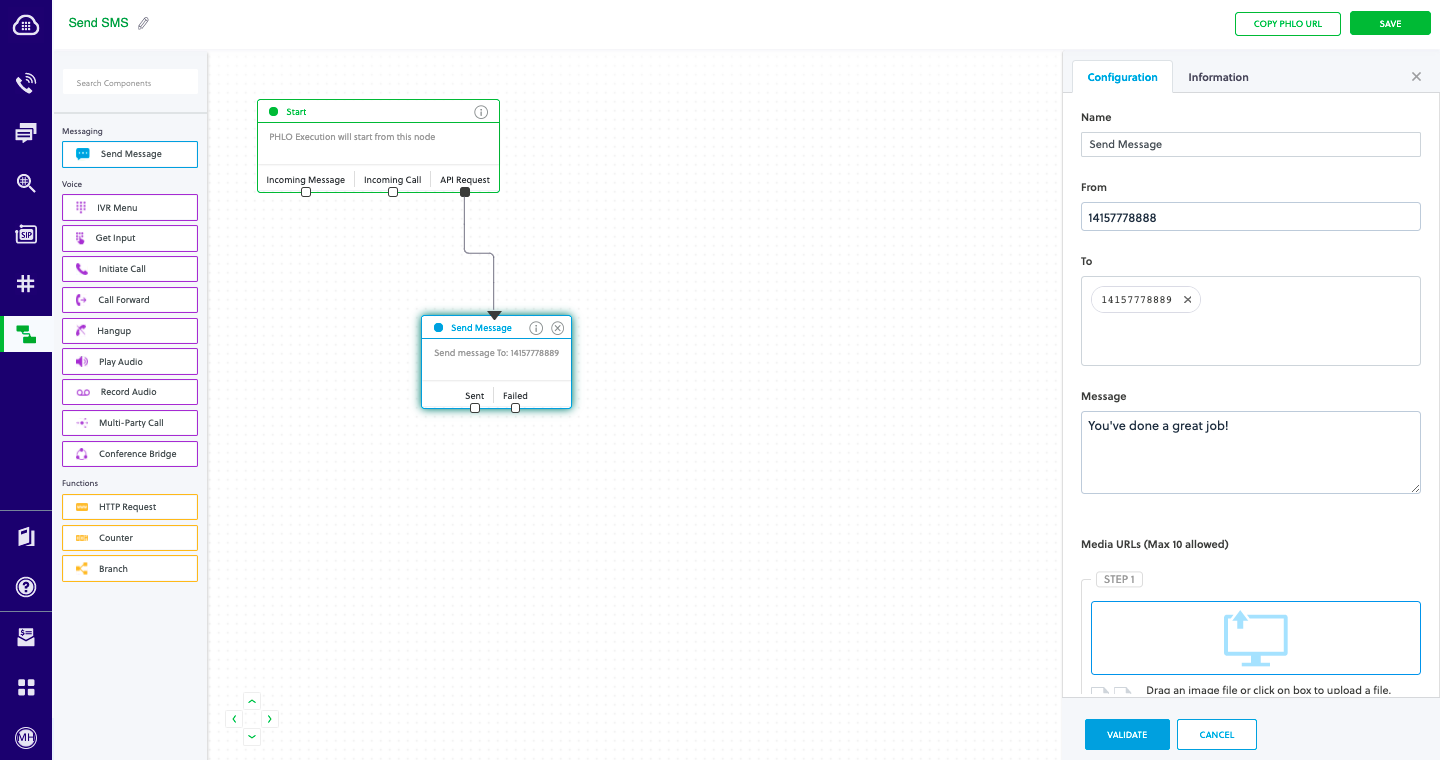
From the list of components on the left-hand side, drag and drop the Send Message component onto the canvas. When a component is placed on the canvas it becomes a node.
- Draw a line to connect the Start node’s API Request trigger state to the Send Message node.
-
In the Configuration pane at the right of the canvas, configure the Send Message node with a sender ID in the From field. Enter the destination numbers you wish to send a message to in the To field. Put your message in the Text field.
You can define a static payload by specifying values when you create the PHLO, or define a dynamic payload by passing values through Liquid templating parameters when you trigger the PHLO from your application.
-
Once you’ve configured the node, click Validate to save the configuration.
- From the list of components on the left-hand side, drag and drop the Branch component onto the canvas.
-
Draw a line to connect the Start node’s Incoming Message trigger state to the Branch node.
- In the Configuration pane at the right of the canvas, configure the Branch node. Rename the node to Handle_Reply. For Variable to compare, enter two curly braces to view all available variables, then select Start.message.msg.
- Click the pencil icon and name the first condition Satisfied. Leave the Operation “is equal to” and enter a value of 1.
- Add a second condition. Name it Not Satisfied and enter a value of 2.
- Once you’ve configured the node, click Validate to save the configuration.
- Drag two Send Message nodes onto the canvas. Draw lines to connect them to the Handle_Reply node using the Satisfied and Not Satisfied trigger states.
- In the Configuration pane for each of the Send Message nodes, specify the From and To keys you configured in the Start node. Enter two curly brackets to display a list of all available variables. In the Message field, you can enter a static message, or combine static text with a variable that includes dynamic text if you specified the variable as a key in the Start node configuration pane.
-
Rename the nodes Reply_Satisfied and Reply_NotSatisfied.
- Once you’ve configured the nodes, click Validate to save their configurations.
- From the list of components on the left-hand side, drag and drop the HTTP Request component onto the canvas. Draw four lines to connect the Sent and Failed trigger states of both the Reply_Satisfied and Reply_NotSatisfied nodes to the HTTP Request node.
- In the Configuration pane for the HTTP Request node, rename the node to Handle_Callback. Enter URL to make the request to. The default method used is GET, but you can click on the box to choose POST, PUT, or DELETE instead. Specify Headers, Auth, Params, and Body values on their respective tabs as necessary.
-
Once you’ve configured the node, click Validate to save the configuration.
Trigger the PHLO
You integrate a PHLO into your application workflow by making an API request to trigger the PHLO with the required payload — the set of parameters you pass to the PHLO. You can define a static payload by specifying values when you create the PHLO, or define a dynamic payload by passing values through parameters when you trigger the PHLO from your application.In either case, you need your Auth ID and Auth Token, which you can get from the overview page of the Plivo console.With a static payload
When you configure values when creating the PHLO, they act as a static payload.Code
Create a file calledTriggerPhlo.js and paste into it this code.Copy
Ask AI
var plivo = require('plivo');
var PhloClient = plivo.PhloClient;

var authId = '<auth_id>';
var authToken = '<auth_token>';
var phloId = '<phlo_id>';
var phloClient = phlo = null;

phloClient = new PhloClient(authId, authToken);
phloClient.phlo(phloId).run().then(function (result) {
    console.log('Phlo run result', result);
}).catch(function (err) {
    console.error('Phlo run failed', err);
});
With a dynamic payload
To use dynamic values for the parameters, use Liquid templating parameters when you create the PHLO …Code
Create a file calledTriggerPhlo.js and paste into it this code.Copy
Ask AI
var plivo = require('plivo');
var PhloClient = plivo.PhloClient;

var authId = '<auth_id>';
var authToken = '<auth_token>';
var phloId = '<phlo_id>';
var phloClient = phlo = null;

var payload = {
    From: '<sender_id>',
    To: '<destination_number>',
}
phloClient = new PhloClient(authId, authToken);
phloClient.phlo(phloId).run(payload).then(function (result) {
    console.log('Phlo run result', result);
}).catch(function (err) {
    console.error('Phlo run failed', err);
});
Test
Save the file and run it.Copy
Ask AI
node TriggerPhlo.js
Here’s how to use Plivo APIs to create surveys using SMS text messages — sending questions and collecting answers.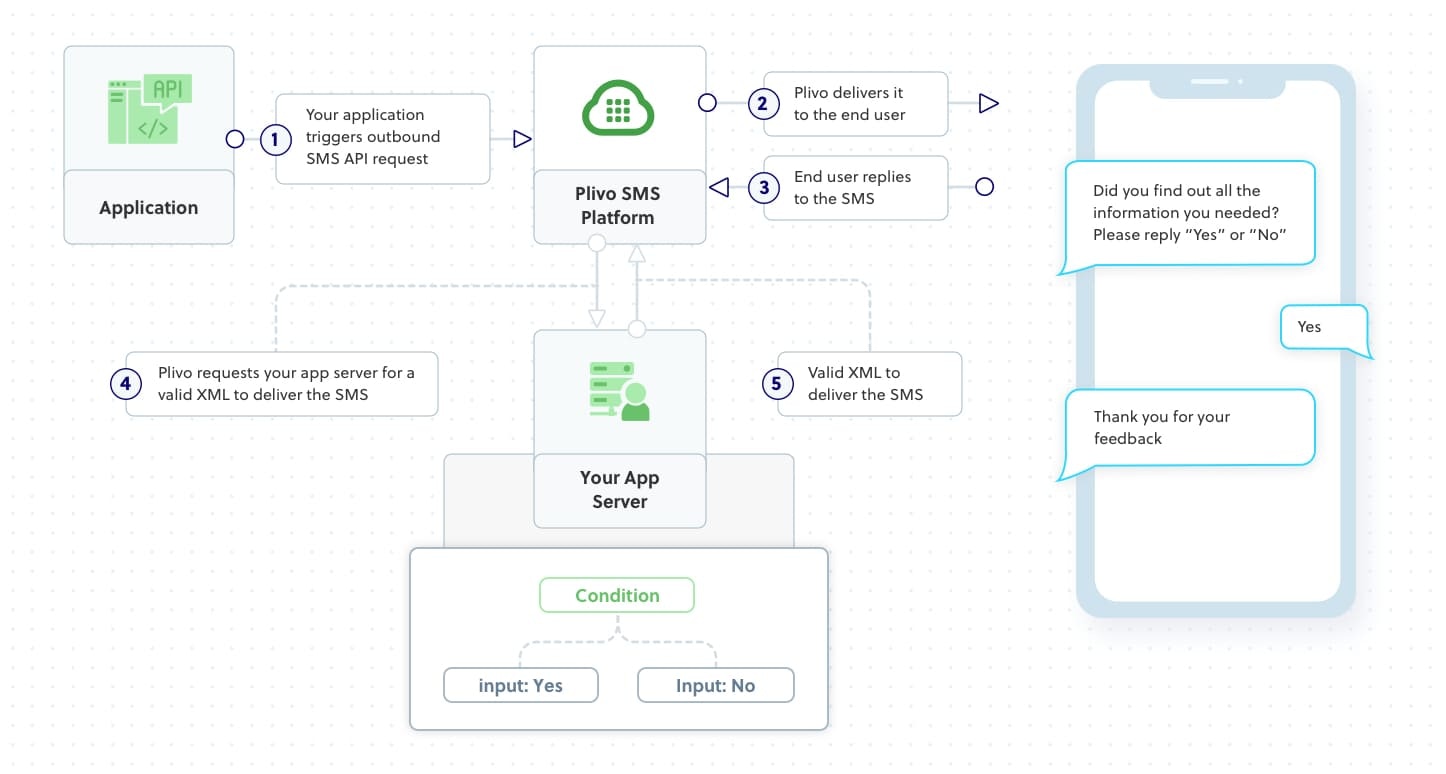
How it works
Prerequisites
To get started, you need a Plivo account — sign up with your work email address if you don’t have one already. To receive incoming messages, you must have a Plivo phone number that supports SMS; you can rent numbers from the Numbers page of the Plivo console or by using the Numbers API. If this is your first time using Plivo APIs, follow our instructions to set up a Node.js development environment.Create the survey application
Create a file calledsurvey.js and paste the below code.Copy
Ask AI
const express = require('express')
const plivo = require('plivo')
const app = express()
const port = 3000

var bodyParser = require('body-parser')
app.use( bodyParser.json() );       // to support JSON-encoded bodies
app.use(bodyParser.urlencoded({     // to support URL-encoded bodies
  extended: true
}));

app.post('/send_survey/', function(req, res) {
    let client = new plivo.Client('<auth_id>', '<auth_token>');
    client.messages.create({
        src: '<sender_id>',
        dst: '<destination_number>',
        text: 'Did you find out all the information you needed? Please reply "Yes" or "No"'
    }).then(function(message_created) {
        res.status(200).send(message_created)
    });
});

app.post('/survey_response/', function(req, res) {

    let from_number = req.body.From;
    let to_number = req.body.To;
    let text = req.body.Text;
    console.log('Message received - From: ' + from_number + ', To: ' + to_number + ', Text: ' + text);

    let plivoxml = plivo.Response();
    let params = {
        'src': to_number,
        'dst': from_number,
    };

    if (text.toLowerCase() == "yes") {
        message_body = "Thank you for your feedback";
    } else if (text.toLowerCase() == "no") {
        message_body = "We apologize for the inconvenience. A representative will contact you to assist you";
    } else {
        message_body = `Response received was "${text}", which is invalid. Please reply with either "Yes" or "No"`;
    }

    plivoxml.addMessage(message_body, params);
    res.contentType('text/xml');
    res.end(plivoxml.toXML()).status(200);
});
app.listen(port, () => {
    console.log(`Example app listening on port ${port}`)
})
We recommend that you store your credentials in the
auth_id and auth_token environment variables to avoid the possibility of accidentally committing them to source control. If you do this, you can initialize the client with no arguments and Plivo will automatically fetch the values from the environment variables. You can use process.env to store environment variables and fetch them when initializing the client.Test
Save the file and run it.Copy
Ask AI
$ node survey.js
Overview
This guide shows how to conduct an SMS survey. Surveys can help businesses with market research. Using SMS for surveys lets organizations process input quickly and efficiently.You can conduct SMS surveys either by using our PHLO visual workflow builder or our APIs. Follow the instructions in one of the tabs below.- Using PHLO
- Using API
You can create and deploy a PHLO to conduct an SMS survey with a few clicks on the PHLO canvas and trigger it with a few lines of code.
How it works
Prerequisites
To get started, you need a Plivo account — sign up with your work email address if you don’t have one already. If this is your first time triggering a PHLO with Ruby, follow our instructions to set up a Ruby development environment.Create the PHLO
To create a PHLO, visit the PHLO page of the Plivo console. If this is your first PHLO, the PHLO page will be empty.- Click Create New PHLO.
-
In the Choose your use case pop-up, click Build my own. The PHLO canvas will appear with the Start node.
The Start node is the starting point of any PHLO. It lets you trigger a PHLO to start upon one of three actions: incoming SMS message, incoming call, or API request.
-
If you plan to use a dynamic payload — passing values through parameters when you trigger the PHLO from your application — click on the Start node to open the Configuration pane. Under API Request, enter key names for the variables you want use in your payload — From, To, and Message fields.
- Once you’ve configured the node, click Validate to save the configuration.
-
From the list of components on the left-hand side, drag and drop the Send Message component onto the canvas. When a component is placed on the canvas it becomes a node.
- Draw a line to connect the Start node’s API Request trigger state to the Send Message node.
-
In the Configuration pane at the right of the canvas, configure the Send Message node with a sender ID in the From field. Enter the destination numbers you wish to send a message to in the To field. Put your message in the Text field.
You can define a static payload by specifying values when you create the PHLO, or define a dynamic payload by passing values through Liquid templating parameters when you trigger the PHLO from your application.
-
Once you’ve configured the node, click Validate to save the configuration.
- From the list of components on the left-hand side, drag and drop the Branch component onto the canvas.
-
Draw a line to connect the Start node’s Incoming Message trigger state to the Branch node.
- In the Configuration pane at the right of the canvas, configure the Branch node. Rename the node to Handle_Reply. For Variable to compare, enter two curly braces to view all available variables, then select Start.message.msg.
- Click the pencil icon and name the first condition Satisfied. Leave the Operation “is equal to” and enter a value of 1.
- Add a second condition. Name it Not Satisfied and enter a value of 2.
- Once you’ve configured the node, click Validate to save the configuration.
- Drag two Send Message nodes onto the canvas. Draw lines to connect them to the Handle_Reply node using the Satisfied and Not Satisfied trigger states.
- In the Configuration pane for each of the Send Message nodes, specify the From and To keys you configured in the Start node. Enter two curly brackets to display a list of all available variables. In the Message field, you can enter a static message, or combine static text with a variable that includes dynamic text if you specified the variable as a key in the Start node configuration pane.
-
Rename the nodes Reply_Satisfied and Reply_NotSatisfied.
- Once you’ve configured the nodes, click Validate to save their configurations.
- From the list of components on the left-hand side, drag and drop the HTTP Request component onto the canvas. Draw four lines to connect the Sent and Failed trigger states of both the Reply_Satisfied and Reply_NotSatisfied nodes to the HTTP Request node.
- In the Configuration pane for the HTTP Request node, rename the node to Handle_Callback. Enter URL to make the request to. The default method used is GET, but you can click on the box to choose POST, PUT, or DELETE instead. Specify Headers, Auth, Params, and Body values on their respective tabs as necessary.
-
Once you’ve configured the node, click Validate to save the configuration.
Trigger the PHLO
You integrate a PHLO into your application workflow by making an API request to trigger the PHLO with the required payload — the set of parameters you pass to the PHLO. You can define a static payload by specifying values when you create the PHLO, or define a dynamic payload by passing values through parameters when you trigger the PHLO from your application.In either case, you need your Auth ID and Auth Token, which you can get from the overview page of the Plivo console.With a static payload
When you configure values when creating the PHLO, they act as a static payload.Code
Create a file calledtrigger_phlo.rb and paste into it this code.Copy
Ask AI
require 'rubygems'
require 'plivo'

include Plivo

AUTH_ID = '<auth_id>'
AUTH_TOKEN = '<auth_token>'

client = Phlo.new(AUTH_ID, AUTH_TOKEN)

# if credentials are stored in the PLIVO_AUTH_ID and the PLIVO_AUTH_TOKEN environment variables
# then initialize client as:
# client = Phlo.new

begin
  phlo = client.phlo.get('<phlo_id>')
  response = phlo.run()
  puts response
rescue PlivoRESTError => e
  puts 'Exception: ' + e.message
end
With a dynamic payload
To use dynamic values for the parameters, use Liquid templating parameters when you create the PHLO …Code
Create a file calledtrigger_phlo.rb and paste into it this code.Copy
Ask AI
require 'rubygems'
require 'plivo'

include Plivo

AUTH_ID = '<auth_id>'
AUTH_TOKEN = '<auth_token>'

client = Phlo.new(AUTH_ID, AUTH_TOKEN)

# if credentials are stored in the PLIVO_AUTH_ID and the PLIVO_AUTH_TOKEN environment variables
# then initialize client as:
# client = Phlo.new

begin
  phlo = client.phlo.get('<phlo_id>')
  #parameters set in PHLO - params
  params = {
     From: '<sender_id>',
     To: '<destination_number>',
  }
  response = phlo.run(params)
  puts response
rescue PlivoRESTError => e
  puts 'Exception: ' + e.message
end
Test
Save the file and run it.Copy
Ask AI
ruby trigger_phlo.rb
Here’s how to use Plivo APIs to create surveys using SMS text messages — sending questions and collecting answers.
How it works
Prerequisites
To get started, you need a Plivo account — sign up with your work email address if you don’t have one already. To receive incoming messages, you must have a Plivo phone number that supports SMS; you can rent numbers from the Numbers page of the Plivo console or by using the Numbers API. If this is your first time using Plivo APIs, follow our instructions to set up a Ruby development environment.Create a Rails controller
Change to the project directory and run this command.Copy
Ask AI
$ rails generate controller Plivo sms
Copy
Ask AI
$ rm app/views/plivo/sms.html.erb
Create the survey application
Edit app/controllers/plivo_controller.rb and paste into it this code.Copy
Ask AI
include Plivo
include Plivo::Exceptions
include Plivo::XML

class PlivoController < ApplicationController
	protect_from_forgery with: :null_session # disbale CSRF
	def send_survey
		api = RestClient.new("<auth_id>","<auth_token>")
		response = api.messages.create(
			src:'<sender_id>',
			dst:'<destination_number>',
			text:'Did you find out all the information you needed? Please reply "Yes" or "No"'
		)
		render json: response.to_s
	end

	def survey_response
		from_number = params[:From]
		to_number = params[:To]
		text = params[:Text]
		puts "From: #{from_number}, To: #{to_number}, Text: #{text}"
		if text.downcase == "yes"
			message_body = "Thank you for your feedback"
		elsif text.downcase=="no"
			message_body = "We apologize for the inconvenience. A representative will contact you to assist you"
		else
			message_body = "Response received was #{text}, which is invalid. Please reply with either Yes or No"
		end
		response = Response.new
		params = {
			src: to_number,
			dst: from_number,
		}
		response.addMessage(message_body, params)
		xml = PlivoXML.new(response)
		puts xml.to_xml
		render xml: xml.to_xml
	end
end
Add a route
Edit config/routes.rb and change the lineCopy
Ask AI
Rails.application.routes.draw do
  get 'plivo/sms'
end
Copy
Ask AI
Rails.application.routes.draw do
  post 'plivo/send_survey/' => 'plivo#send_survey'
  post 'plivo/survey_response/' => 'plivo#survey_response'
end
Test
Save the file and run it.Copy
Ask AI
$ rails server
Overview
This guide shows how to conduct an SMS survey. Surveys can help businesses with market research. Using SMS for surveys lets organizations process input quickly and efficiently.You can conduct SMS surveys either by using our PHLO visual workflow builder or our APIs. Follow the instructions in one of the tabs below.- Using PHLO
- Using API
You can create and deploy a PHLO to conduct an SMS survey with a few clicks on the PHLO canvas and trigger it with a few lines of code.
How it works
Prerequisites
To get started, you need a Plivo account — sign up with your work email address if you don’t have one already. If this is your first time triggering a PHLO with Python, follow our instructions to set up a Python development environment.Create the PHLO
To create a PHLO, visit the PHLO page of the Plivo console. If this is your first PHLO, the PHLO page will be empty.- Click Create New PHLO.
-
In the Choose your use case pop-up, click Build my own. The PHLO canvas will appear with the Start node.
The Start node is the starting point of any PHLO. It lets you trigger a PHLO to start upon one of three actions: incoming SMS message, incoming call, or API request.
-
If you plan to use a dynamic payload — passing values through parameters when you trigger the PHLO from your application — click on the Start node to open the Configuration pane. Under API Request, enter key names for the variables you want use in your payload — From, To, and Message fields.
- Once you’ve configured the node, click Validate to save the configuration.
-
From the list of components on the left-hand side, drag and drop the Send Message component onto the canvas. When a component is placed on the canvas it becomes a node.
- Draw a line to connect the Start node’s API Request trigger state to the Send Message node.
-
In the Configuration pane at the right of the canvas, configure the Send Message node with a sender ID in the From field. Enter the destination numbers you wish to send a message to in the To field. Put your message in the Text field.
You can define a static payload by specifying values when you create the PHLO, or define a dynamic payload by passing values through Liquid templating parameters when you trigger the PHLO from your application.
-
Once you’ve configured the node, click Validate to save the configuration.
- From the list of components on the left-hand side, drag and drop the Branch component onto the canvas.
-
Draw a line to connect the Start node’s Incoming Message trigger state to the Branch node.
- In the Configuration pane at the right of the canvas, configure the Branch node. Rename the node to Handle_Reply. For Variable to compare, enter two curly braces to view all available variables, then select Start.message.msg.
- Click the pencil icon and name the first condition Satisfied. Leave the Operation “is equal to” and enter a value of 1.
- Add a second condition. Name it Not Satisfied and enter a value of 2.
- Once you’ve configured the node, click Validate to save the configuration.
- Drag two Send Message nodes onto the canvas. Draw lines to connect them to the Handle_Reply node using the Satisfied and Not Satisfied trigger states.
- In the Configuration pane for each of the Send Message nodes, specify the From and To keys you configured in the Start node. Enter two curly brackets to display a list of all available variables. In the Message field, you can enter a static message, or combine static text with a variable that includes dynamic text if you specified the variable as a key in the Start node configuration pane.
-
Rename the nodes Reply_Satisfied and Reply_NotSatisfied.
- Once you’ve configured the nodes, click Validate to save their configurations.
- From the list of components on the left-hand side, drag and drop the HTTP Request component onto the canvas. Draw four lines to connect the Sent and Failed trigger states of both the Reply_Satisfied and Reply_NotSatisfied nodes to the HTTP Request node.
- In the Configuration pane for the HTTP Request node, rename the node to Handle_Callback. Enter URL to make the request to. The default method used is GET, but you can click on the box to choose POST, PUT, or DELETE instead. Specify Headers, Auth, Params, and Body values on their respective tabs as necessary.
-
Once you’ve configured the node, click Validate to save the configuration.
Trigger the PHLO
You integrate a PHLO into your application workflow by making an API request to trigger the PHLO with the required payload — the set of parameters you pass to the PHLO. You can define a static payload by specifying values when you create the PHLO, or define a dynamic payload by passing values through parameters when you trigger the PHLO from your application.In either case, you need your Auth ID and Auth Token, which you can get from the overview page of the Plivo console.With a static payload
When you configure values when creating the PHLO, they act as a static payload.Code
Create a file calledtrigger_phlo.py and paste into it this code.Copy
Ask AI
import plivo

auth_id = '<auth_id>'
auth_token = '<auth_token>'
phlo_id = '<phlo_id>'
phlo_client = plivo.phlo.RestClient(auth_id=auth_id, auth_token=auth_token)
phlo = phlo_client.phlo.get(phlo_id)
response = phlo.run()
print(str(response))
With a dynamic payload
To use dynamic values for the parameters, use Liquid templating parameters when you create the PHLO …Code
Create a file calledtrigger_phlo.py and paste into it this code.Copy
Ask AI
import plivo

auth_id = '<auth_id>'
auth_token = '<auth_token>'
phlo_id = '<phlo_id>'
payload = {"From" : "<sender_id>","To" : "<destination_number>"}
phlo_client = plivo.phlo.RestClient(auth_id=auth_id, auth_token=auth_token)
phlo = phlo_client.phlo.get(phlo_id)
response = phlo.run(**payload)
print(str(response))
Test
Save the file and run it.Copy
Ask AI
python trigger_phlo.py
Here’s how to use Plivo APIs to create surveys using SMS text messages — sending questions and collecting answers.
How it works
Prerequisites
To get started, you need a Plivo account — sign up with your work email address if you don’t have one already. To receive incoming messages, you must have a Plivo phone number that supports SMS; you can rent numbers from the Numbers page of the Plivo console or by using the Numbers API. If this is your first time using Plivo APIs, follow our instructions to set up a Python development environment.Create the survey application
Create a file calledsurvey.py and paste into it this code.Copy
Ask AI
from flask import Flask, request, Response
import plivo
from plivo import plivoxml

app = Flask(__name__)


@app.post("/send_survey/")
def send_survey():
    client = plivo.RestClient("<auth_id>", "<auth_token>")
    response = client.messages.create(
        src="<sender_id>",
        dst="<destination_number>",
        text='Did you find out all the information you needed? Please reply "Yes" or "No"',
    )
    return Response(str(response), mimetype="application/json"), 200


@app.post("/survey_response/")
def survey_response():
    from_number = request.values.get("From")
    to_number = request.values.get("To")
    text = request.values.get("Text")
    print(f"Message received - From: {from_number}, To: {to_number}, Text: {text}")

    if text.lower() == "yes":
        message_body = "Thank you for your feedback"
    elif text.lower() == "no":
        message_body = "We apologize for the inconvenience. A representative will contact you to assist you"
    else:
        message_body = f'Response received was "{text}", which is invalid. Please reply with either "Yes" or "No"'

    response = plivoxml.ResponseElement()
    response.add(plivoxml.MessageElement(message_body, src=to_number, dst=from_number))
    return Response(response.to_string(), mimetype="application/xml"), 200


if __name__ == "__main__":
    app.run(host="0.0.0.0", debug=True)
We recommend that you store your credentials in the
auth_id and auth_token environment variables to avoid the possibility of accidentally committing them to source control. If you do this, you can initialize the client with no arguments and Plivo will automatically fetch the values from the environment variables. You can use os module(os.environ) to store environment variables and fetch them when initializing the client.Test
Save the file and run it.Copy
Ask AI
$ python survey.py
Overview
This guide shows how to conduct an SMS survey. Surveys can help businesses with market research. Using SMS for surveys lets organizations process input quickly and efficiently.You can conduct SMS surveys either by using our PHLO visual workflow builder or our APIs. Follow the instructions in one of the tabs below.- Using PHLO
- Using API
You can create and deploy a PHLO to conduct an SMS survey with a few clicks on the PHLO canvas and trigger it with a few lines of code.
How it works
Prerequisites
To get started, you need a Plivo account — sign up with your work email address if you don’t have one already. If this is your first time triggering a PHLO with PHP, follow our instructions to set up a PHP development environment.Create the PHLO
To create a PHLO, visit the PHLO page of the Plivo console. If this is your first PHLO, the PHLO page will be empty.- Click Create New PHLO.
-
In the Choose your use case pop-up, click Build my own. The PHLO canvas will appear with the Start node.
The Start node is the starting point of any PHLO. It lets you trigger a PHLO to start upon one of three actions: incoming SMS message, incoming call, or API request.
-
If you plan to use a dynamic payload — passing values through parameters when you trigger the PHLO from your application — click on the Start node to open the Configuration pane. Under API Request, enter key names for the variables you want use in your payload — From, To, and Message fields.
- Once you’ve configured the node, click Validate to save the configuration.
-
From the list of components on the left-hand side, drag and drop the Send Message component onto the canvas. When a component is placed on the canvas it becomes a node.
- Draw a line to connect the Start node’s API Request trigger state to the Send Message node.
-
In the Configuration pane at the right of the canvas, configure the Send Message node with a sender ID in the From field. Enter the destination numbers you wish to send a message to in the To field. Put your message in the Text field.
You can define a static payload by specifying values when you create the PHLO, or define a dynamic payload by passing values through Liquid templating parameters when you trigger the PHLO from your application.
-
Once you’ve configured the node, click Validate to save the configuration.
- From the list of components on the left-hand side, drag and drop the Branch component onto the canvas.
-
Draw a line to connect the Start node’s Incoming Message trigger state to the Branch node.
- In the Configuration pane at the right of the canvas, configure the Branch node. Rename the node to Handle_Reply. For Variable to compare, enter two curly braces to view all available variables, then select Start.message.msg.
- Click the pencil icon and name the first condition Satisfied. Leave the Operation “is equal to” and enter a value of 1.
- Add a second condition. Name it Not Satisfied and enter a value of 2.
- Once you’ve configured the node, click Validate to save the configuration.
- Drag two Send Message nodes onto the canvas. Draw lines to connect them to the Handle_Reply node using the Satisfied and Not Satisfied trigger states.
- In the Configuration pane for each of the Send Message nodes, specify the From and To keys you configured in the Start node. Enter two curly brackets to display a list of all available variables. In the Message field, you can enter a static message, or combine static text with a variable that includes dynamic text if you specified the variable as a key in the Start node configuration pane.
-
Rename the nodes Reply_Satisfied and Reply_NotSatisfied.
- Once you’ve configured the nodes, click Validate to save their configurations.
- From the list of components on the left-hand side, drag and drop the HTTP Request component onto the canvas. Draw four lines to connect the Sent and Failed trigger states of both the Reply_Satisfied and Reply_NotSatisfied nodes to the HTTP Request node.
- In the Configuration pane for the HTTP Request node, rename the node to Handle_Callback. Enter URL to make the request to. The default method used is GET, but you can click on the box to choose POST, PUT, or DELETE instead. Specify Headers, Auth, Params, and Body values on their respective tabs as necessary.
-
Once you’ve configured the node, click Validate to save the configuration.
Trigger the PHLO
You integrate a PHLO into your application workflow by making an API request to trigger the PHLO with the required payload — the set of parameters you pass to the PHLO. You can define a static payload by specifying values when you create the PHLO, or define a dynamic payload by passing values through parameters when you trigger the PHLO from your application.In either case, you need your Auth ID and Auth Token, which you can get from the overview page of the Plivo console.With a static payload
When you configure values when creating the PHLO, they act as a static payload.Code
Create a file calledTriggerPhlo.php and paste into it this code.Copy
Ask AI
<?php
require 'vendor/autoload.php';
use Plivo\Resources\PHLO\PhloRestClient;
use Plivo\Exceptions\PlivoRestException;
$client = new PhloRestClient("<auth_id>", "<auth_token>");

$phlo = $client->phlo->get("<phlo_id>");
try {
    $response = $phlo->run();
    print_r($response);
} catch (PlivoRestException $ex) {
    print_r($ex);
}
With a dynamic payload
To use dynamic values for the parameters, use Liquid templating parameters when you create the PHLO …Code
Create a file calledTriggerPhlo.php and paste into it this code.Copy
Ask AI
<?php
require 'vendor/autoload.php';
use Plivo\Resources\PHLO\PhloRestClient;
use Plivo\Exceptions\PlivoRestException;
$client = new PhloRestClient("<auth_id>", "<auth_token>");

$phlo = $client->phlo->get("<phlo_id>");
try {
    $response = $phlo->run(["From" => "<sender_id>", "To" => "<destination_number>"]); // These are the fields entered in the PHLO console
    print_r($response);
} catch (PlivoRestException $ex) {
    print_r($ex);
}
Test
Save the file and run it.Copy
Ask AI
php TriggerPhlo.php
Here’s how to use Plivo APIs to create surveys using SMS text messages — sending questions and collecting answers.
How it works
Prerequisites
To get started, you need a Plivo account — sign up with your work email address if you don’t have one already. To receive incoming messages, you must have a Plivo phone number that supports SMS; you can rent numbers from the Numbers page of the Plivo console or by using the Numbers API. If this is your first time using Plivo APIs, follow our instructions to set up a PHP development environment.Create the survey application
Create a file calledsurvey.php and paste into it this code.Copy
Ask AI
<?php
require 'vendor/autoload.php';
use Plivo\RestClient;
$client = new RestClient("<auth_id>","<auth_token>");
$response = $client->messages->create(
   [
        "src" => "<sender_id>",
        "dst" => "<destination_number>",
        "text"  =>"To win a holiday to your dream destination, text ‘MyHolidaydestination’ to 777-444-5555. Winners announced this Friday at the Tennery Shopping Center.",
        "url"=>"https://<yourdomain>.com/sms_status/",
   ]
);
print_r($response);
?>
We recommend that you store your credentials in the
auth_id and auth_token environment variables to avoid the possibility of accidentally committing them to source control. If you do this, you can initialize the client with no arguments and Plivo will automatically fetch the values from the environment variables. You can use os module(os.environ) to store environment variables and fetch them when initializing the client.Test
Save the file and run it.Copy
Ask AI
$ php SendSMS.php
Overview
This guide shows how to conduct an SMS survey. Surveys can help businesses with market research. Using SMS for surveys lets organizations process input quickly and efficiently.You can conduct SMS surveys either by using our PHLO visual workflow builder or our APIs. Follow the instructions in one of the tabs below.- Using PHLO
- Using API
You can create and deploy a PHLO to conduct an SMS survey with a few clicks on the PHLO canvas and trigger it with a few lines of code.
How it works
Prerequisites
To get started, you need a Plivo account — sign up with your work email address if you don’t have one already. If this is your first time triggering a PHLO with .NET, follow our instructions to set up a .NET development environment.Create the PHLO
To create a PHLO, visit the PHLO page of the Plivo console. If this is your first PHLO, the PHLO page will be empty.- Click Create New PHLO.
-
In the Choose your use case pop-up, click Build my own. The PHLO canvas will appear with the Start node.
The Start node is the starting point of any PHLO. It lets you trigger a PHLO to start upon one of three actions: incoming SMS message, incoming call, or API request.
-
If you plan to use a dynamic payload — passing values through parameters when you trigger the PHLO from your application — click on the Start node to open the Configuration pane. Under API Request, enter key names for the variables you want use in your payload — From, To, and Message fields.
- Once you’ve configured the node, click Validate to save the configuration.
-
From the list of components on the left-hand side, drag and drop the Send Message component onto the canvas. When a component is placed on the canvas it becomes a node.
- Draw a line to connect the Start node’s API Request trigger state to the Send Message node.
-
In the Configuration pane at the right of the canvas, configure the Send Message node with a sender ID in the From field. Enter the destination numbers you wish to send a message to in the To field. Put your message in the Text field.
You can define a static payload by specifying values when you create the PHLO, or define a dynamic payload by passing values through Liquid templating parameters when you trigger the PHLO from your application.
-
Once you’ve configured the node, click Validate to save the configuration.
- From the list of components on the left-hand side, drag and drop the Branch component onto the canvas.
-
Draw a line to connect the Start node’s Incoming Message trigger state to the Branch node.
- In the Configuration pane at the right of the canvas, configure the Branch node. Rename the node to Handle_Reply. For Variable to compare, enter two curly braces to view all available variables, then select Start.message.msg.
- Click the pencil icon and name the first condition Satisfied. Leave the Operation “is equal to” and enter a value of 1.
- Add a second condition. Name it Not Satisfied and enter a value of 2.
- Once you’ve configured the node, click Validate to save the configuration.
- Drag two Send Message nodes onto the canvas. Draw lines to connect them to the Handle_Reply node using the Satisfied and Not Satisfied trigger states.
- In the Configuration pane for each of the Send Message nodes, specify the From and To keys you configured in the Start node. Enter two curly brackets to display a list of all available variables. In the Message field, you can enter a static message, or combine static text with a variable that includes dynamic text if you specified the variable as a key in the Start node configuration pane.
-
Rename the nodes Reply_Satisfied and Reply_NotSatisfied.
- Once you’ve configured the nodes, click Validate to save their configurations.
- From the list of components on the left-hand side, drag and drop the HTTP Request component onto the canvas. Draw four lines to connect the Sent and Failed trigger states of both the Reply_Satisfied and Reply_NotSatisfied nodes to the HTTP Request node.
- In the Configuration pane for the HTTP Request node, rename the node to Handle_Callback. Enter URL to make the request to. The default method used is GET, but you can click on the box to choose POST, PUT, or DELETE instead. Specify Headers, Auth, Params, and Body values on their respective tabs as necessary.
-
Once you’ve configured the node, click Validate to save the configuration.
Trigger the PHLO
You integrate a PHLO into your application workflow by making an API request to trigger the PHLO with the required payload — the set of parameters you pass to the PHLO. You can define a static payload by specifying values when you create the PHLO, or define a dynamic payload by passing values through parameters when you trigger the PHLO from your application.In either case, you need your Auth ID and Auth Token, which you can get from the overview page of the Plivo console.With a static payload
When you configure values when creating the PHLO, they act as a static payload.Code
In Visual Studio, open the file in the CS project calledProgram.cs and paste into it this code.Copy
Ask AI
using System;
using Plivo;

namespace test_PHLO
{
    class Program
    {
        public static void Main(string[] args)
        {
            var phloClient = new PhloApi("<auth_id>", "<auth_token>");
            var phloID = "<phlo_id>";
            var phlo = phloClient.Phlo.Get(phloID);
            Console.WriteLine(phlo.Run());
        }
    }
}
With a dynamic payload
To use dynamic values for the parameters, use Liquid templating parameters when you create the PHLO …Code
In Visual Studio, open the file in the CS project calledProgram.cs and paste into it this code.Copy
Ask AI
using System;
using System.Collections.Generic;
using Plivo;

namespace test_PHLO
{
    class Program
    {
        public static void Main(string[] args)
        {
            var phloClient = new PhloApi("<auth_id>", "<auth_token>");
            var phloID = "<phlo_id>";
            var phlo = phloClient.Phlo.Get(phloID);
            var data = new Dictionary<string, object>
            {
                { "From", "<sender_id>" },
                { "To", "<destination_number>" }

            };
            Console.WriteLine(phlo.Run(data));
        }
    }
}
Test
Save the file and run it.Here’s how to use Plivo APIs to create surveys using SMS text messages — sending questions and collecting answers.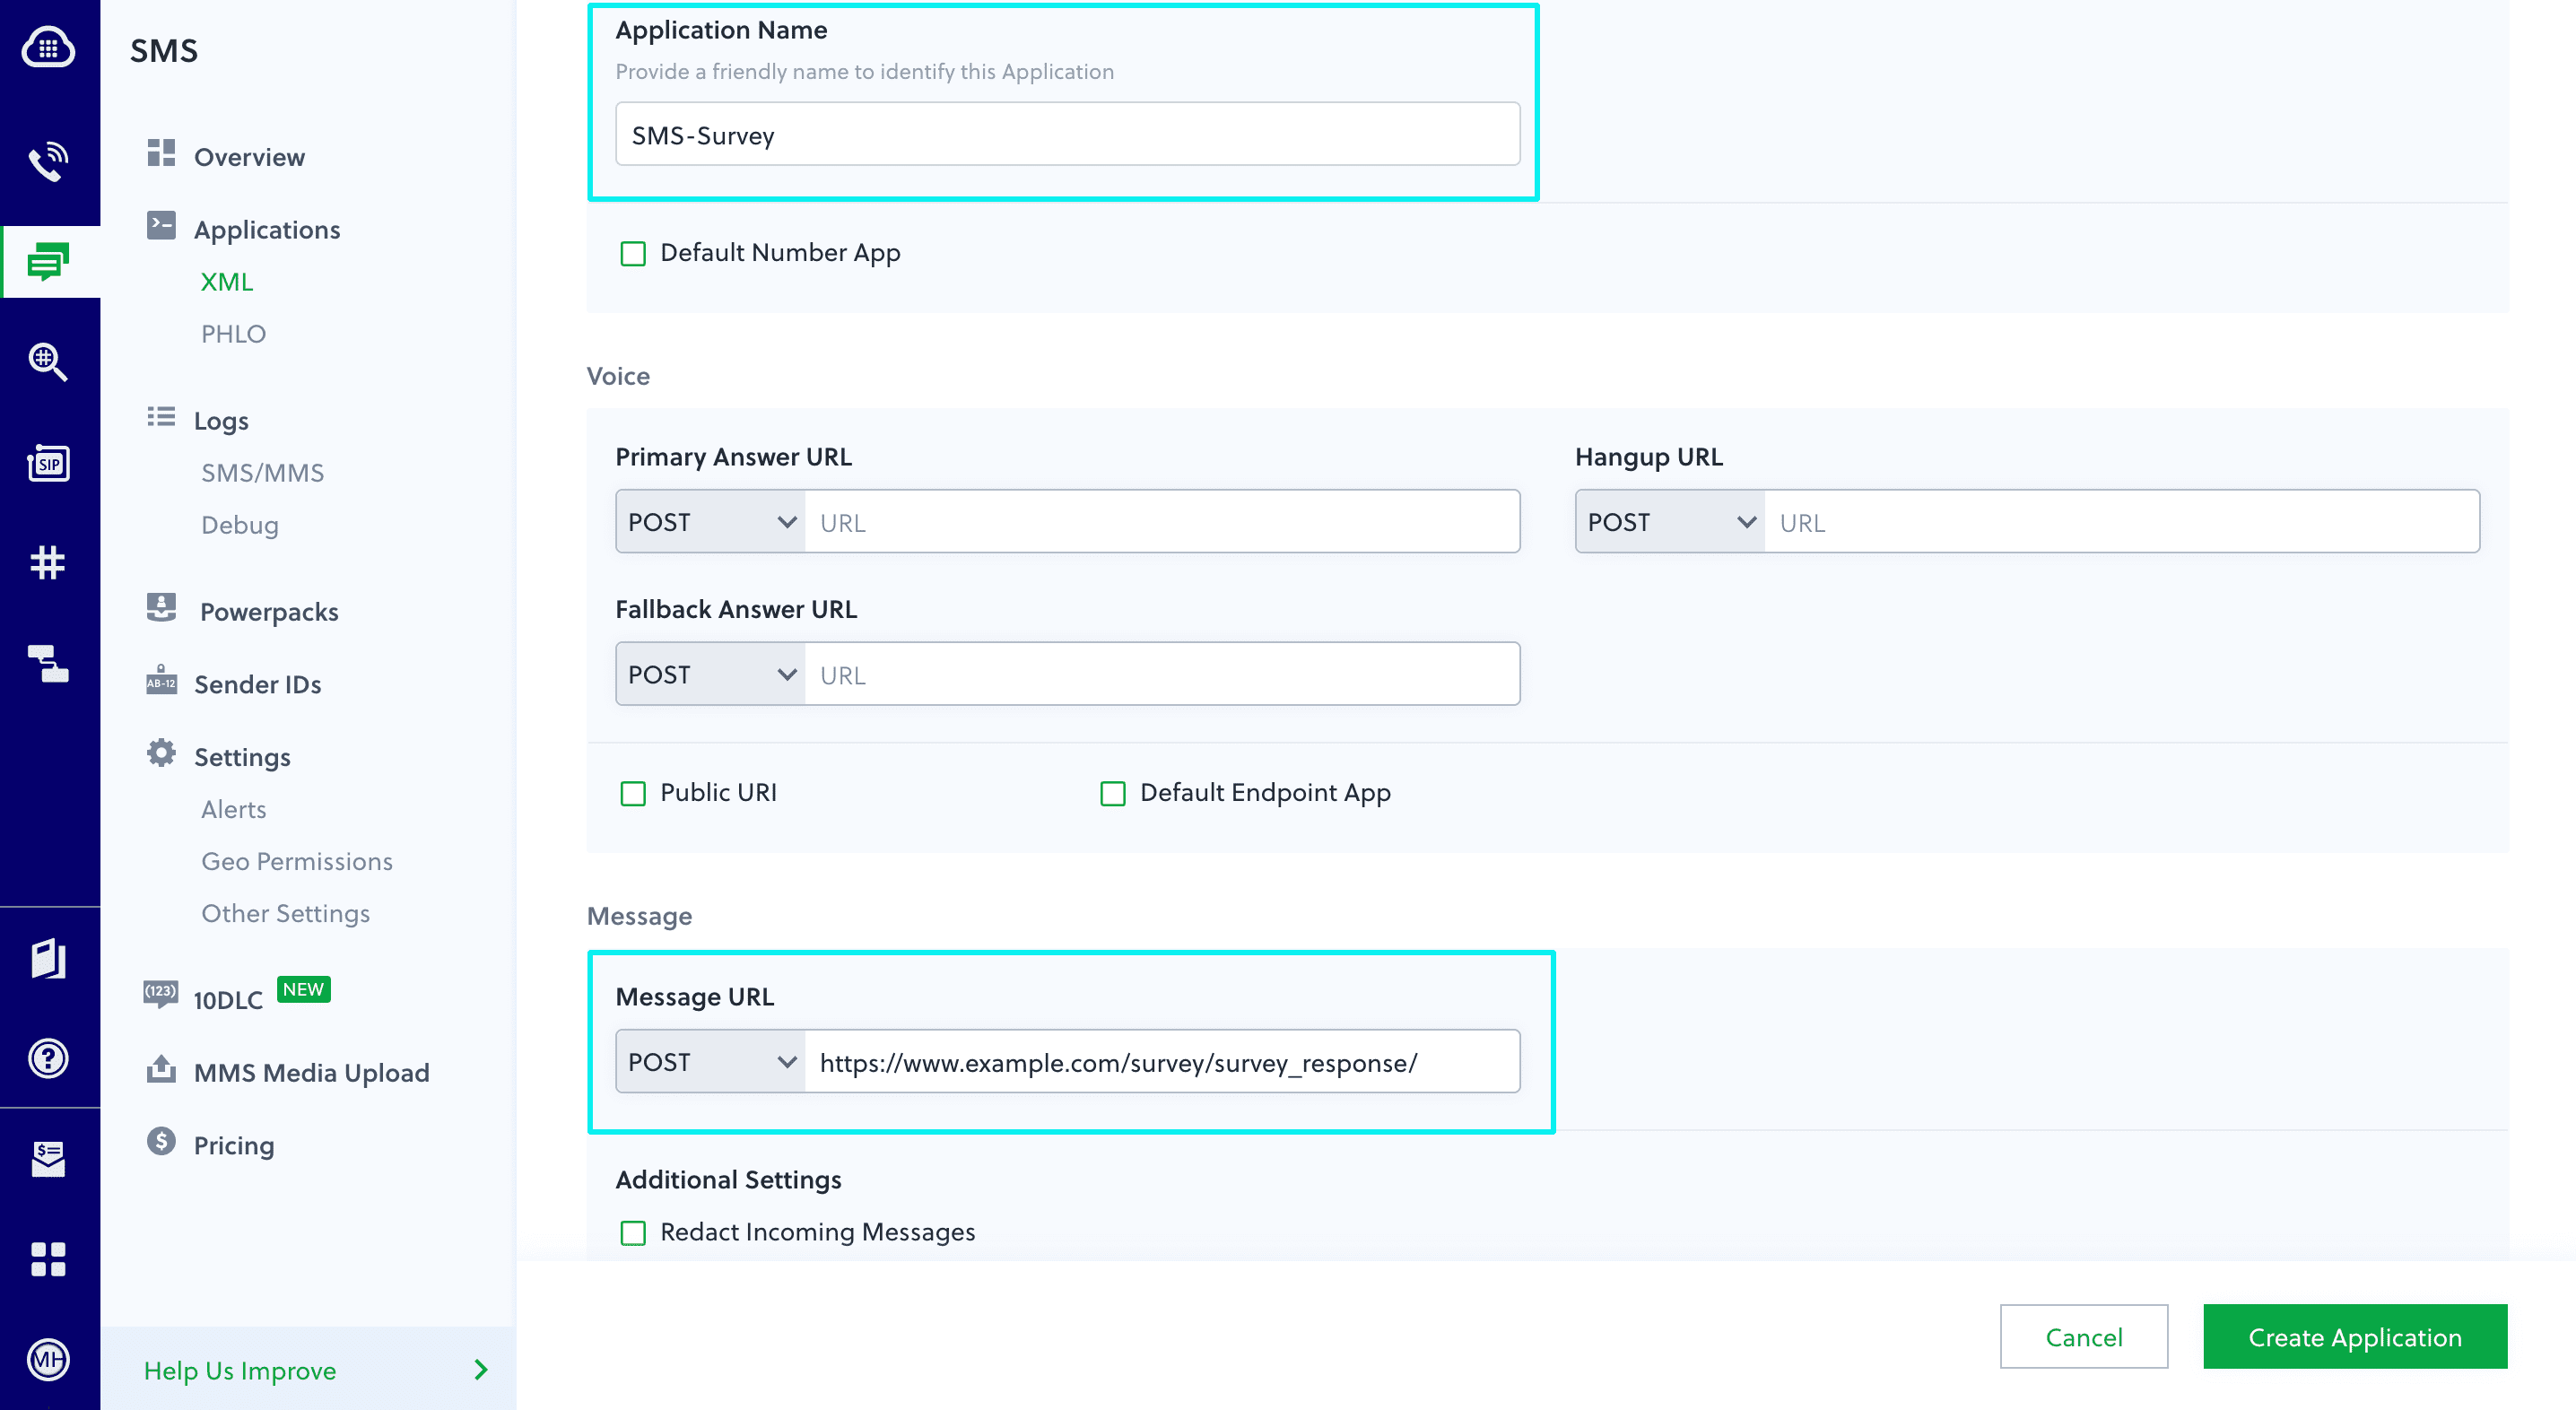
How it works
Prerequisites
To get started, you need a Plivo account — sign up with your work email address if you don’t have one already. To receive incoming messages, you must have a Plivo phone number that supports SMS; you can rent numbers from the Numbers page of the Plivo console or by using the Numbers API. If this is your first time using Plivo APIs, follow our instructions to set up a .NET development environment.Create a .NET controller
Create a new project and navigate to the Controllers directory. Create a controller called Survey.cs and paste into it this code.Copy
Ask AI
using System;
using Plivo;
using System.Collections.Generic;
using Microsoft.AspNetCore.Mvc;


namespace demo.Controllers
{
    public class Survey : Controller
    {

        public IActionResult Index()
        {
            var api = new PlivoApi("<auth_id>","<auth_token>");
            var response = api.Message.Create(
                src: "<sender_id>",
                dst: "<destination_number>",
                text: "Did you find out all the information you needed? Please reply 'Yes' or 'No'");
            return this.Content(response.ToString());
        }

        public IActionResult survey_response()
        {
            String from_number = Request.Form["From"];
            String to_number = Request.Form["To"];
            String text = Request.Form["Text"];
            String body;

            if (text.ToLower() == "yes")
            {
                body = "Thank you for your feedback";
            }
            else if(text.ToLower() == "no")
            {
                body = "We apologize for the inconvenience. A representative will contact you to assist you";
            }
            else
            {
                body = String.Format("Response received was {0}, which is invalid. Please reply with either 'Yes' or 'No'", text);
            }

            Plivo.XML.Response resp = new Plivo.XML.Response();
            resp.AddMessage(body, new Dictionary<string, string>()
            {
                {"src", to_number},
                {"dst", from_number},
                {"type", "sms"}
            });
            var output = resp.ToString();
            Console.WriteLine(output);
            return this.Content(output, "text/xml");
        }
    }
}
We recommend that you store your credentials in the
auth_id and auth_token environment variables to avoid the possibility of accidentally committing them to source control. If you do this, you can initialize the client with no arguments and Plivo will automatically fetch the values from the environment variables. You can use the Environment.SetEnvironmentVariable method to store environment variables and Environment.GetEnvironmentVariable to fetch them when initializing the client.Create a Plivo application for the SMS survey
Associate the controller you created with Plivo by creating a Plivo application. Visiting Messaging > Applications and click Add New Application. You can also use Plivo’s Application API.Give your application a name — we called oursSMS-Survey. Enter the server URL you want to use (for example https://<yourdomain>.com/survey/survey_response/) in the Message URL field and set the method to POST. Click Create Application to save your application.Assign a Plivo number to your application
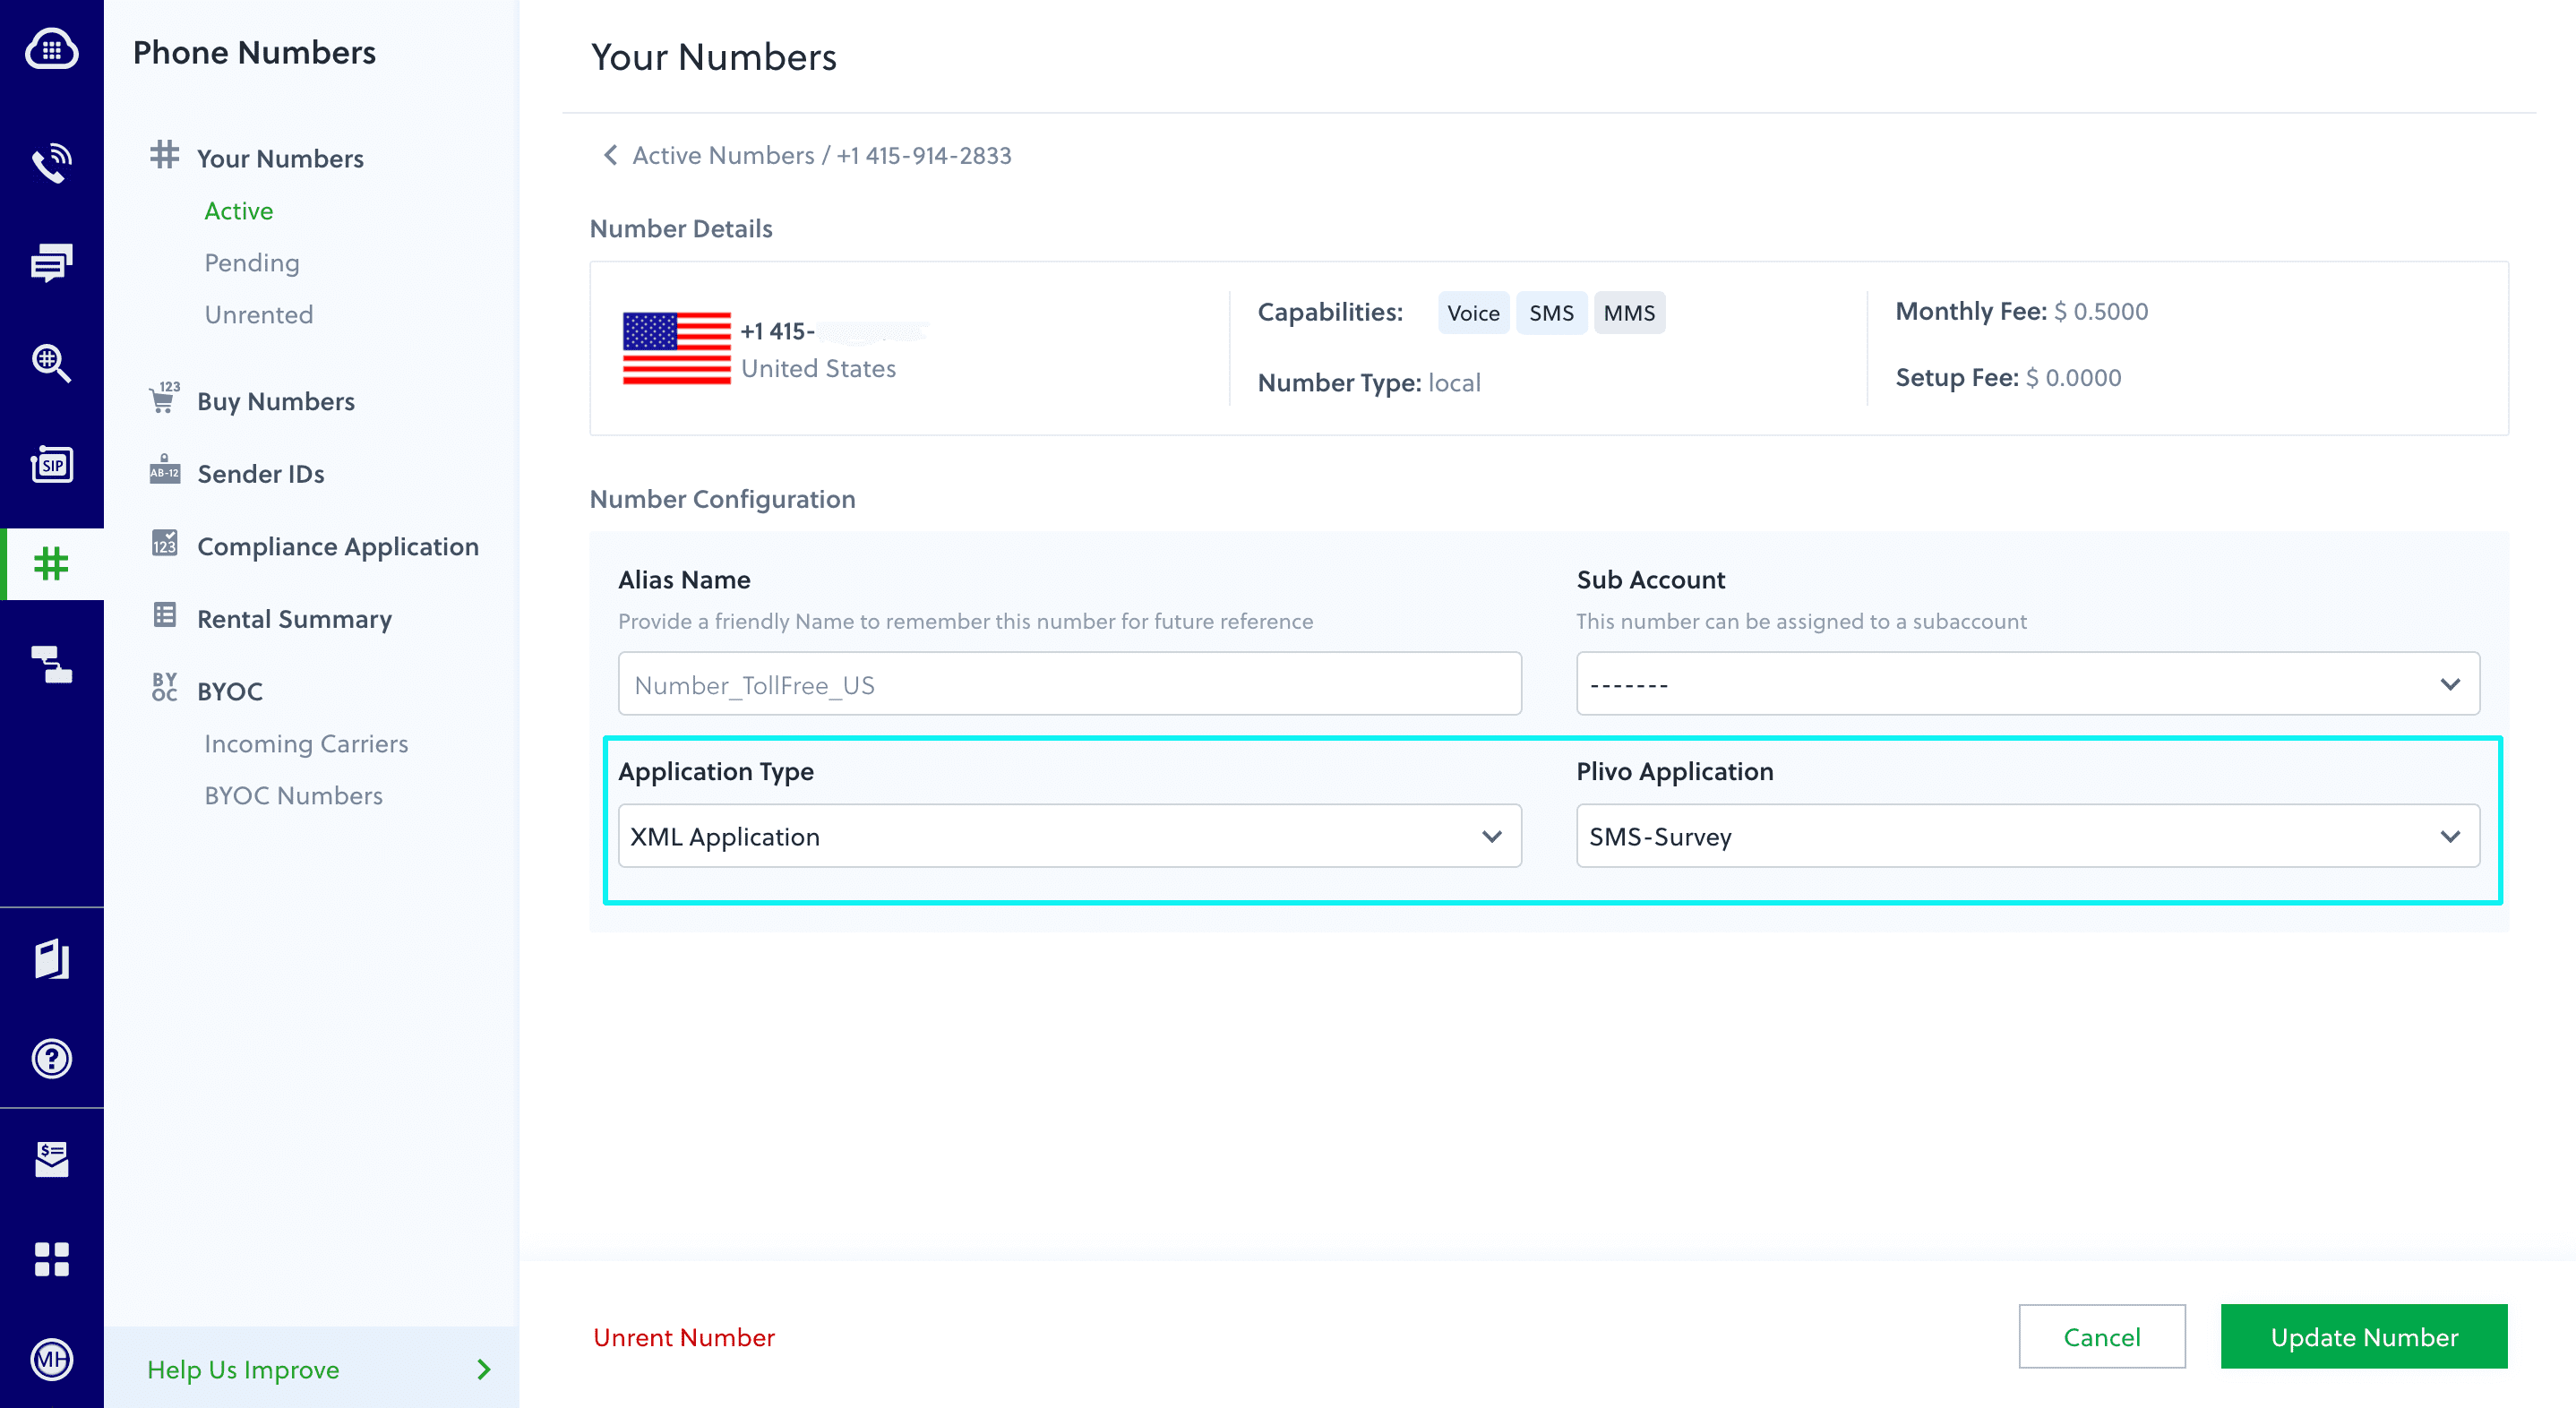
Navigate to the Numbers page and select the phone number you want to use for this application.From the Application Type drop-down, selectXML Application.From the Plivo Application drop-down, select SMS-Survey (the name we gave the application).Click Update Number to save.Test
Send a text message to the Plivo number you specified using any phone.Overview
This guide shows how to conduct an SMS survey. Surveys can help businesses with market research. Using SMS for surveys lets organizations process input quickly and efficiently.You can conduct SMS surveys either by using our PHLO visual workflow builder or our APIs. Follow the instructions in one of the tabs below.- Using PHLO
- Using API
You can create and deploy a PHLO to conduct an SMS survey with a few clicks on the PHLO canvas and trigger it with a few lines of code.
How it works
Prerequisites
To get started, you need a Plivo account — sign up with your work email address if you don’t have one already. If this is your first time triggering a PHLO with Java, follow our instructions to set up a Java development environment.Create the PHLO
To create a PHLO, visit the PHLO page of the Plivo console. If this is your first PHLO, the PHLO page will be empty.- Click Create New PHLO.
-
In the Choose your use case pop-up, click Build my own. The PHLO canvas will appear with the Start node.
The Start node is the starting point of any PHLO. It lets you trigger a PHLO to start upon one of three actions: incoming SMS message, incoming call, or API request.
-
If you plan to use a dynamic payload — passing values through parameters when you trigger the PHLO from your application — click on the Start node to open the Configuration pane. Under API Request, enter key names for the variables you want use in your payload — From, To, and Message fields.
- Once you’ve configured the node, click Validate to save the configuration.
-
From the list of components on the left-hand side, drag and drop the Send Message component onto the canvas. When a component is placed on the canvas it becomes a node.
- Draw a line to connect the Start node’s API Request trigger state to the Send Message node.
-
In the Configuration pane at the right of the canvas, configure the Send Message node with a sender ID in the From field. Enter the destination numbers you wish to send a message to in the To field. Put your message in the Text field.
You can define a static payload by specifying values when you create the PHLO, or define a dynamic payload by passing values through Liquid templating parameters when you trigger the PHLO from your application.
-
Once you’ve configured the node, click Validate to save the configuration.
- From the list of components on the left-hand side, drag and drop the Branch component onto the canvas.
-
Draw a line to connect the Start node’s Incoming Message trigger state to the Branch node.
- In the Configuration pane at the right of the canvas, configure the Branch node. Rename the node to Handle_Reply. For Variable to compare, enter two curly braces to view all available variables, then select Start.message.msg.
- Click the pencil icon and name the first condition Satisfied. Leave the Operation “is equal to” and enter a value of 1.
- Add a second condition. Name it Not Satisfied and enter a value of 2.
- Once you’ve configured the node, click Validate to save the configuration.
- Drag two Send Message nodes onto the canvas. Draw lines to connect them to the Handle_Reply node using the Satisfied and Not Satisfied trigger states.
- In the Configuration pane for each of the Send Message nodes, specify the From and To keys you configured in the Start node. Enter two curly brackets to display a list of all available variables. In the Message field, you can enter a static message, or combine static text with a variable that includes dynamic text if you specified the variable as a key in the Start node configuration pane.
-
Rename the nodes Reply_Satisfied and Reply_NotSatisfied.
- Once you’ve configured the nodes, click Validate to save their configurations.
- From the list of components on the left-hand side, drag and drop the HTTP Request component onto the canvas. Draw four lines to connect the Sent and Failed trigger states of both the Reply_Satisfied and Reply_NotSatisfied nodes to the HTTP Request node.
- In the Configuration pane for the HTTP Request node, rename the node to Handle_Callback. Enter URL to make the request to. The default method used is GET, but you can click on the box to choose POST, PUT, or DELETE instead. Specify Headers, Auth, Params, and Body values on their respective tabs as necessary.
-
Once you’ve configured the node, click Validate to save the configuration.
Trigger the PHLO
You integrate a PHLO into your application workflow by making an API request to trigger the PHLO with the required payload — the set of parameters you pass to the PHLO. You can define a static payload by specifying values when you create the PHLO, or define a dynamic payload by passing values through parameters when you trigger the PHLO from your application.In either case, you need your Auth ID and Auth Token, which you can get from the overview page of the Plivo console.With a static payload
When you configure values when creating the PHLO, they act as a static payload.Code
Create a Java class calledTriggerPhlo and paste into it this code.Copy
Ask AI
import com.plivo.api.Plivo;
import com.plivo.api.PlivoClient;
import com.plivo.api.exceptions.PlivoRestException;
import com.plivo.api.models.phlo.Phlo;
import java.io.IOException;

public class Example
{
    private static final String authId = "<auth_id>";
    private static final String authToken = "<auth_token>";
    private static PlivoClient client = new PlivoClient(authId, authToken);
    public static void main(String[] args) throws IOException, PlivoRestException
    {
        String phloId = "<phlo_id>";
        Plivo.init(authId, authToken);
        Phlo phlo = Phlo.getter(phloId).client(client).get();
        PhloUpdateResponse response = Phlo.updater(phloId).payload().run();
    }
}
With a dynamic payload
To use dynamic values for the parameters, use Liquid templating parameters when you create the PHLO …Code
Create a Java class calledTriggerPhlo and paste into it this code.Copy
Ask AI
import com.plivo.api.Plivo;
import com.plivo.api.PlivoClient;
import com.plivo.api.exceptions.PlivoRestException;
import com.plivo.api.models.phlo.Phlo;
import java.io.IOException;

public class Example
{
    private static final String authId = "<auth_id>";
    private static final String authToken = "<auth_token>";
    private static PlivoClient client = new PlivoClient(authId, authToken);
    public static void main(String[] args) throws IOException, PlivoRestException
    {
        String phloId = "<phlo_id>";
        Plivo.init(authId, authToken);
        Phlo phlo = Phlo.getter(phloId).client(client).get();
        Map<String, Object> payload = new HashMap<>();
        payload.put("From", "<sender_id>");
        payload.put("To", "<destination_number>");
        PhloUpdateResponse response = Phlo.updater(phloId).payload(payload).run();
    }
}
Test
Save the file and run it.Here’s how to use Plivo APIs to create surveys using SMS text messages — sending questions and collecting answers.
How it works
Prerequisites
To get started, you need a Plivo account — sign up with your work email address if you don’t have one already. To receive incoming messages, you must have a Plivo phone number that supports SMS; you can rent numbers from the Numbers page of the Plivo console or by using the Numbers API. If this is your first time using Plivo APIs, follow our instructions to set up a Python development environment.Create the survey application
Edit the PlivoSmsApplication.java file in the src/main/java/com.example.demo/ folder and paste into it this code.Copy
Ask AI
package com.example.demo;

import com.plivo.api.Plivo;
import com.plivo.api.exceptions.PlivoRestException;
import com.plivo.api.exceptions.PlivoXmlException;
import com.plivo.api.models.message.Message;
import com.plivo.api.models.message.MessageCreateResponse;
import com.plivo.api.xml.Response;
import com.plivo.api.xml.Message;
import org.springframework.boot.SpringApplication;
import org.springframework.boot.autoconfigure.SpringBootApplication;
import org.springframework.web.bind.annotation.PostMapping;
import org.springframework.web.bind.annotation.RestController;

import java.io.IOException;

@SpringBootApplication
@RestController
public class ExampleAppApplication {

	public static void main(String[] args) {
		SpringApplication.run(ExampleAppApplication.class, args);
	}

	@PostMapping(value = "/send_survey/", produces = {"application/json"})
	public MessageCreateResponse sendSMS() throws IOException, PlivoRestException {
		Plivo.init("<auth_id>", "<auth_token>");
		MessageCreateResponse response = Message.creator(
				"<sender_id>",
				"<destination_number>",
				"Did you find out all the information you needed? Please reply \"Yes\" or \"No\"").create();
		System.out.println(response);
		return response;
	}

	@PostMapping(value = "/survey_response/", produces = {"text/xml"})
	public String postBody(String From, String To, String Text) throws PlivoXmlException {
		System.out.println(From + " " + To + " " + Text);
		String message_body;
		if (Text.toLowerCase() == "yes") {
			message_body = "Thank you for your feedback";
		}
		else if (Text.toLowerCase() == "no") {
			message_body = "We apologize for the inconvenience. A representative will contact you to assist you";
		}
		else{
			message_body = String.format("Response received was %1$s, which is invalid. Please reply with either \"Yes\" or \"No\"", Text);
		}
		Response response = new Response().children(
				new Message(To,From,message_body));
		System.out.println(response.toXmlString());
		return response.toXmlString();
	}
}
We recommend that you store your credentials in the
auth_id and auth_token environment variables to avoid the possibility of accidentally committing them to source control. If you do this, you can initialize the client with no arguments and Plivo will automatically fetch the values from the environment variables. You can use os module(os.environ) to store environment variables and fetch them when initializing the client.Test
Save the file and run it.Overview
This guide shows how to conduct an SMS survey. Surveys can help businesses with market research. Using SMS for surveys lets organizations process input quickly and efficiently.You can conduct SMS surveys either by using our PHLO visual workflow builder or our APIs. Follow the instructions in one of the tabs below.- Using PHLO
- Using API
You can create and deploy a PHLO to conduct an SMS survey with a few clicks on the PHLO canvas and trigger it with a few lines of code.
How it works
Prerequisites
To get started, you need a Plivo account — sign up with your work email address if you don’t have one already. If this is your first time triggering a PHLO with Go, follow our instructions to set up a Go development environment.Create the PHLO
To create a PHLO, visit the PHLO page of the Plivo console. If this is your first PHLO, the PHLO page will be empty.- Click Create New PHLO.
-
In the Choose your use case pop-up, click Build my own. The PHLO canvas will appear with the Start node.
The Start node is the starting point of any PHLO. It lets you trigger a PHLO to start upon one of three actions: incoming SMS message, incoming call, or API request.
-
If you plan to use a dynamic payload — passing values through parameters when you trigger the PHLO from your application — click on the Start node to open the Configuration pane. Under API Request, enter key names for the variables you want use in your payload — From, To, and Message fields.
- Once you’ve configured the node, click Validate to save the configuration.
-
From the list of components on the left-hand side, drag and drop the Send Message component onto the canvas. When a component is placed on the canvas it becomes a node.
- Draw a line to connect the Start node’s API Request trigger state to the Send Message node.
-
In the Configuration pane at the right of the canvas, configure the Send Message node with a sender ID in the From field. Enter the destination numbers you wish to send a message to in the To field. Put your message in the Text field.
You can define a static payload by specifying values when you create the PHLO, or define a dynamic payload by passing values through Liquid templating parameters when you trigger the PHLO from your application.
-
Once you’ve configured the node, click Validate to save the configuration.
- From the list of components on the left-hand side, drag and drop the Branch component onto the canvas.
-
Draw a line to connect the Start node’s Incoming Message trigger state to the Branch node.
- In the Configuration pane at the right of the canvas, configure the Branch node. Rename the node to Handle_Reply. For Variable to compare, enter two curly braces to view all available variables, then select Start.message.msg.
- Click the pencil icon and name the first condition Satisfied. Leave the Operation “is equal to” and enter a value of 1.
- Add a second condition. Name it Not Satisfied and enter a value of 2.
- Once you’ve configured the node, click Validate to save the configuration.
- Drag two Send Message nodes onto the canvas. Draw lines to connect them to the Handle_Reply node using the Satisfied and Not Satisfied trigger states.
- In the Configuration pane for each of the Send Message nodes, specify the From and To keys you configured in the Start node. Enter two curly brackets to display a list of all available variables. In the Message field, you can enter a static message, or combine static text with a variable that includes dynamic text if you specified the variable as a key in the Start node configuration pane.
-
Rename the nodes Reply_Satisfied and Reply_NotSatisfied.
- Once you’ve configured the nodes, click Validate to save their configurations.
- From the list of components on the left-hand side, drag and drop the HTTP Request component onto the canvas. Draw four lines to connect the Sent and Failed trigger states of both the Reply_Satisfied and Reply_NotSatisfied nodes to the HTTP Request node.
- In the Configuration pane for the HTTP Request node, rename the node to Handle_Callback. Enter URL to make the request to. The default method used is GET, but you can click on the box to choose POST, PUT, or DELETE instead. Specify Headers, Auth, Params, and Body values on their respective tabs as necessary.
-
Once you’ve configured the node, click Validate to save the configuration.
Trigger the PHLO
You integrate a PHLO into your application workflow by making an API request to trigger the PHLO with the required payload — the set of parameters you pass to the PHLO. You can define a static payload by specifying values when you create the PHLO, or define a dynamic payload by passing values through parameters when you trigger the PHLO from your application.In either case, you need your Auth ID and Auth Token, which you can get from the overview page of the Plivo console.With a static payload
When you configure values when creating the PHLO, they act as a static payload.Code
Create a file calledTriggerPhlo.go and paste into it this code.Copy
Ask AI
package main

import (
	"fmt"
	"plivo-go"
)
const authId = "<auth_id>"
const authToken = "<auth_token>"
const phloId = "<phlo_id>"

func main() {
	testPhloRunWithoutParams()
}

func testPhloRunWithoutParams() {
	phloClient, err := plivo.NewPhloClient(authId, authToken, &plivo.ClientOptions{})
	if err != nil {
			fmt.Print("Error", err.Error())
			return
		}
	phloGet, err := phloClient.Phlos.Get(phloId)
	if err != nil {
			fmt.Print("Error", err.Error())
			return
		}
	response, err := phloGet.Run(nil)
	if err != nil {
			fmt.Print("Error", err.Error())
			return
		}
	fmt.Printf("Response: %#v\n", response)
}
With a dynamic payload
To use dynamic values for the parameters, use Liquid templating parameters when you create the PHLO …Code
Create a file calledTriggerPhlo.go and paste into it this code.Copy
Ask AI
package main

import (
	"fmt"
	"plivo-go"
)
const authId = "<auth_id>"
const authToken = "<auth_token>"
const phloId = "<phlo_id>"

func main() {
	testPhloRunWithParams()
}

func testPhloRunWithParams() {
	phloClient, err := plivo.NewPhloClient(authId, authToken, &plivo.ClientOptions{})
	if err != nil {
			fmt.Print("Error", err.Error())
			return
		}
	phloGet, err := phloClient.Phlos.Get(phloId)
	if err != nil {
			fmt.Print("Error", err.Error())
			return
		}
	//pass corresponding from and to values
	type params map[string]interface{}
	response, err := phloGet.Run(params{
		"From": "<sender_id>",
		"To":   "<destination_number>",
	})

	if err != nil {
		println(err)
	}
	fmt.Printf("Response: %#v\n", response)
}
Test
Save the file and run it.Copy
Ask AI
go run TriggerPhlo.go
Here’s how to use Plivo APIs to create surveys using SMS text messages — sending questions and collecting answers.
How it works
Prerequisites
To get started, you need a Plivo account — sign up with your work email address if you don’t have one already. To receive incoming messages, you must have a Plivo phone number that supports SMS; you can rent numbers from the Numbers page of the Plivo console or by using the Numbers API. If this is your first time using Plivo APIs, follow our instructions to set up a Go development environment.Create the survey application
Create a file calledsurvey.go and paste into it this code.Copy
Ask AI
package main

import (
	"encoding/json"
	"fmt"
	"net/http"
	"strings"

	"github.com/go-martini/martini"
	"github.com/plivo/plivo-go/v7"
	"github.com/plivo/plivo-go/v7/xml"
)

func main() {
	m := martini.Classic()

	m.Post("/send_survey/", func(w http.ResponseWriter, r *http.Request) string {
		client, err := plivo.NewClient("<auth_id>", "<auth_token>", &plivo.ClientOptions{})
		if err != nil {
			fmt.Print("Error", err.Error())

		}
		response, err := client.Messages.Create(
			plivo.MessageCreateParams{
				Src:  "<sender_id>",
				Dst:  "<destination_number>",
				Text: "Did you find out all the information you needed? Please reply 'Yes' or 'No'",
			},
		)
		if err != nil {
			fmt.Print("Error", err.Error())

		}
		b, err := json.Marshal(response)
		if err != nil {
			fmt.Println("error:", err)
		}
		fmt.Printf("Response: %#v\n", b)
		return string(b)
	})

	m.Post("/survey_response/", func(w http.ResponseWriter, r *http.Request) string {
		w.Header().Set("Content-Type", "application/xml")
		from_number := r.FormValue("From")
		to_number := r.FormValue("To")
		text := r.FormValue("Text")
		var message_body string
		if strings.ToLower(text) == "yes" {
			message_body = "Thank you for your feedback"
		} else if strings.ToLower(text) == "no" {
			message_body = "We apologize for the inconvenience. A representative will contact you to assist you"
		} else {
			message_body = fmt.Sprintf("Response received was %s, which is invalid. Please reply with either 'Yes' or 'No'", text)
		}
		return xml.ResponseElement{
			Contents: []interface{}{
				new(xml.MessageElement).
					SetDst(to_number).
					SetSrc(from_number).
					SetContents(message_body),
			},
		}.String()
	})

	m.Run()
}
We recommend that you store your credentials in the
auth_id and auth_token environment variables to avoid the possibility of accidentally committing them to source control. If you do this, you can initialize the client with no arguments and Plivo will automatically fetch the values from the environment variables. You can use os module(os.environ) to store environment variables and fetch them when initializing the client.Test
Save the file and run it.Copy
Ask AI
$ go run survey.go