Quickstart Guides
Get Started with PHP
Get Started with PHP Using PHP Server
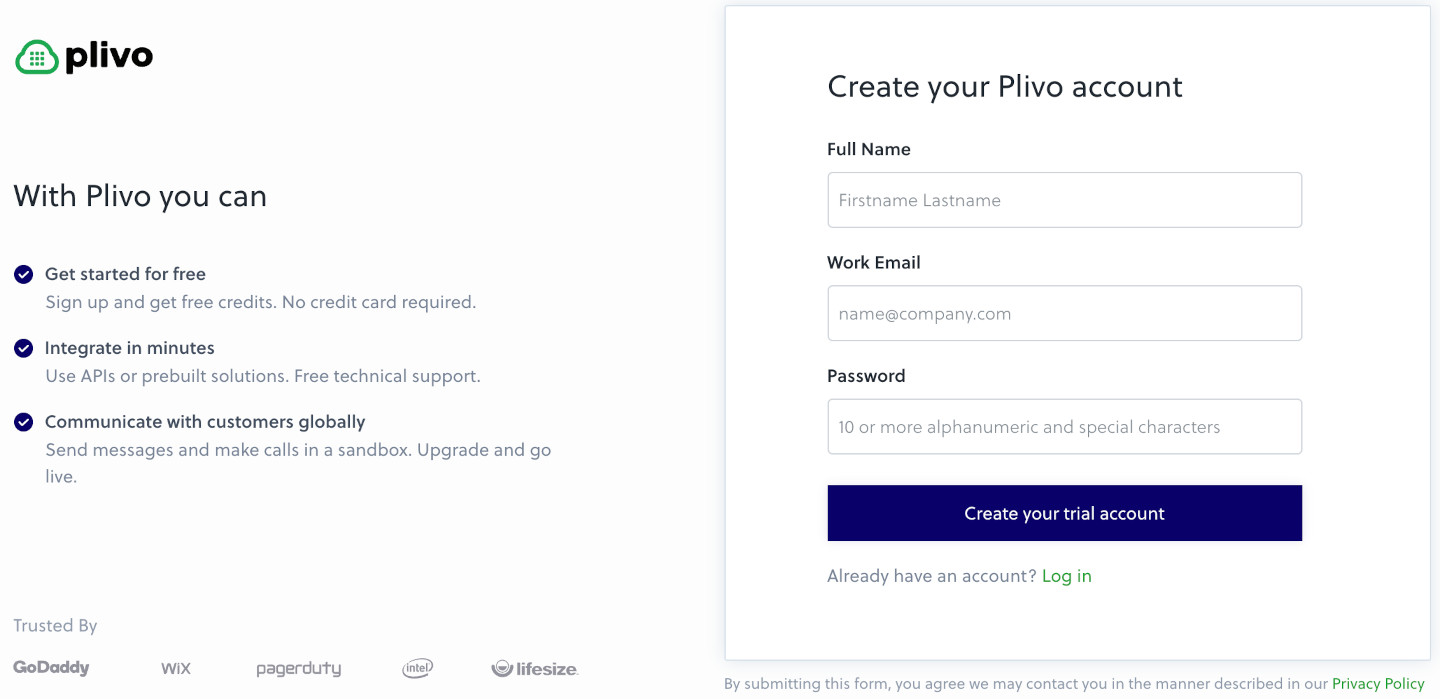
Sign up for a Plivo account
When you sign up with Plivo, we give you a free trial account and free credits to experiment with and learn about our services. You can add a number to your account to start testing the full range of our voice and SMS service features.Follow these steps to get a free trial account:- Sign up with your work email address.
- Check your inbox for an activation email message from Plivo. Click on the link in the message to activate your account.
- Enter your mobile number to complete the phone verification step.
Sign up with your work email address
Set up your PHP dev environment
You must set up and install PHP and Plivo’s PHP SDK before you send your first message.Install PHP
Follow the official PHP instructions to download and install PHP on macOS or Windows or Debian Linux, or use your favorite package manager to install PHP on any Linux distro.Install Composer
We recommend using Composer, a dependency manager for PHP, as the package manager for your PHP projects.- Download the latest version of Composer.
-
Run this command in Terminal to run Composer.
Note: PHAR (PHP archive) is an archive format for PHP that can be run on the command line.
-
Make it executable.
Move the file to bin directory.
-
To check whether the path includes /usr/local/bin, type
If the path is different, update it.Note: If your path doesn’t include /usr/local/bin, we recommend adding it so that you can access it globally.
Install the Plivo PHP SDK
-
Create a project directory and change into it.
-
To install the most recent release of the Plivo PHP SDK, run
-
Alternatively, download the source and run
Send your first outbound SMS/MMS message
You can create and deploy a PHLO to send your first outbound SMS message with a few clicks on the PHLO canvas, and trigger it with some simple code.Create the PHLO

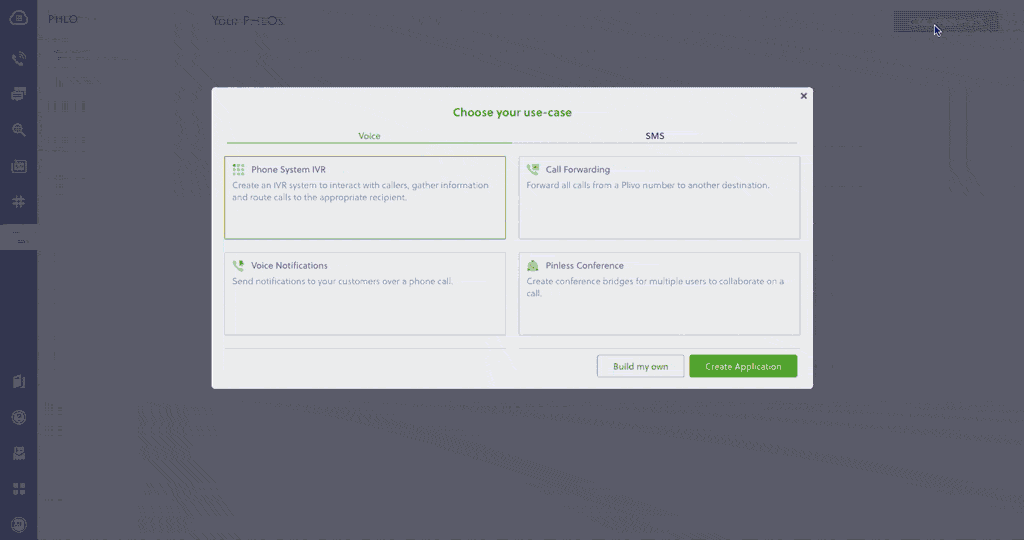
- Click Create New PHLO.
-
In the Choose your use case pop-up, click Build my own. The PHLO canvas will appear with the Start node.
Note: The Start node is the starting point of any PHLO. It lets you trigger a PHLO to start upon one of three actions: incoming SMS message, incoming, or API request.
- From the list of components on the left-hand side, drag and drop the Send Message component onto the canvas. When a component is placed on the canvas it becomes a node.
- Draw a line to connect the Start node’s API Request trigger state to the Send Message node.
-
In the Configuration pane at the right of the canvas, configure the Send Message node with a sender ID in the From field. Enter the destination number you wish to send a message to in the To field. Put your message in the Text field.
Note: You can define a static payload by specifying values when you create the PHLO, or define a dynamic payload by passing values through Liquid templating parameters when you trigger the PHLO from your application.
- If you’d like to send an MMS message, configure the Media URLs field with the media files you’d like to send.
- Once you’ve configured the node, click Validate to save the configuration.
- After you complete the configuration, give the PHLO a name by clicking in the upper left, then click Save.
Trigger the PHLO
You integrate a PHLO into your application workflow by making an API request to trigger the PHLO with the required payload — the set of parameters you pass to the PHLO. You can define a static payload by specifying values when you create the PHLO, or define a dynamic payload by passing values through parameters when you trigger the PHLO from your application.In either case, you need your Auth ID and Auth Token, which you can get from the overview page of the Plivo console.

With a static payload
When you configure values when creating the PHLO, they act as a static payload.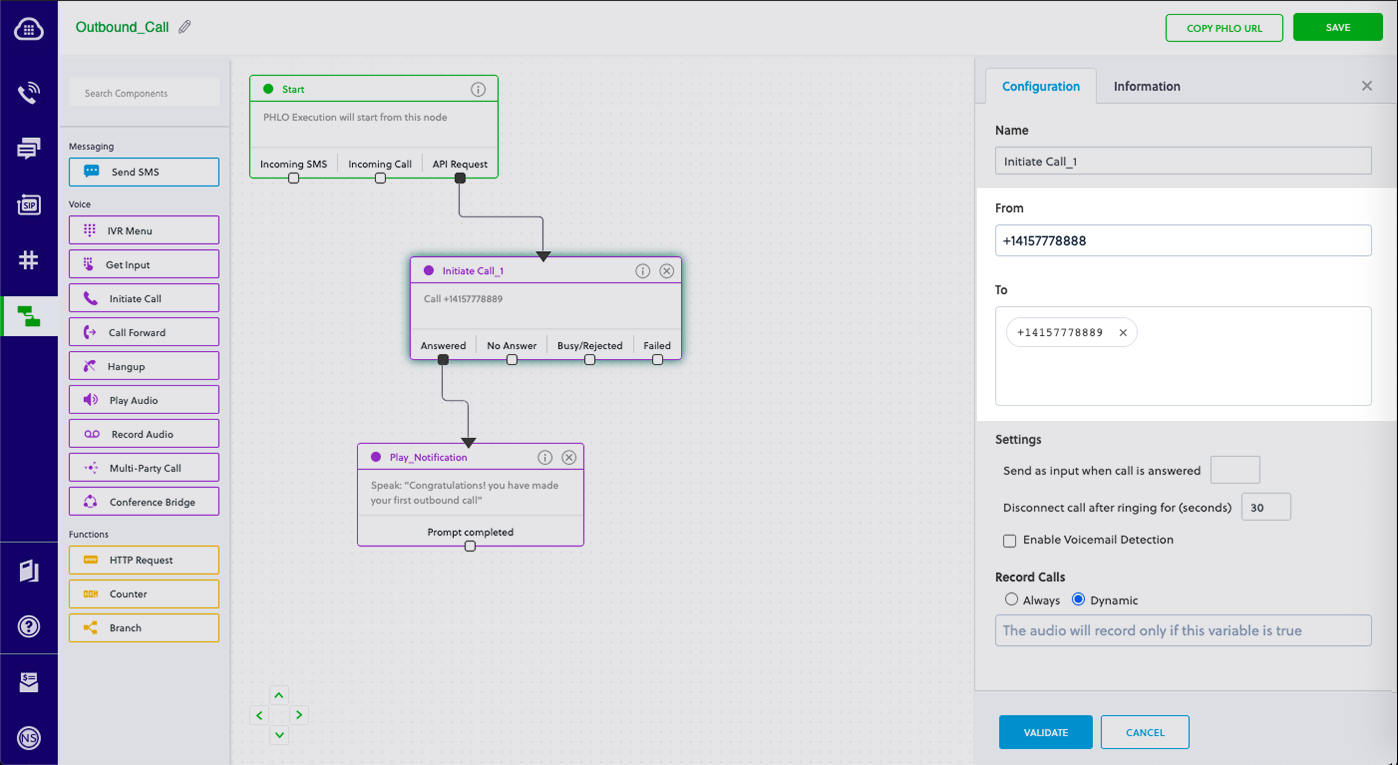
Code
Edit app/http/controllers/phloController.php and paste into it this code.With a dynamic payload
To use dynamic values for the parameters, use Liquid templating parameters when you create the PHLO and pass the values from your code when you trigger it.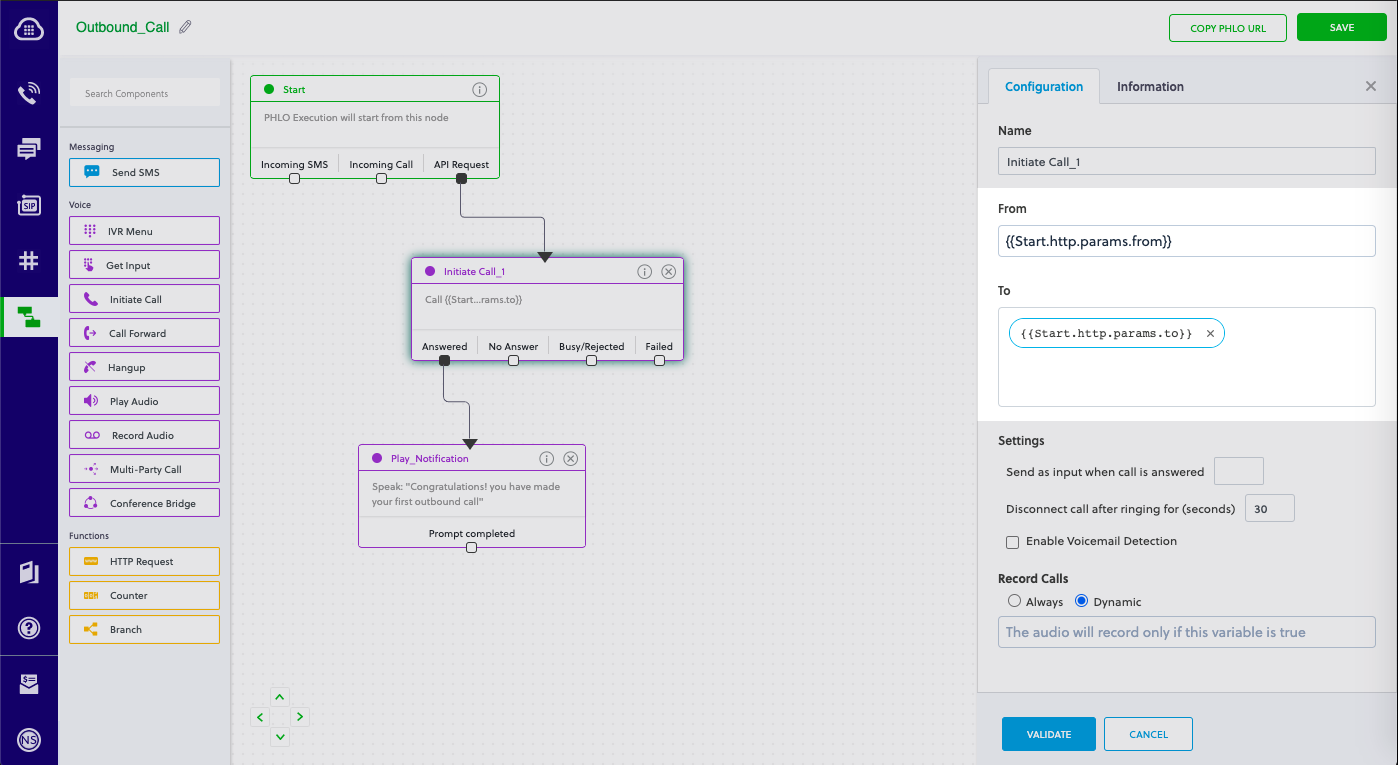
Code
Edit app/http/controllers/phloController.php and paste into it this code.Test
Save the file and run your code.Receive your first inbound SMS/MMS message
You can create and deploy a PHLO to receive an inbound text message with a few clicks on the PHLO canvas, without writing a single line of code.Prerequisite
To receive incoming text messages, you must have an SMS-enabled Plivo phone number. You can rent numbers from the Numbers page of the Plivo console, or by using the Numbers API.Create the PHLO
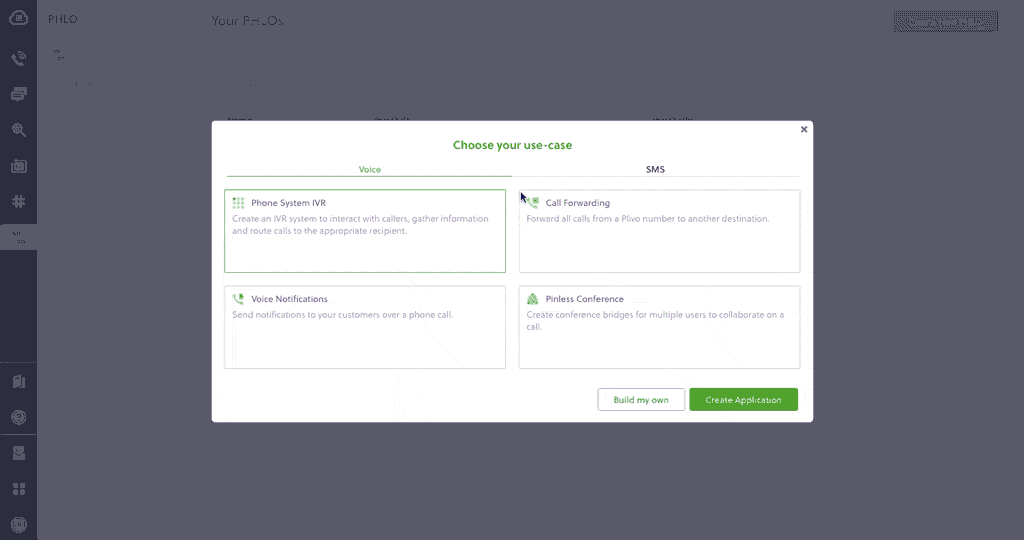
- Click Create New PHLO.
-
In the Choose your use case pop-up, click Build my own. The PHLO canvas will appear with the Start node.
Note: The Start node is the starting point of any PHLO. It lets you trigger a PHLO to start upon one of three actions: incoming SMS message, incoming call, or API request.
- From the list of components on the left-hand side, drag and drop the HTTP Request component onto the canvas. When a component is placed on the canvas it becomes a node.
- Draw a line to connect the Start node’s Incoming Message trigger state to the HTTP Request node.
-
In the Configuration pane at the right of the canvas, configure the HTTP Request node. Specify the address of your web server and specify that
from,to, andtextfields should be passed along with the request. - Once you’ve configured the node, click Validate to save the configuration.
- After you complete the configuration, give the PHLO a name by clicking in the upper left, then click Save.
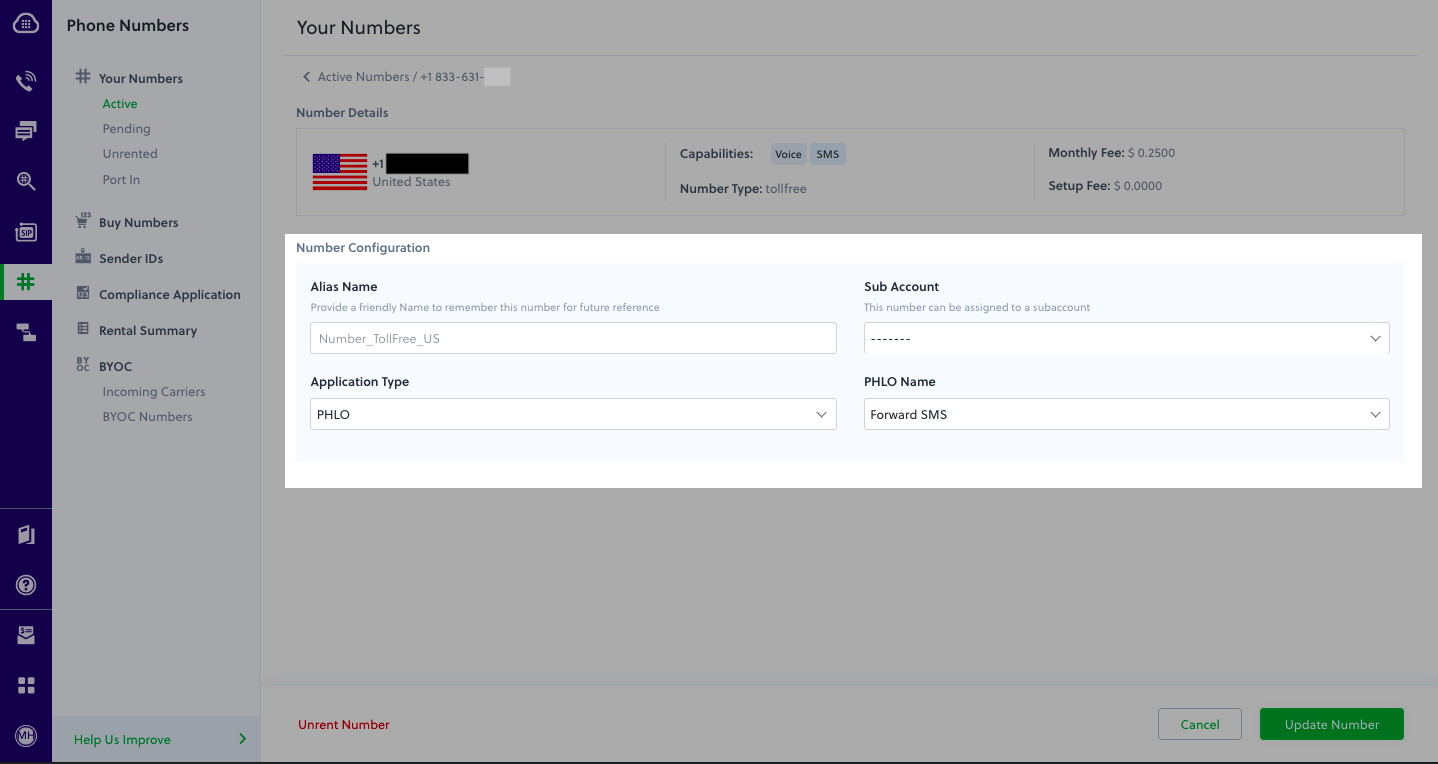
Assign the PHLO to a Plivo number
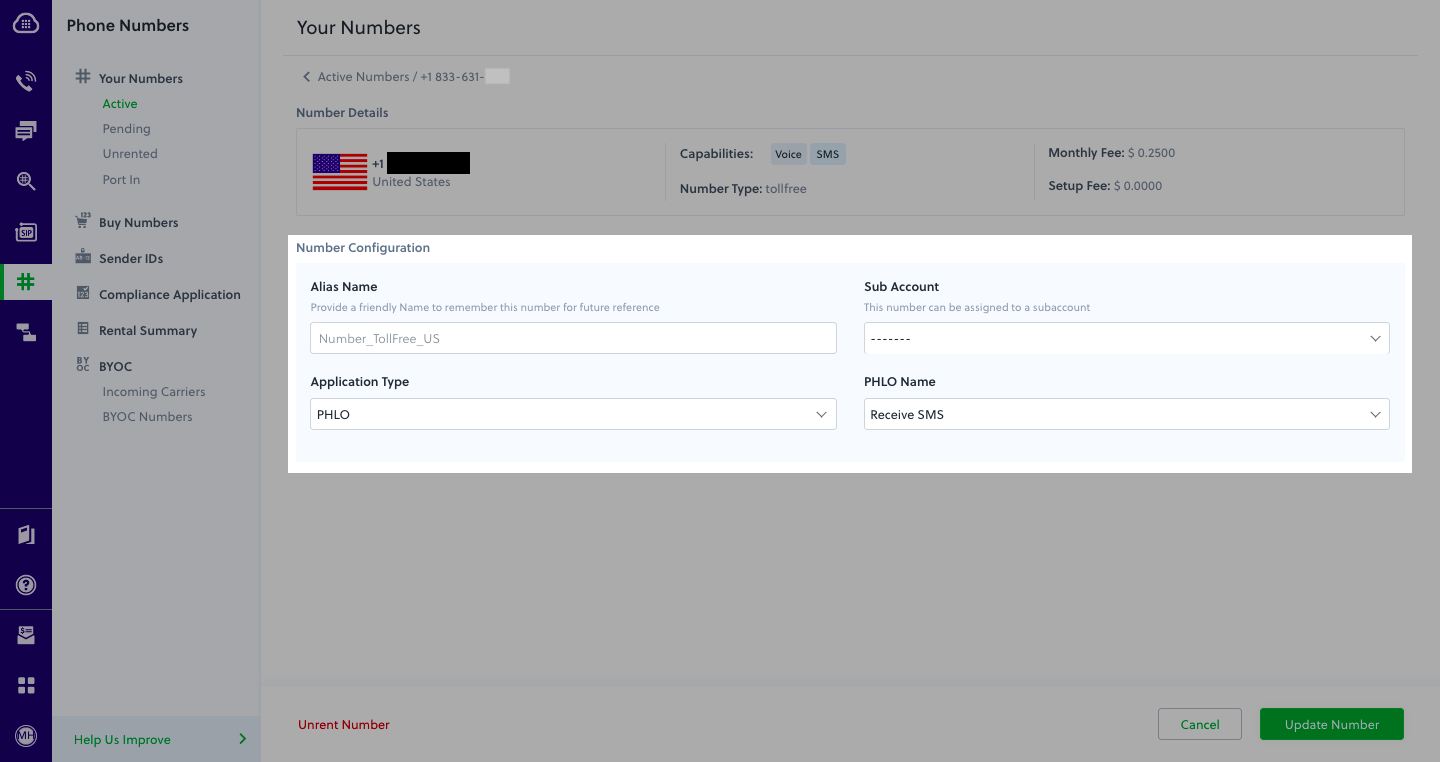
Once you’ve created and configured your PHLO, assign it to a Plivo number.- On the Numbers page of the console, under Your Numbers, click the phone number you want to use for the PHLO.
- In the Number Configuration box, select PHLO from the Application Type drop-down.
- From the PHLO Name drop-down, select the PHLO you want to use with the number, then click Update Number.
Test
You can now send a text message to your Plivo phone number and see how the inbound text is handled.For more information about creating a PHLO application, see the PHLO Getting Started guide. For information on components and their variables, see the PHLO Components Library.Forward an incoming SMS/MMS message
You can create and deploy a workflow to implement text message forwarding with a few clicks on the PHLO canvas.Prerequisite
To receive incoming text messages, you must have an SMS-enabled Plivo phone number. You can rent numbers from the Numbers page of the Plivo console, or by using the Numbers API.Create the PHLO
- Click Create New PHLO.
-
In the Choose your use case pop-up, click Build my own. The PHLO canvas will appear with the Start node.
Note: The Start node is the starting point of any PHLO. It lets you trigger a PHLO to start upon one of three actions: incoming SMS message, incoming call, or API request.
- From the list of components on the left-hand side, drag and drop the Send Message component onto the canvas. When a component is placed on the canvas it becomes a node.
- Draw a line to connect the Start node’s Incoming Message trigger state to the Send Message node.
- In the Configuration pane at the right of the canvas, configure the Send Message node with the phone number to which you want to forward the message.
- Once you’ve configured the node, click Validate to save the configuration.
- After you complete the configuration, give the PHLO a name by clicking in the upper left, then click Save.
Assign the PHLO to a Plivo number
Once you’ve created and configured your PHLO, assign it to a Plivo number.- On the Numbers page of the console, under Your Numbers, click the phone number you want to use for the PHLO.
- In the Number Configuration box, select PHLO from the Application Type drop-down.
- From the PHLO Name drop-down, select the PHLO you want to use with the phone number, then click Update Number.