Get Started with Go
Sign up for a Plivo Account
You can sign up with Plivo and start with a free trial account to experiment with and learn about our services. This free trial account comes with free credits. If you wish to continue with our service, you can add more credits and buy a number by clicking here. Add a number and credits to your account to test the full range of our voice and SMS service features.
Sign up here to get your free Plivo account today.
Follow these steps to sign up for a free trial account:
- Sign up with your work email address
- Check your inbox for an activation email from Plivo. Click on the link in the email to activate your account.
- Enter your mobile number to complete the phone verification step.
Sign up with your work email address
If you have any issues creating a Plivo account, please reach out to our Support Team for assistance.
Start your implementation with Plivo to make/receive calls using PHLO or the traditional API/XML way. PHLO allows you to create the call flows using its intuitive canvas and deploy it with few clicks. Refer to the instructions from the respective tabs below to start your integration with PHLO or XML as you wish.
Send Your First Outbound SMS/MMS
To send your first outbound sms, you can create and deploy a PHLO in just a few clicks using the PHLO canvas. PHLO also lets you visually construct your entire use-case. With PHLO, only pay for sms you send/receive. Building with PHLO is free.
Prerequisites
- Create a Plivo account (if you don’t have one already): Sign up with your work email address and complete the phone verification step using your mobile number.
- Set Up Your Ruby Dev Environment: To set up your dev environment in Ruby, please refer to the instructions available in the Set Up Your Ruby Dev Environment section.
- Buy a Plivo Number(optional): You must have a voice-enabled Plivo phone number if you wish to receive incoming sms. Purchase numbers from the Numbers section of your Plivo Console. It is also possible to purchase numbers using the Numbers API.
Create the PHLO
Create a PHLO to send your first outbound SMS/MMS by following these instructions:
- On the side navigation bar, click PHLO. The PHLO page will appear and display your existing PHLOs, if any exist. If this is your first PHLO, then the PHLO page will be empty.
- Click Create New PHLO to build a new PHLO.
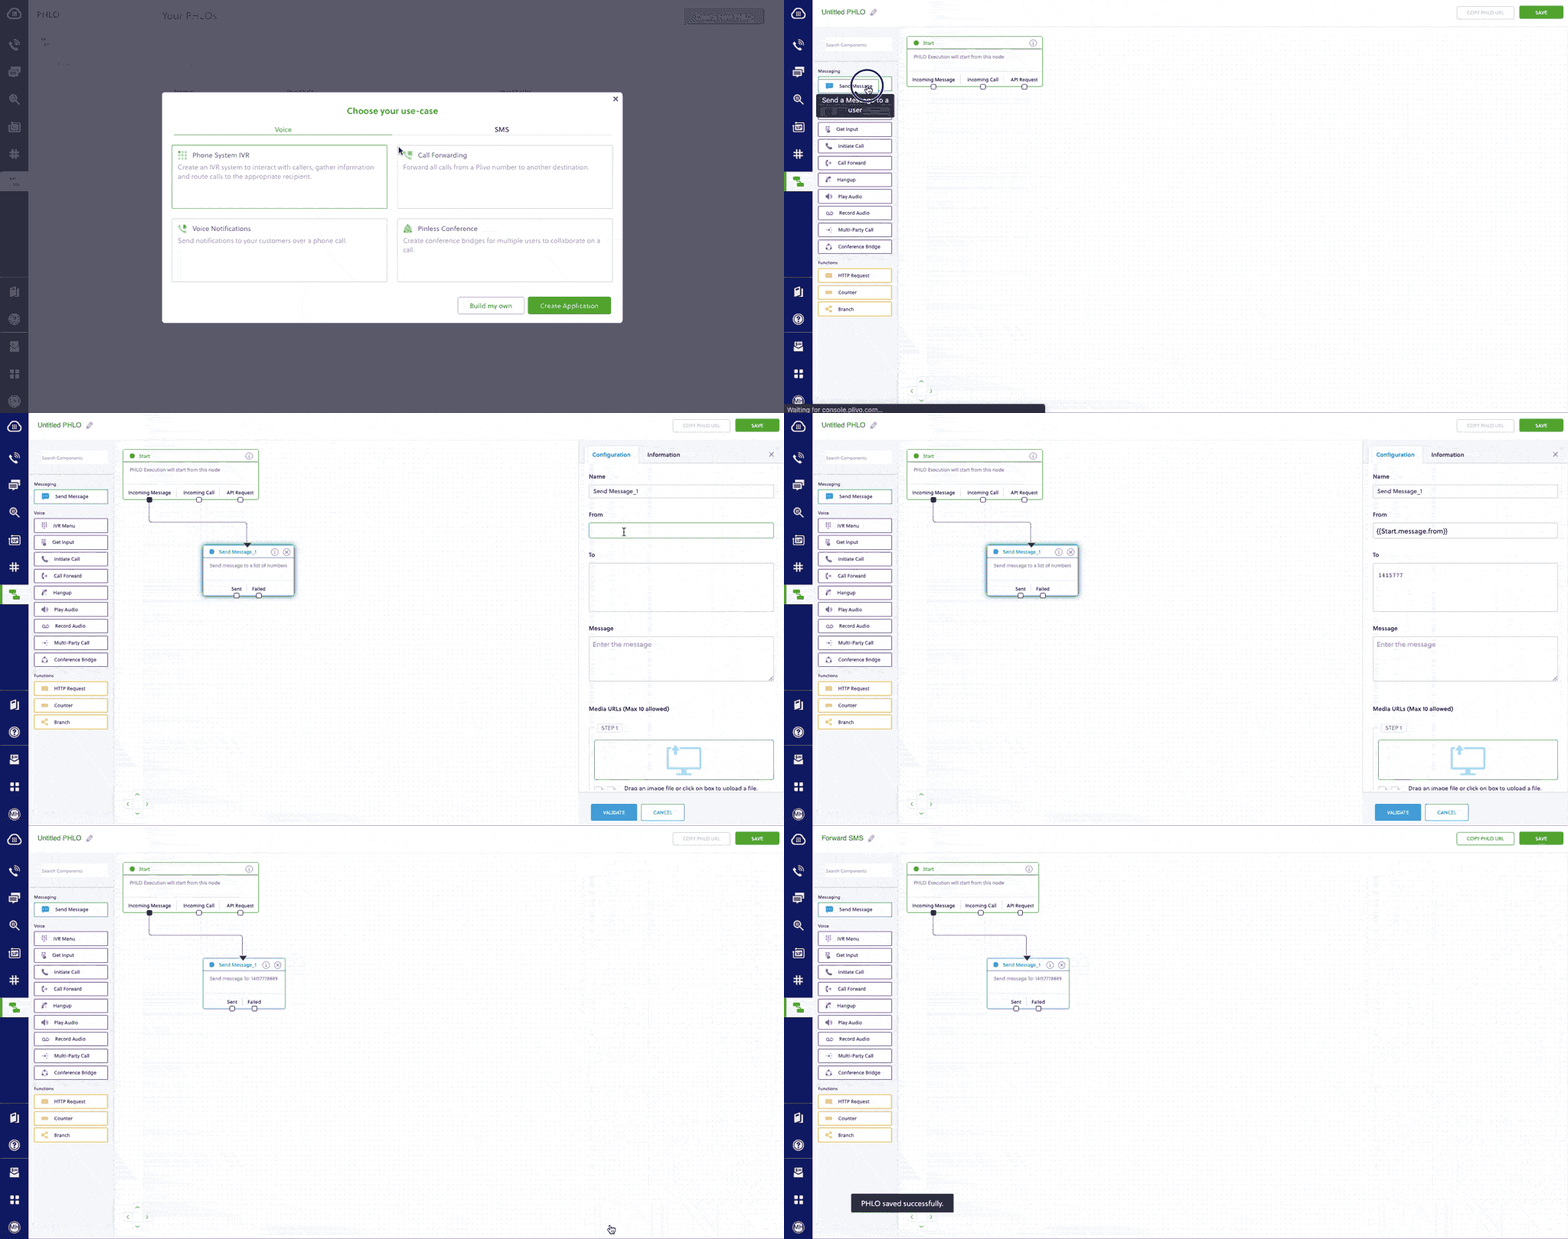
- In the Choose your use-case window, click Build my own. The PHLO canvas will appear with the Start node.Note: The Start node is the starting point of any PHLO. You can choose between the four available trigger states of the start node; Incoming SMS, Incoming Call, and API Request. For this PHLO, we will use the API Request trigger state.
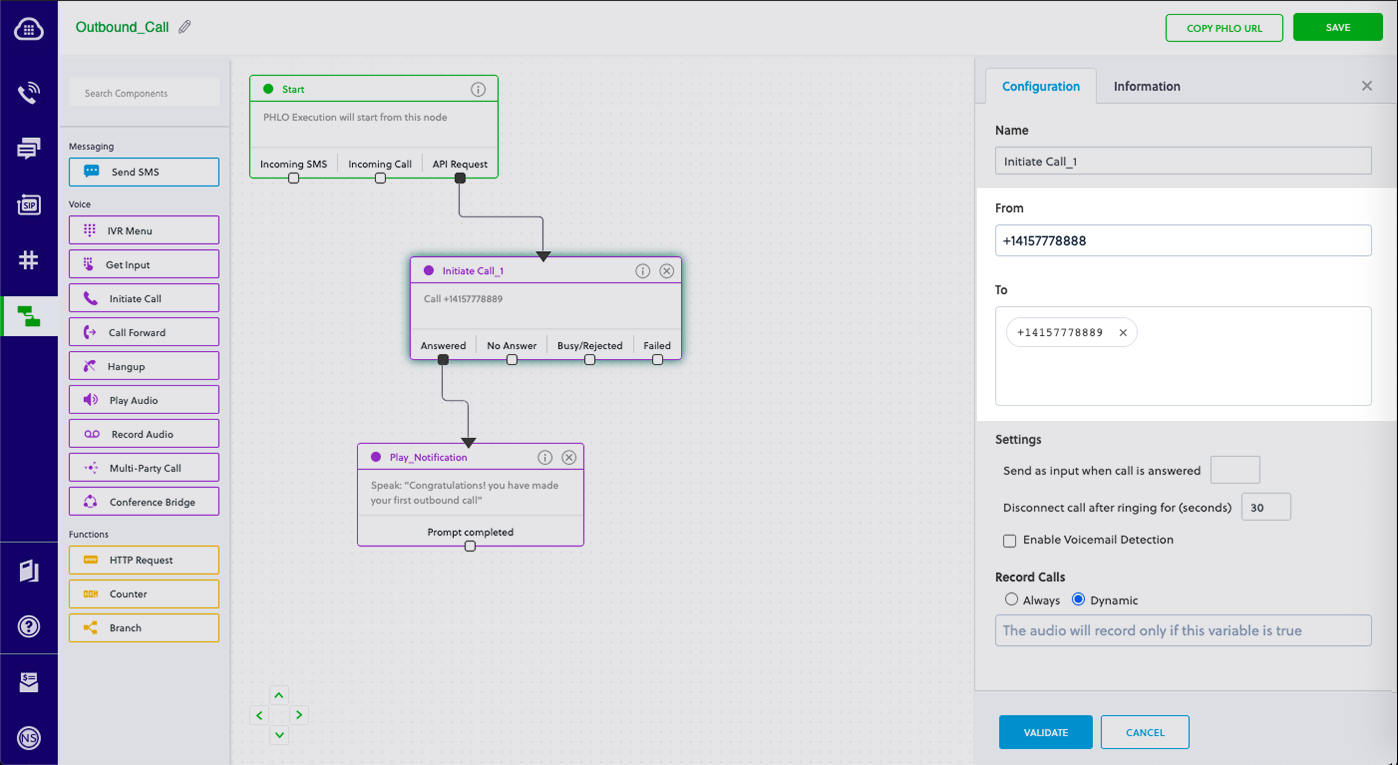
- From the list of components on the left-hand side, drag and drop the Send Message component onto the canvas. This will add an Send Message node onto the canvas.
- Connect the Start node with the Send Message node, using the API Request trigger state.
- Configure the Send Message node with the source/from number using the From field. Enter the destination number you wish to send message in the To field.
- If you’d like to send MMS then Configure the Media URLs node with the Media files you’d like to send using the Media URLs field.
- Once you have configured the node, click Validate to save the configurations.
- After you complete the configurations, provide a recognizable name for your PHLO and click Save. Your PHLO is now ready. You can trigger the PHLO and test it out. For more information, refer to the following section.
Set Up Your Go Dev Environment
You must set up and install Go and Plivo’s Go SDK to send your first sms. Here’s how.
Install Go
You can install Go from the Official Installer.
Install Plivo Go Package
Create a project directory, run the following command:
$ mkdir mygoapp
Change the directory to our project directory in the command line:
$ cd mygoapp
You can install the Plivo Go package using the
go
command.$ go get github.com/plivo/plivo-go
You can also install by cloning this repository into your
GOPATH
.
Trigger the PHLO
Once you have created and configured your PHLO, copy the PHLO_ID from here. Integrate a PHLO into your application workflow by making an API request to trigger the PHLO with the required payload.
With Static Payload
You can choose to either configure the mandatory params required for a PHLO while creating the PHLO itself or, you can pass the params as payload while triggering the PHLO from your app.
Code
Now, create a file called TriggerPhlo.go
and paste the following code:
1
2
3
4
5
6
7
8
9
10
11
12
13
14
15
16
17
18
19
20
21
22
23
24
25
26
27
28
29
30
package main
import (
"fmt"
"plivo-go"
)
// Initialize the following params with corresponding values to trigger resources
const authId = "auth_id"
const authToken = "auth_token"
const phloId = "phlo_id"
func main() {
testPhloRunWithoutParams()
}
func testPhloRunWithoutParams() {
phloClient, err := plivo.NewPhloClient(authId, authToken, &plivo.ClientOptions{})
if err != nil {
panic(err)
}
phloGet, err := phloClient.Phlos.Get(phloId)
if err != nil {
panic(err)
}
response, err := phloGet.Run(nil)
if err != nil {
panic(err)
}
fmt.Printf("Response: %#v\n", response)
}
With Dynamic Payload
To use dynamic values for the parameters, follow the below steps.
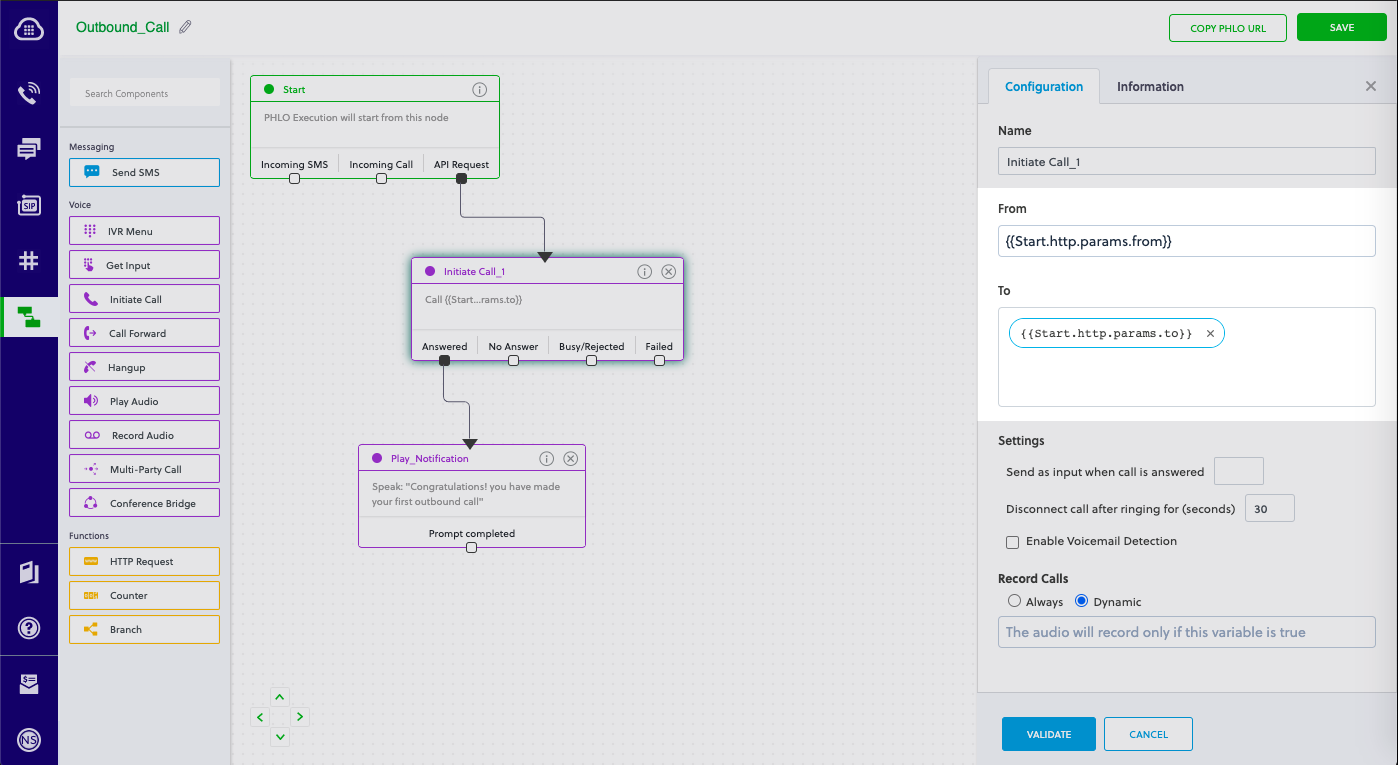
- Select the StartNode - under API request, fill the Payload key as
From
&To
and keep the values empty, then click validate & save.
- Use the liquid templating params while creating the PHLO and pass the values while triggering the PHLO.
Code
Now, create a file called TriggerPhlo.go
and paste the following code:
1
2
3
4
5
6
7
8
9
10
11
12
13
14
15
16
17
18
19
20
21
22
23
24
25
26
27
28
29
30
31
32
33
34
35
36
package main
import (
"fmt"
"plivo-go"
)
// Initialize the following params with corresponding values to trigger resources
const authId = "auth_id"
const authToken = "auth_token"
const phloId = "phlo_id"
func main() {
testPhloRunWithParams()
}
func testPhloRunWithParams() {
phloClient, err := plivo.NewPhloClient(authId, authToken, &plivo.ClientOptions{})
if err != nil {
panic(err)
}
phloGet, err := phloClient.Phlos.Get(phloId)
if err != nil {
panic(err)
}
//pass corresponding from and to values
type params map[string]interface{}
response, err := phloGet.Run(params{
"From": "+14157778888",
"To": "+14157778889",
})
if err != nil {
println(err)
}
fmt.Printf("Response: %#v\n", response)
}
Get your Auth_ID and Auth_token from your dashboard
You can find the PHLO_ID on the PHLO Listing page.
Test and Validate
Save the file and use the below command to run it.
$ go run TriggerPhlo.go
Receive Your First Inbound SMS/MMS
Create and deploy a PHLO to receive your first inbound SMS and forward to your web server with a few clicks on the PHLO canvas. PHLO also lets you visually construct your entire use-case. With PHLO, only pay for calls you make/receive. Building with PHLO is free.
Prerequisites
- Create a Plivo account (if you don’t have one already): Sign up with your work email address and complete the phone verification step using your mobile number.
- Buy a Plivo number: You must have a sms-enabled Plivo phone number to receive incoming calls. Purchase numbers from the Numbers section of your Plivo Console. It is also possible to purchase numbers using the Numbers API.
- PHLO Application: When you receive a call on a Plivo sms-enabled number, you can control the call flow by associating a PHLO application to that Plivo phone number. Plivo will fetch the PHLO associated with the number and expect valid instructions via PHLO to handle the sms.
Create the PHLO
You can create a PHLO by referring to the below instructions to receive your first incoming call:
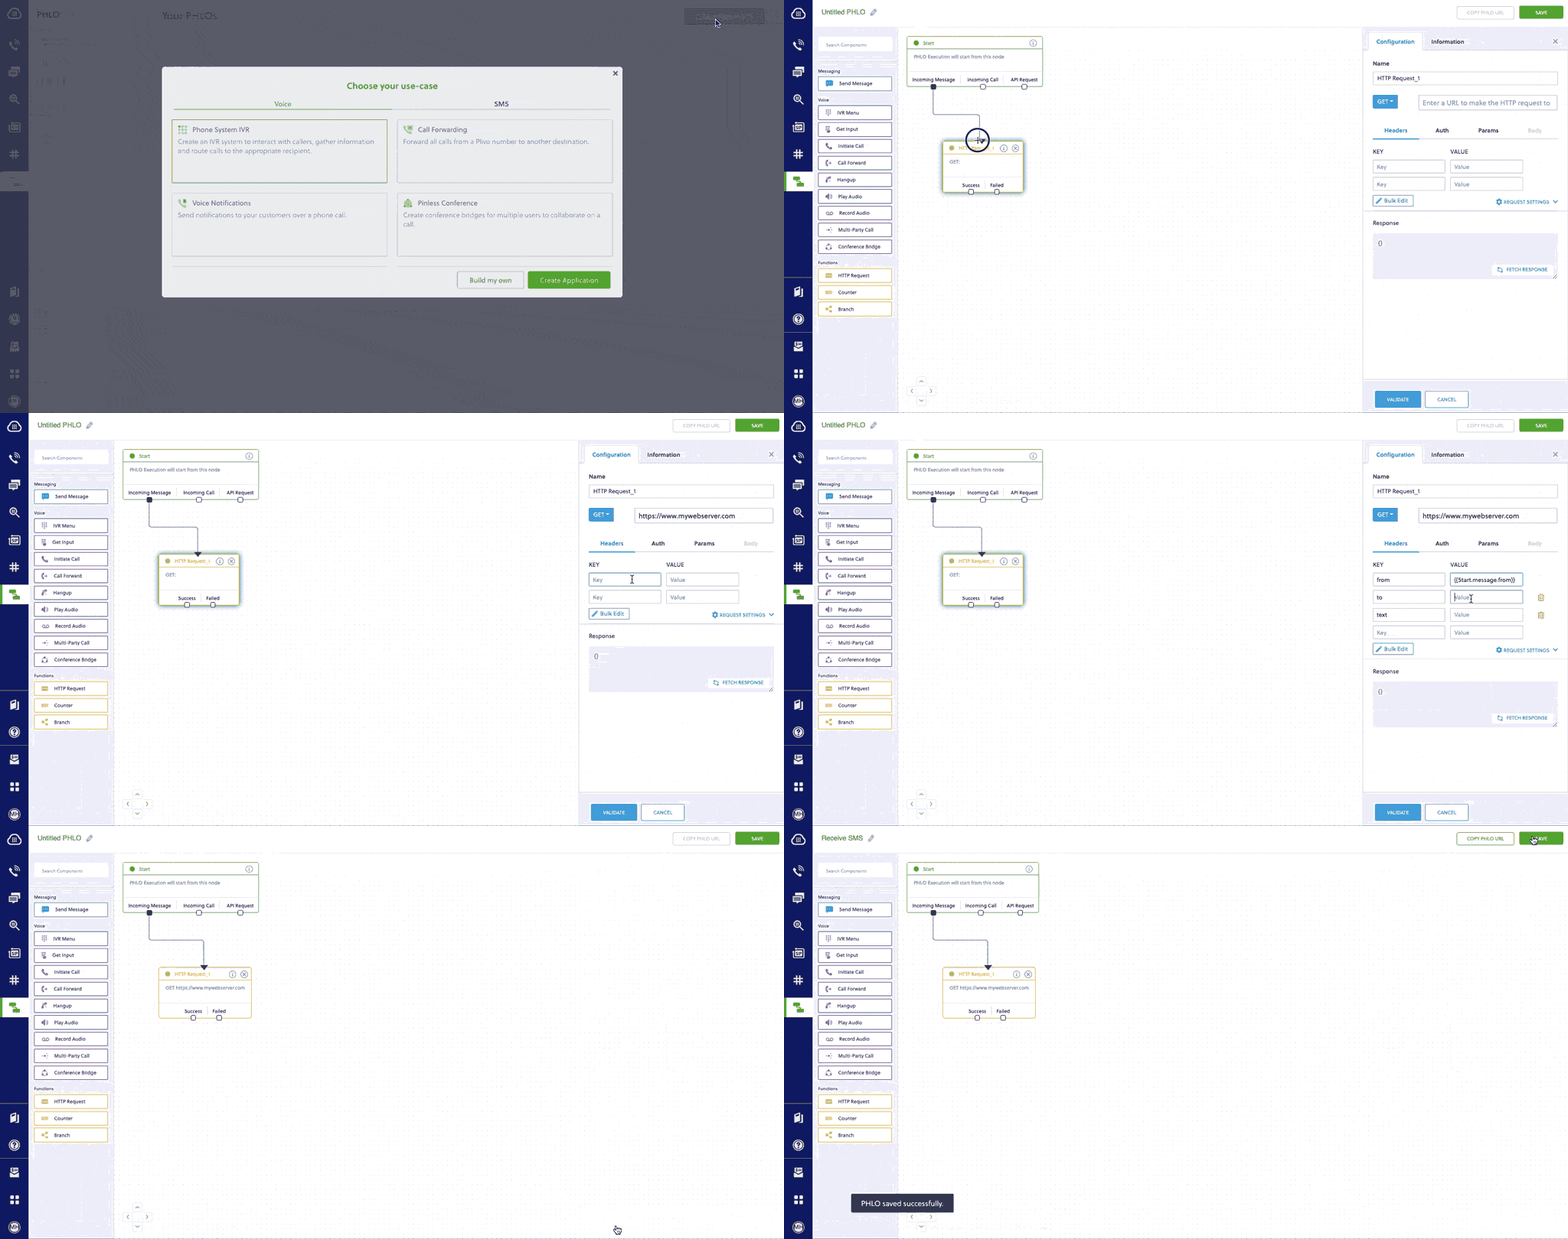
- On the side navigation bar, click PHLO. The PHLO page will appear and display your existing PHLOs, if any exist. If this is your first PHLO, then the PHLO page will be empty.
- Click Create New PHLO to build a new PHLO.
- In the Choose your use-case window, click Build my own. The PHLO canvas will appear with the Start node.Note: The Start node is the starting point of any PHLO. You can choose between the four available trigger states of the start node; Incoming SMS, Incoming Call, and API Request. For this PHLO, we will use the Incoming Message trigger state.
- From the list of components on the left-hand side, drag and drop the HTTP Request component onto the canvas. This will add a HTTP Request node onto the canvas.
- Connect the Start node with the HTTP Request node, using the Incoming Message trigger state.
- Configure the HTTP Request node to send the details to your Web Server.
- Once you have configured the node, click Validate to save the configurations.
- After you complete the configurations, provide a recognizable name for your PHLO and click Save. Your PHLO is now ready.
Assign the PHLO to a Plivo Number for Incoming SMS/MMS
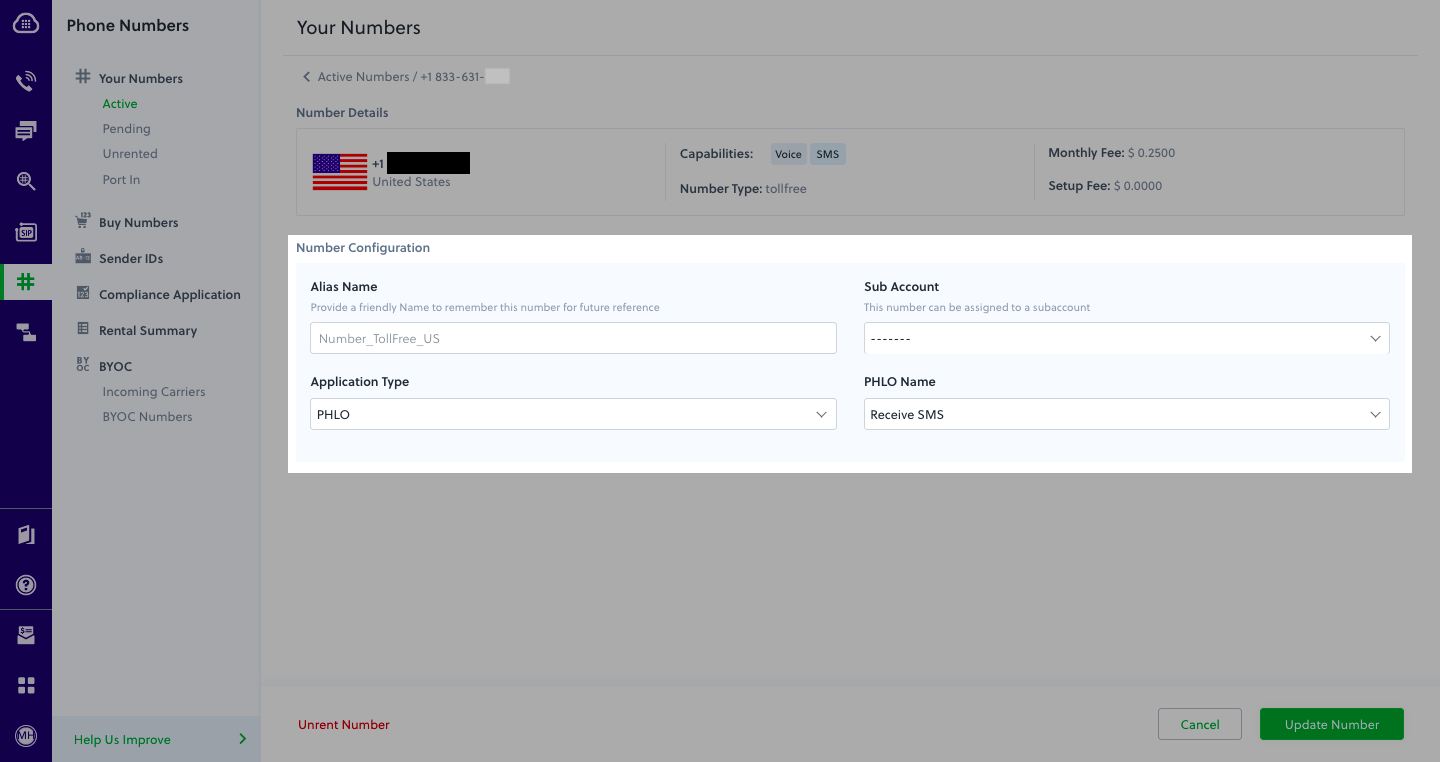
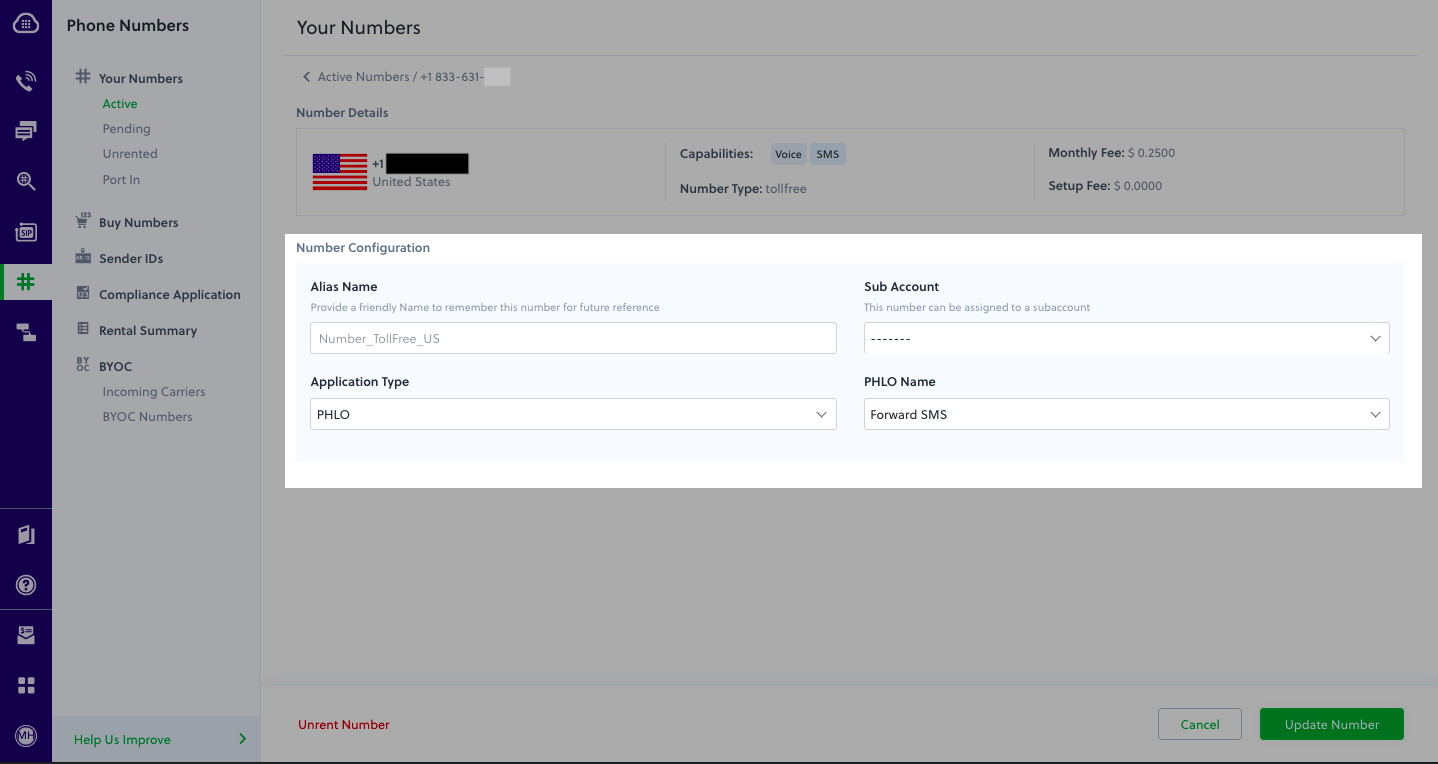
Once you have created and configured your PHLO, assign your PHLO to a Plivo number.
To assign a PHLO to a number:
- Log in to your Plivo Console
- On the Product Navigation bar, click Phone Numbers.
- On the Numbers page, under Your Numbers, click the phone number you wish to use for the PHLO.
- In the Number Configuration window, select PHLO from the Application Type list.
- From the PHLO Name list, select the PHLO you wish to use with the phone number, and then click Update Number.
If you have not purchased a phone number yet, you can buy a phone number(s) by referring to the instructions available here.
Test and Validate
You can now send a message to your Plivo phone number to receive an incoming sms and see how the inbound sms is handled using PHLO.
For more information about creating a PHLO app, see the PHLO User Guide.
For information on components and their variables, see the PHLO Components Library.
Forward an Incoming SMS/MMS
To forward an incoming sms, you can create and deploy a PHLO with a few clicks on the PHLO canvas.
Prerequisites
- Create a Plivo account (if you don’t have one already): Sign up with your work email address and complete the phone verification step using your mobile number.
- Buy a Plivo number: You must have a sms-enabled Plivo phone number to receive incoming sms. Purchase numbers from the Numbers section of your Plivo Console. It is also possible to purchase numbers using the Numbers API.
- PHLO Application: When you receive a sms on a Plivo sms-enabled number, you can control the flow by associating a PHLO application to that Plivo phone number. Plivo will fetch the PHLO associated with the number and expect valid instructions via PHLO to handle the sms.
Create the PHLO
You can create a PHLO by referring to the below instructions to forward an incoming SMS/MMS:
- On the side navigation bar, click PHLO. The PHLO page will appear and display your existing PHLOs, if any exist. If this is your first PHLO, then the PHLO page will be empty.
- Click Create New PHLO to build a new PHLO.
- In the Choose your use-case window, click Build my own. The PHLO canvas will appear with the Start node.Note: The Start node is the starting point of any PHLO. You can choose between the four available trigger states of the start node; Incoming SMS, Incoming Call, and API Request. For this PHLO, we will use the Incoming Message trigger state.
- From the list of components on the left-hand side, drag and drop the Send Message component onto the canvas. This will add a Send Message node onto the canvas.
- Connect the Start node with the Send Message node, using the Incoming Message trigger state.
- Configure the Send Message node with the phone number to which you want to forward the Message. For example, in this case, “+14157778889”.
- Once you have configured the node, click Validate to save the configurations.
- After you complete the configurations, provide a recognizable name for your PHLO and click Save. Your PHLO is now ready.
Assign the PHLO to a Plivo Number to Forward Incoming SMS
Once you have created and configured your PHLO, assign your PHLO to a Plivo number.
To assign a PHLO to a number:
- Log in to your Plivo Console
- On the Product Navigation bar, click Phone Numbers.
- On the Numbers page, under Your Numbers, click the phone number you wish to use for the PHLO.
- In the Number Configuration window, select PHLO from the Application Type list.
- From the PHLO Name list, select the PHLO you wish to use with the phone number, and then click Update Number.
If you have not purchased a phone number yet, you can buy a phone number(s) by referring to the instructions available here.
Test and Validate
You can now send a sms to your Plivo phone number and see how the inbound sms is forwarded to the phone number specified in the PHLO.
For more information about creating a PHLO app, see the PHLO User Guide.
For information on components and their variables, see the PHLO Components Library.
Install Go and the Plivo Go Server SDK
You must set up and install Go and Plivo’s Go SDK to make your first call. Here’s how.
Install Go
You can install Go from the Official Installer.
Install Plivo Go Package
Create a project directory, run the following command:
$ mkdir mygoapp
Change the directory to our project directory in the command line:
$ cd mygoapp
You can install the Plivo Go package using the
go
command.$ go get github.com/plivo/plivo-go
You can also install by cloning this repository into your
GOPATH
.
Send your first Outbound SMS/MMS
This section will guide you through how to use Plivo APIs to Send SMS from your application. First, let’s make sure you meet these prerequisites before we dive into the code.
- Plivo Auth Id and Auth Token: You will find your Plivo Auth Id and Auth Token on the home screen of your Plivo Console. Click here to sign-up for a Plivo account if you haven’t already!
- Plivo Phone Number: You must have a SMS-enabled Plivo phone number to send messages to the US and Canada. Purchase numbers from the Numbers section of your Plivo Console. It is also possible to purchase numbers using the Numbers API.
Now, create a file called SendSMS.go
and paste the following code.
Code
1
2
3
4
5
6
7
8
9
10
11
12
13
14
15
package main
import "github.com/plivo/plivo-go"
func main() {
client, err := plivo.NewClient("auth_id", "auth_token", &plivo.ClientOptions{})
if err != nil {
panic(err)
}
client.Messages.Create(plivo.MessageCreateParams{
Src: "+14151234567",
Dst: "+14157654321",
Text: "Hello, from Go-server!",
})
}
1
2
3
4
5
6
7
8
9
10
11
12
13
14
15
16
17
18
package main
import "github.com/plivo/plivo-go"
func main() {
client, err := plivo.NewClient("auth_id", "auth_token", &plivo.ClientOptions{})
if err != nil {
panic(err)
}
client.Messages.Create(plivo.MessageCreateParams{
Src: "+14151234567",
Dst: "+14157654321",
Text: "Hello, MMS from Go-server!",
Type: "mms",
MediaUrls: []string{"https://media.giphy.com/media/26gscSULUcfKU7dHq/source.gif"},
MediaIds: []string{"801c2056-33ab-499c-80ef-58b574a462a2"},
})
}
- Replace the placeholders auth_id & auth_token with your credentials from Plivo Console
- Replace the placeholder plivo_source_number with the Phone number which you have purchased and +14157654321 with the phone number you will be sending SMS text messages to
- Both plivo_source_number and +14157654321 should be in E.164 format
Test and Validate
Save the file and use the below command to run it.
go run SendSMS.go
Set up Go Server for Incoming Messages & Callbacks
In this section, we’ll walk you through how to set up a Go server in under five minutes and start handling incoming messages & callbacks.
Plivo supports receiving SMS text messages in several countries (see complete SMS API coverage). When an SMS is sent to a Plivo phone number, you can receive the text on your server by setting a Message URL in your Plivo app. Plivo will send the message along with other parameters to your Message URL.
Set up a Go Server
Use the following code snippet to start a local server.
1
2
3
4
5
6
7
8
9
10
11
12
13
14
15
16
17
package main
import (
"net/http"
)
func handler(w http.ResponseWriter, r *http.Request) {
fromnumber := r.FormValue("From")
tonumber := r.FormValue("To")
text := r.FormValue("Text")
print("Message Received - ", fromnumber, " ", tonumber, " ", text)
}
func main() {
http.HandleFunc("/receive_sms/", handler)
http.ListenAndServe(":8080", nil)
}
1
2
3
4
5
6
7
8
9
10
11
12
13
14
15
16
17
18
package main
import (
"net/http"
)
func handler(w http.ResponseWriter, r *http.Request) {
fromnumber := r.FormValue("From")
tonumber := r.FormValue("To")
text := r.FormValue("Text")
media := r.FormValue("Media0")
print("Message Received - ", fromnumber, " ", tonumber, " ", text," ", media)
}
func main() {
http.HandleFunc("/receive_sms/", handler)
http.ListenAndServe(":8080", nil)
}
Test and Validate
Save this code in any file (let’s say the file name is receive_sms.go
). To run this file on the server, go to the folder where this file resides and use the following command:
go run receive_sms.go
And you should see your basic server app in action on http://localhost:8080/receive_sms/
Exposing your local server to the internet
To receive Incoming Messages and to handle callbacks, your local server should be able to connect with Plivo API service, Ngrok is a tunneling software used to expose a web server running on your local machine to the internet. Using Ngrok you can set webhooks which can talk to Plivo server.
You can download and install ngrok from here. Follow the detailed configuration instructions to get started.
Run ngrok on the port which currently hosts your application. For example, if your port number is 80, run the following command:
./ngrok http <port_on_which_your_local_server_is_running>
This will give you a UI with links that look like ngrok.io/*
which you can use to access your local server using the public network.
Create an Application
- Create an Application by visiting the Application Page and click on
New Application
. You can also use Plivo’s Application API. - Give your application a name. Let’s call it
Receive SMS
. Enter your server URL (e.g.http://example.com/receive_sms/
) in theMessage URL
field and set the method asPOST
. See our Application API docs to learn how to modify your application through our APIs. - Click on
Create
to save your application.
Assign a Plivo number to your app
- Navigate to the Numbers page and select the phone number you want to use for this app.
- Select
Receive SMS
(name of the app) from the Plivo App dropdown list. - Click on
Update
to save.
Test and validate
Send an SMS to your Plivo number using a regular mobile phone. Plivo will send a request to your Message URL
with the parameters listed in the Messages Documentation.
Reply to an incoming SMS/MMS
When an SMS is sent to an Plivo phone number, you can receive the text on your server by setting a Message URL in your Plivo app. Plivo will send the message along with other parameters to your Message URL. You can reply back using the Plivo Message XML.
Create a file called reply_to_sms.go
and paste the following code.
1
2
3
4
5
6
7
8
9
10
11
12
13
14
15
16
17
18
19
20
21
22
23
24
25
26
27
28
package main
import (
"net/http"
"plivo-go/xml"
)
func handler(w http.ResponseWriter, r *http.Request) {
fromnumber := r.FormValue("From")
tonumber := r.FormValue("To")
text := r.FormValue("Text")
print("Message Received - ", fromnumber, " ", tonumber, " ", text)
response := xml.ResponseElement{
Contents: []interface{}{
new(xml.MessageElement).
SetDst(tonumber).
SetSrc(fromnumber).
SetContents("Thanks, we have received your request"),
},
}
w.Write([]byte(response.String()))
}
func main() {
http.HandleFunc("/reply_to_sms/", handler)
http.ListenAndServe(":8080", nil)
}
Test and validate
To run this file on the server, go to the folder where this file resides and use the following command:
go run reply_to_sms.go
And you should see your basic server app in action on http://localhost:8080/reply_to_sms/
Send an SMS to your Plivo number using a regular mobile phone and an automatic response will be sent from your Plivo number to your mobile phone. Also, Plivo will send a request to your Message URL
with the parameters listed in the Messages Documentation.