Interactive voice response (IVR) systems let incoming callers access information and find contacts via a menu of pre-recorded messages, without having to speak to an agent, and let you automate polling via outgoing calls. Callers and call recipients can respond to prompts via Touch-Tone keypad presses or speech recognition. IVR systems can handle larger call volumes than operators and reduce costs associated with customer service.
Common IVR use cases include:
- Auto-attendant: You can replace a receptionist with an IVR system that routes calls to agents during business hours and accepts voicemail when no one is available.
- Call center: You can route calls coming in to call centers to the appropriate representatives based on user input.
- Surveys, polling, and voting: You can implement IVR in outbound calls to collect customer satisfaction scores or conduct political polling.
- Appointment reminders: You can send automated reminders to customers before their scheduled visits to help avoid missed appointments and facilitate rescheduling.
- Lead assignment and lead routing: For inbound sales calls, you can set up an IVR menu with a set of qualifying questions to discover a customer’s interests, then redirect their call to a representative based on their responses.
This guide shows how to build an IVR menu system on the Plivo platform, either by using our PHLO visual workflow builder or our APIs and XML documents. This post talks about how to do it with PHLO.
Prerequisites
To get started, you need a Plivo account - sign up with your work email address if you don’t have one already. To receive incoming calls, you must have a voice-enabled Plivo phone number. You can rent numbers from the Numbers page of the Plivo console, or by using the Numbers API.
How it works
You can create and deploy a workflow to implement an IVR system with a few clicks on the PHLO canvas.
Create a PHLO to build a virtual assistant
To create a PHLO, visit the PHLO page of the Plivo console. If this is your first PHLO, the PHLO page will be empty.
- Click CREATE NEW PHLO.
- In the Choose your use case pop-up, click Build my own. The PHLO canvas will appear with the Start node.
Note: The Start node is the starting point of any PHLO. It lets you trigger a PHLO to start upon one of three actions: incoming SMS message, incoming call, or API request. - Click the Start node to open the Configuration tab, then enter information that other nodes can retrieve in the API Request section - in this case, the From and optionally To numbers for the IVR system.
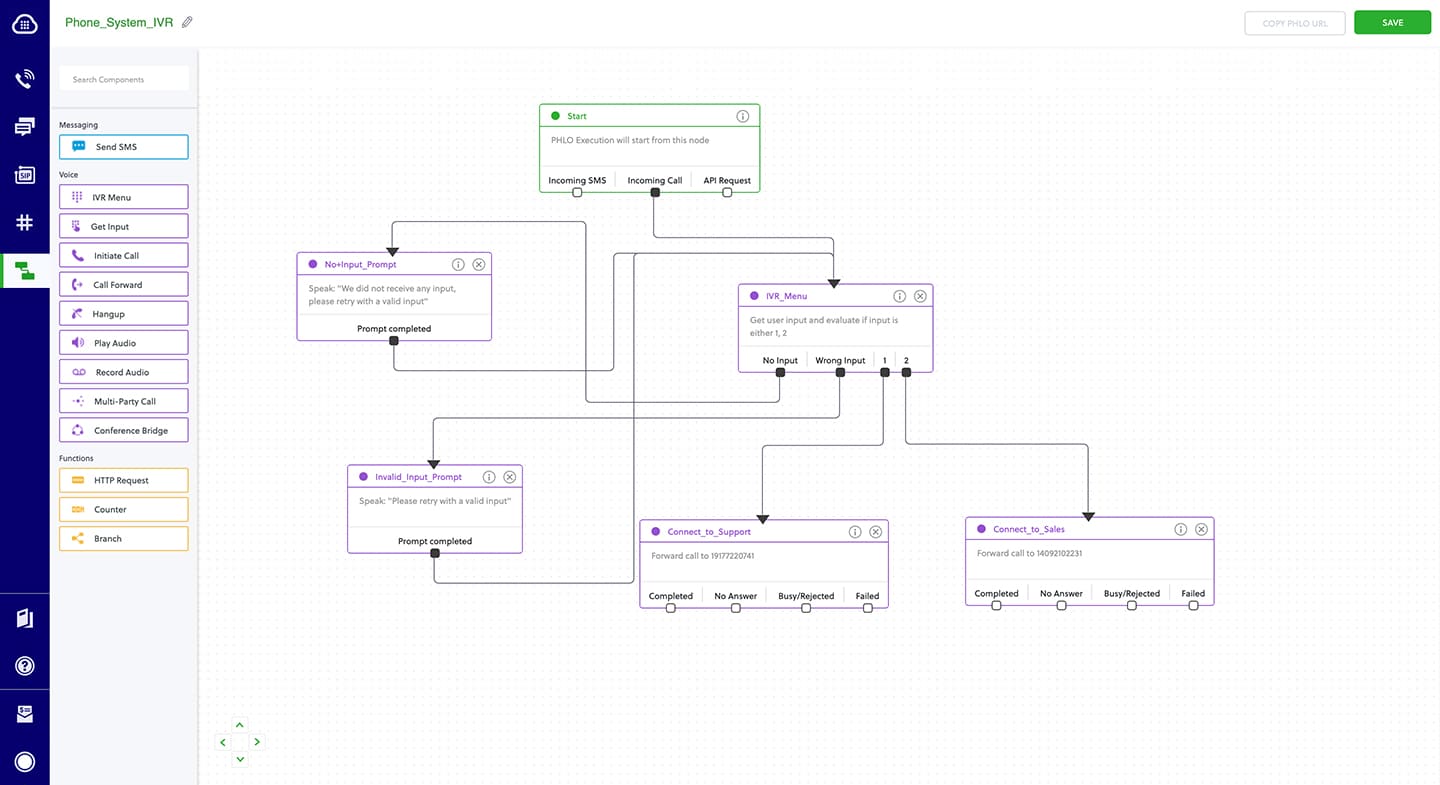
- From the list of components on the left side, drag and drop the IVR Menu component onto the canvas. When a component is placed on the canvas it becomes a node.
- Draw a line to connect the Start node‘s Incoming Call trigger state to the IVR Menu node.
- In the Configuration tab at the right of the canvas, configure the choices for the IVR menu. For this example, select 1 and 2 as allowed choices. Enter a message to play to the user in the Speak Text box.
- Once you’ve configured the node, save the configuration by clicking Validate. Do the same for each node as you go along.
- Drag and drop two instances of the Call Forward component onto the canvas. Rename them Connect_to_Support and Connect_to_Sales. Draw lines to connect the IVR Menu node‘s 1 and 2 trigger states to the new nodes.
- Configure each Call Forward node to select the From number using a variable. PHLO will get the number from the key/value pairs set in the Start node. Enter two curly brackets to view all available variables, and choose the appropriate one. For the To number, either enter a fixed number directly into the To field or use a variable that you configured in the Start node.
- Drag and drop two instances of the Play Audio component onto the canvas. Rename the two nodes No_Input_Prompt and Invalid_Input_Prompt and configure each to speak a fixed message for callers to hear when they enter no input or invalid input. Draw lines from the IVR Menu node‘s No Input and Wrong Input trigger states to the respective nodes, then draw lines from the Prompt Completed trigger states of the new nodes back to the IVR Menu node, to give callers another chance to enter a menu choice.
- Give the PHLO a name by clicking in the upper left, then click Save.
Your complete PHLO should look like this.
Refer to the Create the PHLO section in our use case guide for more information.
Assign the PHLO to a Plivo number
Once you‘ve created and configured your PHLO, assign it to a Plivo number.
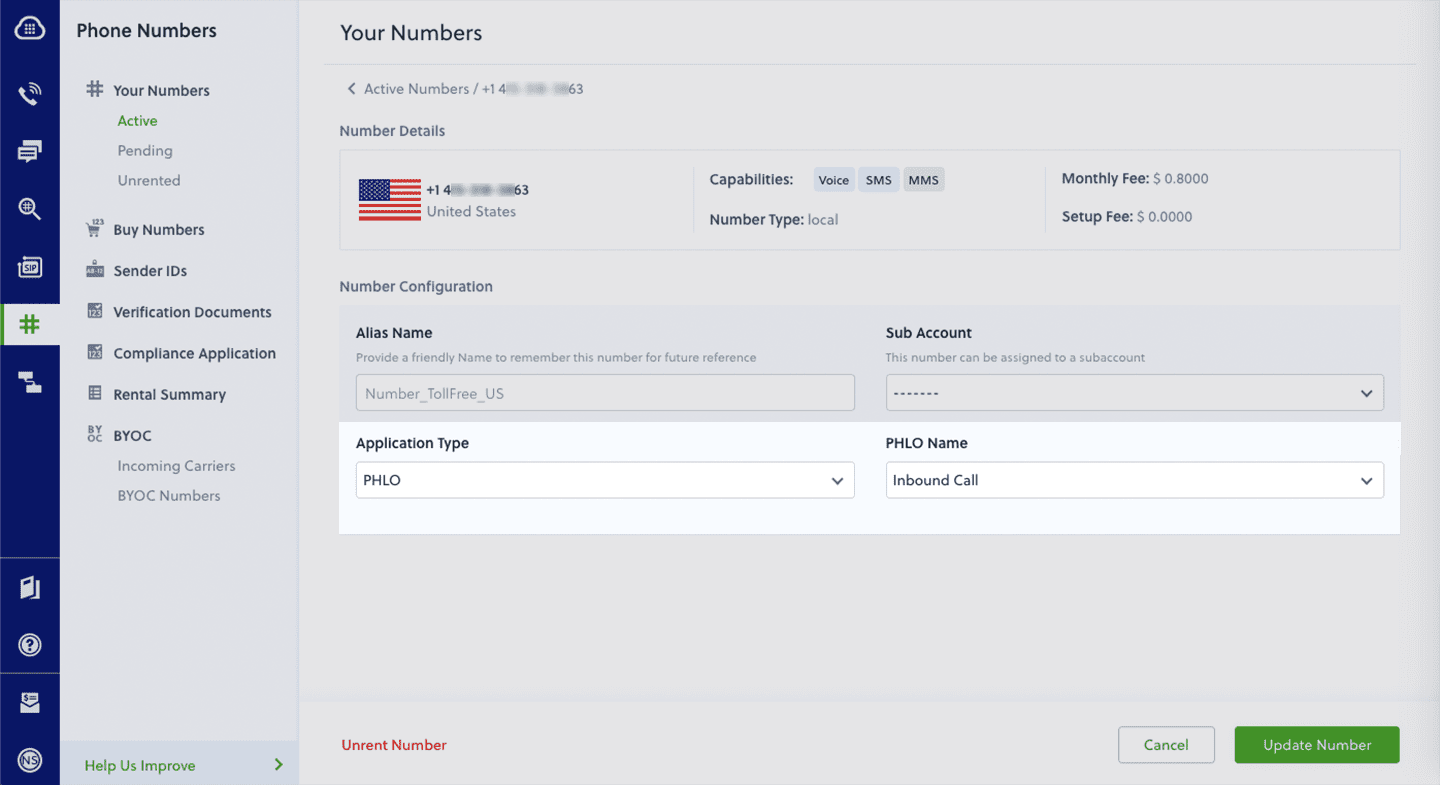
- On the Numbers page of the console, under Your Numbers, click the phone number you want to use for the PHLO.
- In the Number Configuration box, select PHLO from the Application Type drop-down.
- From the PHLO Name drop-down, select the PHLO you want to use with the phone number, then click Update Number.
Test
You can now call your Plivo phone number and see how the IVR system works.
For more information about creating a PHLO application, see the PHLO Getting Started guide. For information on components and their variables, see the PHLO Components Library.