> ## Documentation Index
> Fetch the complete documentation index at: https://plivo.com/docs/llms.txt
> Use this file to discover all available pages before exploring further.
# Click to Call
> Set up click-to-call for website visitors using the Plivo Browser SDK
Click-to-call enables your website users to engage with your support and sales teams on the website itself. Sometimes they want to speak to someone via their handset but initiate the call online or talk to someone directly from the website. You can implement this click to call use case using Plivo's Browser SDK.
## How it works
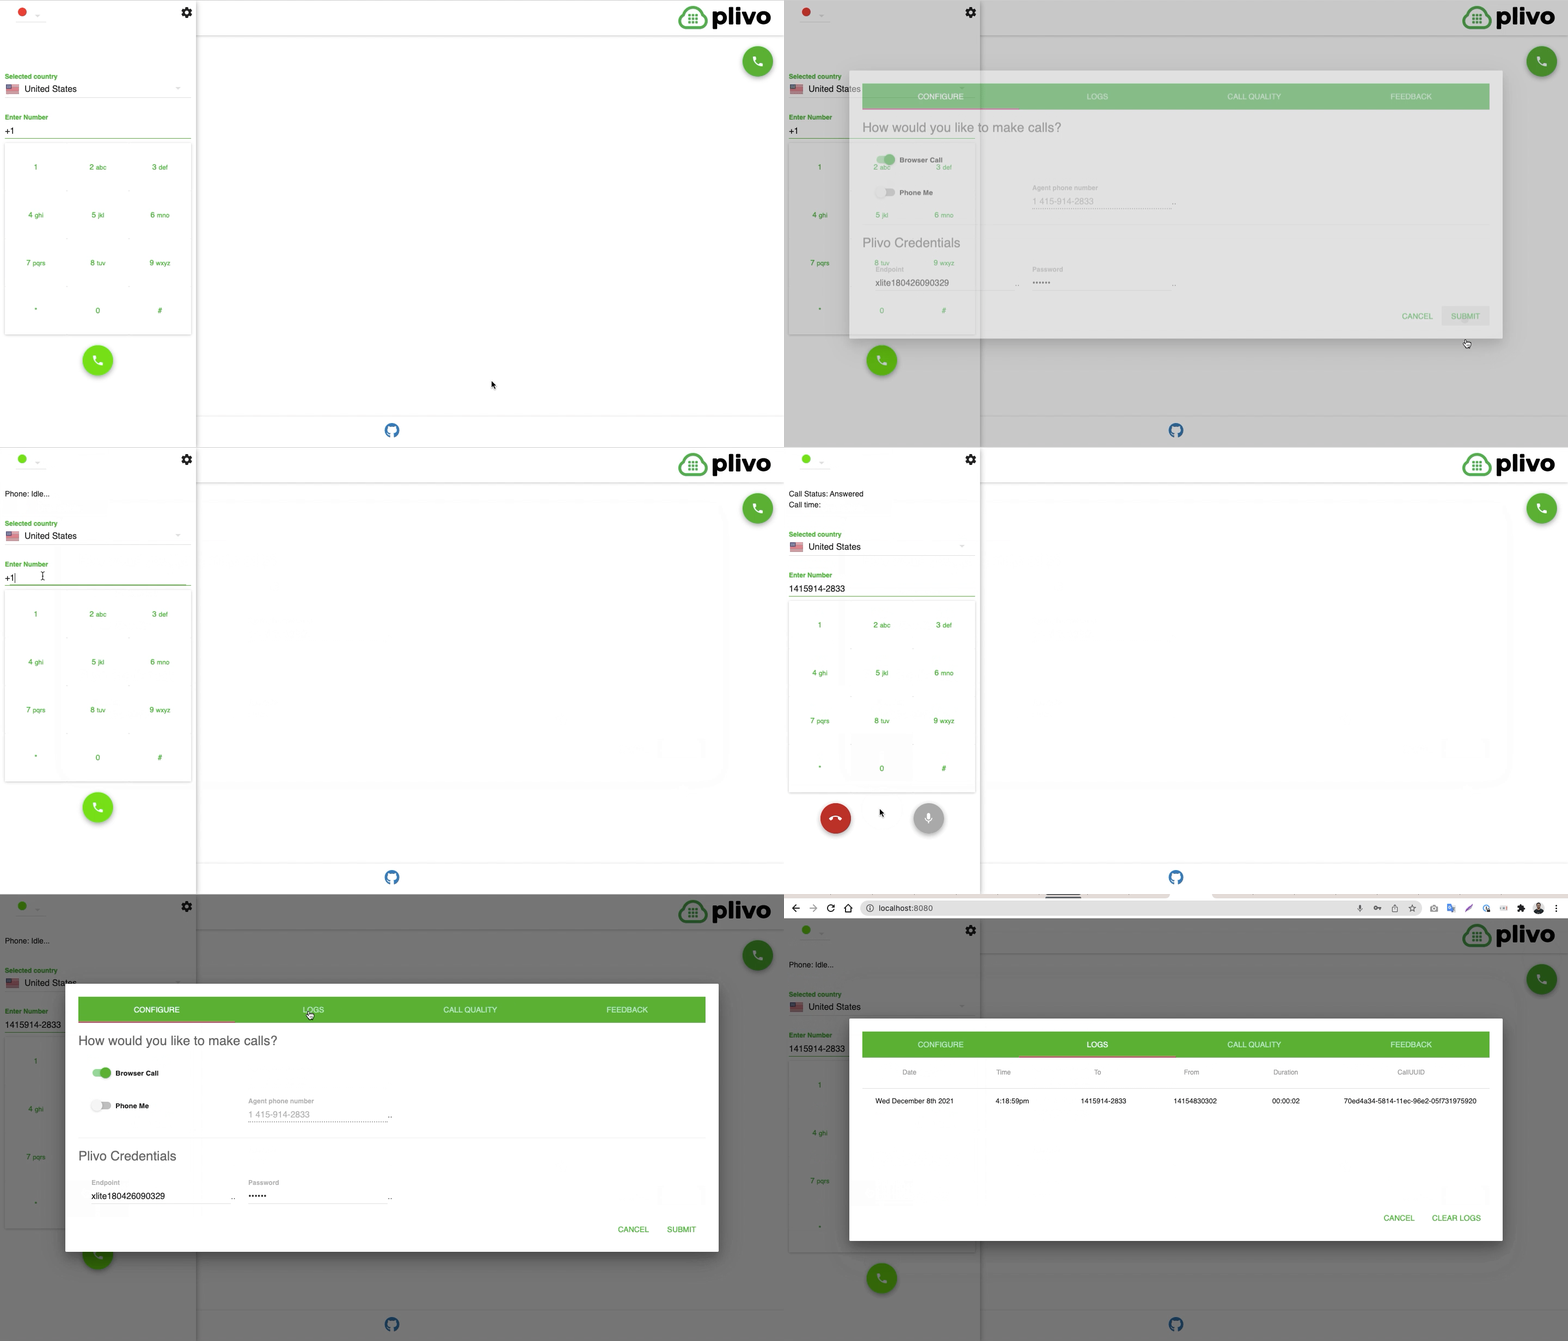 The [Plivo Browser SDK](/sdk/client/browser/reference/) lets you make and receive calls using Plivo applications directly from any web browser.
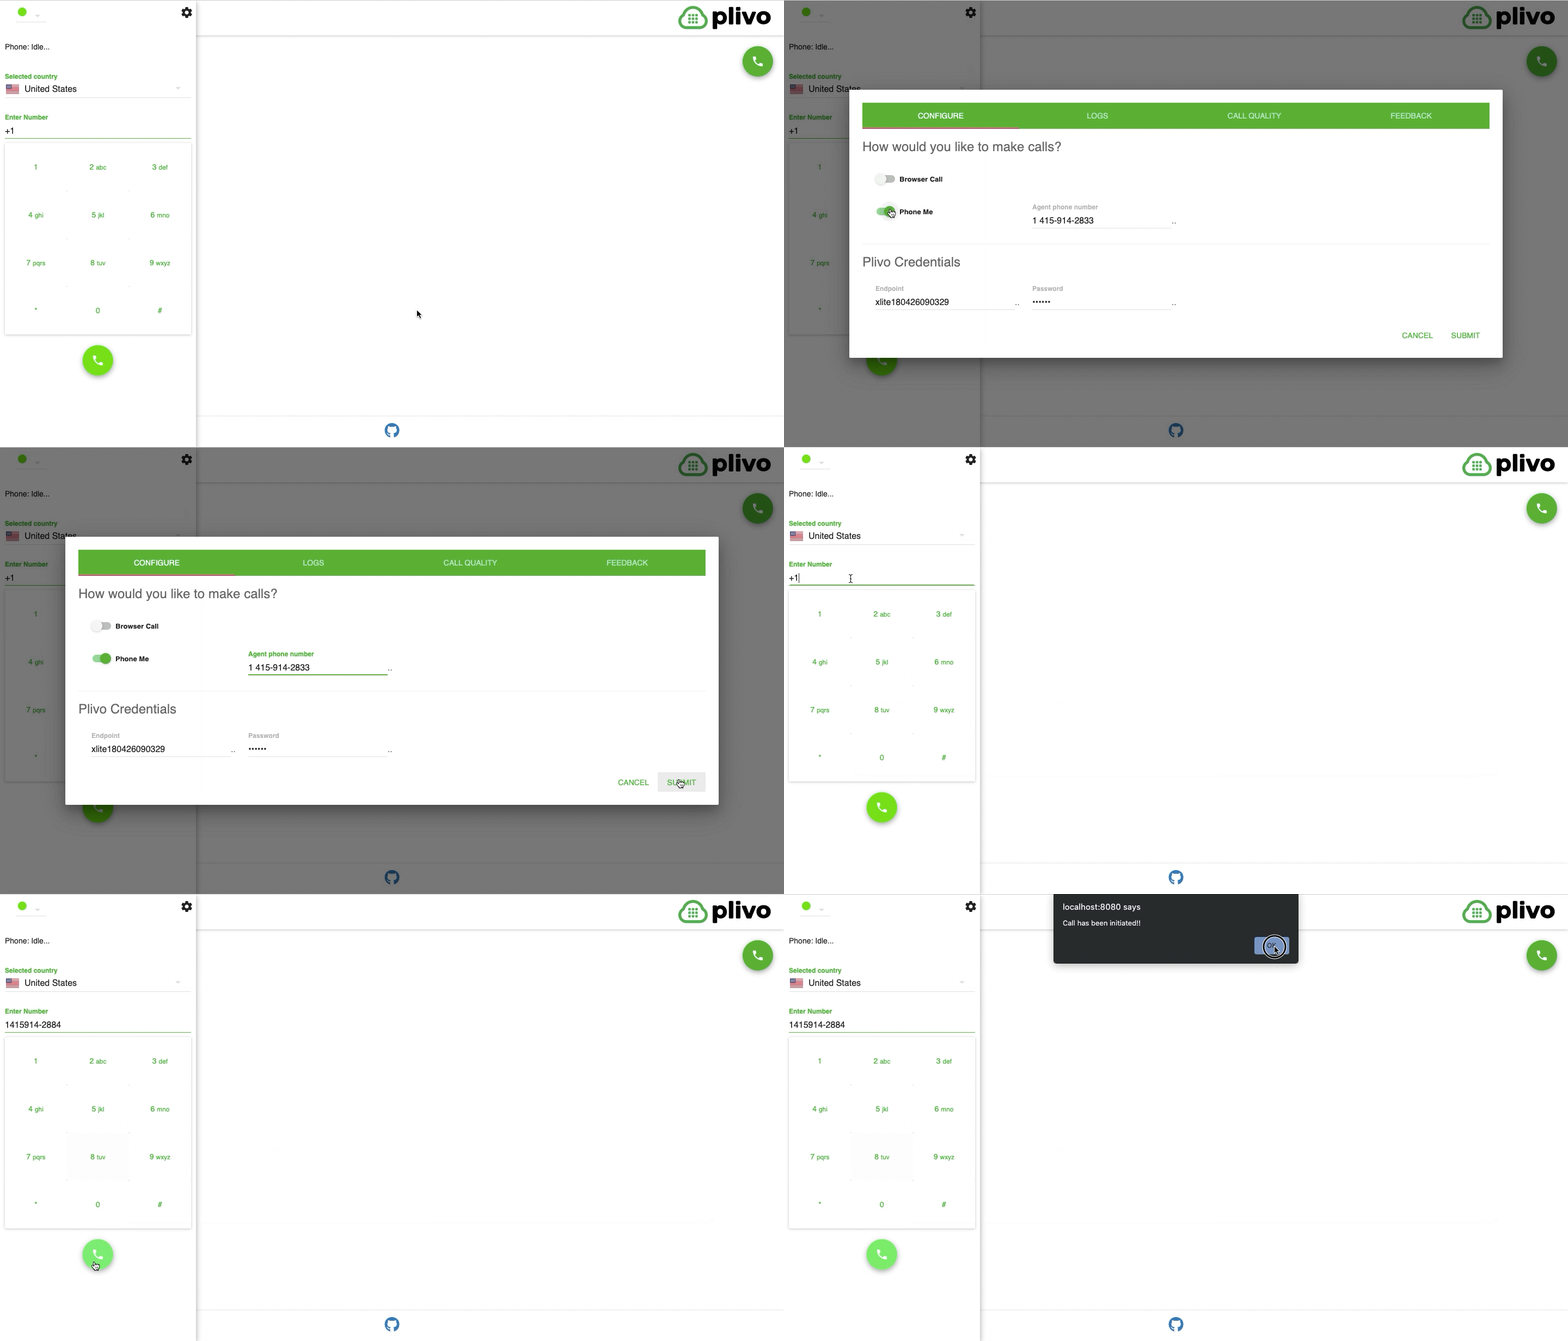 User enters their phone number in the settings. When a call is placed, the user's handset is called first, then the call is connected to the destination number.
## Prerequisites
To get started, you need a Plivo account — [sign up](https://cx.plivo.com/signup) with your work email address if you don’t have one already. You must have a voice-enabled Plivo phone number to receive incoming calls; you can rent numbers from the [Numbers](https://cx.plivo.com/phone-numbers) page of the Plivo console, or by using the [Numbers API](/numbers/). Click to call requires JavaScript; we recommend using Node.js. If this is your first time triggering a PHLO with Node.js, follow our instructions to [set up a Node.js development environment](/sdk/server/set-up-node-dev-environment-api-xml-voice/) and a web server and safely expose that server to the internet.
### Create a PHLO to handle call logic
User enters their phone number in the settings. When a call is placed, the user's handset is called first, then the call is connected to the destination number.
## Prerequisites
To get started, you need a Plivo account — [sign up](https://cx.plivo.com/signup) with your work email address if you don’t have one already. You must have a voice-enabled Plivo phone number to receive incoming calls; you can rent numbers from the [Numbers](https://cx.plivo.com/phone-numbers) page of the Plivo console, or by using the [Numbers API](/numbers/). Click to call requires JavaScript; we recommend using Node.js. If this is your first time triggering a PHLO with Node.js, follow our instructions to [set up a Node.js development environment](/sdk/server/set-up-node-dev-environment-api-xml-voice/) and a web server and safely expose that server to the internet.
### Create a PHLO to handle call logic
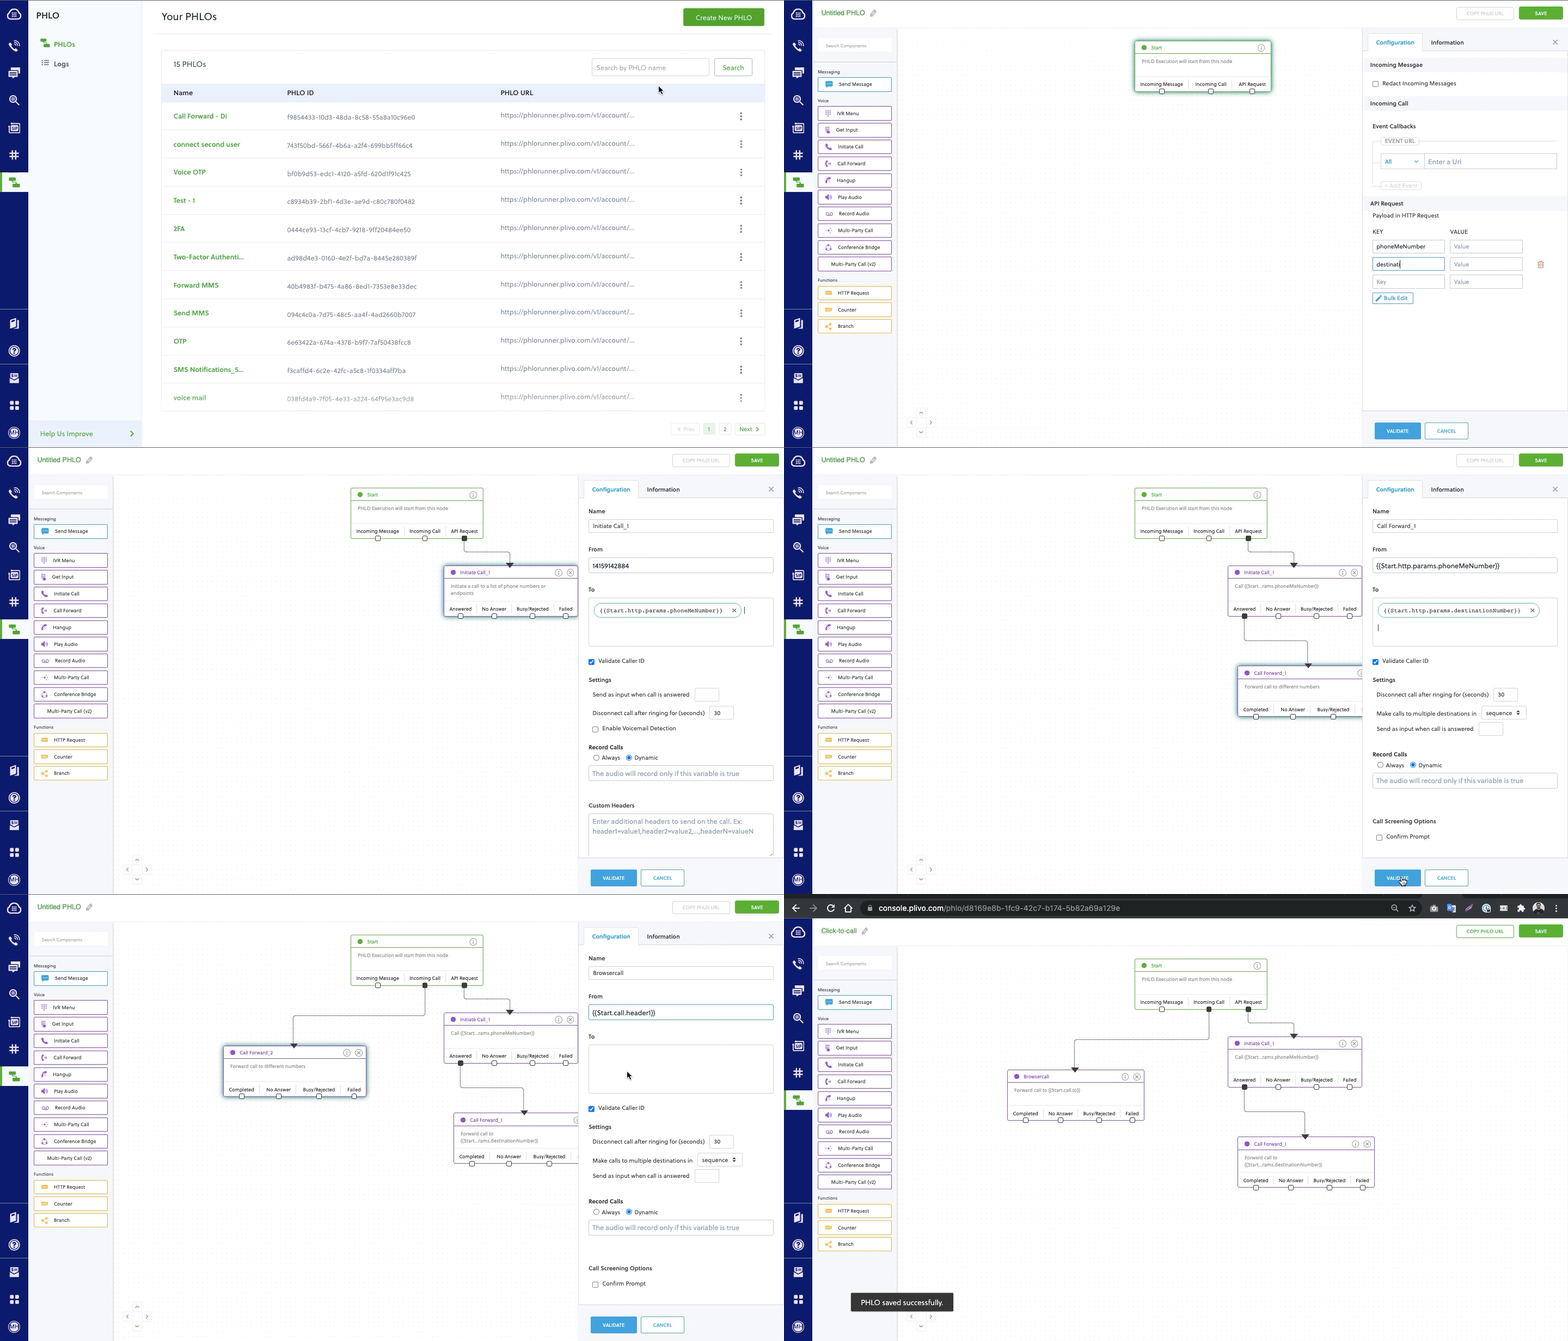 To create a PHLO, visit the [PHLO](https://cx.plivo.com/agents) page of the Plivo console. If this is your first PHLO, the PHLO page will be empty.
* Click **Create New PHLO**.
* In the **Choose your use case** pop-up, click **Build my own**. The PHLO canvas will appear with the **Start** node.
**Note**: The Start node is the starting point of any PHLO. It lets you trigger a PHLO to start upon one of three actions: incoming SMS message, incoming call, or API request.
* Click the **Start** node to open the Configuration tab, and then enter the information to retrieve from the HTTP Request payload — in this case key names are `destinationNumber` and `phoneMeNumber`. The values will remain blank as we will receive them when the request is made by the browser.
* Validate the configuration by clicking **Validate**. Do the same for each node as you go along.
* From the list of components on the left side, drag and drop the **Initiate Call** component onto the canvas. This adds an Initiate Call node onto the canvas. When a component is placed on the canvas it becomes a node.
* Draw a line to connect the **Start** node’s **API Request** trigger state to the **Initiate Call** node.
* In the Configuration tab of the **Initiate Call** node, give the node a name. To enter values for the **From** and **To** fields, enter two curly brackets to view all available variables, and choose the appropriate ones. The values for the numbers will be retrieved from the HTTP Request payload you defined in the Start node. Here **From** is **14159142884** and **To** is **\{\{Start.http.params.phoneMeNumber}}**.
* From the list of components on the left side, drag and drop the **Call Forward** component onto the canvas. Draw a line to connect the **Answered** trigger state of the **Initiate Call** node with the **Call Forward** node.
* Configure the **Call Forward** node to initiate call forward to another user. To enter values for the **From** and **To** fields, enter two curly brackets to view all available variables, and choose the appropriate ones. The values for the numbers will be retrieved from the HTTP Request payload you defined in the Start node. Here **From** is **\{\{Start.http.params.phoneMeNumber}}** and **To** is **\{\{Start.http.params.destinationNumber}}**.
* After you complete and validate the node configurations, give the PHLO a name by clicking in the upper left, then click **Save**.
* From the list of components on the left side, drag and drop the **Call Forward** component onto the canvas.
* Draw a line to connect the **Start** node’s **Incoming call** trigger state to the **Call Forward** node.
* In the Configuration tab of the **Call Forward** node, give the node a name. To enter values for the **From** and **To** fields, enter two curly brackets to view all available variables, and choose the appropriate ones. The values for the numbers will be retrieved from the HTTP Request payload you defined in the Start node. Here **From** is **\{\{Start.http.params.header1}}**. and **To** is **\{\{Start.http.params.to}}**.
* After you complete and validate the node configurations, give the PHLO a name by clicking in the upper left, then click **Save**.
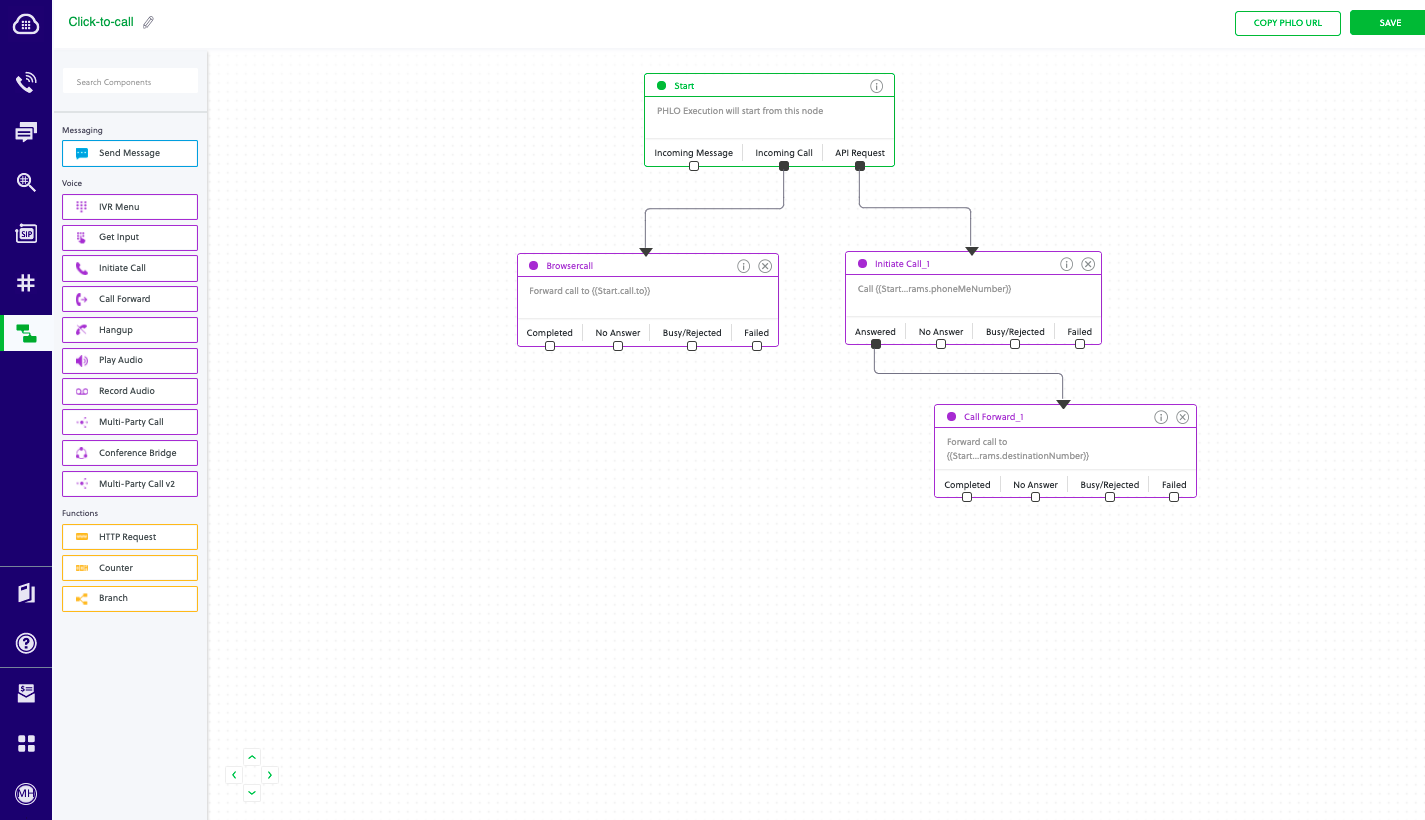
Your complete PHLO should look like this:
To create a PHLO, visit the [PHLO](https://cx.plivo.com/agents) page of the Plivo console. If this is your first PHLO, the PHLO page will be empty.
* Click **Create New PHLO**.
* In the **Choose your use case** pop-up, click **Build my own**. The PHLO canvas will appear with the **Start** node.
**Note**: The Start node is the starting point of any PHLO. It lets you trigger a PHLO to start upon one of three actions: incoming SMS message, incoming call, or API request.
* Click the **Start** node to open the Configuration tab, and then enter the information to retrieve from the HTTP Request payload — in this case key names are `destinationNumber` and `phoneMeNumber`. The values will remain blank as we will receive them when the request is made by the browser.
* Validate the configuration by clicking **Validate**. Do the same for each node as you go along.
* From the list of components on the left side, drag and drop the **Initiate Call** component onto the canvas. This adds an Initiate Call node onto the canvas. When a component is placed on the canvas it becomes a node.
* Draw a line to connect the **Start** node’s **API Request** trigger state to the **Initiate Call** node.
* In the Configuration tab of the **Initiate Call** node, give the node a name. To enter values for the **From** and **To** fields, enter two curly brackets to view all available variables, and choose the appropriate ones. The values for the numbers will be retrieved from the HTTP Request payload you defined in the Start node. Here **From** is **14159142884** and **To** is **\{\{Start.http.params.phoneMeNumber}}**.
* From the list of components on the left side, drag and drop the **Call Forward** component onto the canvas. Draw a line to connect the **Answered** trigger state of the **Initiate Call** node with the **Call Forward** node.
* Configure the **Call Forward** node to initiate call forward to another user. To enter values for the **From** and **To** fields, enter two curly brackets to view all available variables, and choose the appropriate ones. The values for the numbers will be retrieved from the HTTP Request payload you defined in the Start node. Here **From** is **\{\{Start.http.params.phoneMeNumber}}** and **To** is **\{\{Start.http.params.destinationNumber}}**.
* After you complete and validate the node configurations, give the PHLO a name by clicking in the upper left, then click **Save**.
* From the list of components on the left side, drag and drop the **Call Forward** component onto the canvas.
* Draw a line to connect the **Start** node’s **Incoming call** trigger state to the **Call Forward** node.
* In the Configuration tab of the **Call Forward** node, give the node a name. To enter values for the **From** and **To** fields, enter two curly brackets to view all available variables, and choose the appropriate ones. The values for the numbers will be retrieved from the HTTP Request payload you defined in the Start node. Here **From** is **\{\{Start.http.params.header1}}**. and **To** is **\{\{Start.http.params.to}}**.
* After you complete and validate the node configurations, give the PHLO a name by clicking in the upper left, then click **Save**.
Your complete PHLO should look like this:
 ## Set up the demo application locally
Download and modify the code to trigger the PHLO.
* Clone the repository from [GitHub](https://github.com/plivo/click2call-webRTC.git).
```shell theme={null}
git clone https://github.com/plivo/click2call-webRTC.git
```
* Change your working directory to click2call-webRTC.
```shell theme={null}
cd click2call-webRTC
```
* Install the necessary dependencies using the package.json file.
```shell theme={null}
npm install
```
* Edit the **.env** file. Replace the auth placeholders with your authentication credentials from the [Plivo console](https://cx.plivo.com/home). Enter your PHLO ID, which you can find on the [Plivo console](https://cx.plivo.com/agents).
```shell theme={null}
PORT="8080"
PLIVO_AUTH_ID=""
PLIVO_AUTH_TOKEN=""
PHLO_ID=""
```
* Edit **/client/src/index.jsx** and replace the caller\_id placeholder with a Plivo number.
```sh theme={null}
const customCallerId = ;
const extraHeaders = {
'X-PH-Test1': 'test1',
'X-PH-callerId': customCallerId
};
this.plivoBrowserSdk.client.call(dest, extraHeaders);
```
## A review of the code
Let‘s walk through what the code does. The PHLO can be triggered either by an incoming call or an HTTP request.
### Broswer SDK call
When someone clicks on an application button to initiate a call, we can use the Browser SDK‘s **call()** method to initiate a call from the application endpoint to the destination phone number. In this case our PHLO is the endpoint, so our outbound call is treated as an *incoming* call to our PHLO. When the request we make from the browser reaches the endpoint, the browser is connected to Plivo via the endpoint and the endpoint is attached to the PHLO, so when the browser makes a request to Plivo as an incoming call, Plivo connects to the endpoint, which in turn triggers the PHLO to forward the call to the destination number.
The code looks like this.
```js theme={null}
const customCallerId = ;
const extraHeaders = {
'X-PH-Test1': 'test1',
'X-PH-callerId': customCallerId
};
this.plivoBrowserSdk.client.call(dest, extraHeaders);
```
Here the **extraHeaders** is used to pass the caller\_id for a call initiated by the broswer.
### Click to call
Click to call is a more complicated use case because it requires us to actually send an HTTP request with a payload to the PHLO endpoint. Remember that we‘re making a call to our user‘s handset first, then connecting to the destination once the first call is answered. We need to get both phone numbers from the application and send them to the server. The code looks like this.
```js theme={null}
let XMLReq = new XMLHttpRequest();
XMLReq.open("POST", "/makeCall");
XMLReq.setRequestHeader("Content-Type", "application/json");
XMLReq.onreadystatechange = function() {
console.log('response text', XMLReq.responseText);
}
XMLReq.send(JSON.stringify({
"src": this.state.phoneMeNumber,
"dst": dest
}));
```
We need to listen for this request on the server. Once we receive the request and get the numbers from the payload, we set up another HTTP request that sends this data to the PHLO.
```js theme={null}
// when we receive an http post request
app.post('/makeCall/', function(req, res) {
console.log(req.fields);
jsonObject = JSON.stringify({
"phoneMeNumber": req.fields.src,
"destinationNumber": req.fields.dst,
});
// prepare the header
let postHeaders = {
'Content-Type': 'application/json',
'Authorization': 'Basic ' + new Buffer.from(process.env. +':' + process.env.).toString('base64')
};
// set the post options
let postOptions = {
port: 443,
host: 'phlo-runner-service.plivo.com',
path: process.env.,
method: 'POST',
headers: postHeaders,
};
// do the POST request
let reqPost = https.request(postOptions, function(response) {
console.log("statusCode: ", response.statusCode);
response.on('data', function(d) {
console.info('POST result:\n');
process.stdout.write(d);
console.info('\n\nPOST completed');
res.send(d);
});
});
// write the json data
console.log(jsonObject);
reqPost.write(jsonObject);
reqPost.end();
reqPost.on('error', function(e) { // log any errors
console.error(e);
});
})
```
## Assign the PHLO to a Plivo number
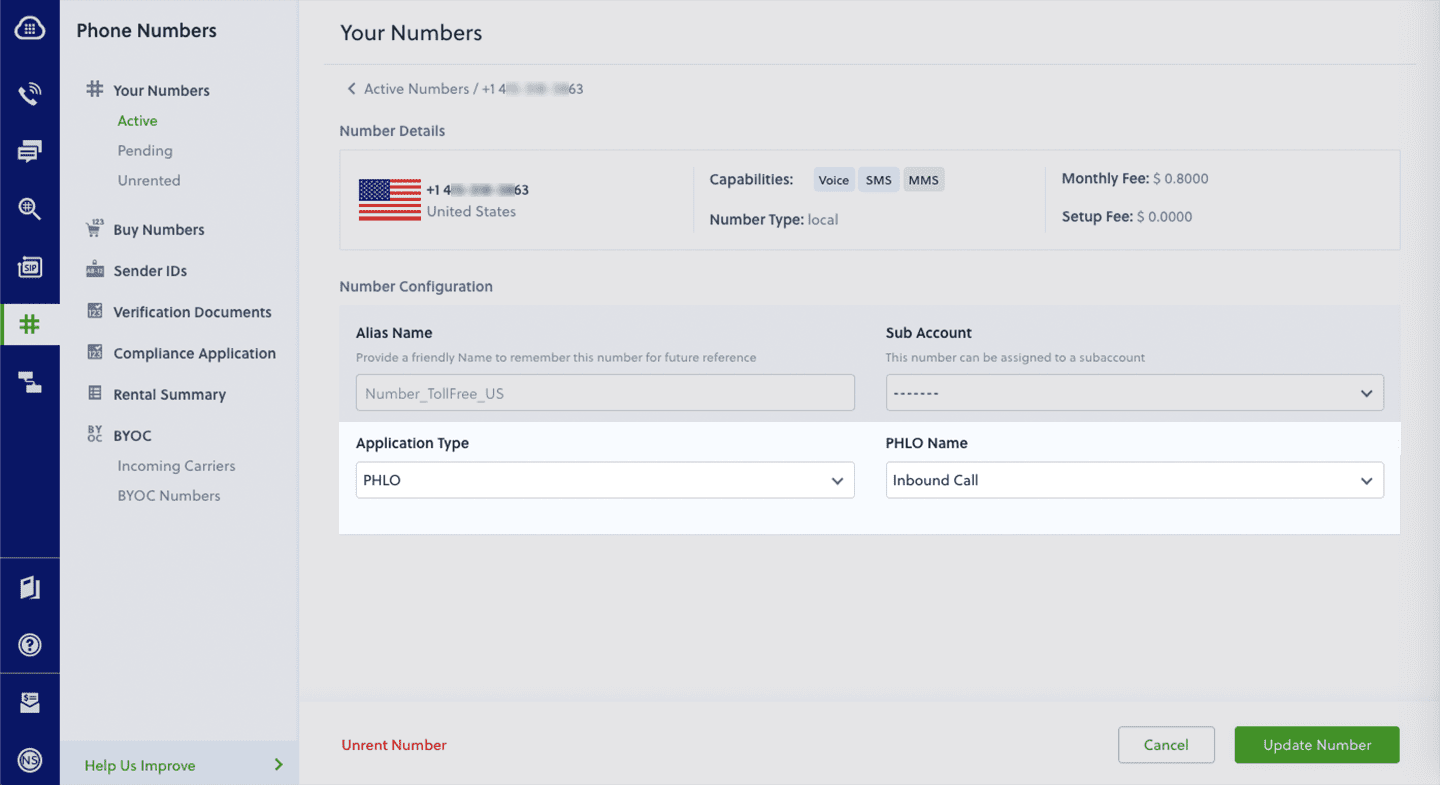
Once you’ve created and configured your PHLO, assign it to a Plivo number.
* On the [Numbers](https://cx.plivo.com/phone-numbers) page of the console, under **Your Numbers**, click the phone number you want to use for the PHLO.
* In the **Number Configuration** box, select **PHLO** from the **Application Type** drop-down.
* From the **PHLO Name** drop-down, select the PHLO you want to use with the phone number, then click **Update Number**.
## Set up the demo application locally
Download and modify the code to trigger the PHLO.
* Clone the repository from [GitHub](https://github.com/plivo/click2call-webRTC.git).
```shell theme={null}
git clone https://github.com/plivo/click2call-webRTC.git
```
* Change your working directory to click2call-webRTC.
```shell theme={null}
cd click2call-webRTC
```
* Install the necessary dependencies using the package.json file.
```shell theme={null}
npm install
```
* Edit the **.env** file. Replace the auth placeholders with your authentication credentials from the [Plivo console](https://cx.plivo.com/home). Enter your PHLO ID, which you can find on the [Plivo console](https://cx.plivo.com/agents).
```shell theme={null}
PORT="8080"
PLIVO_AUTH_ID=""
PLIVO_AUTH_TOKEN=""
PHLO_ID=""
```
* Edit **/client/src/index.jsx** and replace the caller\_id placeholder with a Plivo number.
```sh theme={null}
const customCallerId = ;
const extraHeaders = {
'X-PH-Test1': 'test1',
'X-PH-callerId': customCallerId
};
this.plivoBrowserSdk.client.call(dest, extraHeaders);
```
## A review of the code
Let‘s walk through what the code does. The PHLO can be triggered either by an incoming call or an HTTP request.
### Broswer SDK call
When someone clicks on an application button to initiate a call, we can use the Browser SDK‘s **call()** method to initiate a call from the application endpoint to the destination phone number. In this case our PHLO is the endpoint, so our outbound call is treated as an *incoming* call to our PHLO. When the request we make from the browser reaches the endpoint, the browser is connected to Plivo via the endpoint and the endpoint is attached to the PHLO, so when the browser makes a request to Plivo as an incoming call, Plivo connects to the endpoint, which in turn triggers the PHLO to forward the call to the destination number.
The code looks like this.
```js theme={null}
const customCallerId = ;
const extraHeaders = {
'X-PH-Test1': 'test1',
'X-PH-callerId': customCallerId
};
this.plivoBrowserSdk.client.call(dest, extraHeaders);
```
Here the **extraHeaders** is used to pass the caller\_id for a call initiated by the broswer.
### Click to call
Click to call is a more complicated use case because it requires us to actually send an HTTP request with a payload to the PHLO endpoint. Remember that we‘re making a call to our user‘s handset first, then connecting to the destination once the first call is answered. We need to get both phone numbers from the application and send them to the server. The code looks like this.
```js theme={null}
let XMLReq = new XMLHttpRequest();
XMLReq.open("POST", "/makeCall");
XMLReq.setRequestHeader("Content-Type", "application/json");
XMLReq.onreadystatechange = function() {
console.log('response text', XMLReq.responseText);
}
XMLReq.send(JSON.stringify({
"src": this.state.phoneMeNumber,
"dst": dest
}));
```
We need to listen for this request on the server. Once we receive the request and get the numbers from the payload, we set up another HTTP request that sends this data to the PHLO.
```js theme={null}
// when we receive an http post request
app.post('/makeCall/', function(req, res) {
console.log(req.fields);
jsonObject = JSON.stringify({
"phoneMeNumber": req.fields.src,
"destinationNumber": req.fields.dst,
});
// prepare the header
let postHeaders = {
'Content-Type': 'application/json',
'Authorization': 'Basic ' + new Buffer.from(process.env. +':' + process.env.).toString('base64')
};
// set the post options
let postOptions = {
port: 443,
host: 'phlo-runner-service.plivo.com',
path: process.env.,
method: 'POST',
headers: postHeaders,
};
// do the POST request
let reqPost = https.request(postOptions, function(response) {
console.log("statusCode: ", response.statusCode);
response.on('data', function(d) {
console.info('POST result:\n');
process.stdout.write(d);
console.info('\n\nPOST completed');
res.send(d);
});
});
// write the json data
console.log(jsonObject);
reqPost.write(jsonObject);
reqPost.end();
reqPost.on('error', function(e) { // log any errors
console.error(e);
});
})
```
## Assign the PHLO to a Plivo number
Once you’ve created and configured your PHLO, assign it to a Plivo number.
* On the [Numbers](https://cx.plivo.com/phone-numbers) page of the console, under **Your Numbers**, click the phone number you want to use for the PHLO.
* In the **Number Configuration** box, select **PHLO** from the **Application Type** drop-down.
* From the **PHLO Name** drop-down, select the PHLO you want to use with the phone number, then click **Update Number**.
 ## Test
Run these commands.
```shell theme={null}
npm run watch
npm run start
```
You should see your basic server application running at [http://localhost:8080/](http://localhost:8080/). [Set up ngrok](/sdk/server/set-up-node-dev-environment-api-xml-voice/#ngrok-setup) to expose your local server to the internet. Now make a call from your browser-based application to test it.
**Note**: If you’re using a Plivo Trial account, you can make calls only to phone numbers that have been verified with Plivo. You can verify (sandbox) a number by going to the console’s Phone Numbers [Sandbox Numbers](https://cx.plivo.com/home) page.
## Test
Run these commands.
```shell theme={null}
npm run watch
npm run start
```
You should see your basic server application running at [http://localhost:8080/](http://localhost:8080/). [Set up ngrok](/sdk/server/set-up-node-dev-environment-api-xml-voice/#ngrok-setup) to expose your local server to the internet. Now make a call from your browser-based application to test it.
**Note**: If you’re using a Plivo Trial account, you can make calls only to phone numbers that have been verified with Plivo. You can verify (sandbox) a number by going to the console’s Phone Numbers [Sandbox Numbers](https://cx.plivo.com/home) page.