> ## Documentation Index
> Fetch the complete documentation index at: https://plivo.com/docs/llms.txt
> Use this file to discover all available pages before exploring further.
# Voice API Quickstart
> Make your first outbound call and handle incoming calls with Plivo's Voice API
Get started with Plivo Voice in minutes. This guide walks you through making your first outbound call and receiving incoming calls.
## Prerequisites
Before you begin:
1. [Sign up for a Plivo account](https://cx.plivo.com/signup) (free trial includes credits)
2. Note your **Auth ID** and **Auth Token** from the [console dashboard](https://cx.plivo.com/home)
3. [Rent a phone number](https://cx.plivo.com/phone-numbers) for receiving calls
***
## Install the SDK
```bash theme={null}
pip install plivo
```
For web framework support, also install Flask:
```bash theme={null}
pip install flask
```
```bash theme={null}
npm install plivo
```
For web server support, also install Express:
```bash theme={null}
npm install express
```
```bash theme={null}
gem install plivo sinatra
```
```bash theme={null}
composer require plivo/plivo-php
```
Add to your `pom.xml`:
```xml theme={null}
com.plivo
plivo-java
5.9.0
```
```bash theme={null}
dotnet add package Plivo
```
```bash theme={null}
go get github.com/plivo/plivo-go/v7
```
***
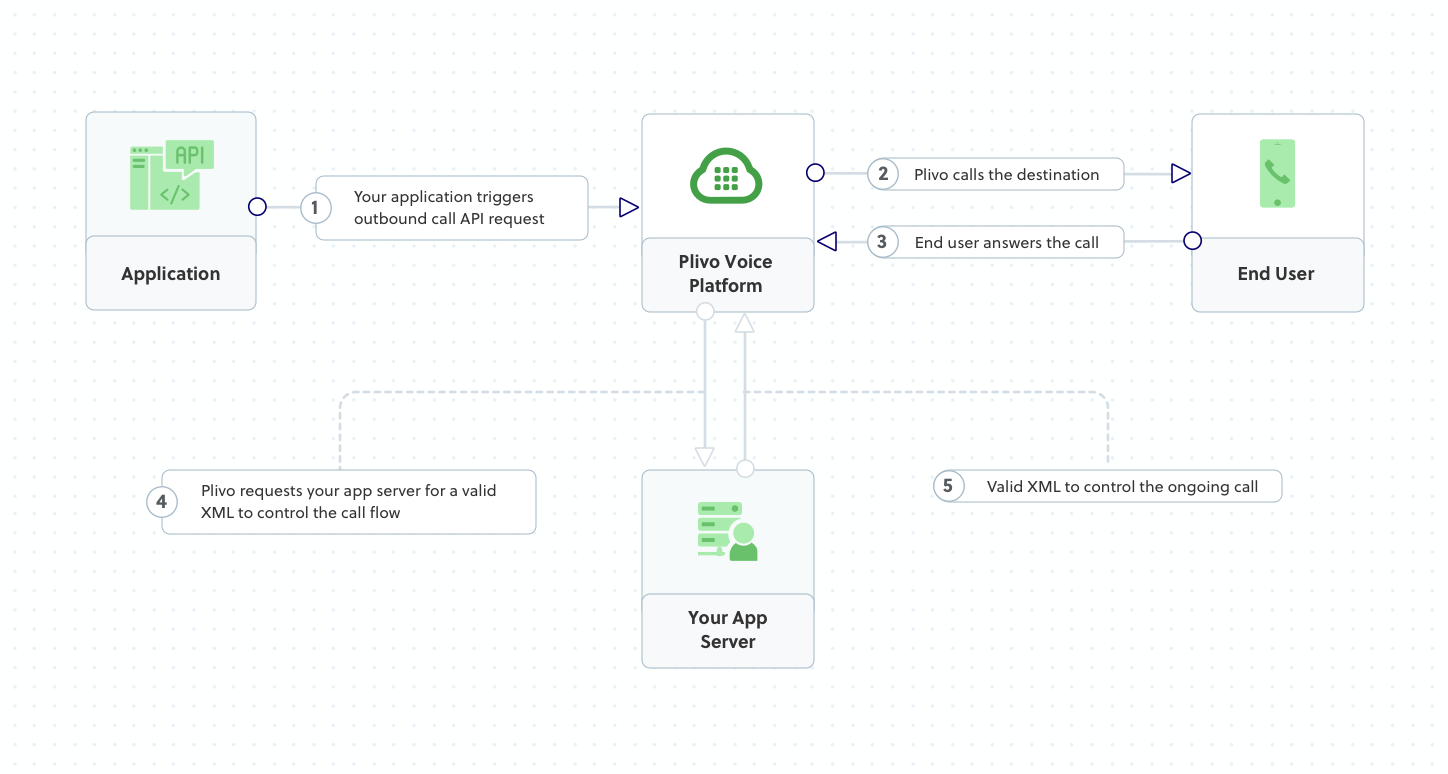
## Make an Outbound Call
Create a call from your Plivo number to any phone number. When the call is answered, Plivo fetches XML instructions from your `answer_url`.
 ```python theme={null}
import plivo
client = plivo.RestClient('', '')
response = client.calls.create(
from_='+14151234567', # Your Plivo number
to_='+14157654321', # Destination number
answer_url='https://s3.amazonaws.com/static.plivo.com/answer.xml',
answer_method='GET'
)
print(response)
```
```javascript theme={null}
const plivo = require('plivo');
const client = new plivo.Client('', '');
client.calls.create(
'+14151234567', // from
'+14157654321', // to
'https://s3.amazonaws.com/static.plivo.com/answer.xml', // answer_url
{ answerMethod: 'GET' }
).then(console.log);
```
```ruby theme={null}
require 'plivo'
api = Plivo::RestClient.new('', '')
response = api.calls.create(
'+14151234567', # from
['+14157654321'], # to
'https://s3.amazonaws.com/static.plivo.com/answer.xml', # answer_url
'GET' # answer_method
)
puts response
```
```php theme={null}
', '');
$response = $client->calls->create(
'+14151234567', // from
['+14157654321'], // to
'https://s3.amazonaws.com/static.plivo.com/answer.xml', // answer_url
['answerMethod' => 'GET']
);
print_r($response);
```
```java theme={null}
import com.plivo.api.Plivo;
import com.plivo.api.models.call.Call;
public class MakeCall {
public static void main(String[] args) {
Plivo.init("", "");
Call.creator("+14151234567", "+14157654321",
"https://s3.amazonaws.com/static.plivo.com/answer.xml")
.answerMethod("GET")
.create();
}
}
```
```csharp theme={null}
using Plivo;
var api = new PlivoApi("", "");
var response = api.Call.Create(
from: "+14151234567",
to: new[] { "+14157654321" },
answerUrl: "https://s3.amazonaws.com/static.plivo.com/answer.xml",
answerMethod: "GET"
);
Console.WriteLine(response);
```
```go theme={null}
package main
import "github.com/plivo/plivo-go/v7"
func main() {
client, _ := plivo.NewClient("", "", &plivo.ClientOptions{})
client.Calls.Create(plivo.CallCreateParams{
From: "+14151234567",
To: "+14157654321",
AnswerURL: "https://s3.amazonaws.com/static.plivo.com/answer.xml",
AnswerMethod: "GET",
})
}
```
```bash theme={null}
curl -i --user AUTH_ID:AUTH_TOKEN \
-H "Content-Type: application/json" \
-d '{
"from": "+14151234567",
"to": "+14157654321",
"answer_url": "https://s3.amazonaws.com/static.plivo.com/answer.xml",
"answer_method": "GET"
}' \
https://api.plivo.com/v1/Account/{auth_id}/Call/
```
The sample `answer.xml` file plays a message:
```xml theme={null}
Congratulations! You've made your first outbound call!
```
Replace this URL with your own server endpoint to control call behavior dynamically.
***
## Receive an Incoming Call
Set up a web server to handle incoming calls. When someone calls your Plivo number, Plivo sends a request to your Answer URL and executes the XML instructions you return.
```python theme={null}
import plivo
client = plivo.RestClient('', '')
response = client.calls.create(
from_='+14151234567', # Your Plivo number
to_='+14157654321', # Destination number
answer_url='https://s3.amazonaws.com/static.plivo.com/answer.xml',
answer_method='GET'
)
print(response)
```
```javascript theme={null}
const plivo = require('plivo');
const client = new plivo.Client('', '');
client.calls.create(
'+14151234567', // from
'+14157654321', // to
'https://s3.amazonaws.com/static.plivo.com/answer.xml', // answer_url
{ answerMethod: 'GET' }
).then(console.log);
```
```ruby theme={null}
require 'plivo'
api = Plivo::RestClient.new('', '')
response = api.calls.create(
'+14151234567', # from
['+14157654321'], # to
'https://s3.amazonaws.com/static.plivo.com/answer.xml', # answer_url
'GET' # answer_method
)
puts response
```
```php theme={null}
', '');
$response = $client->calls->create(
'+14151234567', // from
['+14157654321'], // to
'https://s3.amazonaws.com/static.plivo.com/answer.xml', // answer_url
['answerMethod' => 'GET']
);
print_r($response);
```
```java theme={null}
import com.plivo.api.Plivo;
import com.plivo.api.models.call.Call;
public class MakeCall {
public static void main(String[] args) {
Plivo.init("", "");
Call.creator("+14151234567", "+14157654321",
"https://s3.amazonaws.com/static.plivo.com/answer.xml")
.answerMethod("GET")
.create();
}
}
```
```csharp theme={null}
using Plivo;
var api = new PlivoApi("", "");
var response = api.Call.Create(
from: "+14151234567",
to: new[] { "+14157654321" },
answerUrl: "https://s3.amazonaws.com/static.plivo.com/answer.xml",
answerMethod: "GET"
);
Console.WriteLine(response);
```
```go theme={null}
package main
import "github.com/plivo/plivo-go/v7"
func main() {
client, _ := plivo.NewClient("", "", &plivo.ClientOptions{})
client.Calls.Create(plivo.CallCreateParams{
From: "+14151234567",
To: "+14157654321",
AnswerURL: "https://s3.amazonaws.com/static.plivo.com/answer.xml",
AnswerMethod: "GET",
})
}
```
```bash theme={null}
curl -i --user AUTH_ID:AUTH_TOKEN \
-H "Content-Type: application/json" \
-d '{
"from": "+14151234567",
"to": "+14157654321",
"answer_url": "https://s3.amazonaws.com/static.plivo.com/answer.xml",
"answer_method": "GET"
}' \
https://api.plivo.com/v1/Account/{auth_id}/Call/
```
The sample `answer.xml` file plays a message:
```xml theme={null}
Congratulations! You've made your first outbound call!
```
Replace this URL with your own server endpoint to control call behavior dynamically.
***
## Receive an Incoming Call
Set up a web server to handle incoming calls. When someone calls your Plivo number, Plivo sends a request to your Answer URL and executes the XML instructions you return.
 ```python theme={null}
from flask import Flask, Response
from plivo import plivoxml
app = Flask(__name__)
@app.route('/answer/', methods=['GET', 'POST'])
def answer_call():
response = plivoxml.ResponseElement()
response.add(plivoxml.SpeakElement('Hello! Thanks for calling.'))
return Response(response.to_string(), mimetype='application/xml')
if __name__ == '__main__':
app.run(host='0.0.0.0', port=5000)
```
Run: `python app.py`
```javascript theme={null}
const express = require('express');
const plivo = require('plivo');
const app = express();
app.all('/answer/', (req, res) => {
const response = plivo.Response();
response.addSpeak('Hello! Thanks for calling.');
res.set('Content-Type', 'application/xml');
res.send(response.toXML());
});
app.listen(5000, () => console.log('Server running on port 5000'));
```
Run: `node app.js`
```ruby theme={null}
require 'sinatra'
require 'plivo'
get '/answer/' do
response = Plivo::XML::Response.new
response.addSpeak('Hello! Thanks for calling.')
content_type 'application/xml'
response.to_xml
end
```
Run: `ruby app.rb`
```php theme={null}
addSpeak('Hello! Thanks for calling.');
header('Content-Type: application/xml');
echo $response->toXML();
```
```java theme={null}
import com.plivo.api.xml.Response;
import com.plivo.api.xml.Speak;
import static spark.Spark.*;
public class ReceiveCall {
public static void main(String[] args) {
get("/answer/", (req, res) -> {
res.type("application/xml");
return new Response()
.children(new Speak("Hello! Thanks for calling."))
.toXmlString();
});
}
}
```
```csharp theme={null}
using Microsoft.AspNetCore.Mvc;
using Plivo.XML;
[ApiController]
[Route("[controller]")]
public class AnswerController : ControllerBase
{
[HttpGet]
[HttpPost]
public ContentResult Answer()
{
var response = new Response();
response.AddSpeak("Hello! Thanks for calling.");
return Content(response.ToString(), "application/xml");
}
}
```
```go theme={null}
package main
import (
"github.com/plivo/plivo-go/v7/xml"
"net/http"
)
func main() {
http.HandleFunc("/answer/", func(w http.ResponseWriter, r *http.Request) {
response := xml.ResponseElement{
Contents: []interface{}{
new(xml.SpeakElement).SetContents("Hello! Thanks for calling."),
},
}
w.Header().Set("Content-Type", "application/xml")
w.Write([]byte(response.String()))
})
http.ListenAndServe(":5000", nil)
}
```
Run: `go run main.go`
### Expose Your Server
Use [ngrok](https://ngrok.com) to expose your local server to the internet:
```bash theme={null}
ngrok http 5000
```
Copy the HTTPS forwarding URL (e.g., `https://abc123.ngrok.io`).
### Configure Your Number
1. Go to [Voice Applications](https://cx.plivo.com/xml-applications) in the Plivo console
2. Click **Add New Application**
3. Set the **Answer URL** to your ngrok URL + `/answer/` (e.g., `https://abc123.ngrok.io/answer/`)
4. Save the application
5. Go to [Active Numbers](https://cx.plivo.com/home)
6. Select your number and assign your application
Now call your Plivo number to hear the greeting!
***
## Forward a Call
Dial another number when receiving an incoming call.
```python theme={null}
from flask import Flask, Response
from plivo import plivoxml
app = Flask(__name__)
@app.route('/forward/', methods=['GET', 'POST'])
def forward_call():
response = plivoxml.ResponseElement()
dial = plivoxml.DialElement()
dial.add(plivoxml.NumberElement('+14157654321'))
response.add(dial)
return Response(response.to_string(), mimetype='application/xml')
if __name__ == '__main__':
app.run(host='0.0.0.0', port=5000)
```
```javascript theme={null}
const express = require('express');
const plivo = require('plivo');
const app = express();
app.all('/forward/', (req, res) => {
const response = plivo.Response();
const dial = response.addDial();
dial.addNumber('+14157654321');
res.set('Content-Type', 'application/xml');
res.send(response.toXML());
});
app.listen(5000);
```
```ruby theme={null}
require 'sinatra'
require 'plivo'
get '/forward/' do
response = Plivo::XML::Response.new
dial = response.addDial()
dial.addNumber('+14157654321')
content_type 'application/xml'
response.to_xml
end
```
```php theme={null}
addDial();
$dial->addNumber('+14157654321');
header('Content-Type: application/xml');
echo $response->toXML();
```
Example XML to return:
```xml theme={null}
+14157654321
```
***
## Next Steps
Complete API documentation for managing calls
All XML elements for call control
Common voice application patterns
Handle call events in real-time
### Framework-Specific Guides
For detailed setup with specific frameworks:
| Language | Frameworks |
| -------- | ----------------------------------------------------------------------------------------------------------------------------------------- |
| Python | [Flask](/voice/quickstart/python-quickstart/), [Django](/voice/quickstart/python-django/), [FastAPI](/voice/quickstart/python-fastapi/) |
| Node.js | [Express](/voice/quickstart/node-quickstart/), [NestJS](/voice/quickstart/node-nestjs/), [Serverless](/voice/quickstart/node-serverless/) |
| Ruby | [Sinatra](/voice/quickstart/ruby-quickstart/), [Rails](/voice/quickstart/ruby-rails/) |
| PHP | [PHP Server](/voice/quickstart/php-quickstart/) |
| Java | [Spring](/voice/quickstart/java-quickstart/), [Spark](/voice/quickstart/java-spark/) |
| .NET | [ASP.NET Core](/voice/quickstart/dotnet-quickstart/), [.NET Framework](/voice/quickstart/dotnet-framework/) |
| Go | [Standard Library](/voice/quickstart/go-quickstart/), [Martini](/voice/quickstart/go-martini/) |
### Environment Variables
Store credentials securely using environment variables:
```bash theme={null}
export PLIVO_AUTH_ID=your_auth_id
export PLIVO_AUTH_TOKEN=your_auth_token
```
All Plivo SDKs automatically read these variables when you initialize the client without arguments:
```python theme={null}
# Python
client = plivo.RestClient() # Reads from environment
```
```javascript theme={null}
// Node.js
const client = new plivo.Client(); // Reads from environment
```
```python theme={null}
from flask import Flask, Response
from plivo import plivoxml
app = Flask(__name__)
@app.route('/answer/', methods=['GET', 'POST'])
def answer_call():
response = plivoxml.ResponseElement()
response.add(plivoxml.SpeakElement('Hello! Thanks for calling.'))
return Response(response.to_string(), mimetype='application/xml')
if __name__ == '__main__':
app.run(host='0.0.0.0', port=5000)
```
Run: `python app.py`
```javascript theme={null}
const express = require('express');
const plivo = require('plivo');
const app = express();
app.all('/answer/', (req, res) => {
const response = plivo.Response();
response.addSpeak('Hello! Thanks for calling.');
res.set('Content-Type', 'application/xml');
res.send(response.toXML());
});
app.listen(5000, () => console.log('Server running on port 5000'));
```
Run: `node app.js`
```ruby theme={null}
require 'sinatra'
require 'plivo'
get '/answer/' do
response = Plivo::XML::Response.new
response.addSpeak('Hello! Thanks for calling.')
content_type 'application/xml'
response.to_xml
end
```
Run: `ruby app.rb`
```php theme={null}
addSpeak('Hello! Thanks for calling.');
header('Content-Type: application/xml');
echo $response->toXML();
```
```java theme={null}
import com.plivo.api.xml.Response;
import com.plivo.api.xml.Speak;
import static spark.Spark.*;
public class ReceiveCall {
public static void main(String[] args) {
get("/answer/", (req, res) -> {
res.type("application/xml");
return new Response()
.children(new Speak("Hello! Thanks for calling."))
.toXmlString();
});
}
}
```
```csharp theme={null}
using Microsoft.AspNetCore.Mvc;
using Plivo.XML;
[ApiController]
[Route("[controller]")]
public class AnswerController : ControllerBase
{
[HttpGet]
[HttpPost]
public ContentResult Answer()
{
var response = new Response();
response.AddSpeak("Hello! Thanks for calling.");
return Content(response.ToString(), "application/xml");
}
}
```
```go theme={null}
package main
import (
"github.com/plivo/plivo-go/v7/xml"
"net/http"
)
func main() {
http.HandleFunc("/answer/", func(w http.ResponseWriter, r *http.Request) {
response := xml.ResponseElement{
Contents: []interface{}{
new(xml.SpeakElement).SetContents("Hello! Thanks for calling."),
},
}
w.Header().Set("Content-Type", "application/xml")
w.Write([]byte(response.String()))
})
http.ListenAndServe(":5000", nil)
}
```
Run: `go run main.go`
### Expose Your Server
Use [ngrok](https://ngrok.com) to expose your local server to the internet:
```bash theme={null}
ngrok http 5000
```
Copy the HTTPS forwarding URL (e.g., `https://abc123.ngrok.io`).
### Configure Your Number
1. Go to [Voice Applications](https://cx.plivo.com/xml-applications) in the Plivo console
2. Click **Add New Application**
3. Set the **Answer URL** to your ngrok URL + `/answer/` (e.g., `https://abc123.ngrok.io/answer/`)
4. Save the application
5. Go to [Active Numbers](https://cx.plivo.com/home)
6. Select your number and assign your application
Now call your Plivo number to hear the greeting!
***
## Forward a Call
Dial another number when receiving an incoming call.
```python theme={null}
from flask import Flask, Response
from plivo import plivoxml
app = Flask(__name__)
@app.route('/forward/', methods=['GET', 'POST'])
def forward_call():
response = plivoxml.ResponseElement()
dial = plivoxml.DialElement()
dial.add(plivoxml.NumberElement('+14157654321'))
response.add(dial)
return Response(response.to_string(), mimetype='application/xml')
if __name__ == '__main__':
app.run(host='0.0.0.0', port=5000)
```
```javascript theme={null}
const express = require('express');
const plivo = require('plivo');
const app = express();
app.all('/forward/', (req, res) => {
const response = plivo.Response();
const dial = response.addDial();
dial.addNumber('+14157654321');
res.set('Content-Type', 'application/xml');
res.send(response.toXML());
});
app.listen(5000);
```
```ruby theme={null}
require 'sinatra'
require 'plivo'
get '/forward/' do
response = Plivo::XML::Response.new
dial = response.addDial()
dial.addNumber('+14157654321')
content_type 'application/xml'
response.to_xml
end
```
```php theme={null}
addDial();
$dial->addNumber('+14157654321');
header('Content-Type: application/xml');
echo $response->toXML();
```
Example XML to return:
```xml theme={null}
+14157654321
```
***
## Next Steps
Complete API documentation for managing calls
All XML elements for call control
Common voice application patterns
Handle call events in real-time
### Framework-Specific Guides
For detailed setup with specific frameworks:
| Language | Frameworks |
| -------- | ----------------------------------------------------------------------------------------------------------------------------------------- |
| Python | [Flask](/voice/quickstart/python-quickstart/), [Django](/voice/quickstart/python-django/), [FastAPI](/voice/quickstart/python-fastapi/) |
| Node.js | [Express](/voice/quickstart/node-quickstart/), [NestJS](/voice/quickstart/node-nestjs/), [Serverless](/voice/quickstart/node-serverless/) |
| Ruby | [Sinatra](/voice/quickstart/ruby-quickstart/), [Rails](/voice/quickstart/ruby-rails/) |
| PHP | [PHP Server](/voice/quickstart/php-quickstart/) |
| Java | [Spring](/voice/quickstart/java-quickstart/), [Spark](/voice/quickstart/java-spark/) |
| .NET | [ASP.NET Core](/voice/quickstart/dotnet-quickstart/), [.NET Framework](/voice/quickstart/dotnet-framework/) |
| Go | [Standard Library](/voice/quickstart/go-quickstart/), [Martini](/voice/quickstart/go-martini/) |
### Environment Variables
Store credentials securely using environment variables:
```bash theme={null}
export PLIVO_AUTH_ID=your_auth_id
export PLIVO_AUTH_TOKEN=your_auth_token
```
All Plivo SDKs automatically read these variables when you initialize the client without arguments:
```python theme={null}
# Python
client = plivo.RestClient() # Reads from environment
```
```javascript theme={null}
// Node.js
const client = new plivo.Client(); // Reads from environment
```