> ## Documentation Index
> Fetch the complete documentation index at: https://plivo.com/docs/llms.txt
> Use this file to discover all available pages before exploring further.
# Configuring FusionPBX to connect with Zentrunk
> Connect FusionPBX with Zentrunk — inbound and outbound gateway setup
## Overview
Zentrunk is a SIP Trunking service from Plivo that allows you to connect with fixed and mobile phones in over 200 countries. Connect your cloud or on-premise communication infrastructure to Plivo’s Zentrunk SIP Trunking service to connect to your customers easily.
This documentation provides a basic configuration to get FusionPBX up and running with Plivo as the external SIP gateway.
To get started with Zentrunk using FusionPBX you would need to do the following:
1. [Install FusionPBX on your environment](/sip-trunking/interconnection-guides/fusionpbx/#installation-of-fusionpbx).
2. [Create a Trunk on Zentrunk using Plivo Console](/sip-trunking/#create-an-outbound-trunk).
3. [Configure Outbound Gateway](/sip-trunking/interconnection-guides/fusionpbx/#configuring-an-outbound-trunk).
4. [Configure Inbound Gateway](/sip-trunking/interconnection-guides/fusionpbx/#configuring-an-inbound-trunk).
## Installation of FusionPBX
For more information on installing FusionPBX, see the following FusionPBX documents:
* Follow the instructions [here](https://docs.fusionpbx.com/en/latest/getting_started/quick_install.html) to install FusionPBX on Debian.
* Follow the instructions [here](https://www.fusionpbx.com/download.php) to install FusionPBX on CentOS/Ubuntu.
## Create a Trunk on Zentrunk
You can create a trunk using Plivo Console. For more information on creating a Trunk on Plivo Console, see [Getting Started with Zentrunk](/sip-trunking/).
## Configuring an Outbound Trunk
Configuring your Outbound Trunk involves the following steps:
1. Set IP of FusionPBX server - from local to public
2. Configuring an Extension
3. Adding a Gateway
4. Adding Outbound Routes
5. Configuring X-Lite
**Note:** There are many softphones that you can use (for example, X-Lite, Blink for Linux, etc). In this tutorial, we will be using the X-Lite Softphone.
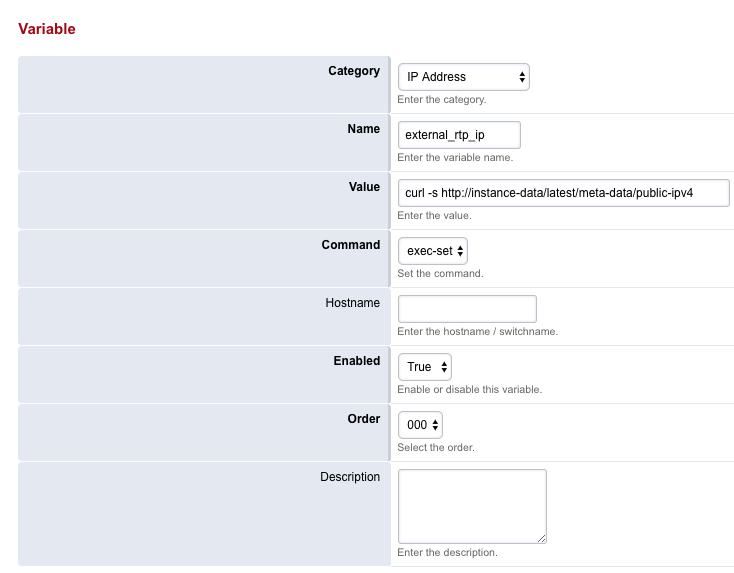
### Set IP of FusionPBX server
1. From the dashboard, hover over the **Advanced** menu, and then click **Variables**.
2. On the Variable page, go to IP Address section and change the following variables :
* external\_rtp\_ip: **curl -s [http://instance-data/latest/meta-data/public-ipv4](http://instance-data/latest/meta-data/public-ipv4)**
* external\_sip\_ip: **curl -s [http://instance-data/latest/meta-data/public-ipv4](http://instance-data/latest/meta-data/public-ipv4)**
 ### To add an extension
1. From the **Accounts** menu, click **Extensions**.
2. On the Extensions page, click **+** to add an extension.
The Add SIP Extension page appears.
### To add an extension
1. From the **Accounts** menu, click **Extensions**.
2. On the Extensions page, click **+** to add an extension.
The Add SIP Extension page appears.
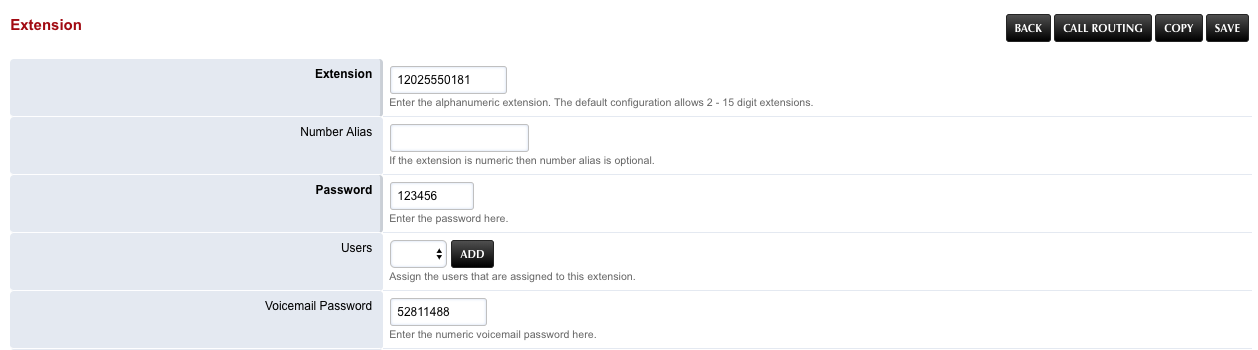 3. Add the **Extension**, and then click **Save**.
**Note:** Extension is the extension number to dial to reach the user.
4. Enter the password for the extension.
**Note:** This will be the password configured for the device.
5. Once done, click **Save.**
Your extension is created.
### To add a Gateway
1. From your FusionPBX dashboard, hover over the **Accounts** menu, and then click **Gateways**.
2. On the **Gateways** page, click **+** to add a gateway.
3. On the Add Gateway page, enter the following details:
* **Gateway:** A friendly name for the trunk (for example, demo-gateway)
* **Username:** Username for TestAuthGroup
* **Password:** Password for TestAuthGroup
* **Proxy:** Termination SIP Domain of your Plivo Trunk
4. Once done, click **Save**.
A gateway will be created. You must now configure an outbound route to this gateway.
### To add an outbound route
1. From the **Dialplan** menu, click **Outbound Routes**.
2. On the Outbound Routes page, click **+** to add an outbound route.
3. Add the **Extension**, and then click **Save**.
**Note:** Extension is the extension number to dial to reach the user.
4. Enter the password for the extension.
**Note:** This will be the password configured for the device.
5. Once done, click **Save.**
Your extension is created.
### To add a Gateway
1. From your FusionPBX dashboard, hover over the **Accounts** menu, and then click **Gateways**.
2. On the **Gateways** page, click **+** to add a gateway.
3. On the Add Gateway page, enter the following details:
* **Gateway:** A friendly name for the trunk (for example, demo-gateway)
* **Username:** Username for TestAuthGroup
* **Password:** Password for TestAuthGroup
* **Proxy:** Termination SIP Domain of your Plivo Trunk
4. Once done, click **Save**.
A gateway will be created. You must now configure an outbound route to this gateway.
### To add an outbound route
1. From the **Dialplan** menu, click **Outbound Routes**.
2. On the Outbound Routes page, click **+** to add an outbound route.
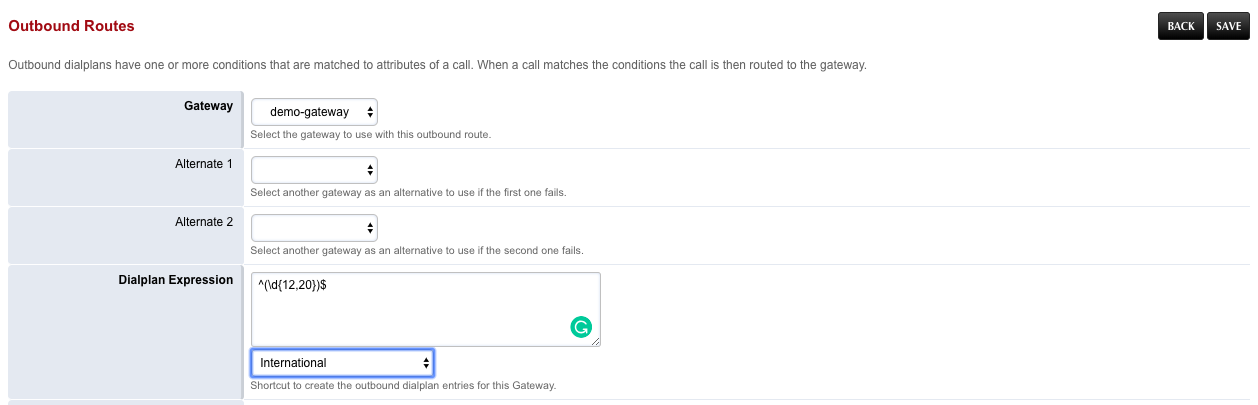 3. On the **Outbound Route - Add Route** page, enter the following details:
* **Gateway:** Select the gateway you created in the previous section (demo-gateway).
* **Dialplan Expression:** Select **International** from the drop-down list.
4. Once you have entered your dial pattern, click **SAVE**.
The outbound route will be configured to your gateway.
## Configuring an Inbound Trunk
Configuring your Inbound Trunk involves the following steps:
1. Set IP of Fusion PBX
2. Checking SIP status
3. Changing the domain
4. Adding an extension
5. Adding a dialplan
6. Whitelisting incoming IP’s
**Note:** There are many softphones that you can use (for example, X-Lite, Blink for Linux, etc). In this tutorial, we will be using the X-Lite Softphone.
### Set IP of FusionPBX server
1. From the dashboard, hover over the **Advanced** menu, and then click **Variables**.
2. Here you will have to make these change to the below variables.
3. On the Variable page, go to IP Address section and change the following variables and click on save: a. External\_sip\_ip
```sh theme={null}
Value =curl -s http://instance-data/latest/meta-data/public-ipv4
```
b. External\_rtp\_ip
```sh theme={null}
command=exec-set
Value =curl -s http://instance-data/latest/meta-data/public-ipv4
```
4. In the same page go to the **XMPP** section and at \*\* bind\_SERVER\_ip\*\* make same changes.
```sh theme={null}
command=exec-set
Value =curl -s http://instance-data/latest/meta-data/public-ipv4
```
### Checking SIP status
1. From your dashboard hover to **Status** menu and click on **sip status**
2. Here click on we will have to click on the below buttons
```
Flush cache
RELOADACL
RELOADXML
```
3. You will also have to \*\* Stop and start \*\* all 4 Sofia profiles.
4. Once done, click **Save.**
### Changing the domain
1. From your dashboard hover to **Advanced** menu and click on **domain**.
2. Click on the edit option of the IP
3. On the **Outbound Route - Add Route** page, enter the following details:
* **Gateway:** Select the gateway you created in the previous section (demo-gateway).
* **Dialplan Expression:** Select **International** from the drop-down list.
4. Once you have entered your dial pattern, click **SAVE**.
The outbound route will be configured to your gateway.
## Configuring an Inbound Trunk
Configuring your Inbound Trunk involves the following steps:
1. Set IP of Fusion PBX
2. Checking SIP status
3. Changing the domain
4. Adding an extension
5. Adding a dialplan
6. Whitelisting incoming IP’s
**Note:** There are many softphones that you can use (for example, X-Lite, Blink for Linux, etc). In this tutorial, we will be using the X-Lite Softphone.
### Set IP of FusionPBX server
1. From the dashboard, hover over the **Advanced** menu, and then click **Variables**.
2. Here you will have to make these change to the below variables.
3. On the Variable page, go to IP Address section and change the following variables and click on save: a. External\_sip\_ip
```sh theme={null}
Value =curl -s http://instance-data/latest/meta-data/public-ipv4
```
b. External\_rtp\_ip
```sh theme={null}
command=exec-set
Value =curl -s http://instance-data/latest/meta-data/public-ipv4
```
4. In the same page go to the **XMPP** section and at \*\* bind\_SERVER\_ip\*\* make same changes.
```sh theme={null}
command=exec-set
Value =curl -s http://instance-data/latest/meta-data/public-ipv4
```
### Checking SIP status
1. From your dashboard hover to **Status** menu and click on **sip status**
2. Here click on we will have to click on the below buttons
```
Flush cache
RELOADACL
RELOADXML
```
3. You will also have to \*\* Stop and start \*\* all 4 Sofia profiles.
4. Once done, click **Save.**
### Changing the domain
1. From your dashboard hover to **Advanced** menu and click on **domain**.
2. Click on the edit option of the IP
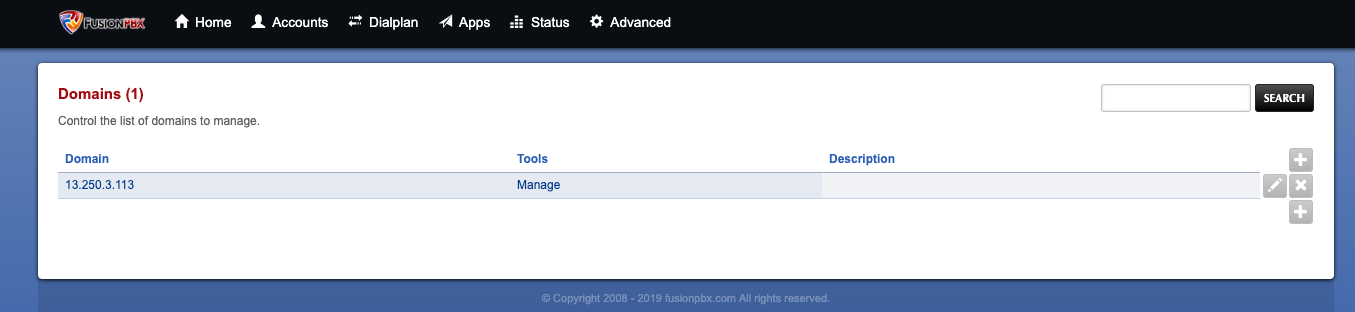 1. Change the ip from local to public i.e the ip of the Fusion PBX
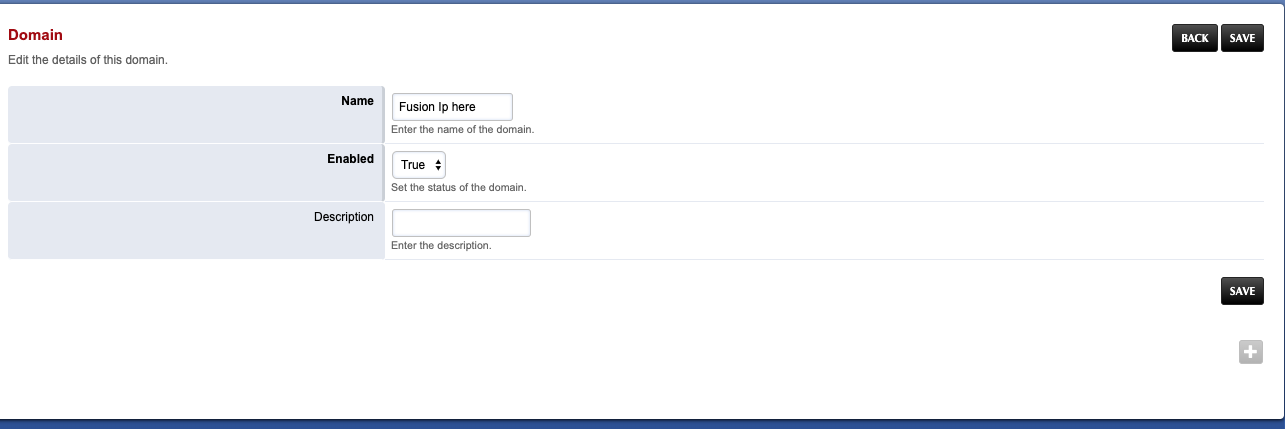 2. Once you have entered your dial pattern, click **SAVE**.
### To add an extension
1. From the **Accounts** menu, click **Extensions**.
2. On the Extensions page, click **+** to add an extension.
The Add SIP Extension page appears.
2. Once you have entered your dial pattern, click **SAVE**.
### To add an extension
1. From the **Accounts** menu, click **Extensions**.
2. On the Extensions page, click **+** to add an extension.
The Add SIP Extension page appears.
 3. Add the **Extension**, and then click **Save**.
**Note:** Extension is the extension number to dial to reach the user.
4. Enter the password for the extension.
**Note:** This will be the password configured for the device.
5. Once done, click **Save.**
Your extension is created.
### To add a Dialpan
1. From the **Dialplan** menu, click the **destination** option
2. Choose “+” add destination
3. Add the **Extension**, and then click **Save**.
**Note:** Extension is the extension number to dial to reach the user.
4. Enter the password for the extension.
**Note:** This will be the password configured for the device.
5. Once done, click **Save.**
Your extension is created.
### To add a Dialpan
1. From the **Dialplan** menu, click the **destination** option
2. Choose “+” add destination
 3. Enter your inbound number in destination.
4. Once done, click **Save**.
A destination number will be added.
\###Whitelisting incoming IP’s
1. From the **Advanced** menu, click **access control**
2. Click on domain
3. Click on \*\*+ \*\*symbol
4. Choose type as **allow**
5. In CIDR add the ip ranges from [here](/sip-trunking/#list-of-ips-to-whitelist).
Configure your Xlite and you will be able to receive calls.
3. Enter your inbound number in destination.
4. Once done, click **Save**.
A destination number will be added.
\###Whitelisting incoming IP’s
1. From the **Advanced** menu, click **access control**
2. Click on domain
3. Click on \*\*+ \*\*symbol
4. Choose type as **allow**
5. In CIDR add the ip ranges from [here](/sip-trunking/#list-of-ips-to-whitelist).
Configure your Xlite and you will be able to receive calls.