> ## Documentation Index
> Fetch the complete documentation index at: https://plivo.com/docs/llms.txt
> Use this file to discover all available pages before exploring further.

# Set Up a PHP Dev Environment for PHLO

> Configure a PHP development environment to trigger PHLOs with Plivo

Using this guide, you can set up a development environment in five minutes to trigger a PHLO.

## Install PHP, Composer, Laravel, and the Plivo PHP SDK

To get started, install PHP, the [Composer](https://getcomposer.org/) dependency manager, the [Laravel](https://laravel.com/) web framework, and Plivo’s PHP SDK.

### Install PHP

<table><tbody><thead><tr><th>Operating System</th><th>Instructions</th></tr></thead><tr><td>macOS</td><td>Install PHP using the <a rel="nofollow" href="https://php.net/manual/en/install.macosx.php">official macOS installer</a> or by <a rel="nofollow" href="https://php.net/downloads.php">downloading</a> and installing it.</td></tr><tr><td>Linux</td><td>Download and install PHP using your favorite package installer.</td></tr><tr><td>Windows</td><td>Use the <a rel="nofollow" href="https://www.php.net/manual/en/install.windows.php">official Windows installer</a>.</td></tr></tbody></table>

### Install Composer

All modern PHP frameworks use the Composer dependency manager; we highly recommend using it as the package manager for your web project. Follow the instructions to [download and install Composer for macOS and Linux](https://getcomposer.org/doc/00-intro.md#installation-linux-unix-macos) and [for Windows](https://getcomposer.org/doc/00-intro.md#installation-windows), or follow the steps below.

<Tabs>
  <Tab title="macOS">
    1. Download the latest version of [Composer](https://getcomposer.org/download/).

    2. Run this command in Terminal:

       ```sh theme={null}
       php ~/Downloads/composer.phar --version
       ```

       **Note:** PHAR (PHP archive) is an archive format for PHP that can be run on the command line.

    3. Copy the file to /usr/local/bin and make it executable:
       ```shs theme={null}
       cp ~/Downloads/composer.phar /usr/local/bin/composer
       sudo chmod +x /usr/local/bin/composer
       ```

    4. If your PATH doesn’t include /usr/local/bin directory, we recommend adding it so that you can access it globally. To check if the path has /usr/local/bin, enter
       ```sh theme={null}
       echo $PATH
       ```
       If necessary, run these commands to update the \$PATH:
       ```sh theme={null}
       export PATH = $PATH:/usr/local/bin
       source ~/.bash_profile
       ```

    5. You can also check the version of Composer by running this command:
       ```sh theme={null}
       composer --version.       
       ```
  </Tab>

  <Tab title="Linux">
    1. Run the command
       ```sh theme={null}
       curl -sS https://getcomposer.org/installer | php
       ```

    2. Make the composer.phar file executable:
       ```sh theme={null}
       chmod +x composer.phar
       ```
       **Note:** PHAR (PHP archive) is an archive format for PHP that can be run on the command line.

    3. Run this command to make Composer globally available for all system users:
       ```sh theme={null}
       mv composer.phar /usr/local/bin/composer
       ```
  </Tab>

  <Tab title="Windows">
    1. Download and run the Windows Installer for Composer.

       **Note:** Allow Windows Installer for Composer to make changes to your php.ini file.

    2. If you have any terminal windows open, close all instances and open a fresh terminal instance.

    3. Run the Composer command.
       ```sh theme={null}
       composer -V
       ```
  </Tab>
</Tabs>

### Install Laravel and create a Laravel project

Install the Laravel web framework by running the command

```shell theme={null}
composer require laravel/installer
```

Once you have Laravel installed, create a project directory using the command `mkdir mylaravelapp`, then change to that directory and create a new Laravel project.

```shell theme={null}
  composer create-project laravel/laravel quickstart --prefer-dist
```

This command creates a directory named quickstart with the necessary folders and files for development.

<h3 id="xml-{{'Install Plivo' | slugify}}">Install the PHP Plivo SDK</h3>

To install the **stable release** of the Plivo SDK, run this command in the project directory:

```shell theme={null}
composer require plivo/plivo-php
```

To install a **specific release**, run this command in the project directory:

```shell theme={null}
composer require plivo/plivo-php:4.15.0
```

Alternatively, you can download [source code](https://github.com/plivo/plivo-php/) from GitHub and run

```shell theme={null}
composer install
```

The `composer` command generates the autoload files, which you can include in your PHP source code by using the line

```php theme={null}
<?php
require 'vendor/autoload.php'
```

## Trigger the PHLO

Create and configure a PHLO, then integrate the PHLO into your application workflow by making an API request to trigger the PHLO with the required payload.

You can run a PHLO with static payload values by entering specific values in fields like `from` and `to` on the PHLO console.

<Frame>
  <img src="https://mintcdn.com/plivo/sqGJ0ONkT5kTuesy/images/static_payload.png?fit=max&auto=format&n=sqGJ0ONkT5kTuesy&q=85&s=e34e3011bffc239aa02054403be0e79a" alt="With Static Payload" width="1398" height="765" data-path="images/static_payload.png" />
</Frame>

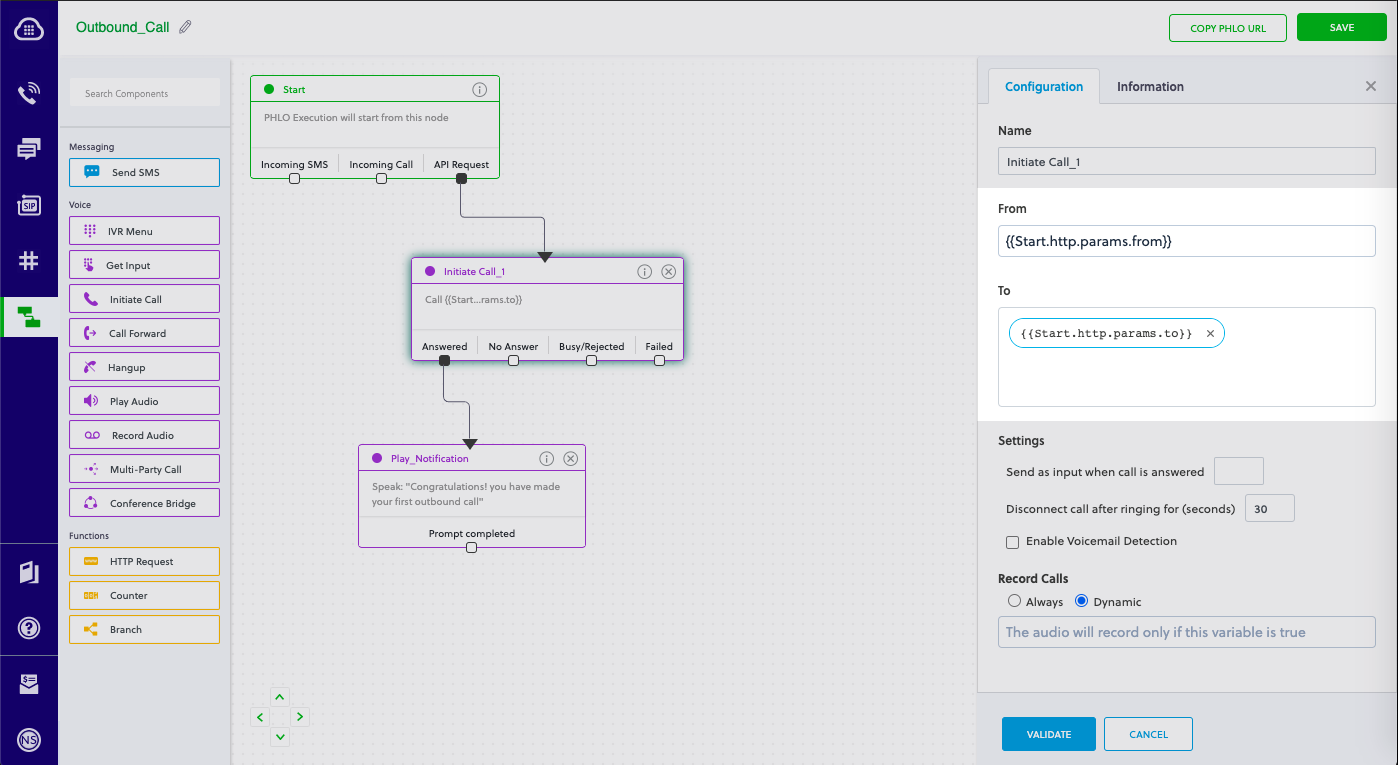
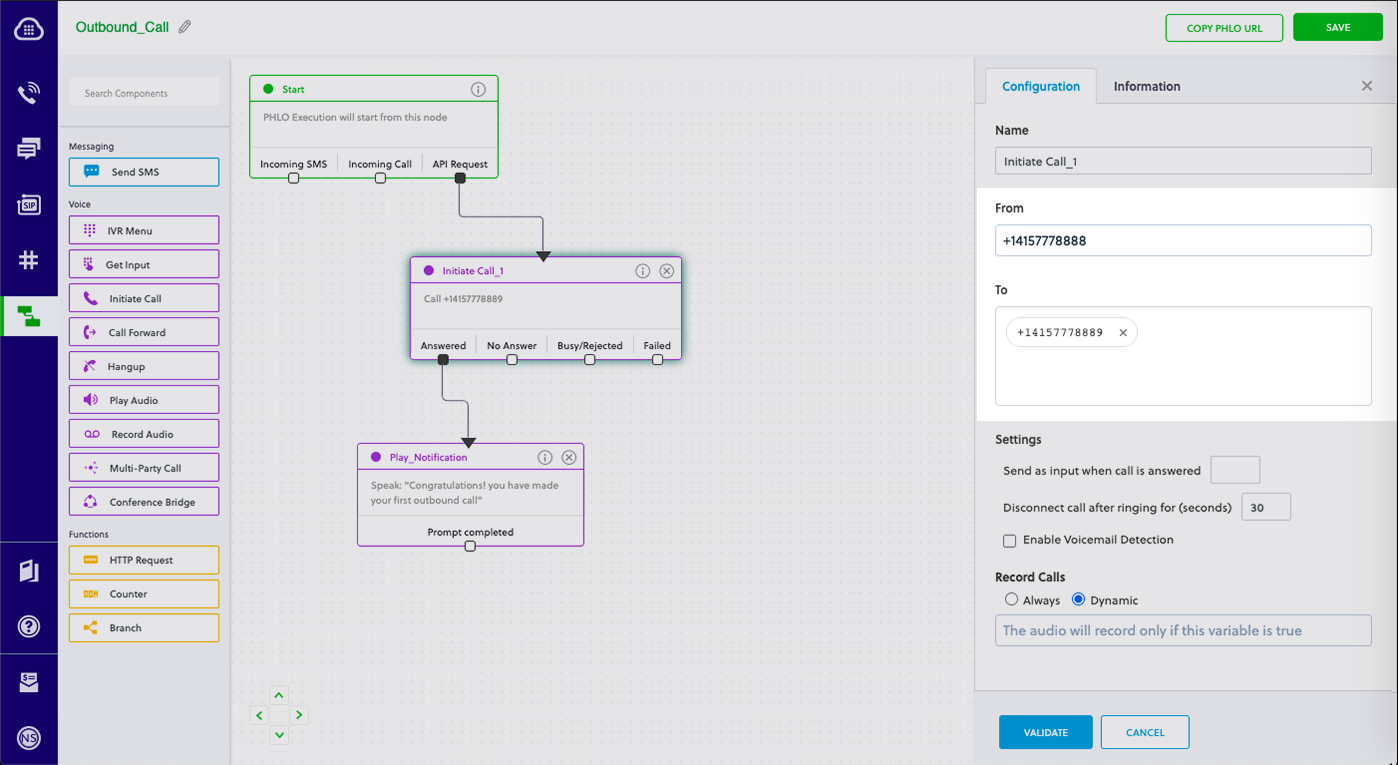
To deliver a dynamic payload instead of a static one, define the payload keys as [Liquid](https://shopify.github.io/liquid/) templates on the PHLO console and pass the values at runtime.

<Frame>
  <img src="https://mintcdn.com/plivo/2OFvQXVNT3srKLUy/images/dynamic_payload.png?fit=max&auto=format&n=2OFvQXVNT3srKLUy&q=85&s=9af2698b7d971dfa9ad451e66d038256" alt="With Dynamic Payload" width="1398" height="765" data-path="images/dynamic_payload.png" />
</Frame>

### Create a Laravel Controller

Change the directory to the project directory and run this command to create a Laravel controller named PhloController in the app/http/controllers/ directory.

```shell theme={null}
php artisan make:controller PhloController
```

Edit app/http/controllers/phloController.php and paste into it the code below for either a static or dynamic payload.

### Static payload

```php theme={null}
<?php
namespace App\Http\Controllers;
require '../../vendor/autoload.php';
use Plivo\Resources\PHLO\PhloRestClient;
use Plivo\Exceptions\PlivoRestException;

class PhloController extends Controller
{
    public function triggerPhlo()
    {
        $client = new PhloRestClient("<auth_id>", "<auth_token>");
        $phlo = $client->phlo->get("<phlo_id>");
        try {
            $response = $phlo->run(["from" => "<Caller_ID>", "to" => "<Destination_Number>"]); // These are the fields entered in the PHLO console
            echo json_encode($response);
        } catch (PlivoRestException $ex) {
            echo json_encode($ex);
        }
    }
}
```

### Dynamic payload

```php theme={null}
<?php
namespace App\Http\Controllers;
require '../../vendor/autoload.php';
use Plivo\Resources\PHLO\PhloRestClient;
use Plivo\Exceptions\PlivoRestException;

class PhloController extends Controller
{
    public function triggerPhlo()
    {
        $client = new PhloRestClient("<auth_id>", "<auth_token>");
        $phlo = $client->phlo->get("<phlo_id>");
        try {
            $response = $phlo->run();
            echo json_encode($response);
        } catch (PlivoRestException $ex) {
            echo json_encode($ex);
        }
    }
}
```

<Note>
  <strong>Note:</strong>
  <ul><li>Replace the placeholders `&lt;auth_id>` and `&lt;auth_token>` with your authentication credentials, which you can find on the overview page of the <a href="https://cx.plivo.com/home">Plivo console</a>.</li><li>We recommend that you store your credentials in the `auth_id` and `auth_token` environment variables to avoid the possibility of accidentally committing them to source control. If you do this, you can initialize the client with no arguments and it will automatically fetch the values from the environment variables.</li><li>Replace the placeholder `&lt;phlo_id>` with the PHLO\_ID from the <a href="https://cx.plivo.com/agents">PHLO list</a> screen of the Plivo console.</li><li>Replace the placeholder `&lt;Caller_ID>` with a phone number you’ve purchased, and `&lt;Destination_Number>` with the phone number you’ll be calling. Both phone numbers should be in <a rel="nofollow" href="https://en.wikipedia.org/wiki/E.164">E.164 format</a>.</li></ul>
</Note>

### Add a route

To add a route for the outbound function in the PhloController class, edit routes/web.php and add this line at the end of the file:

```shell theme={null}
Route::match(['get', 'post'], '/triggerphlo', 'PhloController@triggerPhlo');
```

<Note>
  <strong>Note:</strong> If you’re using Laravel 8 you need to use the fully qualified Class name for your controllers. For example:<br /> `Route::match(['get', 'post'], '/triggerphlo', 'App\Http\Controllers\PhloController@triggerPhlo')`
</Note>

Save the file and run it.

```shell theme={null}
php artisan serve
```

Your local development server will be started and you can test the Laravel application via the URL [http://localhost:8000/triggerphlo/](http://localhost:8000/triggerphlo/).

<Note>
  <strong>Note:</strong> If you’re using a free trial account you must verify (sandbox) your destination number, unless you use the phone number you used for signup verification as your destination number. We require this as a security measure to avoid abuse. To sandbox a number in a Plivo trial account, visit Phone Numbers > <a href="https://cx.plivo.com/home">Sandbox Numbers</a> and click on <strong>Add Sandbox Number</strong>.
</Note>
