> ## Documentation Index
> Fetch the complete documentation index at: https://plivo.com/docs/llms.txt
> Use this file to discover all available pages before exploring further.
# Forward SMS Messages to Email
> Route incoming SMS messages to an email address for centralized archiving
Businesses get communications through many channels. It can be handy to have a searchable archive of messages in one place. Forwarding SMS messages to email lets you keep both kinds of messages in one spot. Plivo makes it easy to forward SMS messages to email using the most popular web development languages. Here we walk through the process with .NET.
Prerequisites
To get started, you need a Plivo account — [sign up](https://cx.plivo.com/signup) with your work email address if you don’t have one already. To receive messages, you must have a Plivo phone number that supports SMS; you can rent numbers from the [Numbers](https://cx.plivo.com/phone-numbers) page of the Plivo console or by using the [Numbers API](/docs/numbers/). If this is your first time using Plivo APIs, follow our instructions to set up a .NET development environment.
The code example below presumes you have a Gmail account, but it’s easy to edit the code to support another SMTP client.
Create the forward SMS application
Navigate to the Controllers directory, create a controller called `EmailSMSController.cs`, and paste into it this code.
```cs theme={null}
using System;
using Microsoft.AspNetCore.Mvc;
using System.Collections.Generic;
using System.Reflection;
using System.Net;
using System.Net.Security;
using System.Security.Cryptography.X509Certificates;
using System.Net.Mail;
namespace EmailSms.Controllers
{
public class EmailSmsController : Controller
{
// GET: //
public String Index()
{
String from_number = Request.Form["From"];
String to_number = Request.Form["To"];
String text = Request.Form["Text"];
Console.WriteLine("Message received - From: {0}, To: {1}, Text: {2}", from_number, to_number, text);
string user_name = "";// Sender's email address
const string password = "";
string subject = "SMS from " + from_number; // Email subject
string to = "";
string body = text; // Email body — the text that was received
ServicePointManager.ServerCertificateValidationCallback =
delegate(object s, X509Certificate certificate, X509Chain chain, SslPolicyErrors sslPolicyErrors)
{ return true; };
try {
// Initialize the smtp client
SmtpClient smtp = new SmtpClient
{
Host = "smtp.gmail.com", // smtp server address
Port = 587,
EnableSsl = true,
DeliveryMethod = SmtpDeliveryMethod.Network,
Credentials = new System.Net.NetworkCredential(user_name, password),
Timeout = 30000,
};
MailMessage message = new MailMessage(user_name, to, subject, body);
// Send the mail
smtp.Send(message);
} catch (Exception ex) {
Console.WriteLine("Error sending email", ex);
}
return "Success";
}
}
}
```
Note: If you use Gmail to send email, you must use an app password, which will be treated as your password to send email from the application.
Run the project and you should see your basic server application in action at [http://localhost:5001/emailsmscontroller/](http://localhost:5001/emailsmscontroller/).
Set up ngrok to expose your local server to the internet.
Create a Plivo application
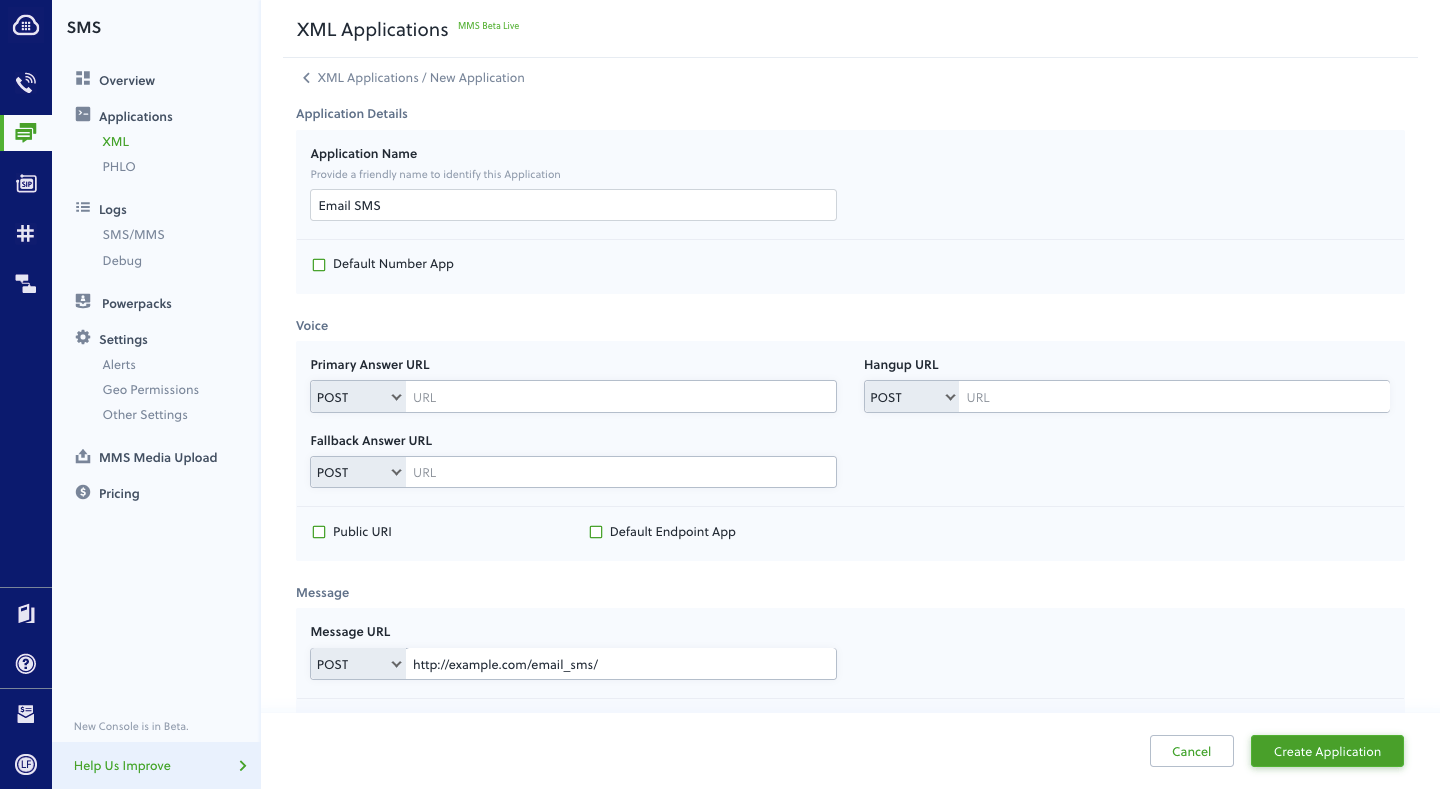
Associate the controller you created with Plivo by creating a Plivo application. Visit Messaging > [Applications](https://cx.plivo.com/xml-applications) and click **Add New Application**. You can also use Plivo's [Application API](/docs/account/api/application/#create-an-application).
Give your application a name — we called ours `Email SMS`. Enter the server URL you want to use (for example `https://.com/email_sms/`) in the `Message URL` field and set the method to `POST`. Click **Create Application** to save your application.
Assign a Plivo number to your application
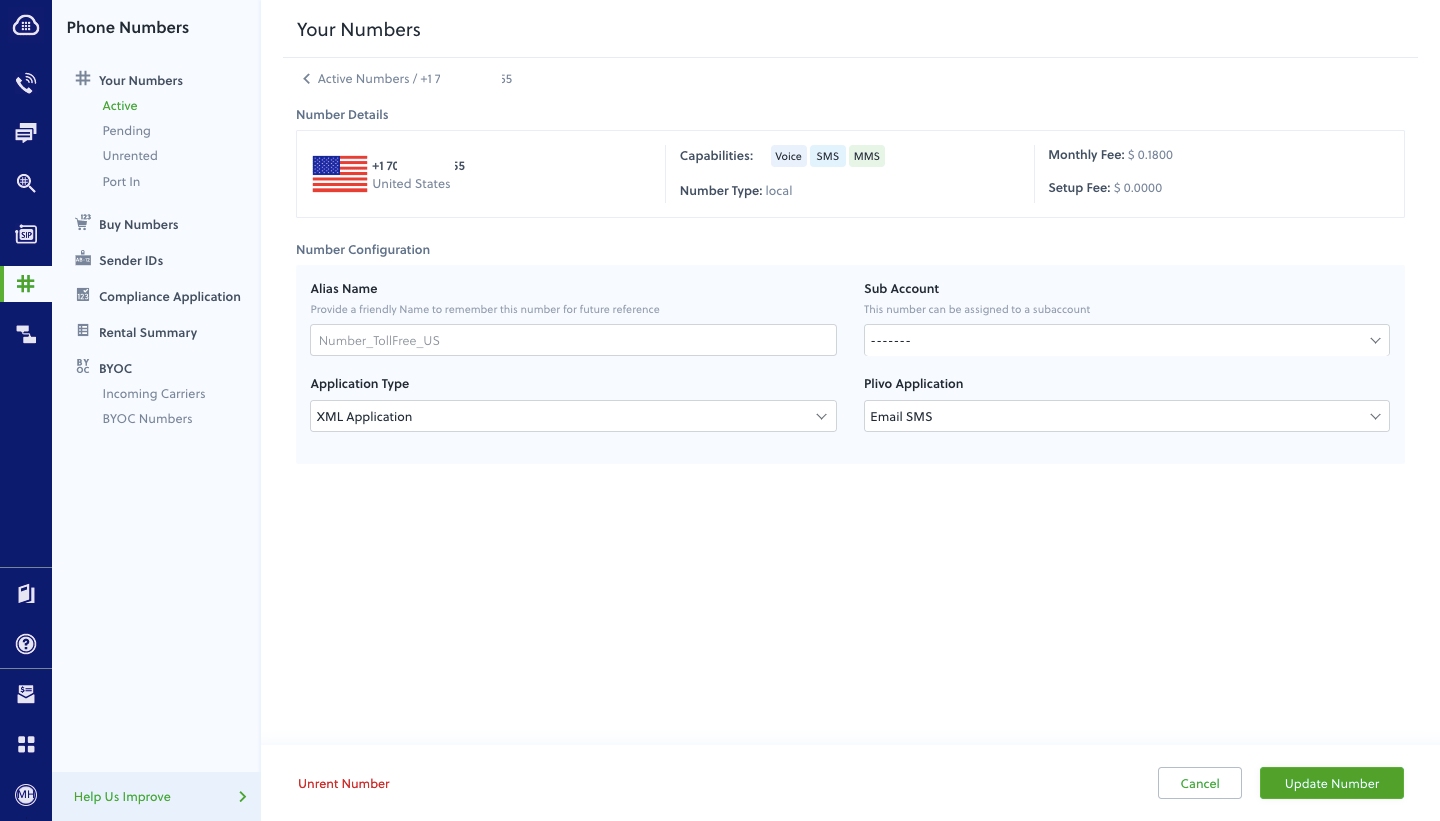
Navigate to the [Numbers](https://cx.plivo.com/phone-numbers) page and select the phone number you want to use for this application.
From the Application Type drop-down, select `XML Application`.
From the Plivo Application drop-down, select `Email SMS` (the name we gave the application).
Click **Update Number** to save.
Test
Send a text message to the Plivo number you associated with the application using a regular mobile phone. The incoming message should be forwarded to the email address you specified.